- Smartlink F&B POS restaurant and eatery management software provides
comprehensive
solutions to help optimize the business operations of many restaurant and eatery models.
- Software is a tool to support the management of all operational aspects of restaurants and eateries: staff,
products,
reports,
orders, payments,... It helps restaurant owners save time and human resources and improve business efficiency.
- Smartlink F&B POS restaurant management software helps synchronize orders,
optimize
processes between kitchen - serving - cashier and effectively manage staff.
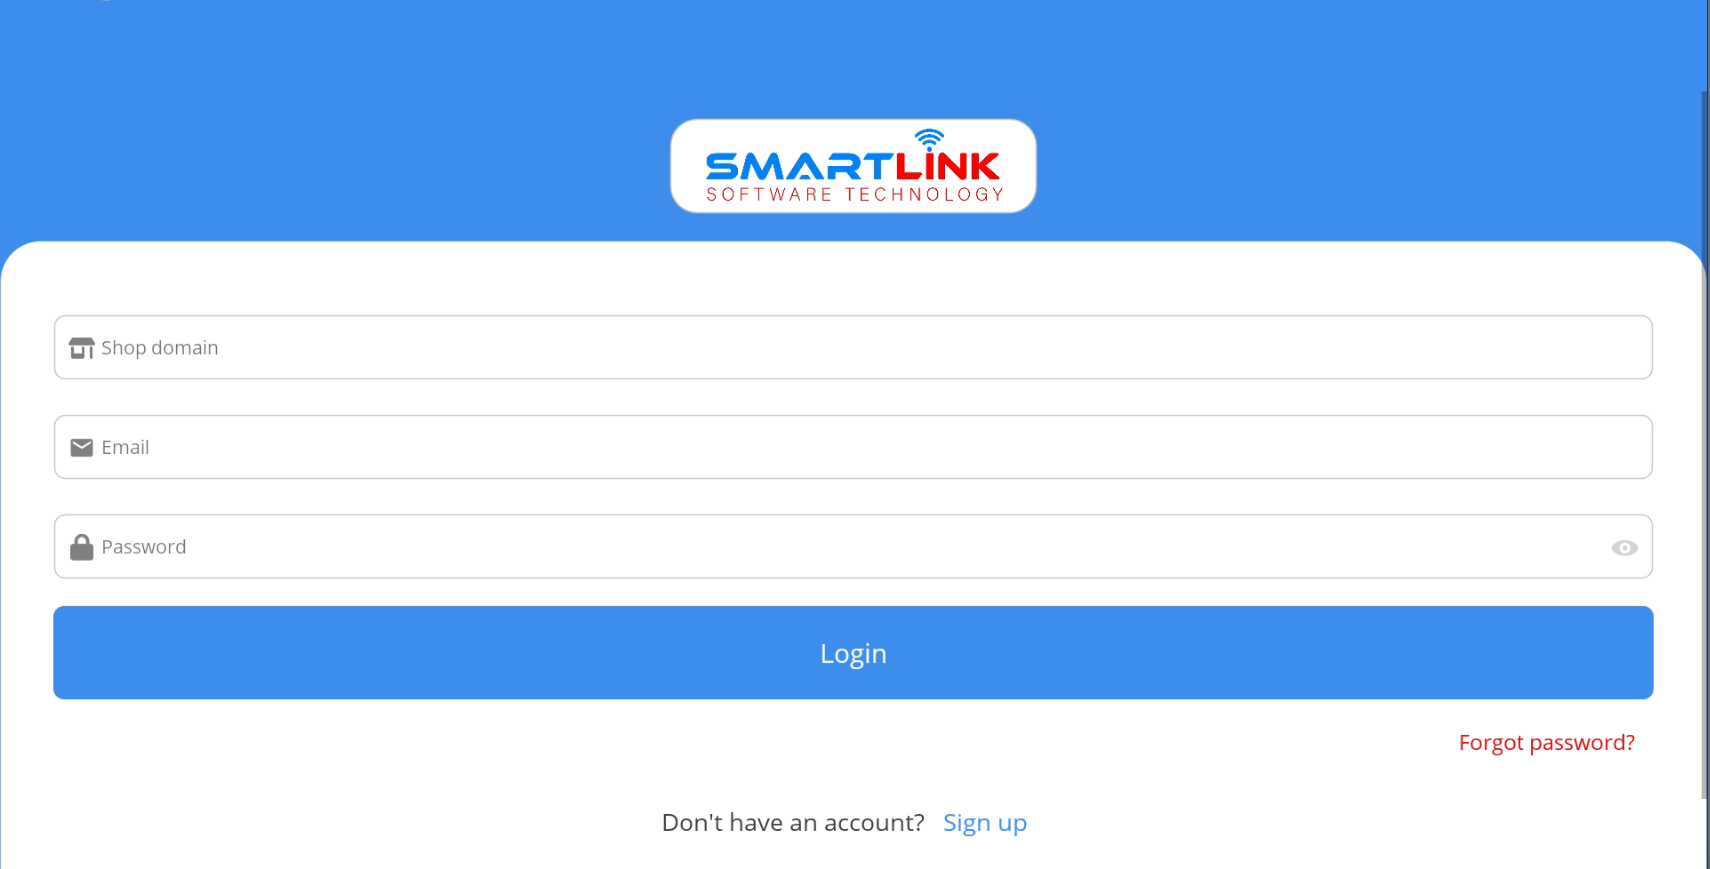
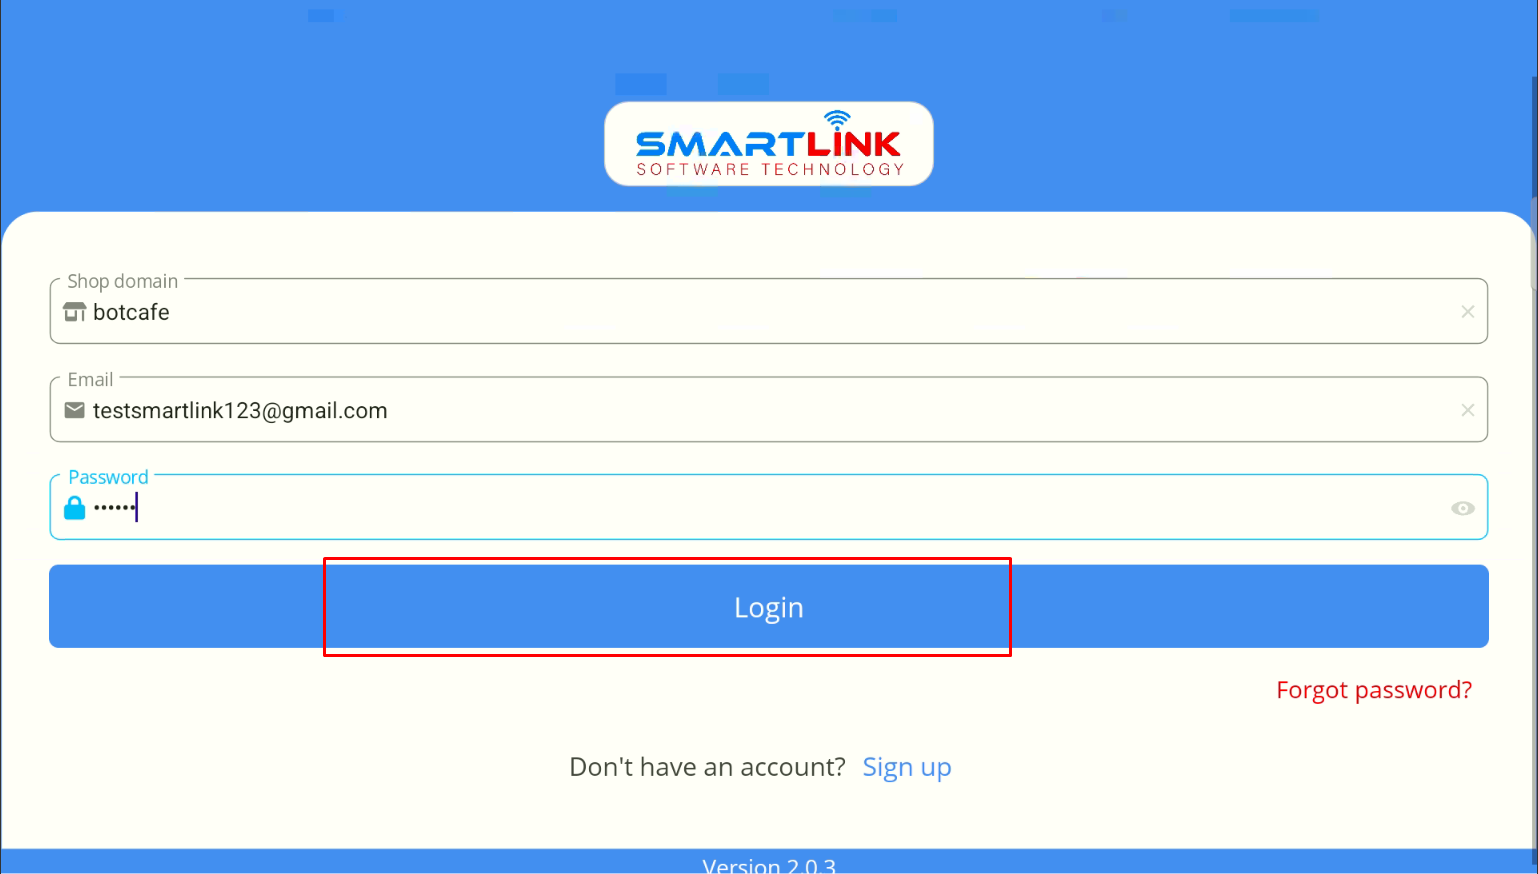
Log in to the POS
After successfully activating the account, the system will send account login information to the user's email.
-Step 1: Open app
Smartlink F&B POS
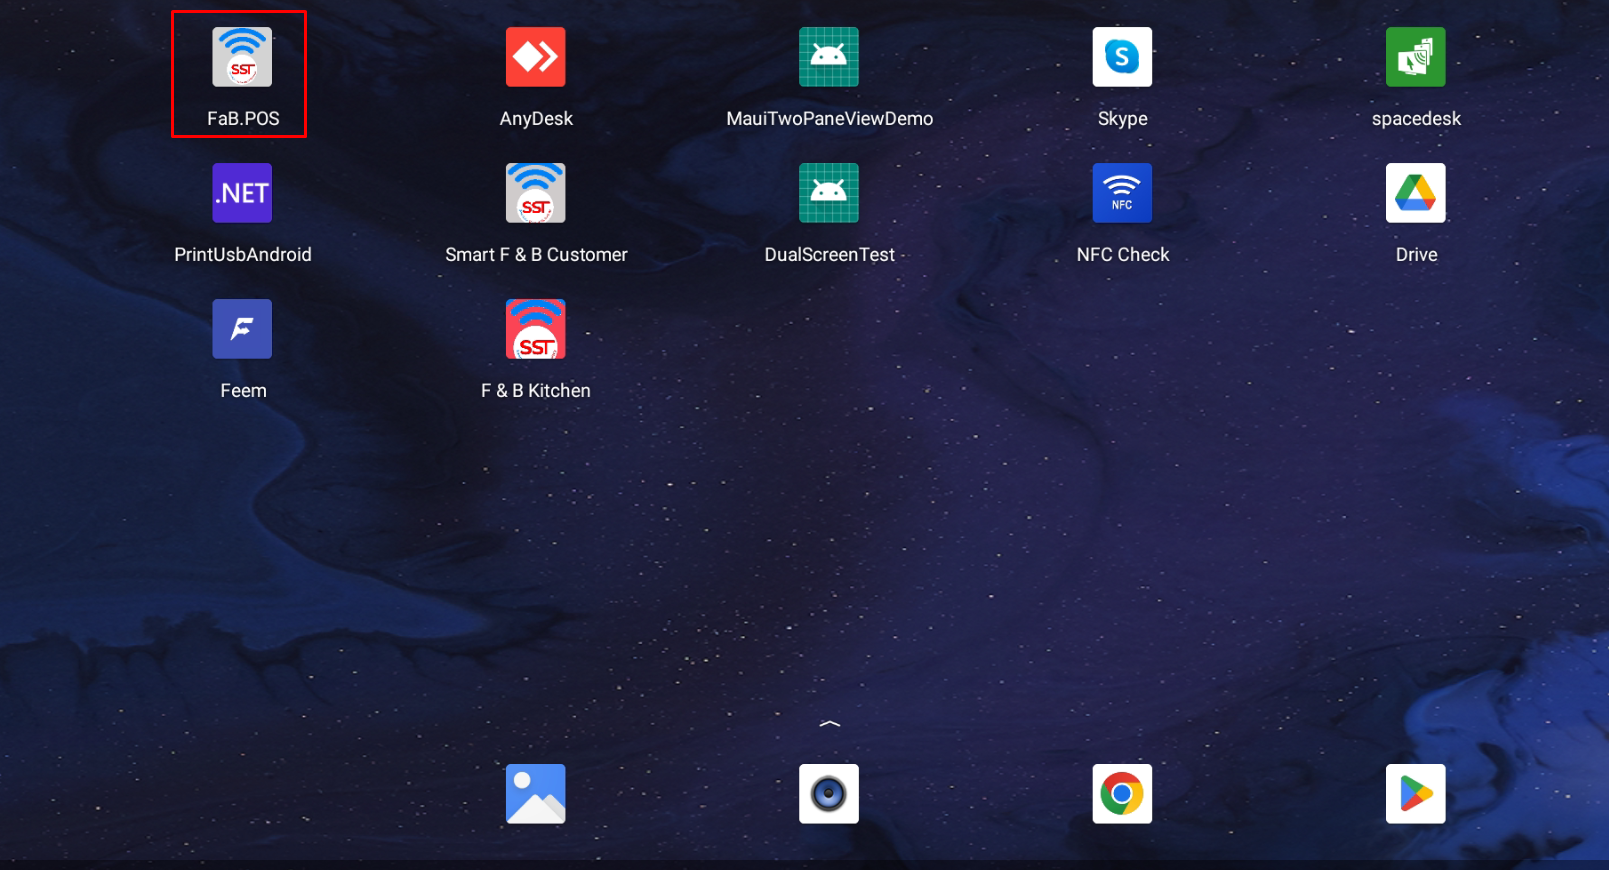
● The system displays the login screen
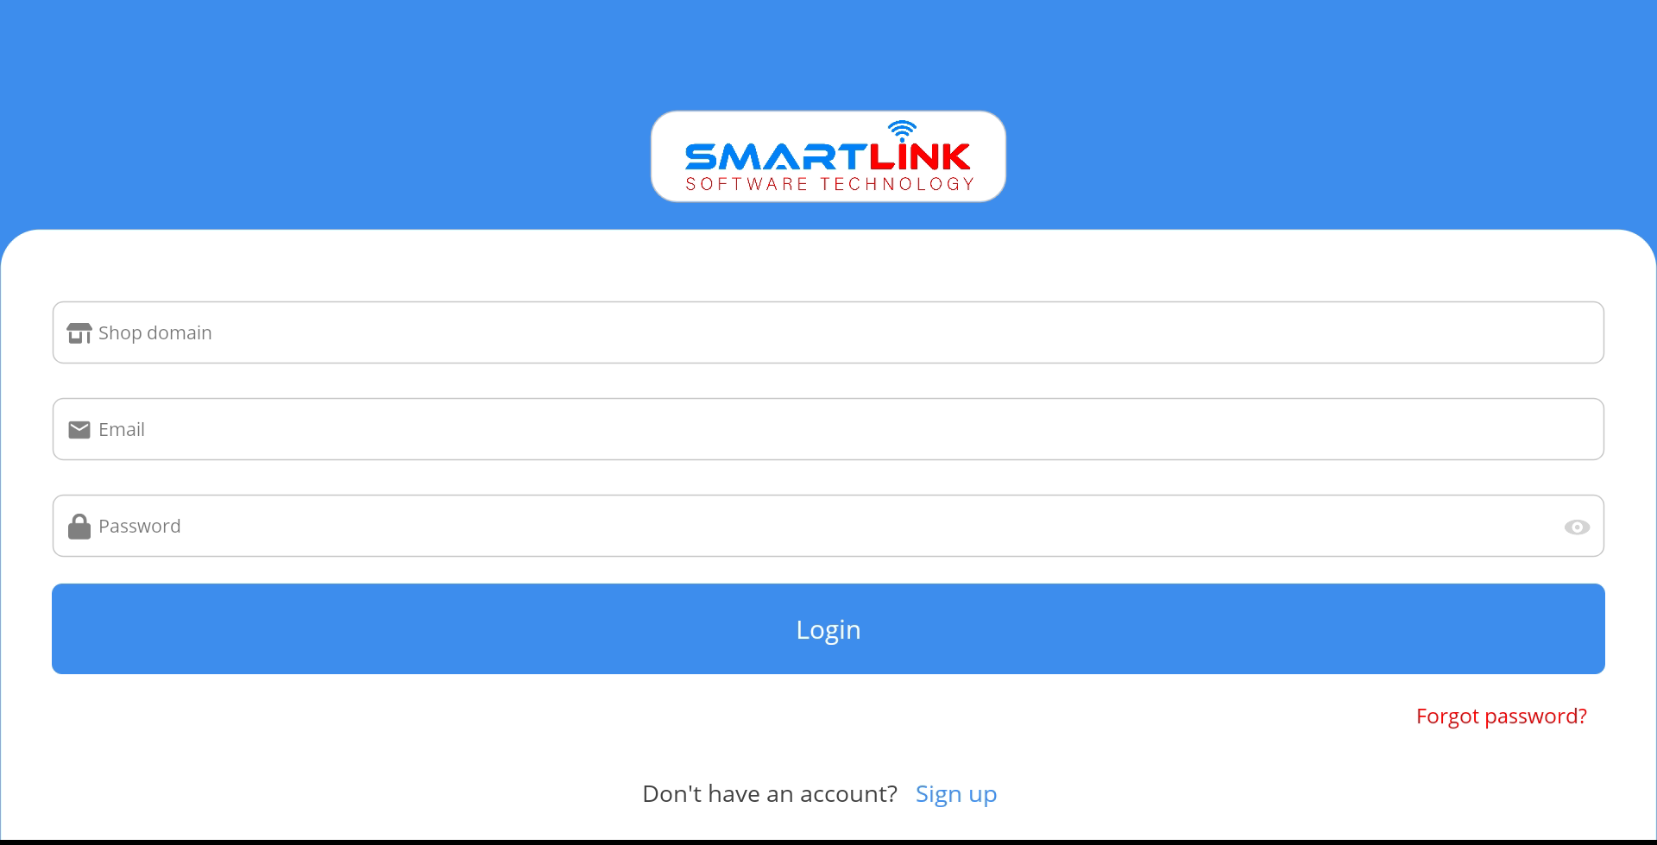
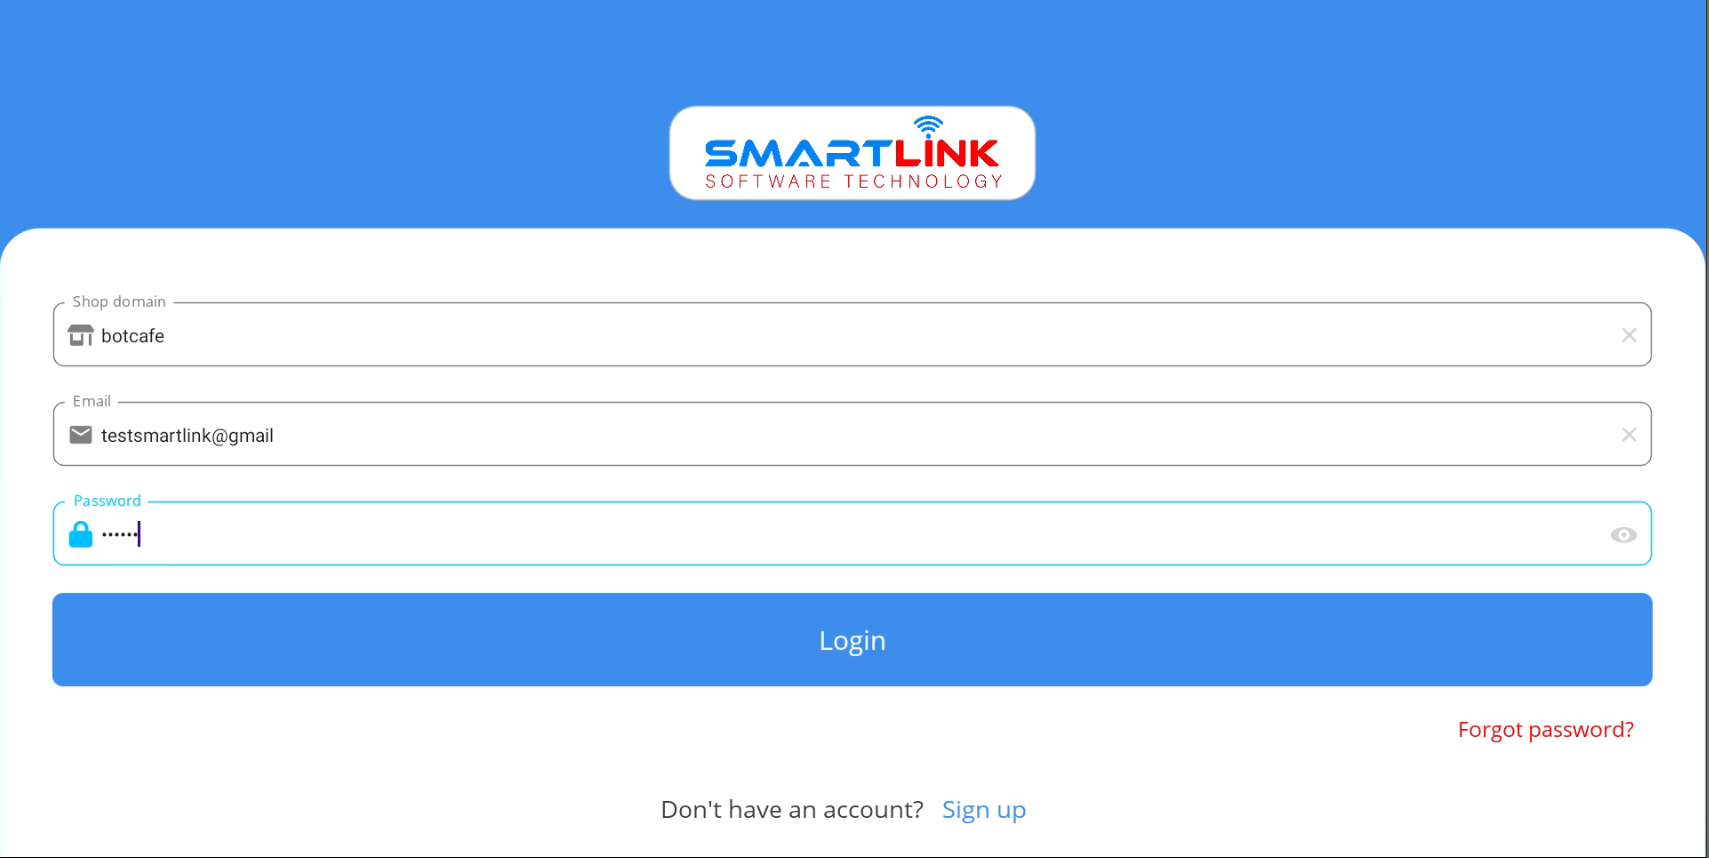
-Step 2: Fill in all fields Shop domain & Email
&
Password
Note:
● Email and Password are sent to the user's
email.
● Shop domain is the shop domain that user enter when registering an account.
- Step 3: Press
Login
- Step 4: Select a
Location
● For shops have only 1 Location, after entering all login information, the
system
switches
to
the Check-in screen.

● For shops have more than one Location, after entering all login information,
the
system
displays the
Location selection
screen.
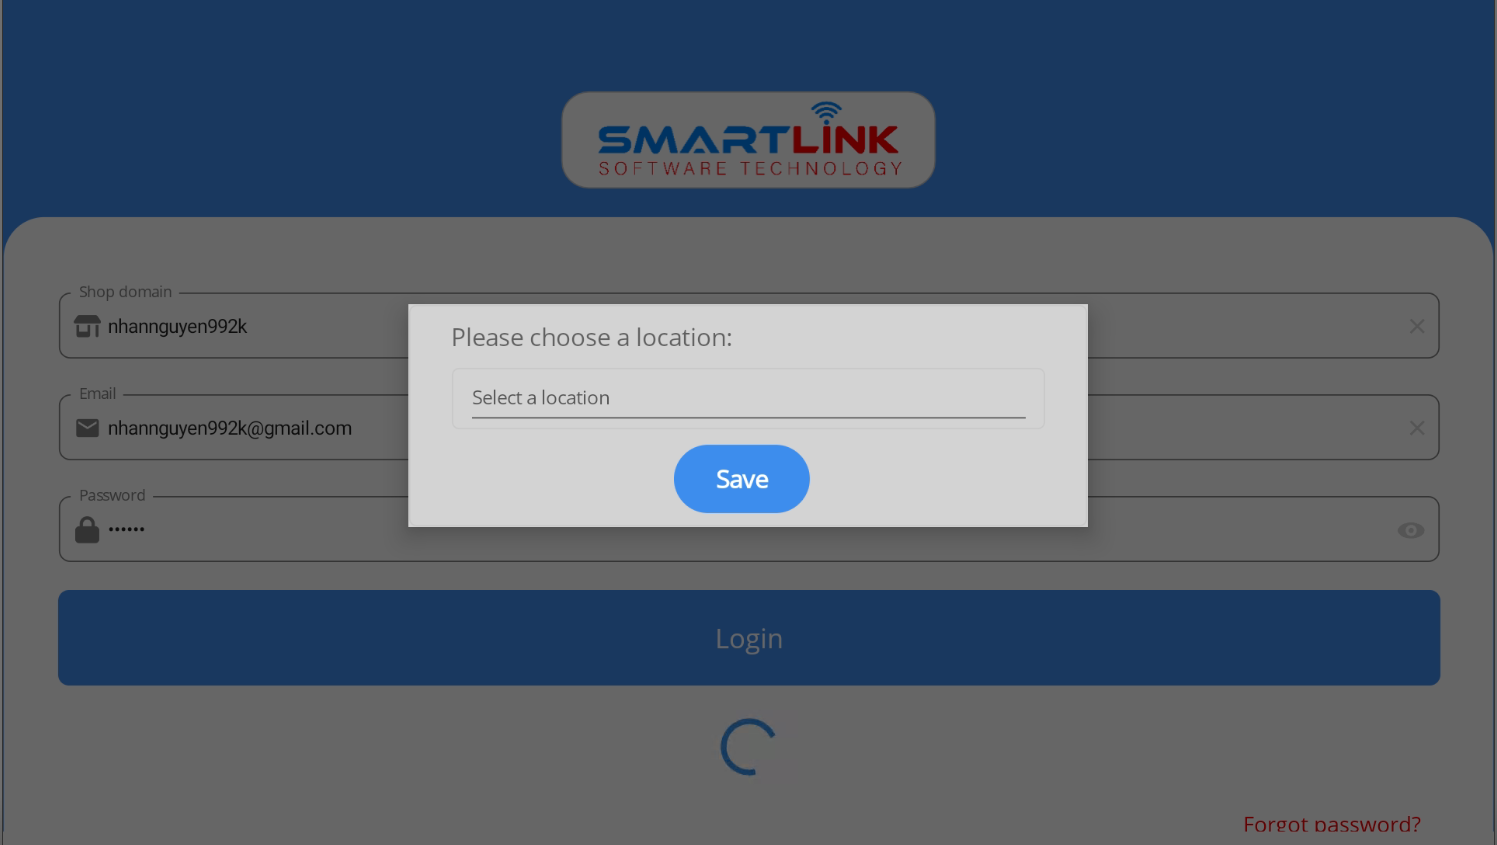
● User selects a Location, the system switches to the
Check-in
screen
with the selected location.
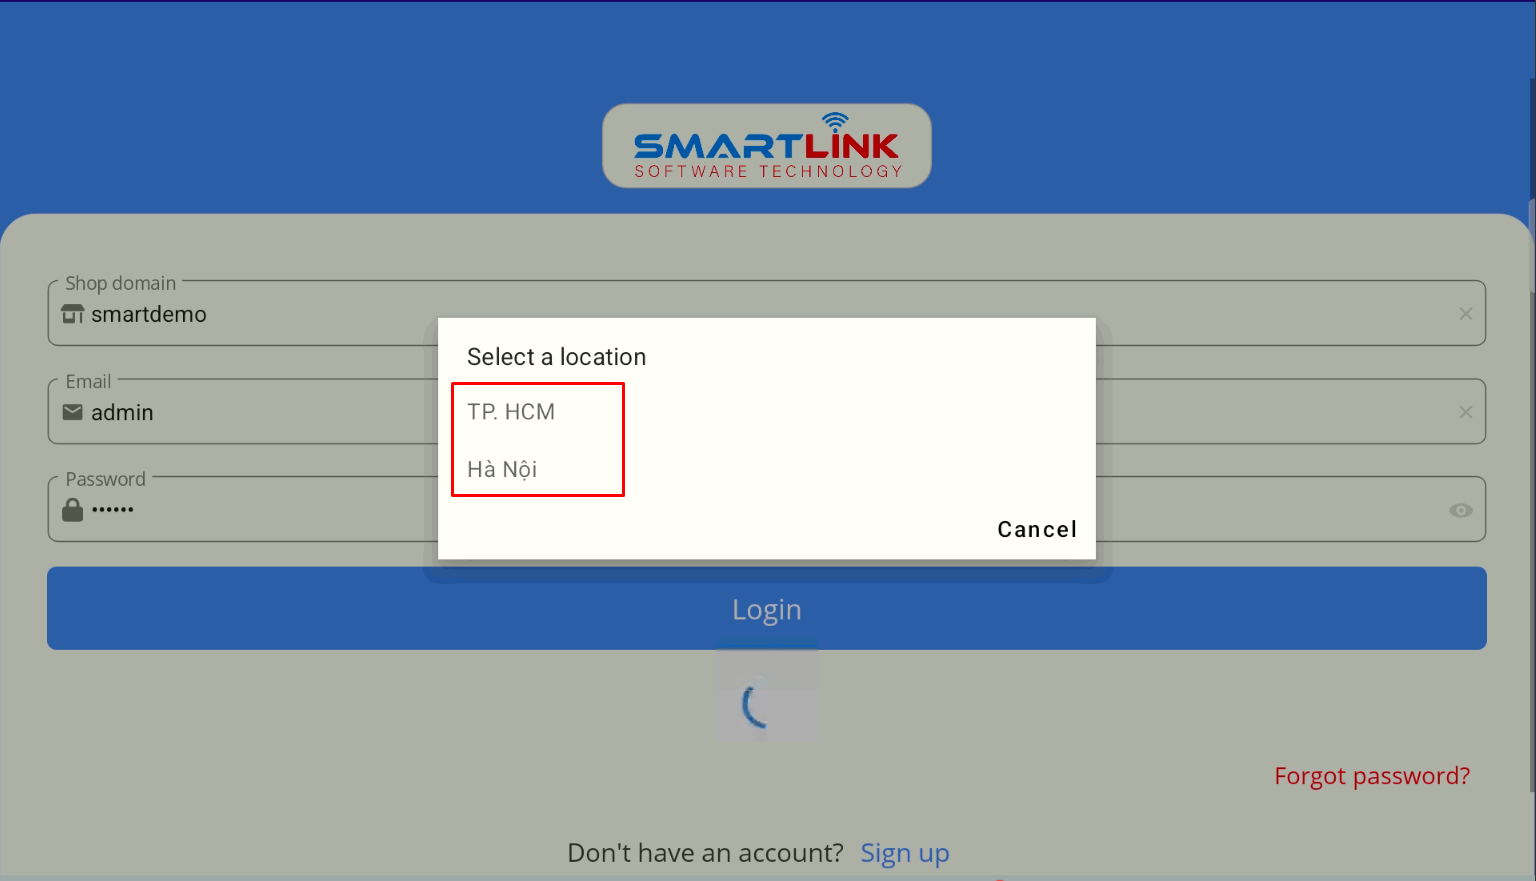
Note:
● The system allows to choose only oneLocation.
Synchronize data from the cloud to the POS machine
After the user enters the correct login information into the system:
- From the second time onwards, when the user logs in, the system automatically switches to the
Check-in
screen.
- For the first time, the system displays a notification that the system will synchronize data from the Cloud to
your
device
"The system is loading data from cloud. Do you want to view the process?"
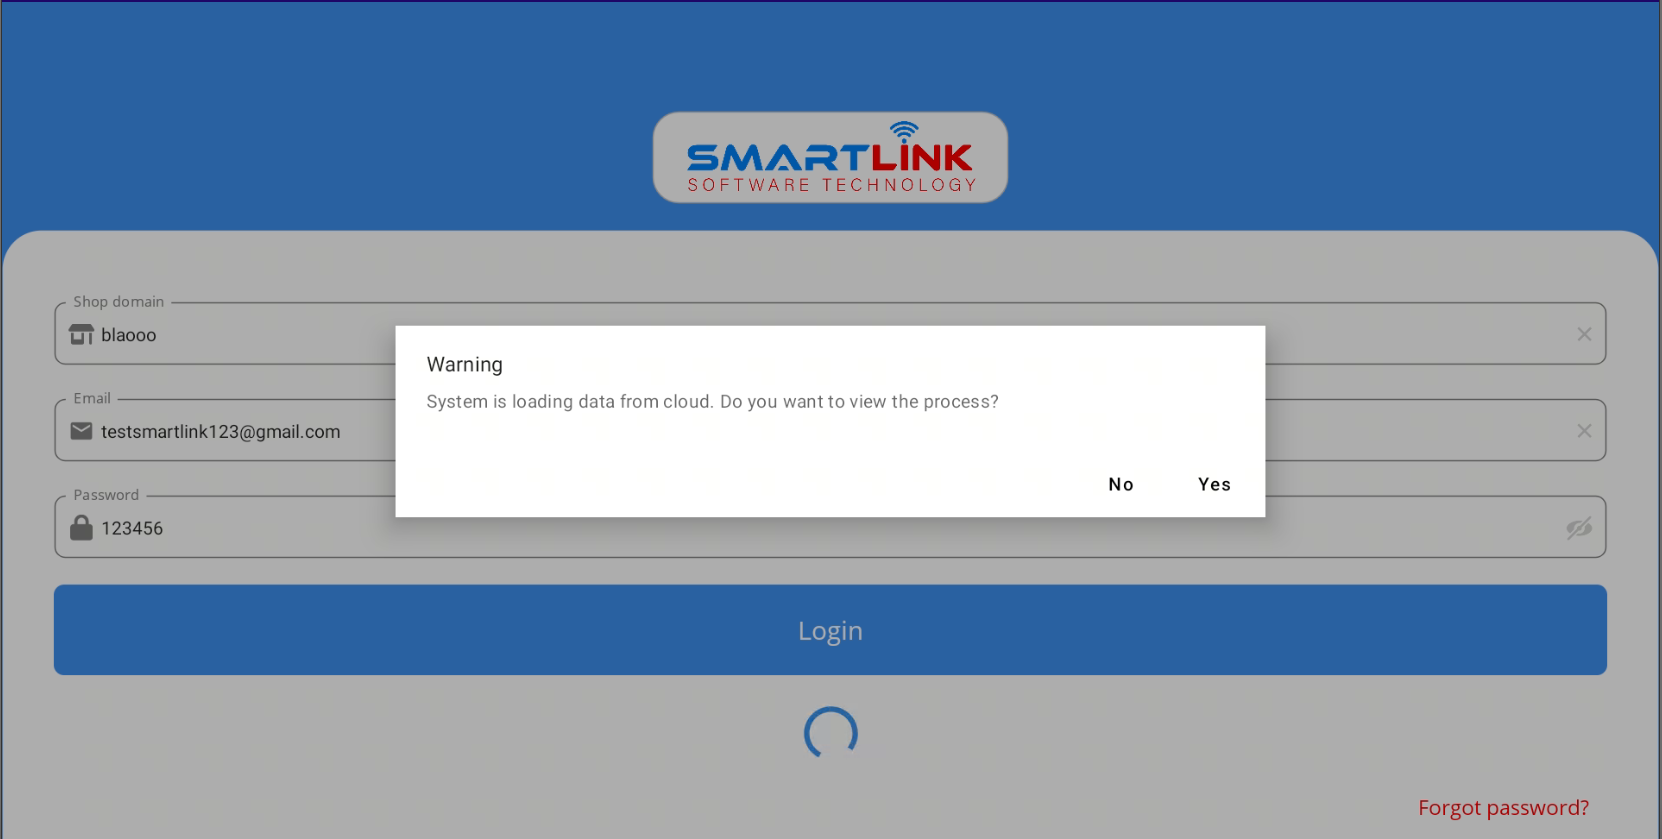
- If the shop already has initialization data:
● Step 1: Press the button Yes, the system synchronizes data
from the Cloud to the POS machine.
● Step 2: Press the button Sync, the system will stop
synchronizing data to the POS machine. Press
the
button Close the system will stop synchronizing data to the POS machine
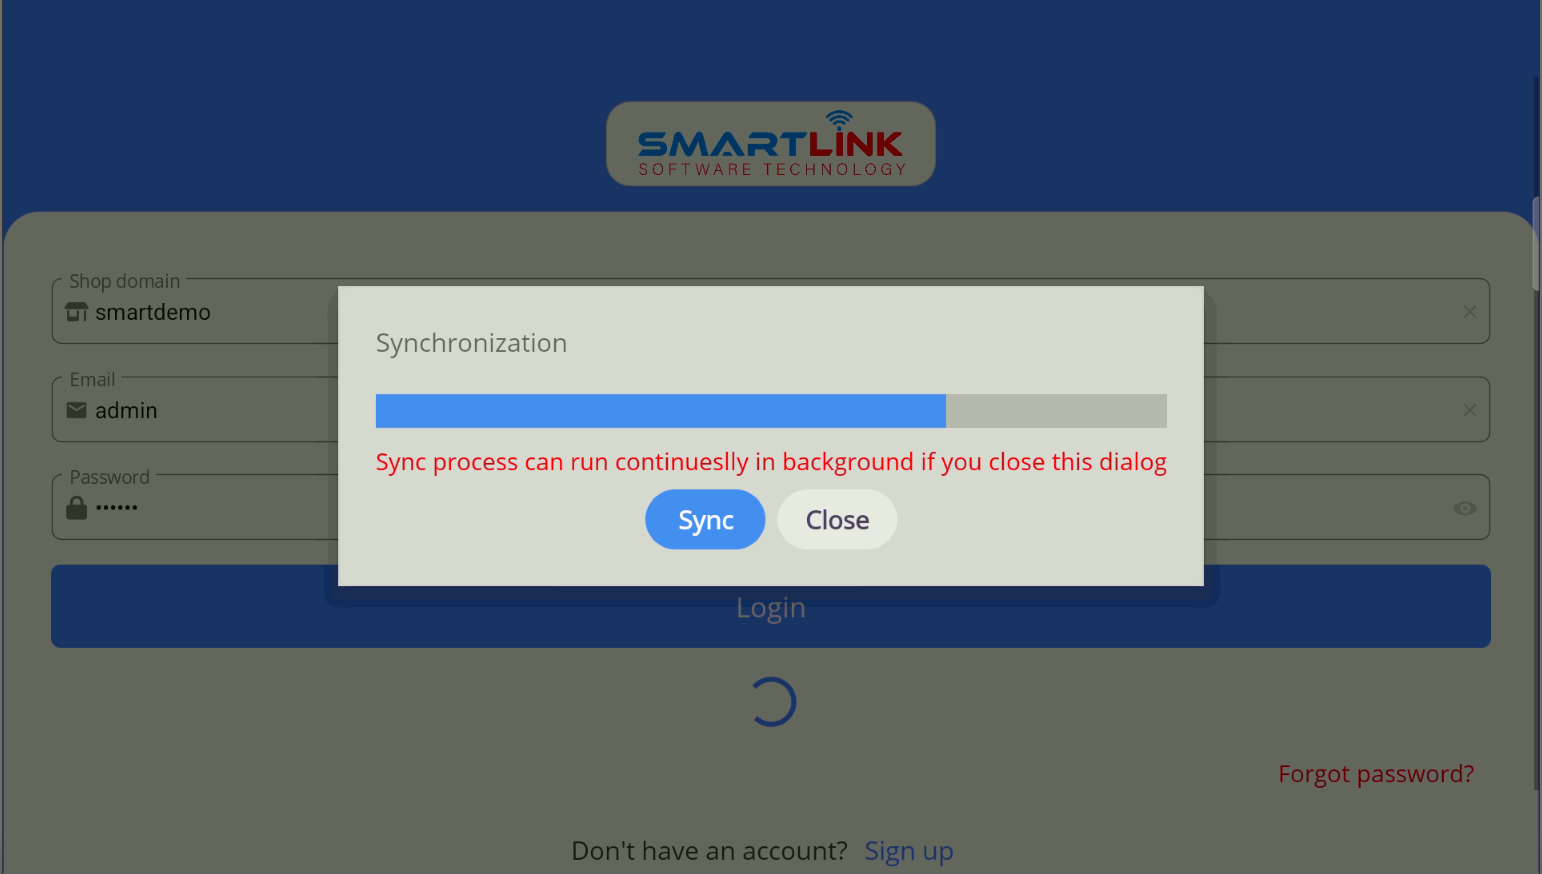
● Step 3: After successfully synchronizing, the system automatically switches to the
Check-in
screen.
- If the shop does not have initialization data:
● Press the button No, the system will not synchronize data from the Cloud to the POS
machine,
but
will switch to the
Check-in
screen.
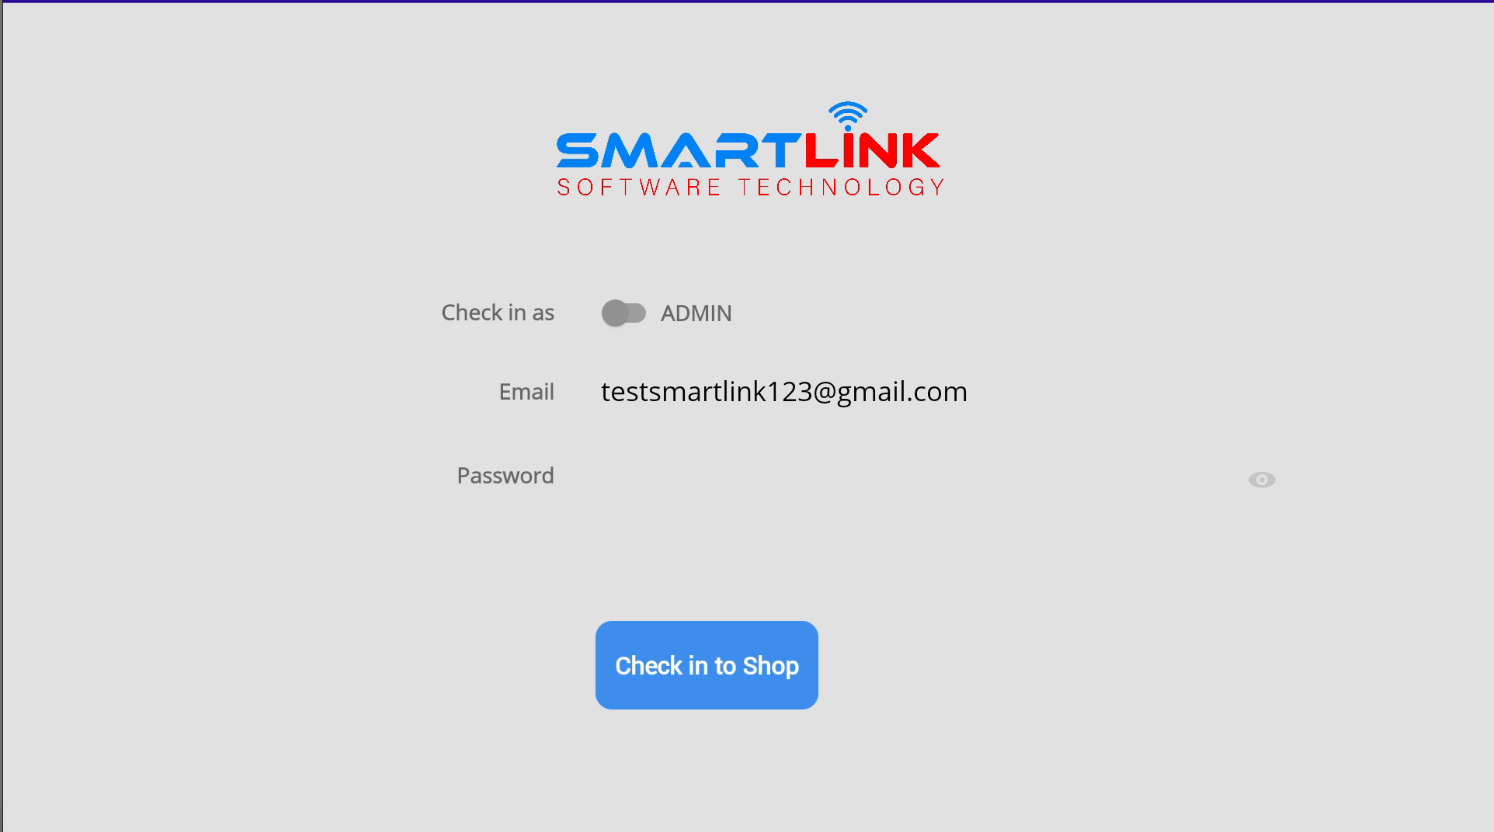
Check-in
User can log in to the system with two roles: Admin or
Cashier
● Admin: is the shop manager.
● Cashier: is an employee of the shop.
3.1. Check-in as Admin
- Step 1: Press the button
Check in as "ADMIN"
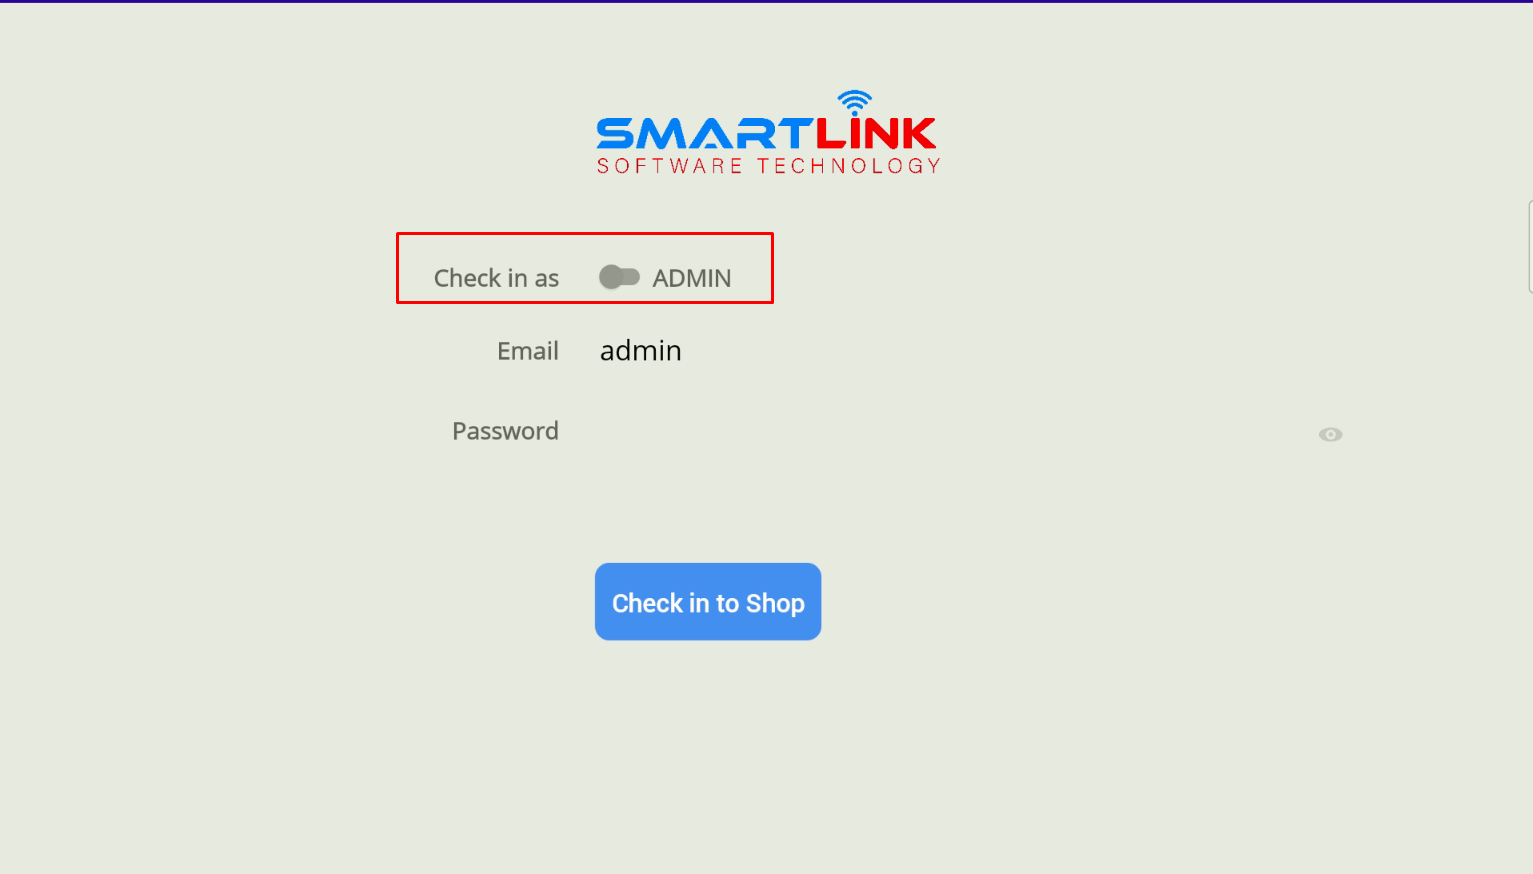
- Step 2: Enter information to log in to the shop
● The system will suggest
Email
● User enter the
Password
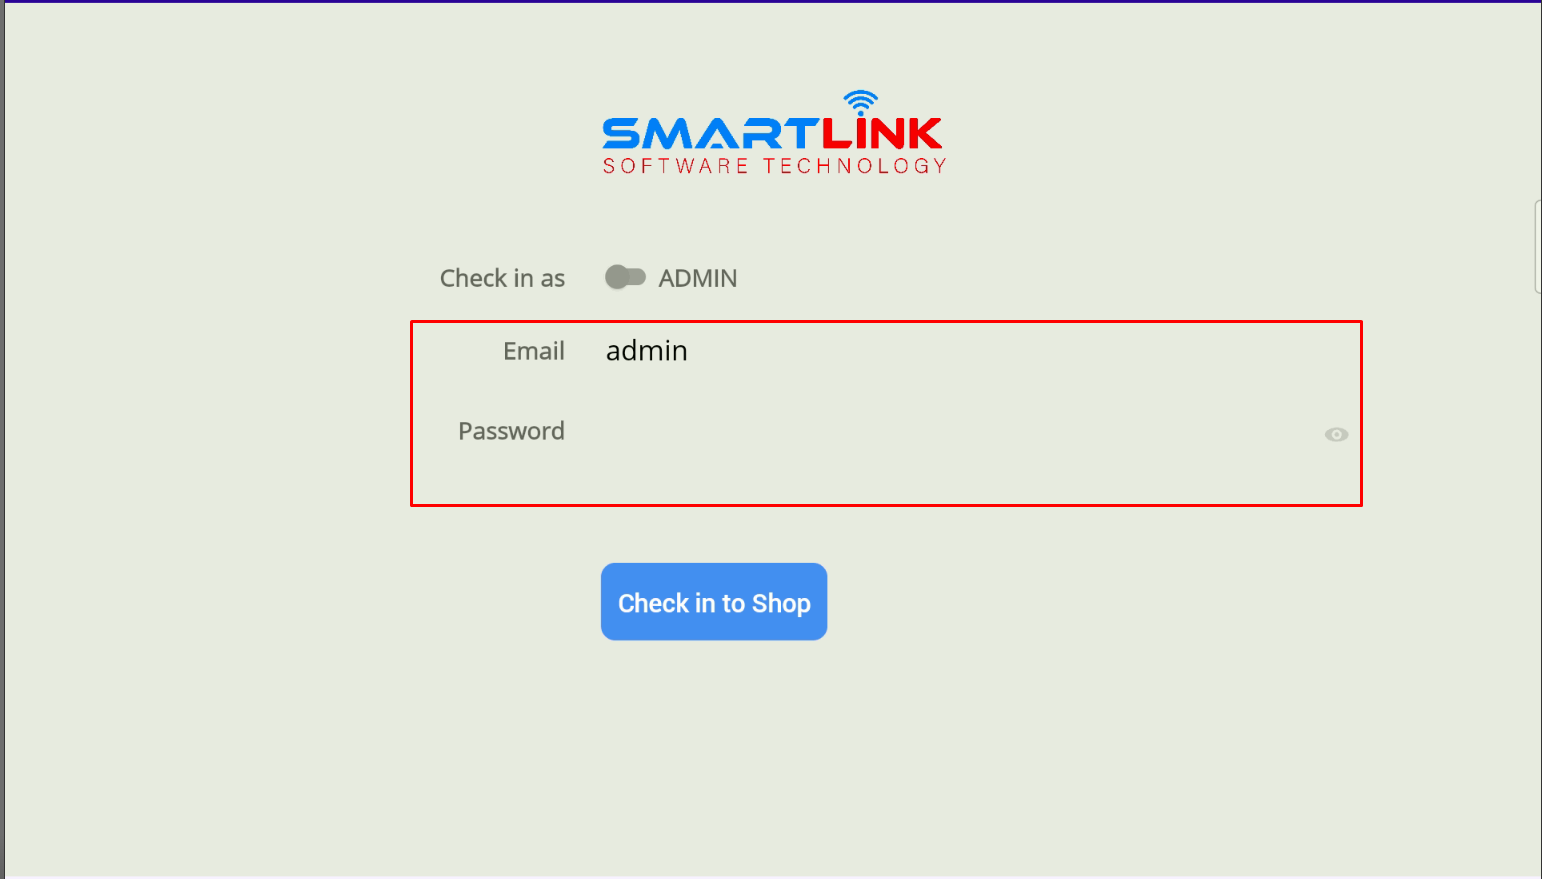
- Step 3: Press the button Check in to shop, the system switches
to the main transaction screen
3.2. Check-in as Cashier
- Step 1: Press the button
Check in as "CASHIER"
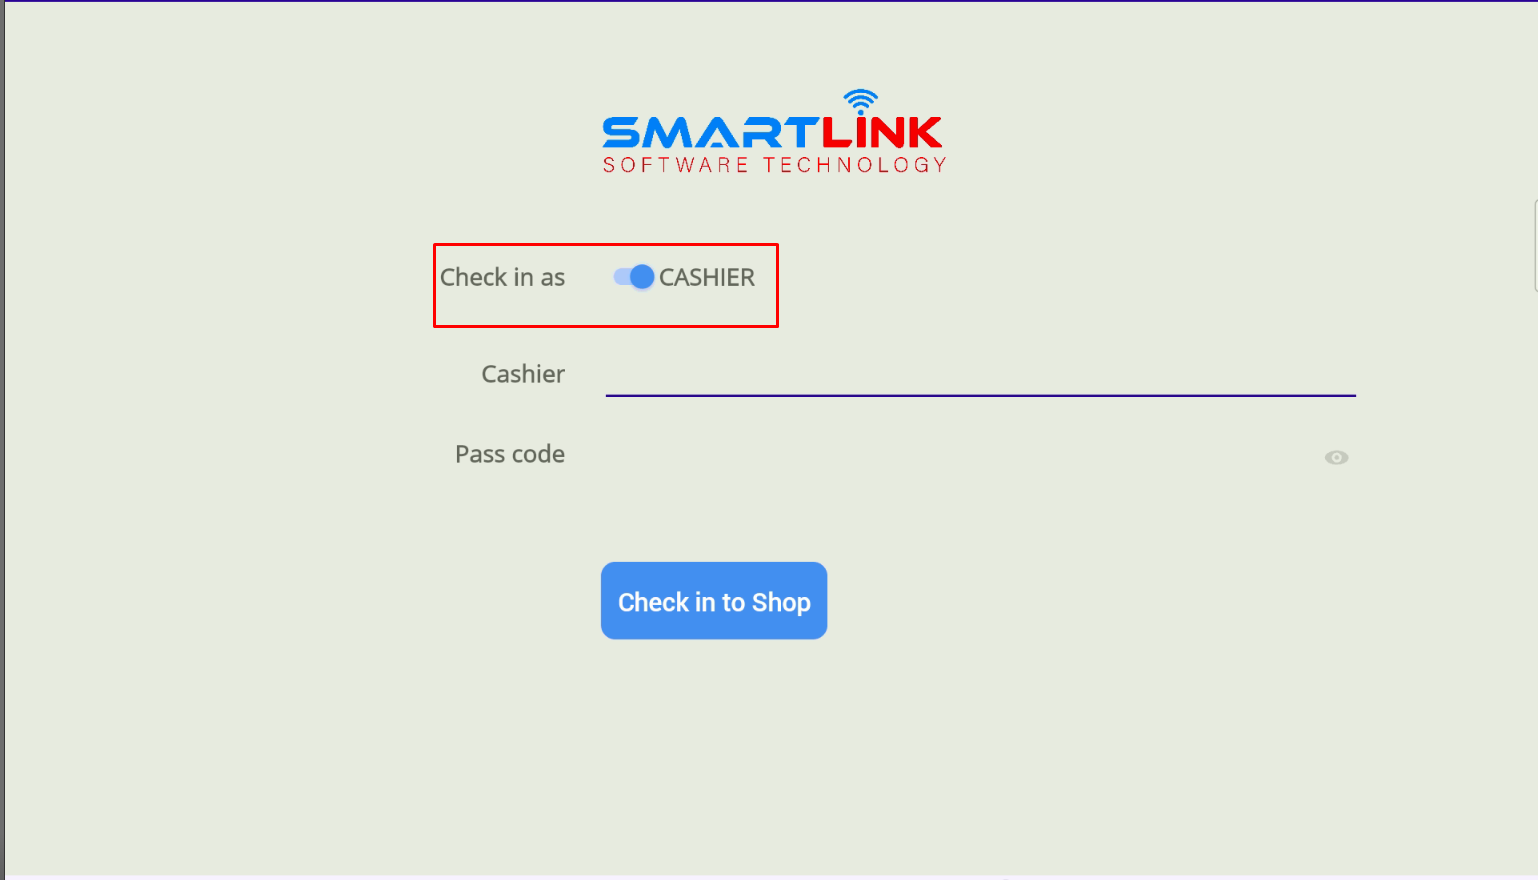
- Step 2: Enter the information provided by the Administrator to log in to the shop
● Choose your name.
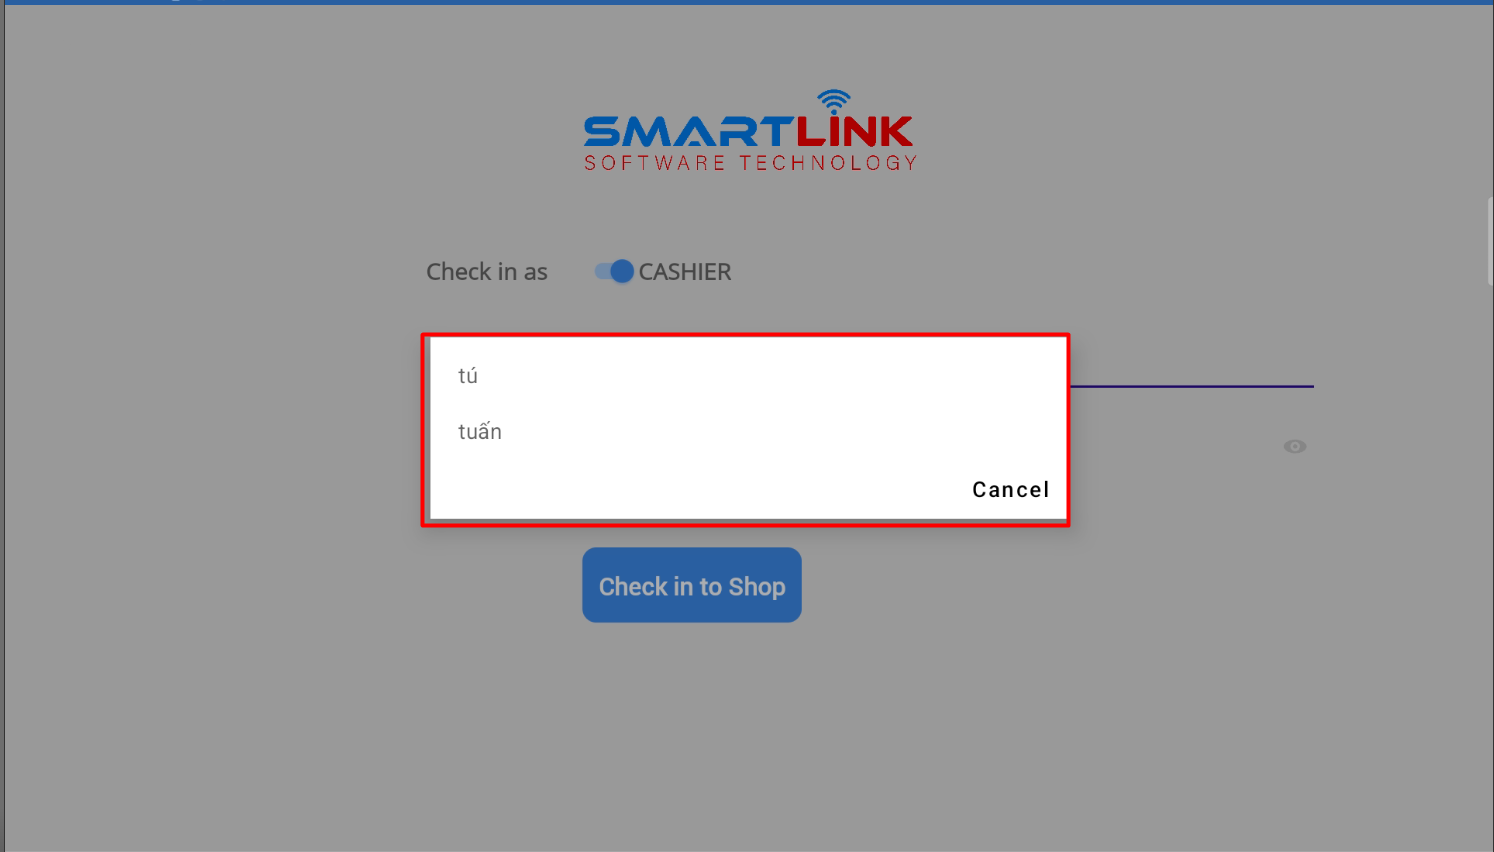
● Use the Passcode that was provided by Administrator to log in.
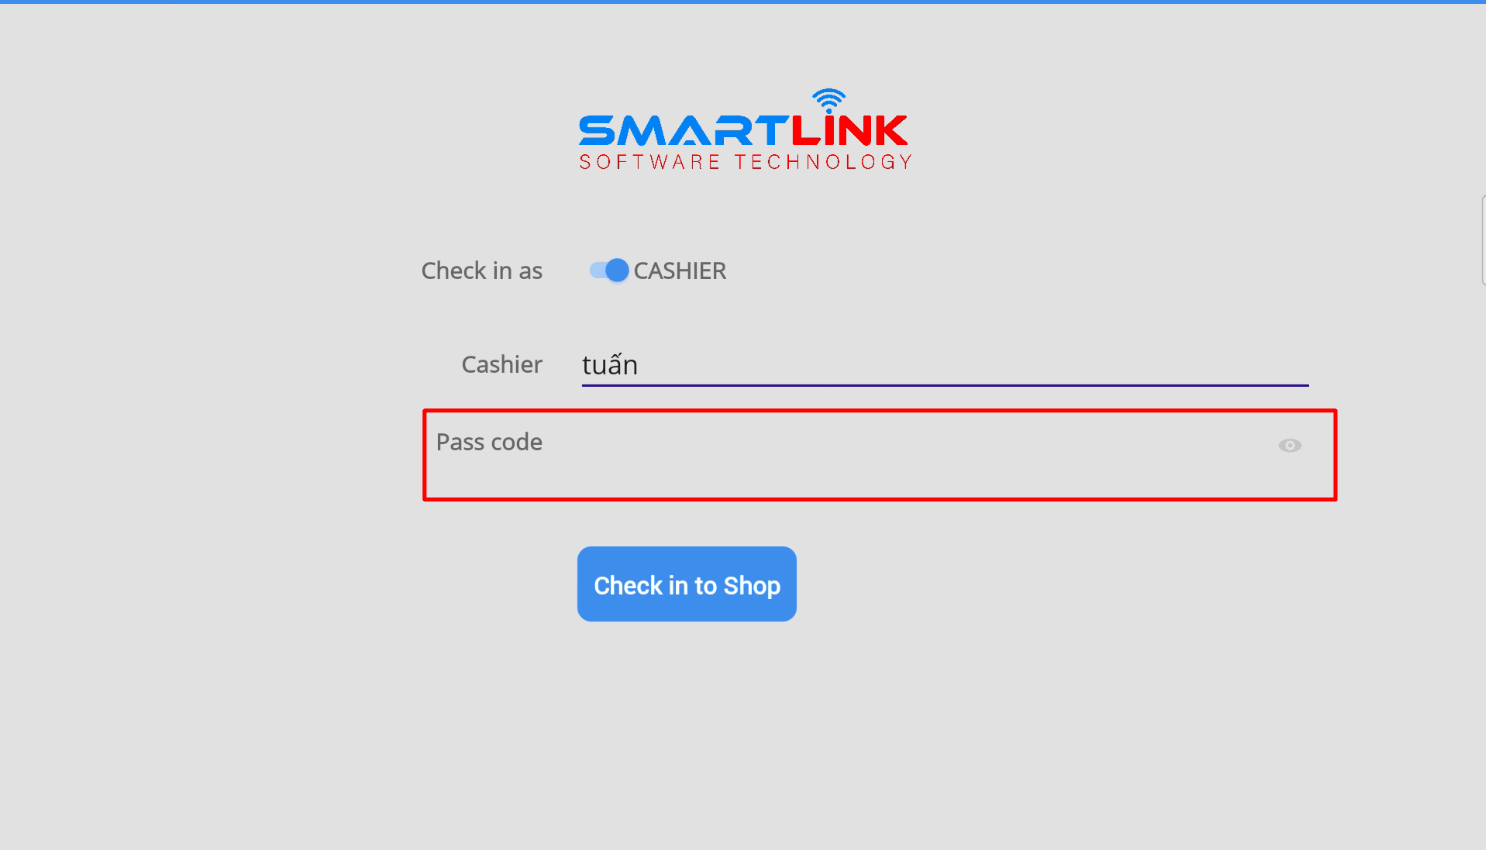
- Step 3: Press the button Check in to shop, the system will
switche to the main transaction
screen.

● The administration module will only display when the user Check-in as an
Administrator
● Administrator haves set-up rights in the administration section.
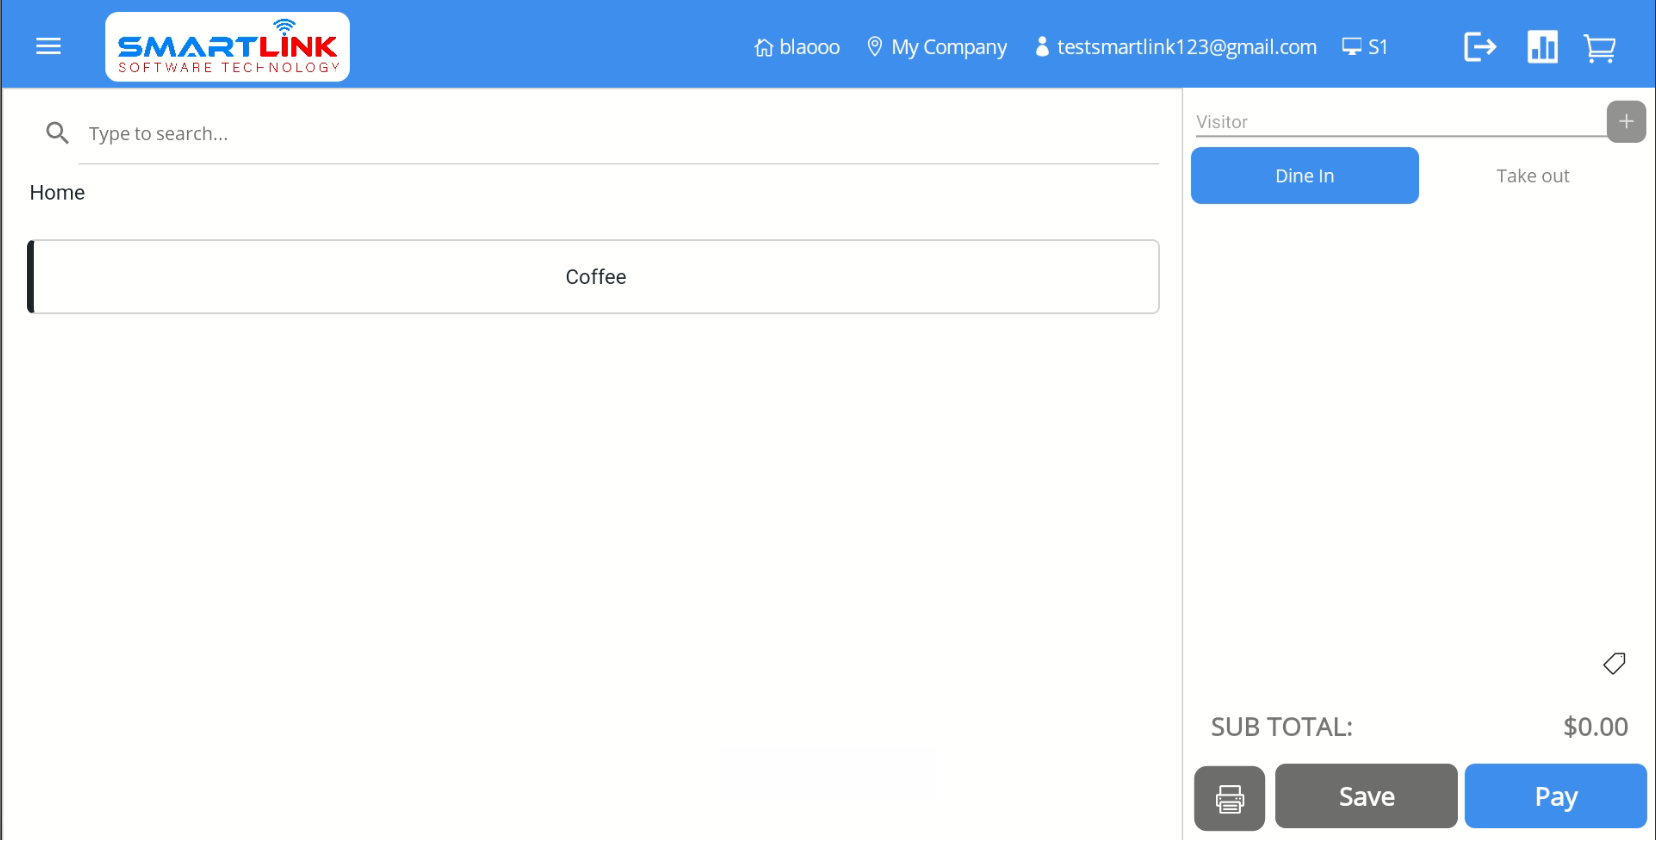
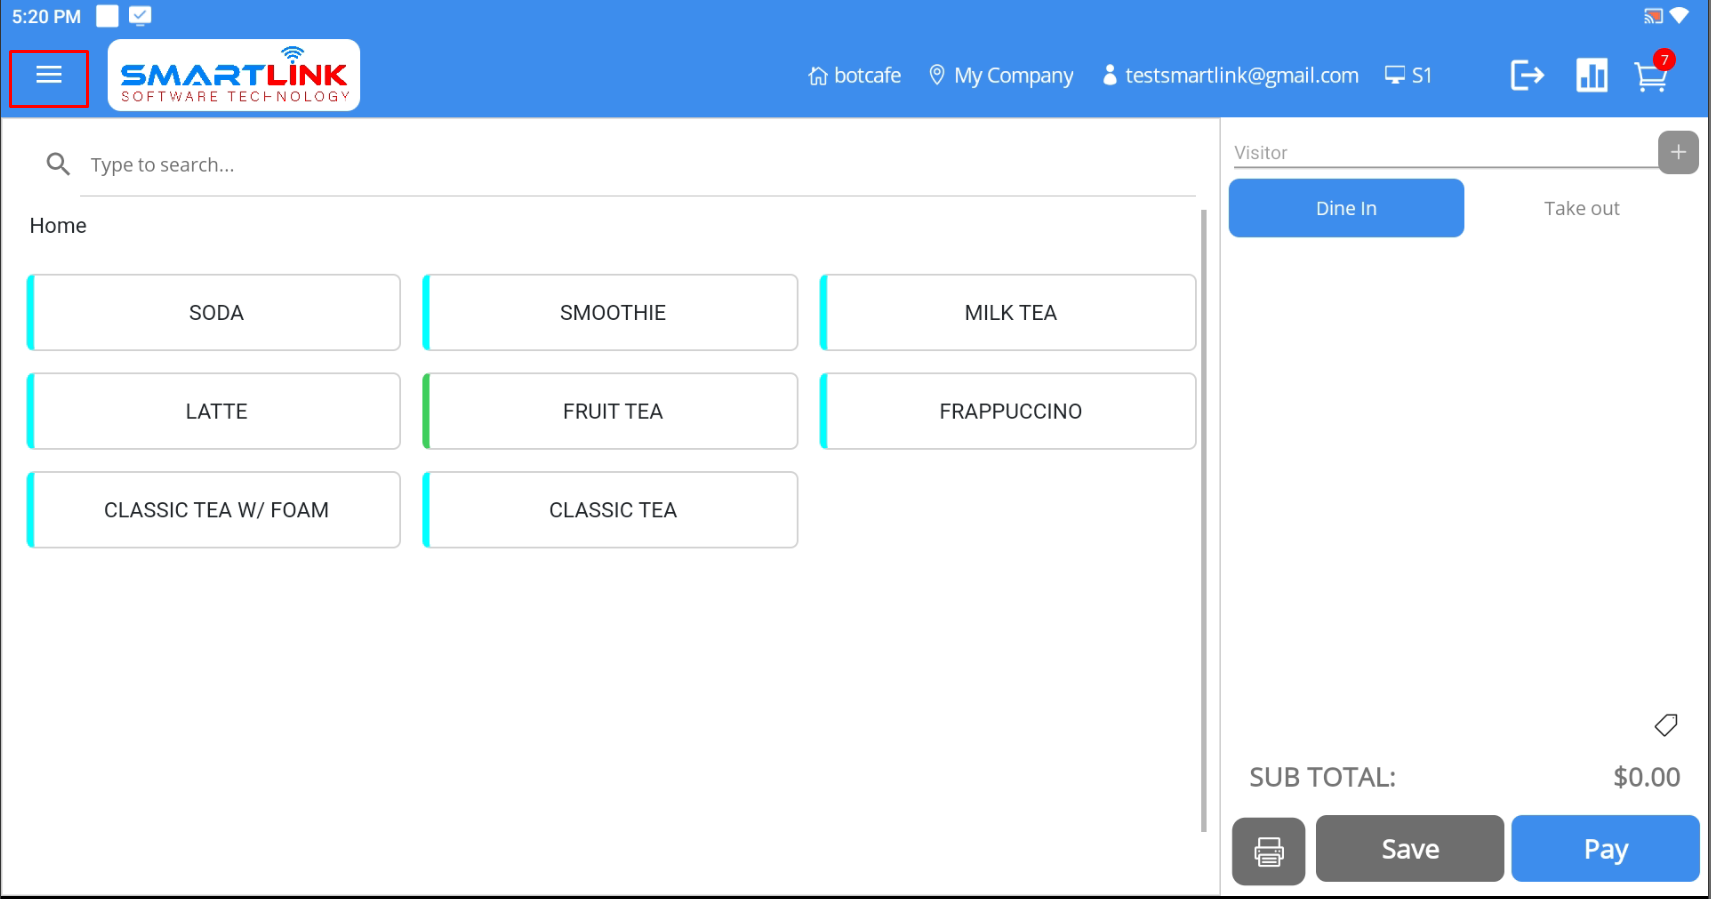
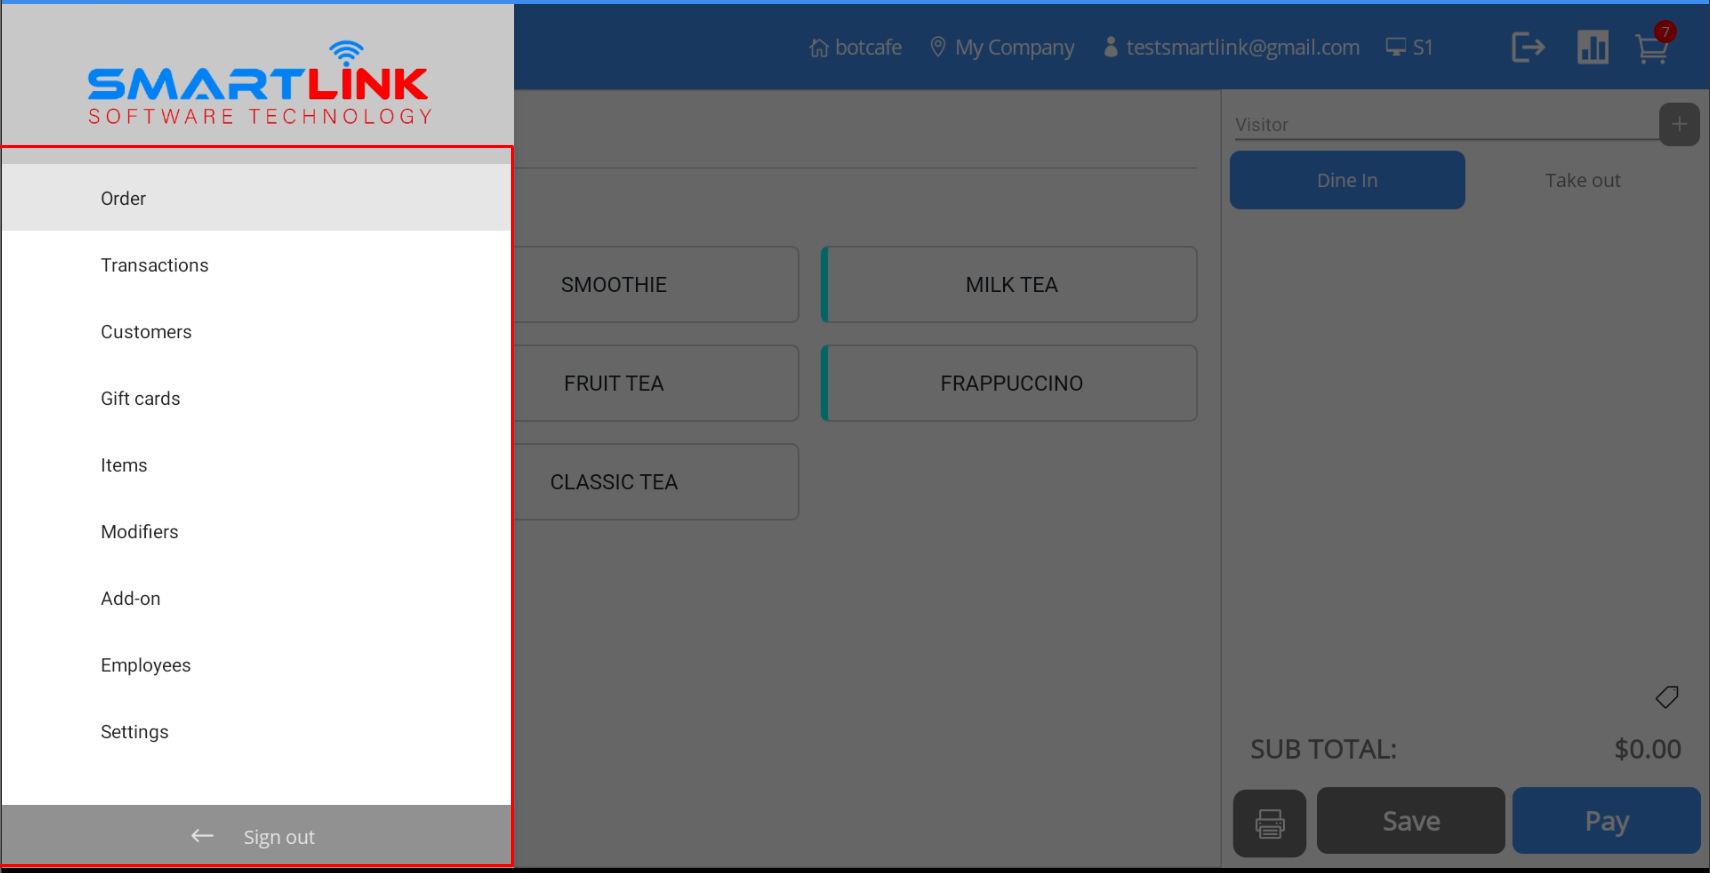
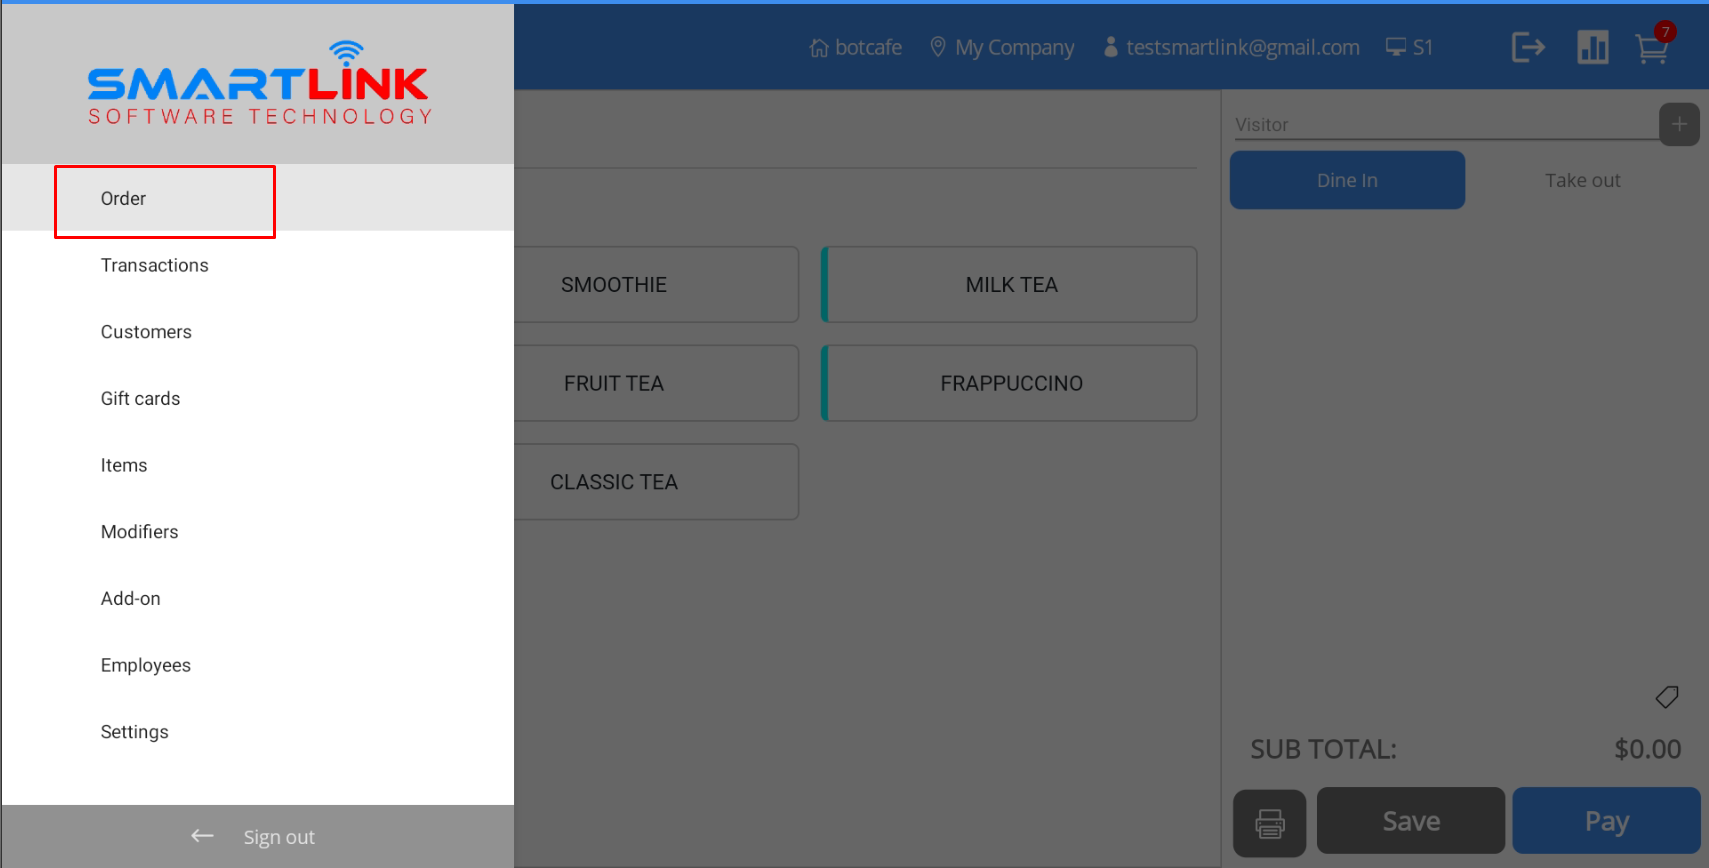
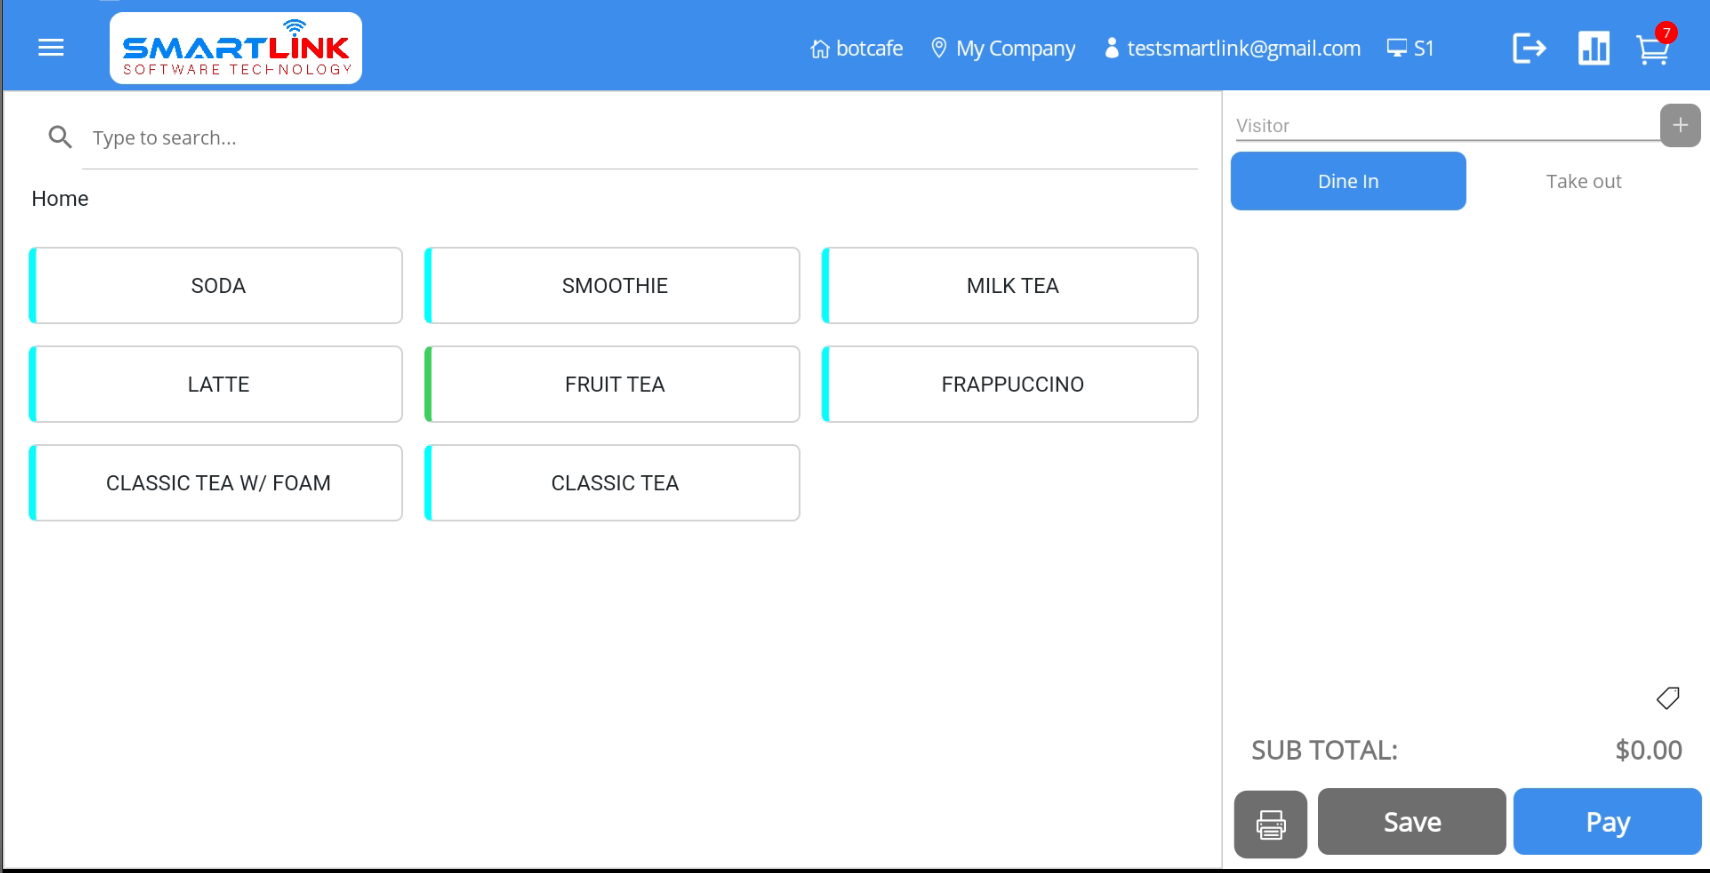
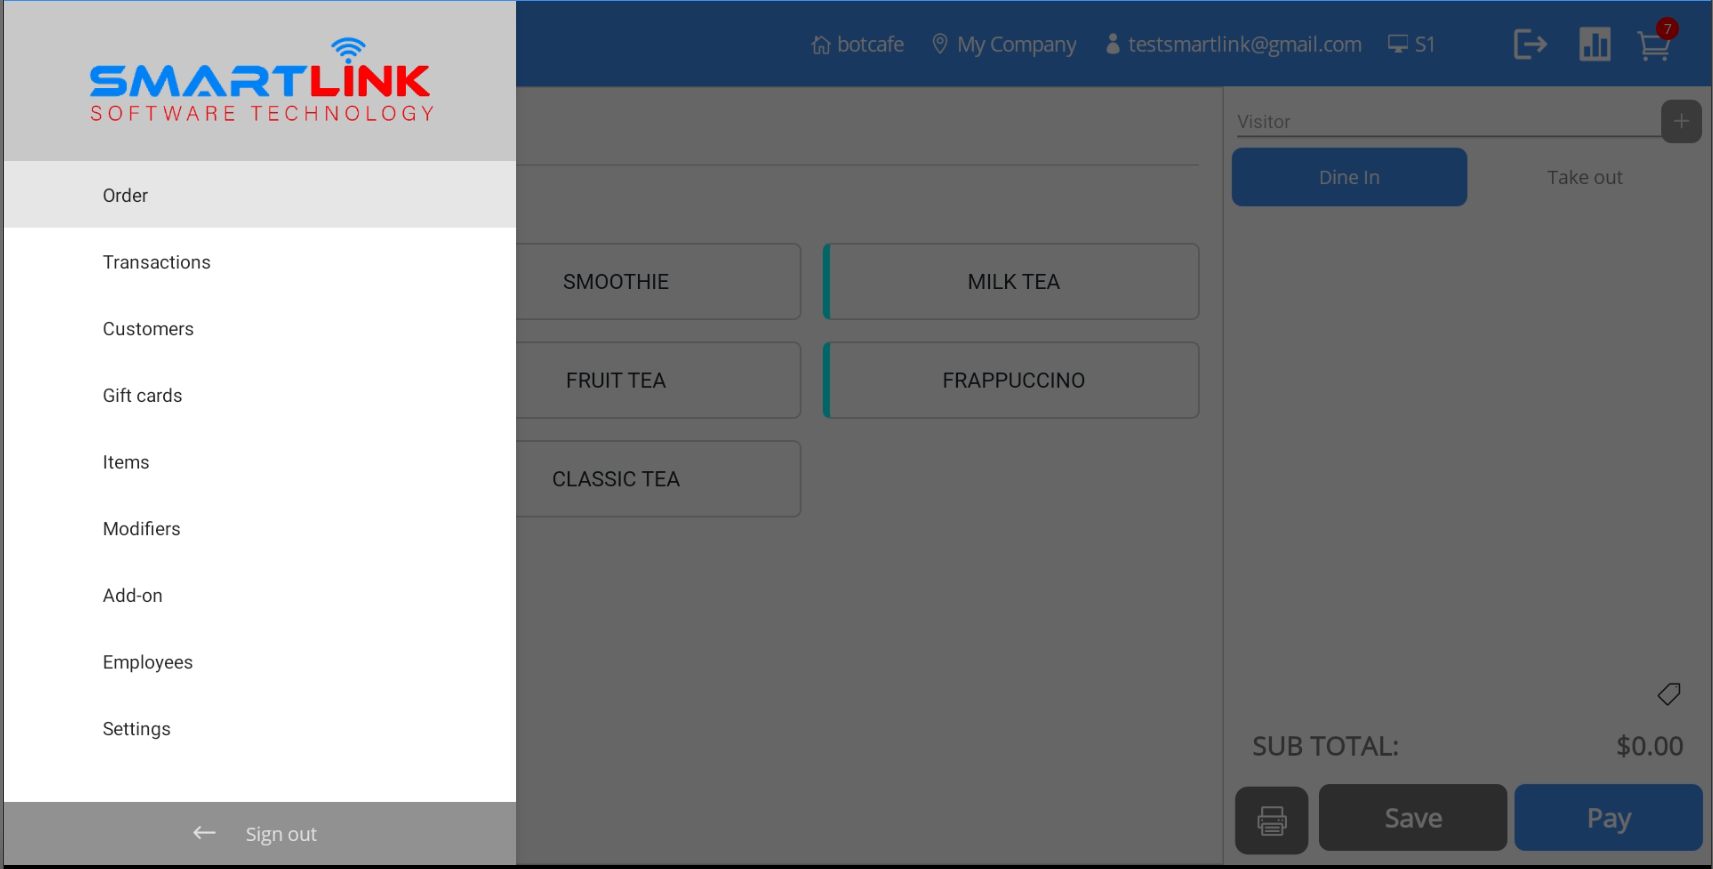
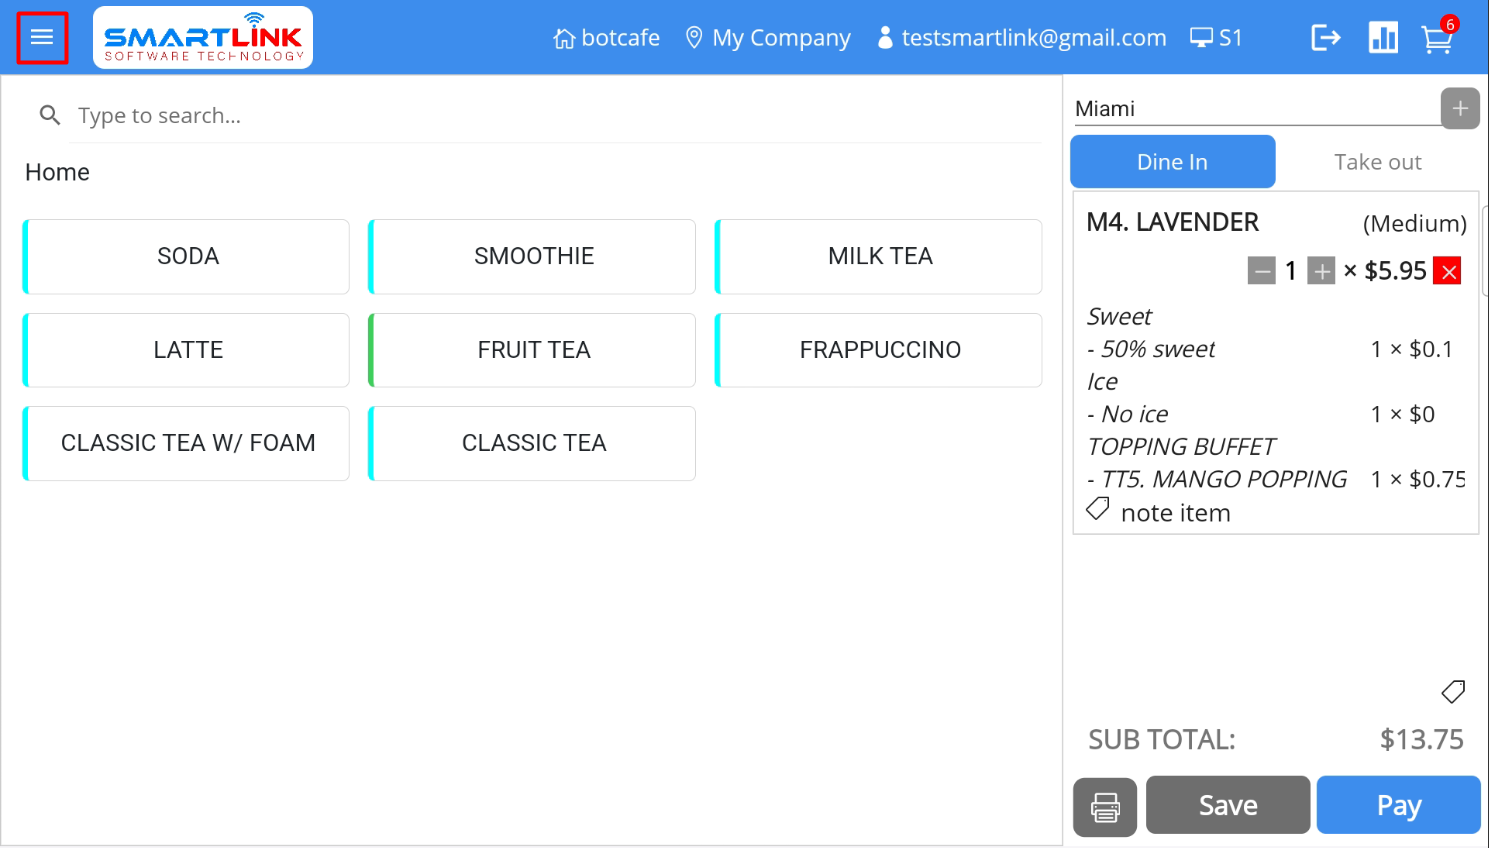
Order management
To place an order, follow these steps:
- Step 1: Press the button Menu in the left corner of the
screen.

● The system displays menu categories.

- Step 2: Press the button
Order
● The system displays the main screen so users can make order.
Transaction management
To manage transactions, follow these steps:
- Step 1: Press the button Menu in the left corner of the
screen.
● The system displays a side-bar menu.
- Step 2: Press the
Transaction
button
![]()
● The system displays the Transaction screen.
![]()
2.1. View transaction details
- Step 1: On the Transaction screen, the user press the three dots
icon on the order with Paid status.
![]()
● The system displays detailed transaction information.
![]()
- Step 2: Press the "
" button to close the pop-up.
2.2. Reprint the paid invoice
- Step 1: On the Transaction screen, the user press the three dots
icon on the order with Paid status.
![]()
● The system displays detailed transaction information.
![]()
- Step 2: Press the
Reprint
button to reprint the invoice.
![]()
2.3. Delete transaction
Note:
- Users can only delete transactions in Draft status.
- For transactions with Paidor Completed status,
users
are
not
allowed to delete the transactions.
To delete transaction:
- Step 1: On the Transaction screen, press the Delete
icon at
the
transaction which status is
Draft.
![]()
● The system displays a confirmation message to delete the transaction.
![]()
- Step 2: Press the
Yes
button to delete the transaction. Press the
No
button to cancel.
![]()
- After successfully deleting transaction, the system returned to the
Transaction
screen.
2.4. Edit transaction
Lưu ý:
- Users can only edit transactions in Draft status
- For transactions with Paid or Completed status,
users
are
not
allowed to edit the transactions.
To edit transaction:
- Step 1: On the Transaction screen, press the Edit
icon at the transaction which status is
Draft.
![]()
● The system switches to the main screen with previously saved transaction information.
![]()
- Step 2: Users can continue to order on this transaction.
2.5. Void transaction
During the transaction process, customers can return the goods and the store will void the transaction.
2.5.1. Cash payment method
- Step 1: At the transaction where the payment method is Cash that
needs to be disabled, người
dùng
kích chọn
Void transaction.
![]()
● The system displays a void order confirmation message.
![]()
- Step 2:
● Press the Yes button, void transaction successfully. Press the No
button
to cancel.
![]()
● Void transaction successfully, order status changed from
Paid
to
Cancel
![]()
- Step 3: The cashier returns the money to the customer.
2.5.2. Credit card payment method
- Step 1: In a transaction with a Credit Card payment method
that needs to be voided, the user
clicks
Void transaction.
![]()
● The system displays a void order confirmation message.
![]()
- Step 2: Press the Yes button, the system displays detailed
transaction information.
![]()
- Step 3: Press the Void button.
![]()
● The POS machine displays a notification screen Please wait to processing.
![]()
● The Pax machine displays the Transaction ID input screen to proceed with disabling
the
transaction.
![]()
- Step 4: Enter the Transaction ID of the transaction to be
voided into the Pax machine.
![]()
- Step 4: Press the Enter button on the Pax machine.
After successfully void the transaction, order status changes to Cancel
2.6. Refund transaction
2.6.1. Cash payment method
Refund to customers when customers pay by cash:
- Step 1: In the transaction where the payment method is Cash that
needs to be refunded, the user
press the
Refund transaction
button.
![]()
● The system displays a void order confirmation message
![]()
- Step 2:
● Press the Yes button, refund the transaction successfully. Press the
No
button to cancel.
![]()
● The transaction was refunded successfully, order status changed from
Paid
to
Cancel
![]()
- Step 3: The cashier returns the money to the customer.
2.6.2. Credit card payment method:
- Step 1: In a transaction where the payment method is Credit Card
that needs to be refunded, the
user
clicks on
Void transaction.
![]()
● The system displays a void order confirmation message.
![]()
- Step 2: Press the Yes button, the system displays detailed
transaction information.
![]()
- Step 3: Press the Refund button.
![]()
● The POS machine displays a notification Please wait to processing.
![]()
● At the Pax machine, a screen is displayed to enter the amount to be refunded to the customer to proceed with refunding
the
order.
- Step 4: The user enters the amount to be refunded to the customer into the Pax machine.
- Step 4: Press the Enter button on the Pax machine.
● The system displays the card scanning screen, the user scans the card.
After a successful refund, order status changes to Cancel
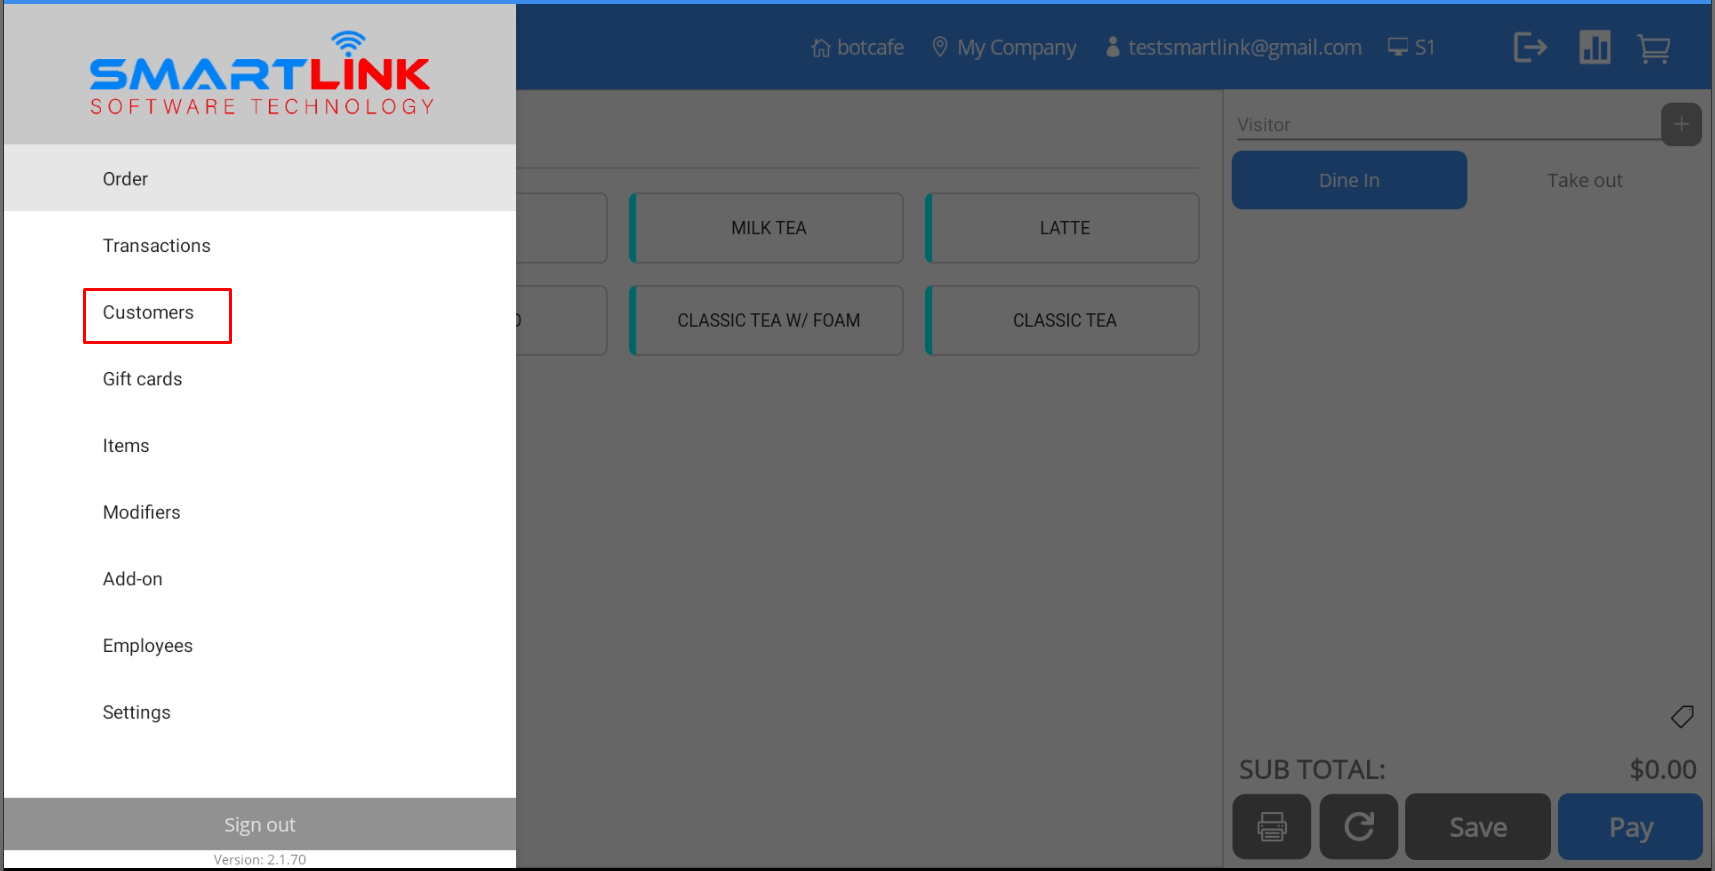
Customer management
To manage customers, follow these steps:
- Step 1: Press the Menu button on the left corner of the
screen.

● The system displays a side-bar.

- Step 2:
● Press the Customer category.
3.1. Add new customer
To add new customer information, follow these steps:
- Step 1: On the Customer screen, press the Add
button.
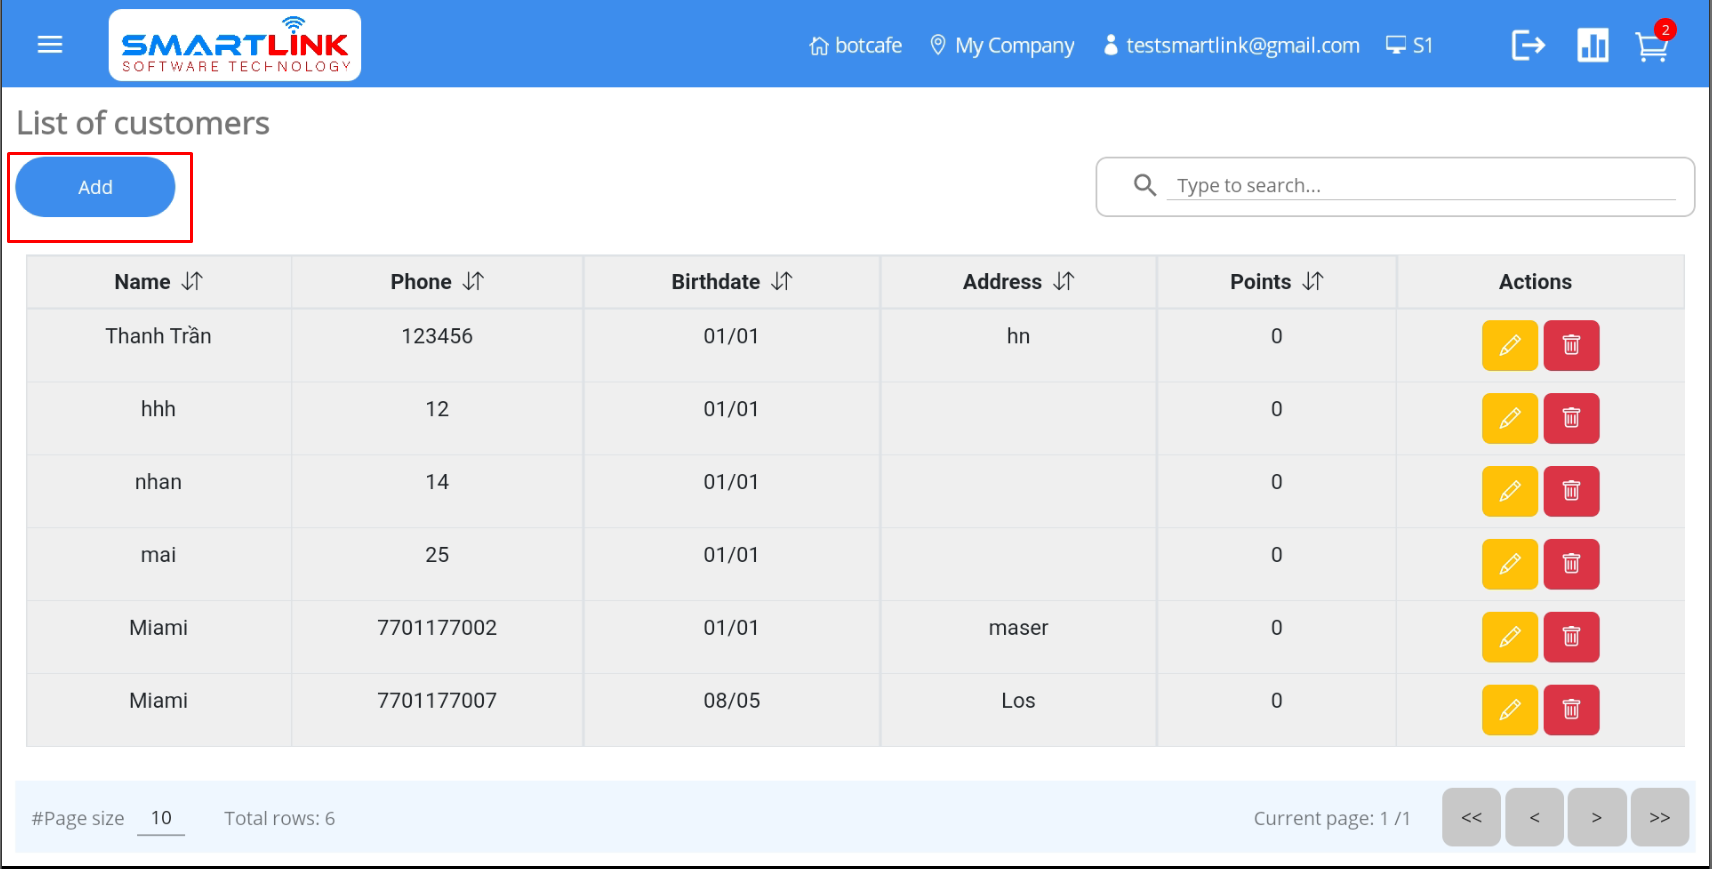
● The system displays a screen to add new customer information.

- Step 2: The user enters complete customer information into the fields such as Name,
Phone number
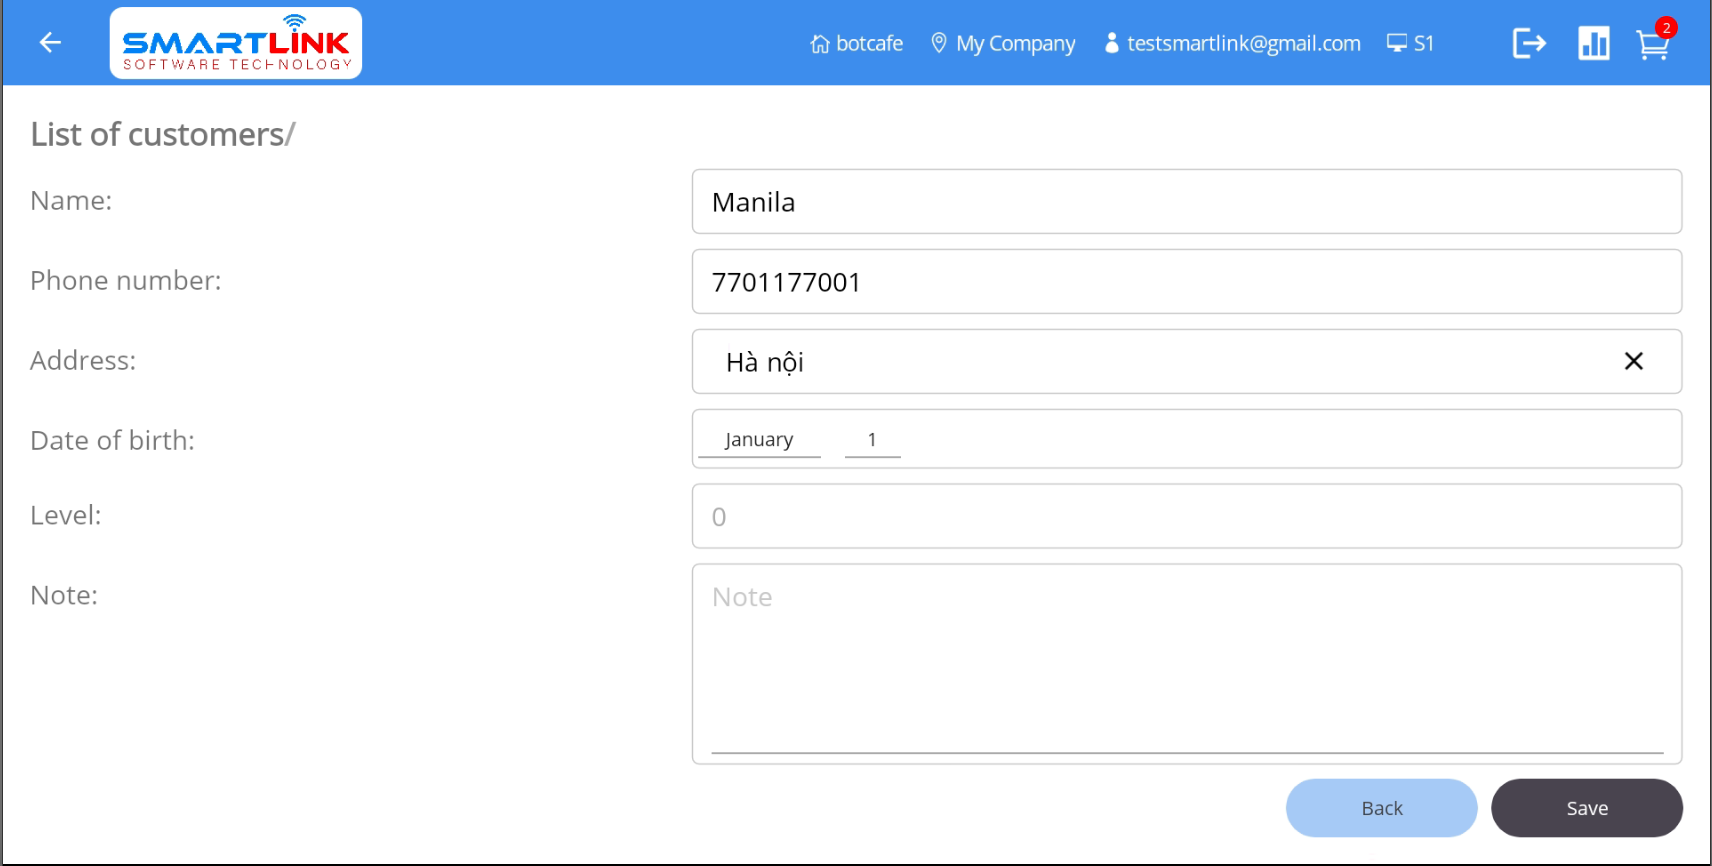
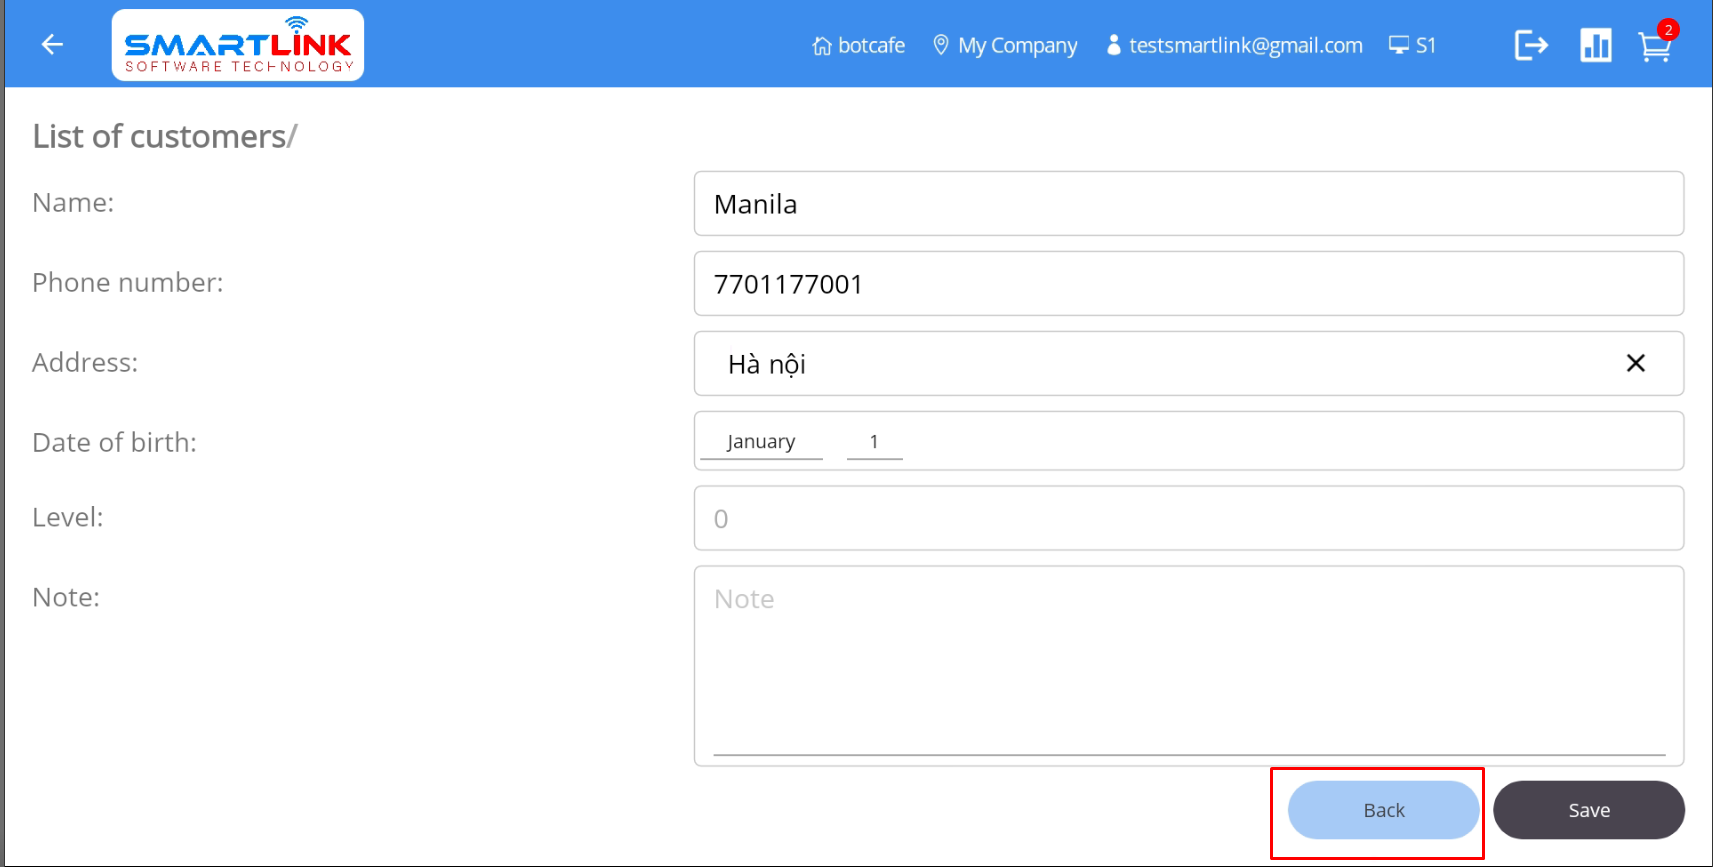
- Step 3: Press the Save button to save a new customer
information. Press the Back
button if you want to cancel.
- Step 4: Successfully added new customer information, the system displays the newly created
customer information on the customer
list.
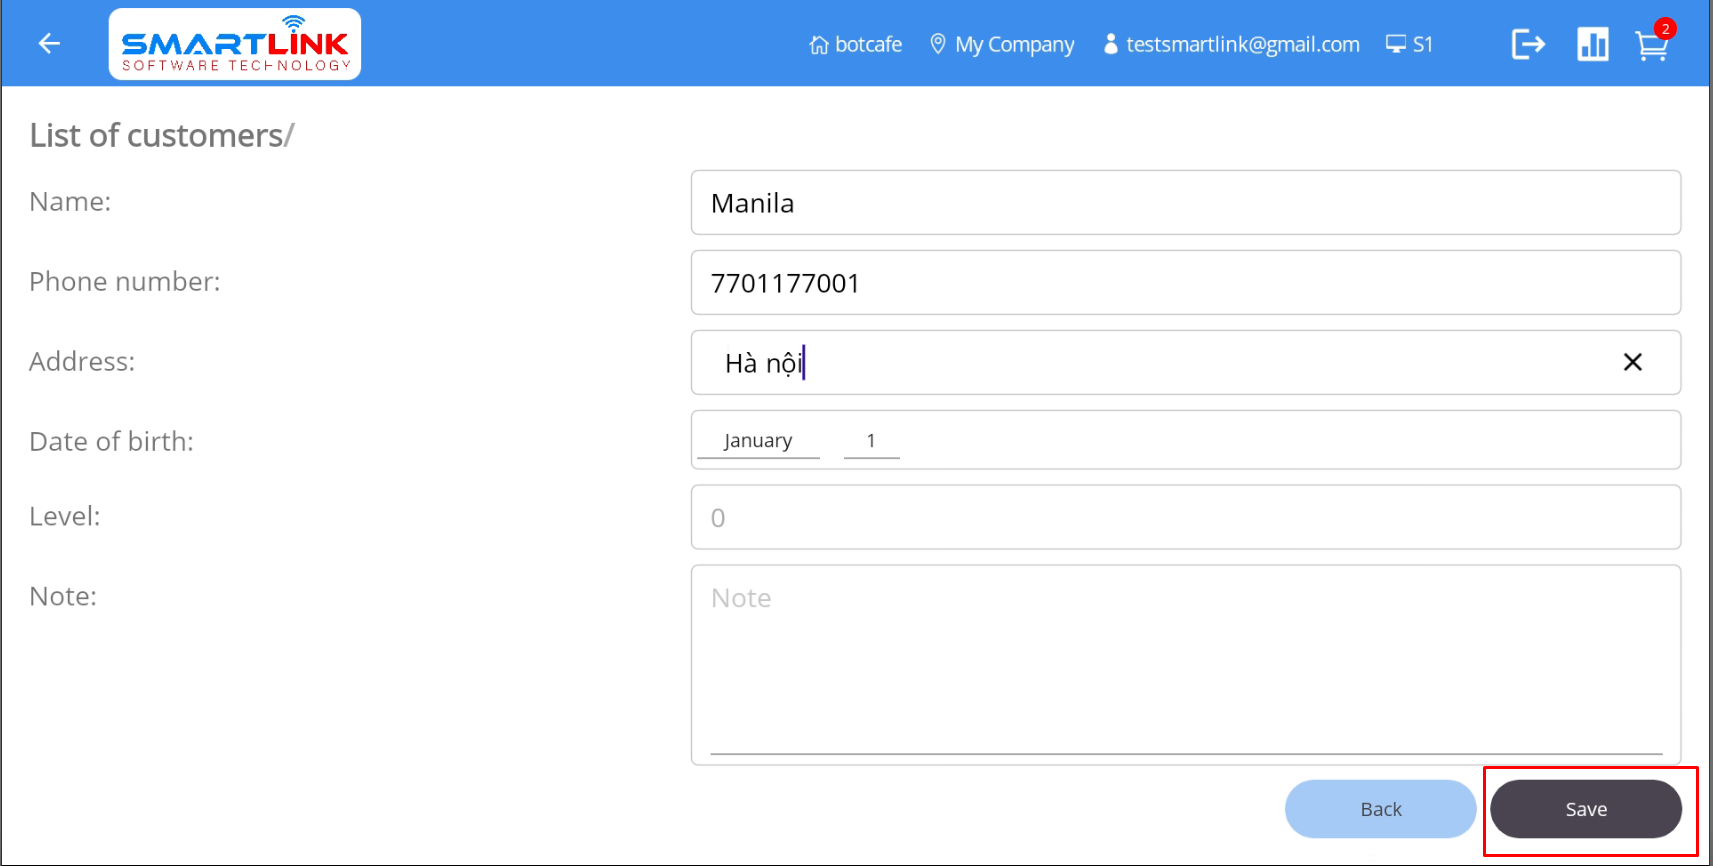
3.2. Edit customer information
To edit customer information, follow these steps:
- Step 1: On the Customer screen, press the Edit
button.
● The system displays detailed customer information.
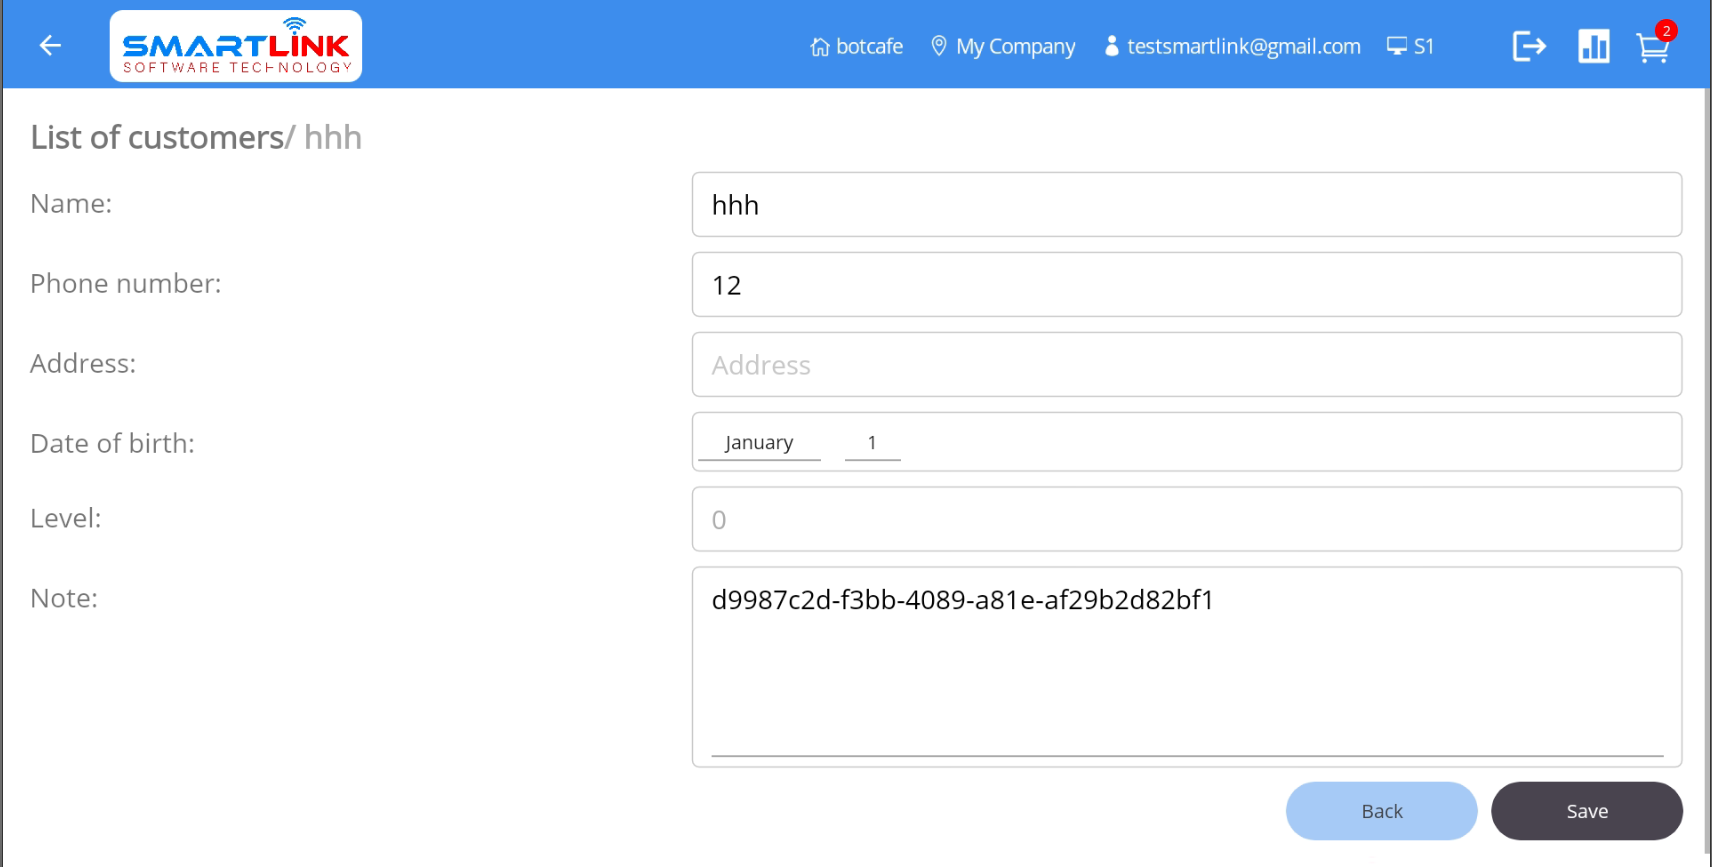
- Step 2: Enter the information to be edited

- Step 3: Press the Save button to save a new customer
information. Press the Back
button if you want to cancel.
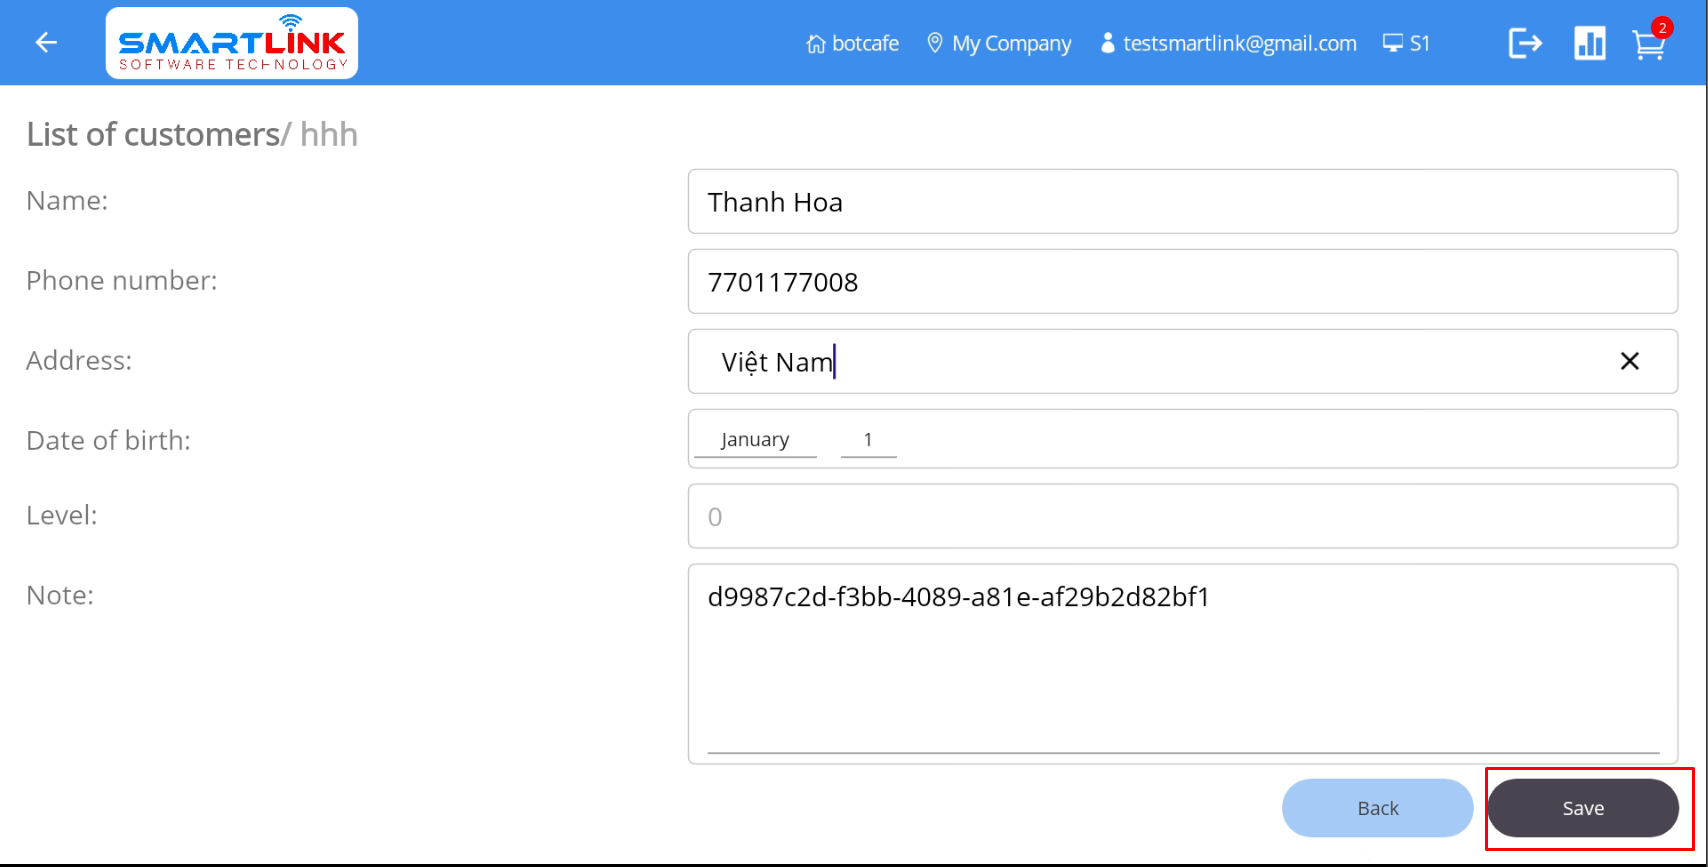
- Step 4: Successfully edited new customer information, the system displays the newly edited
customer information on the customer
list.
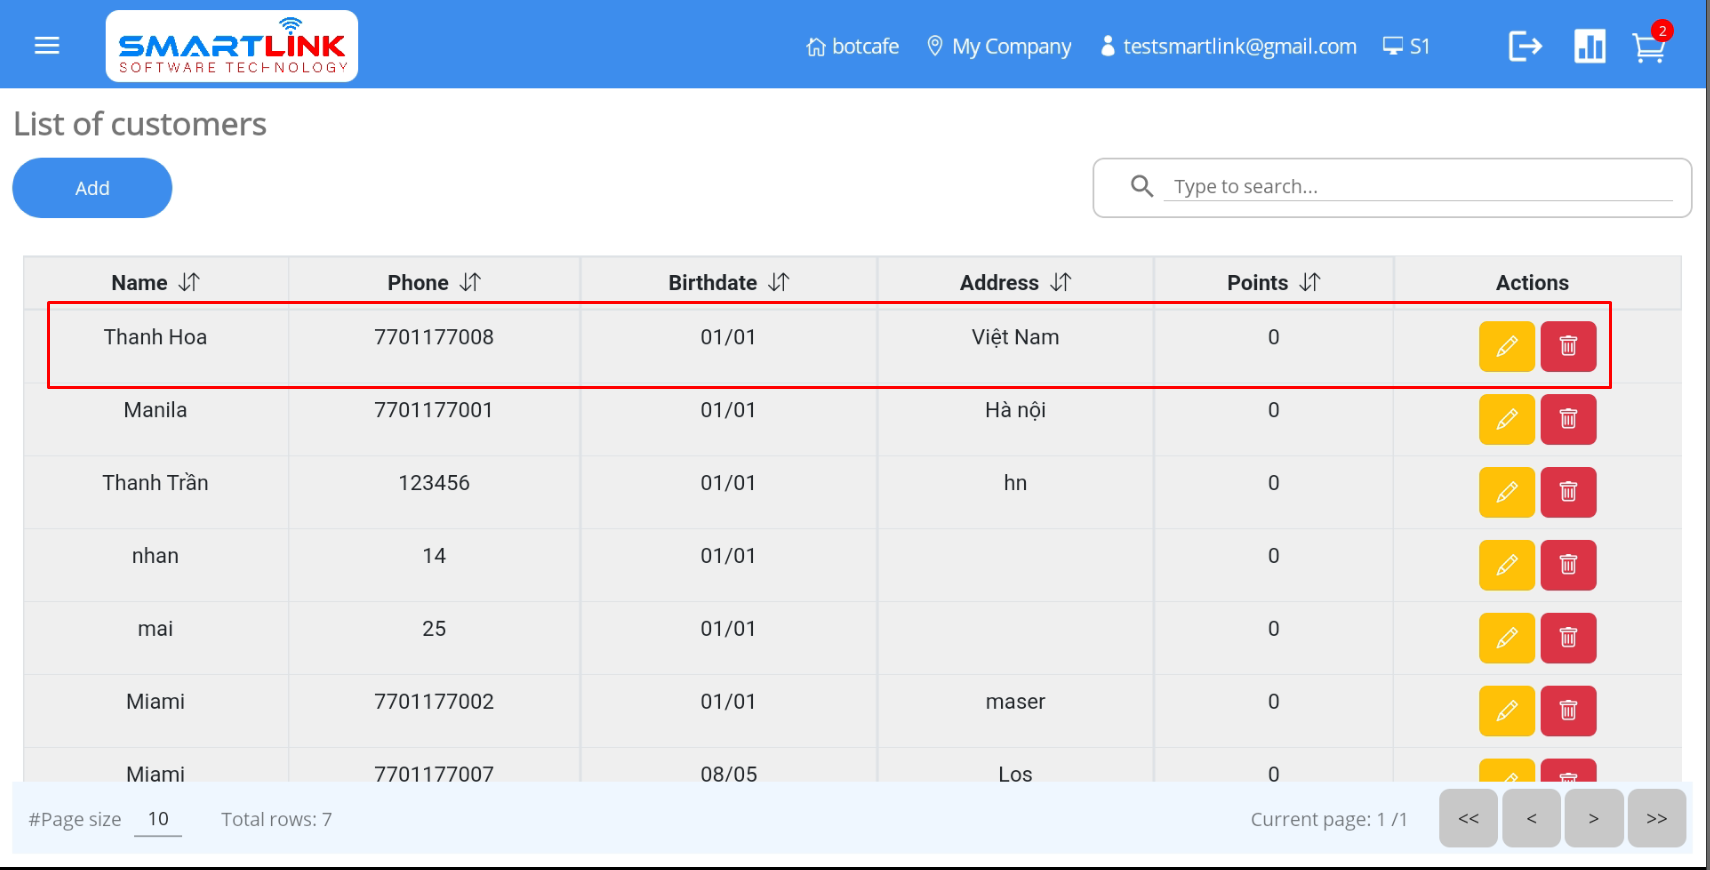
3.3. Delete customer information
To delete customer information, follow these steps:
- Step 1: On the Customer screen, press the Delete
button.
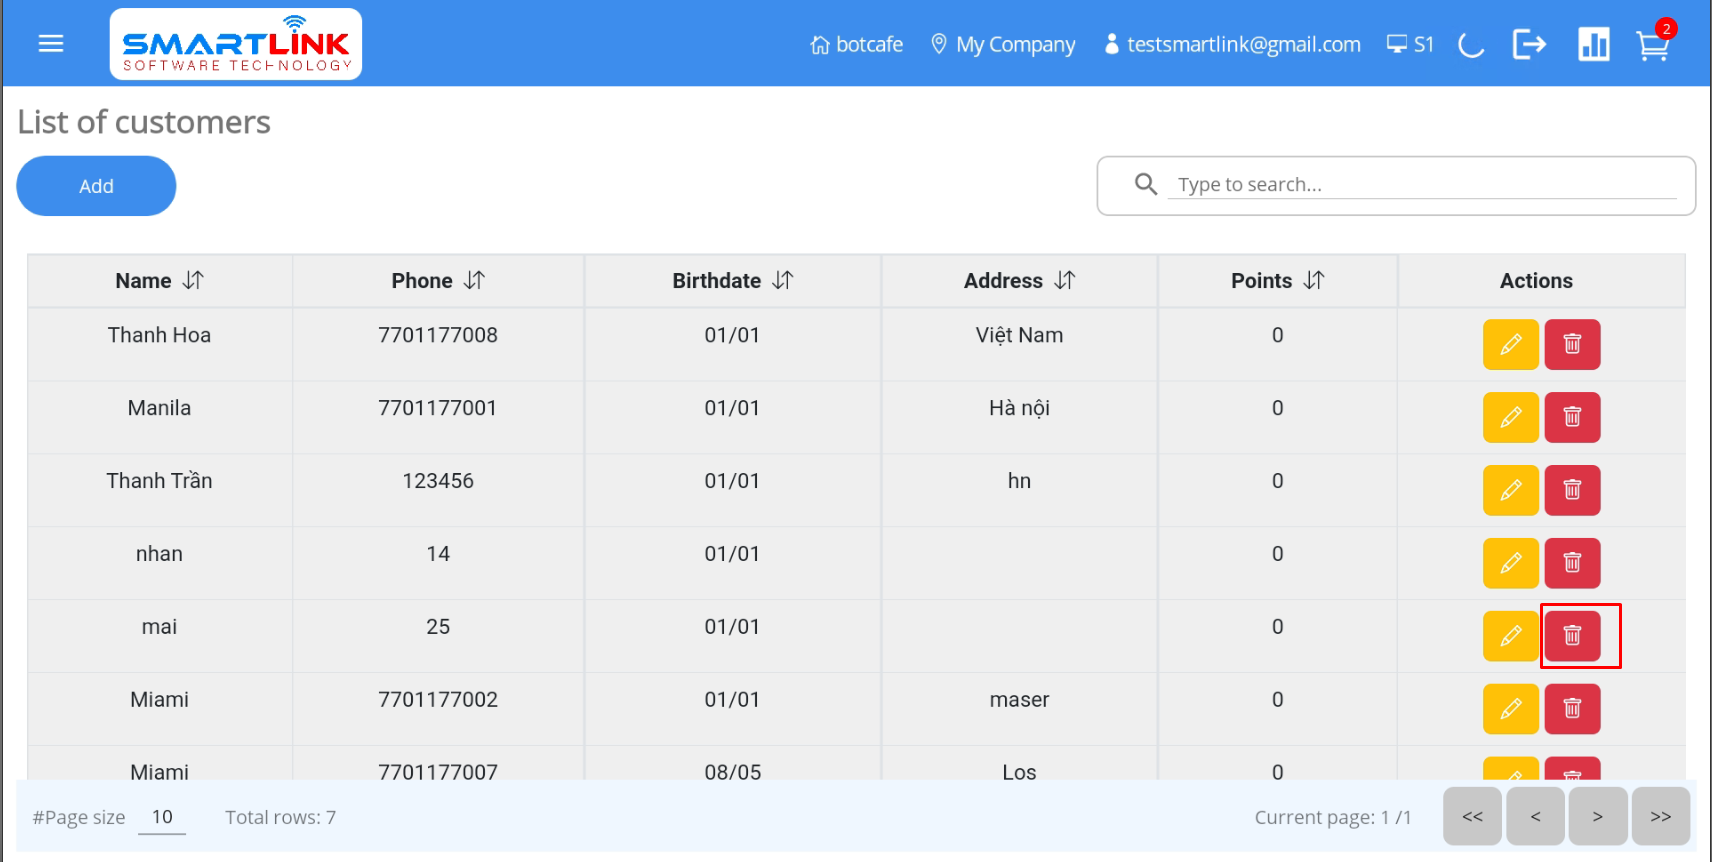
● The system displays a confirmation screen to delete customer information.
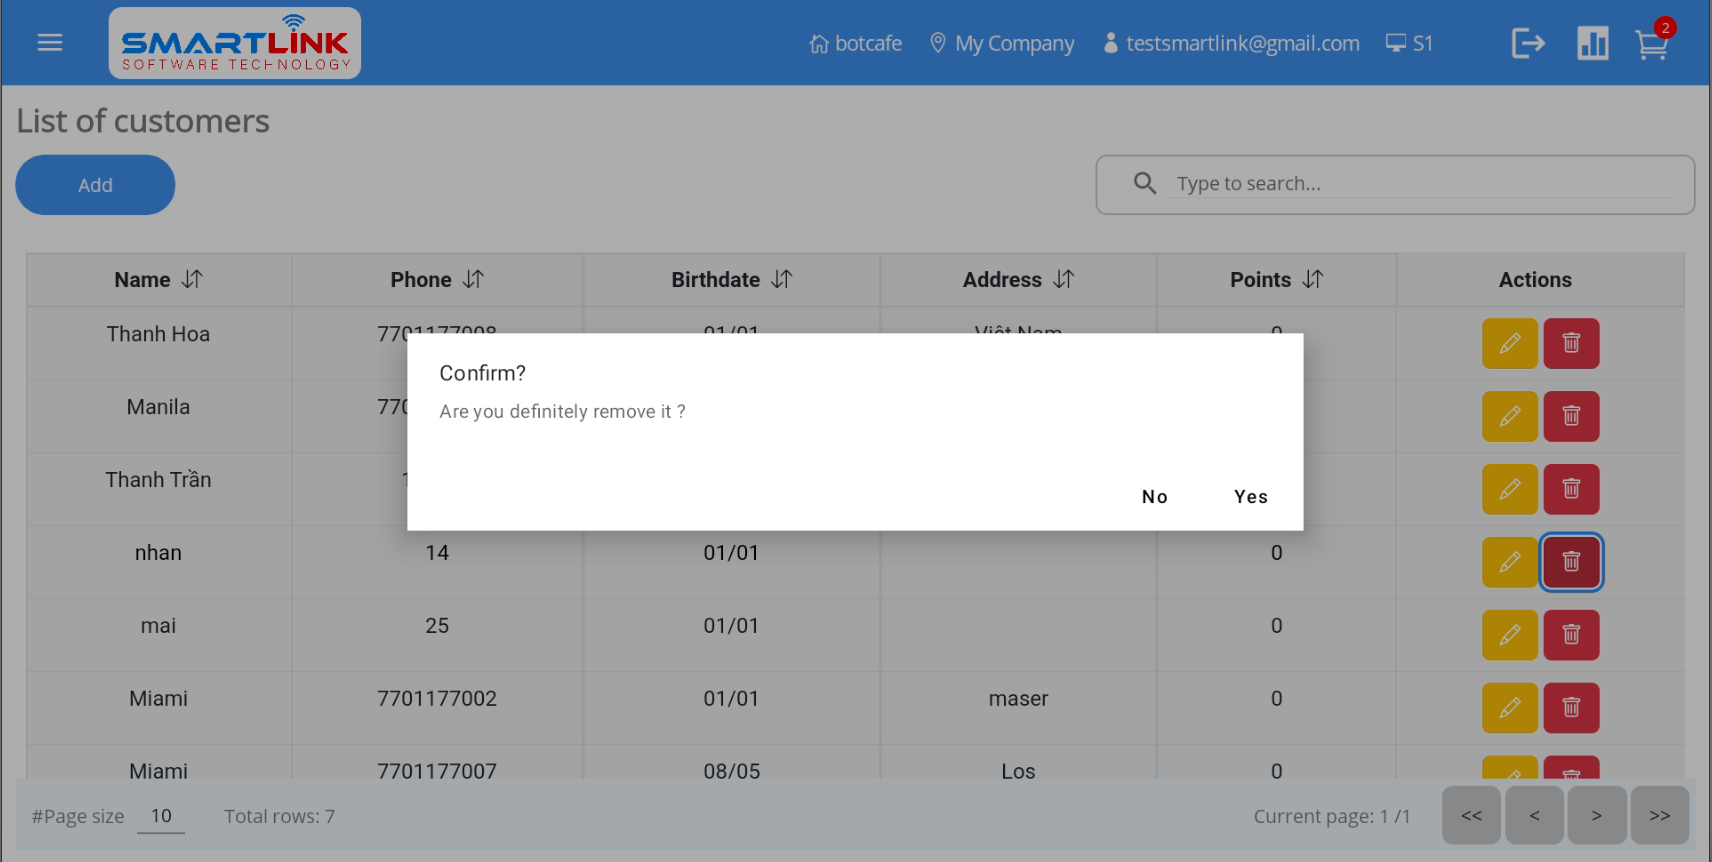
- Step 2: Press the Yes button to delete customer information.
Press the No
button to cancel.
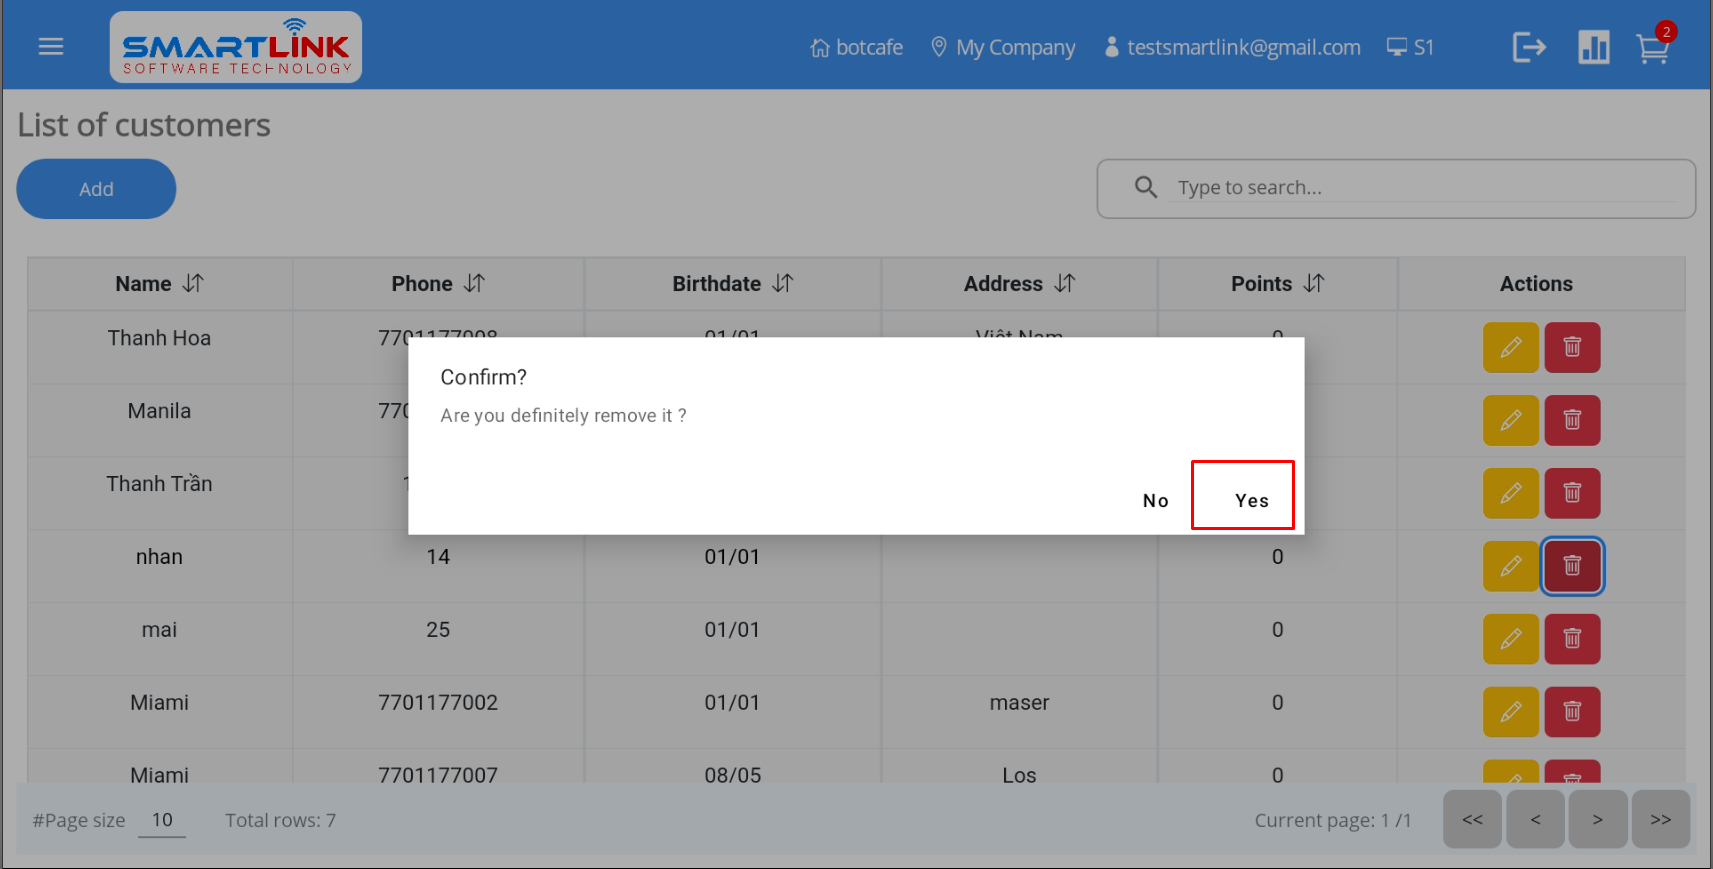
- Step 3: After successfully deleting new customer information, the system returns to the customer
screen without the deleted
customer information.
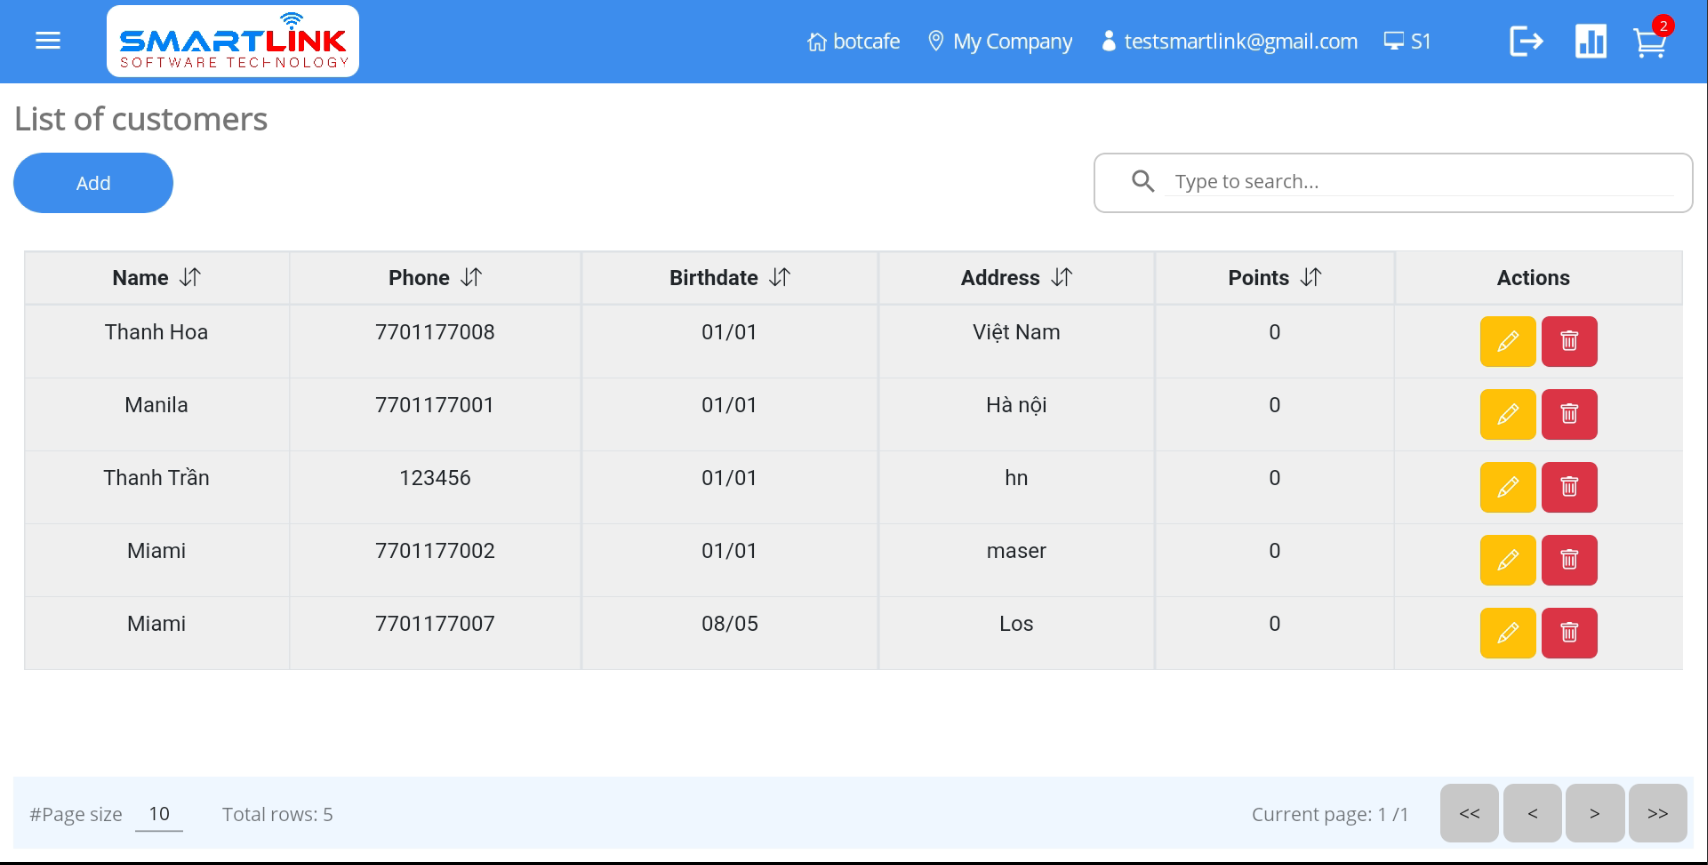
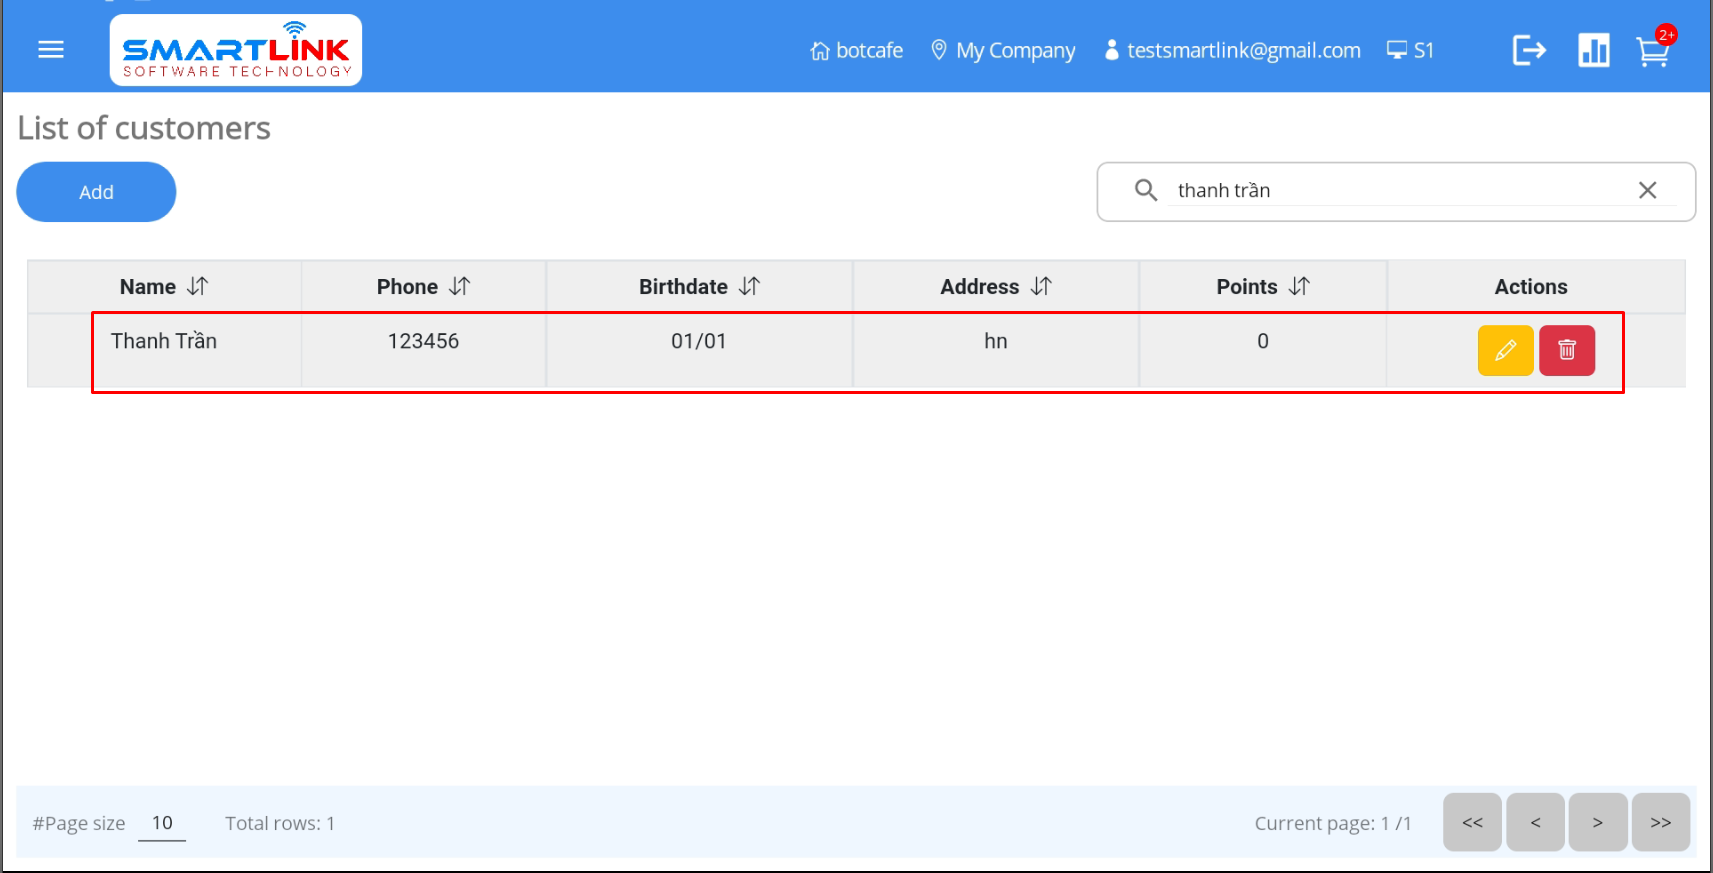
3.4. Search for customer information
To search for customer information, follow these steps:
- Step 1: Users enter customer search information into the search bar.
● Search customer information by customer name
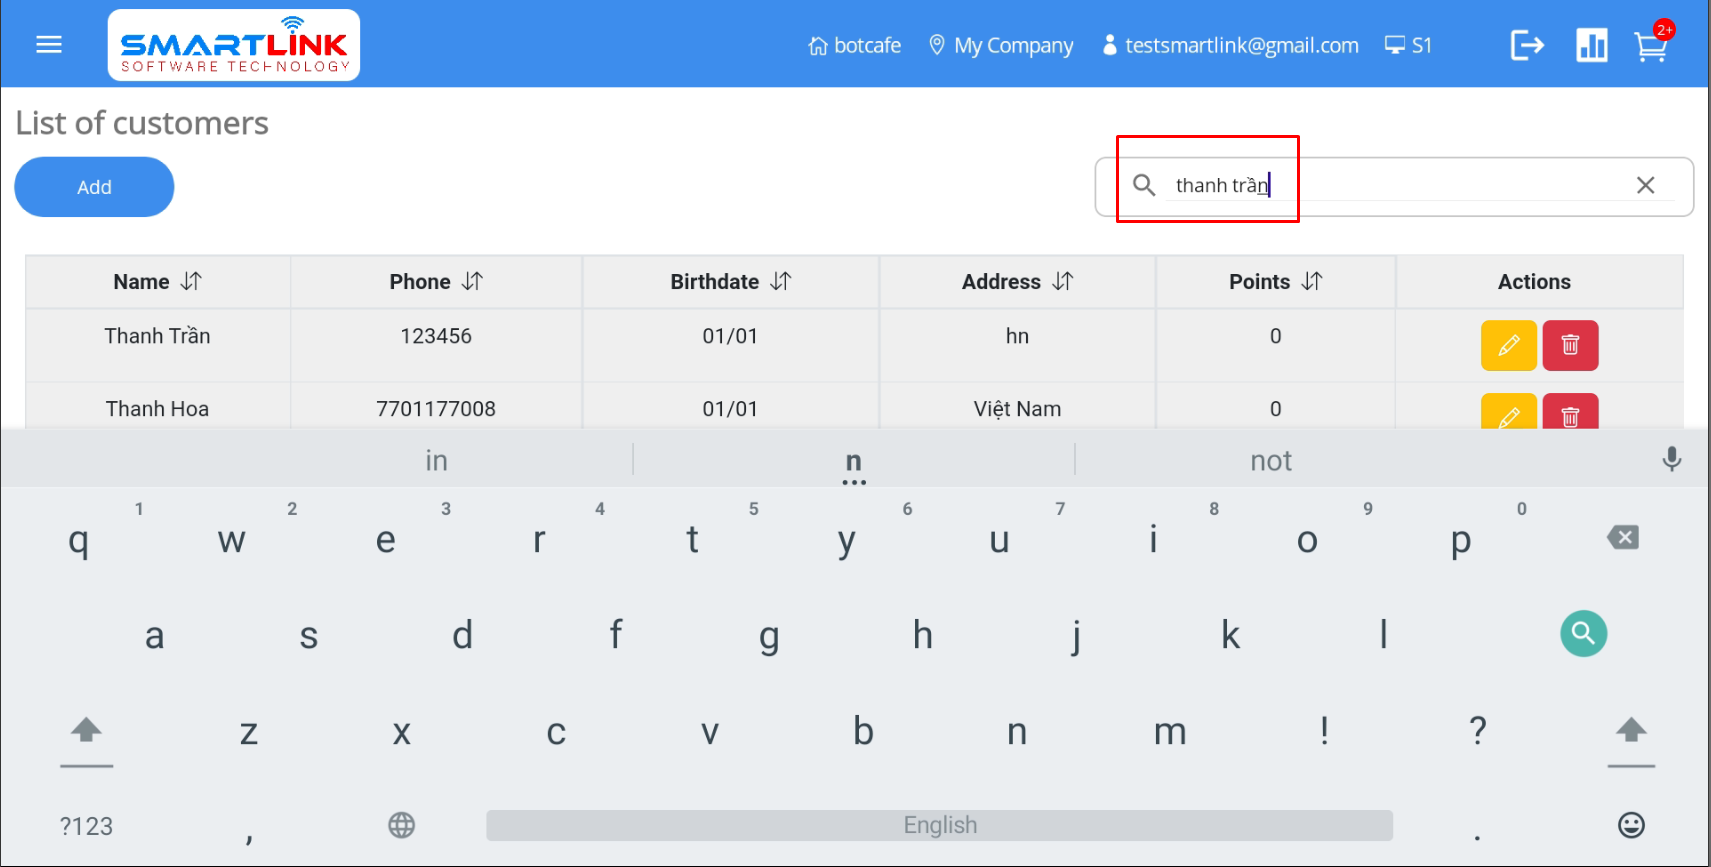
● Search customer information by phone number
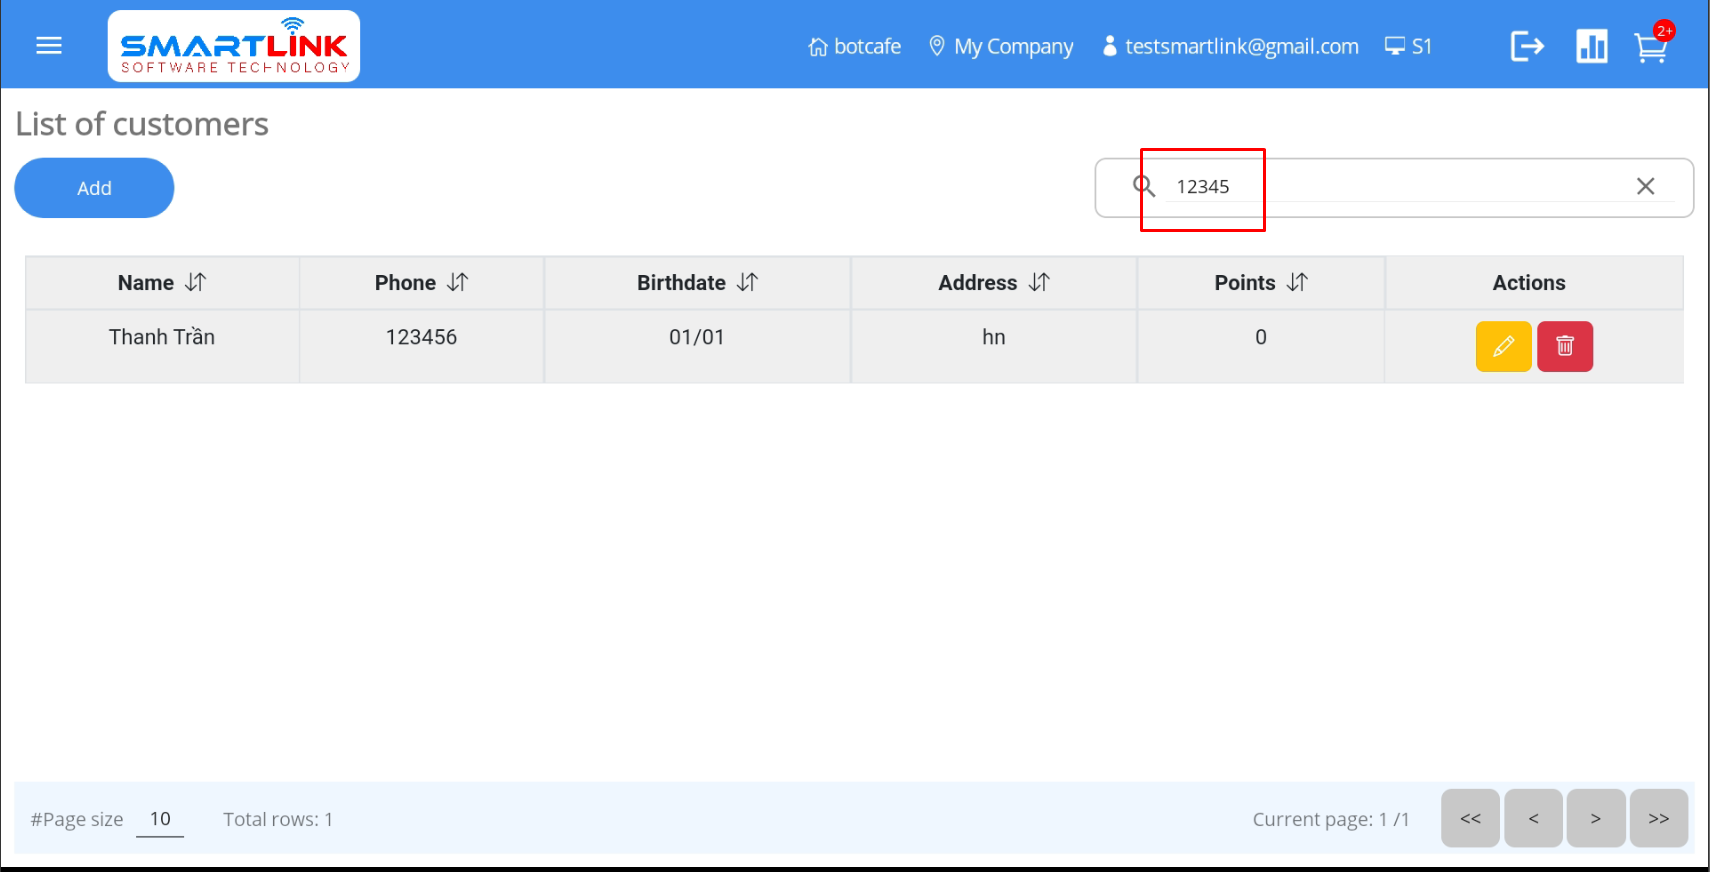
- Step 2: Press the Search button on the keyboard.
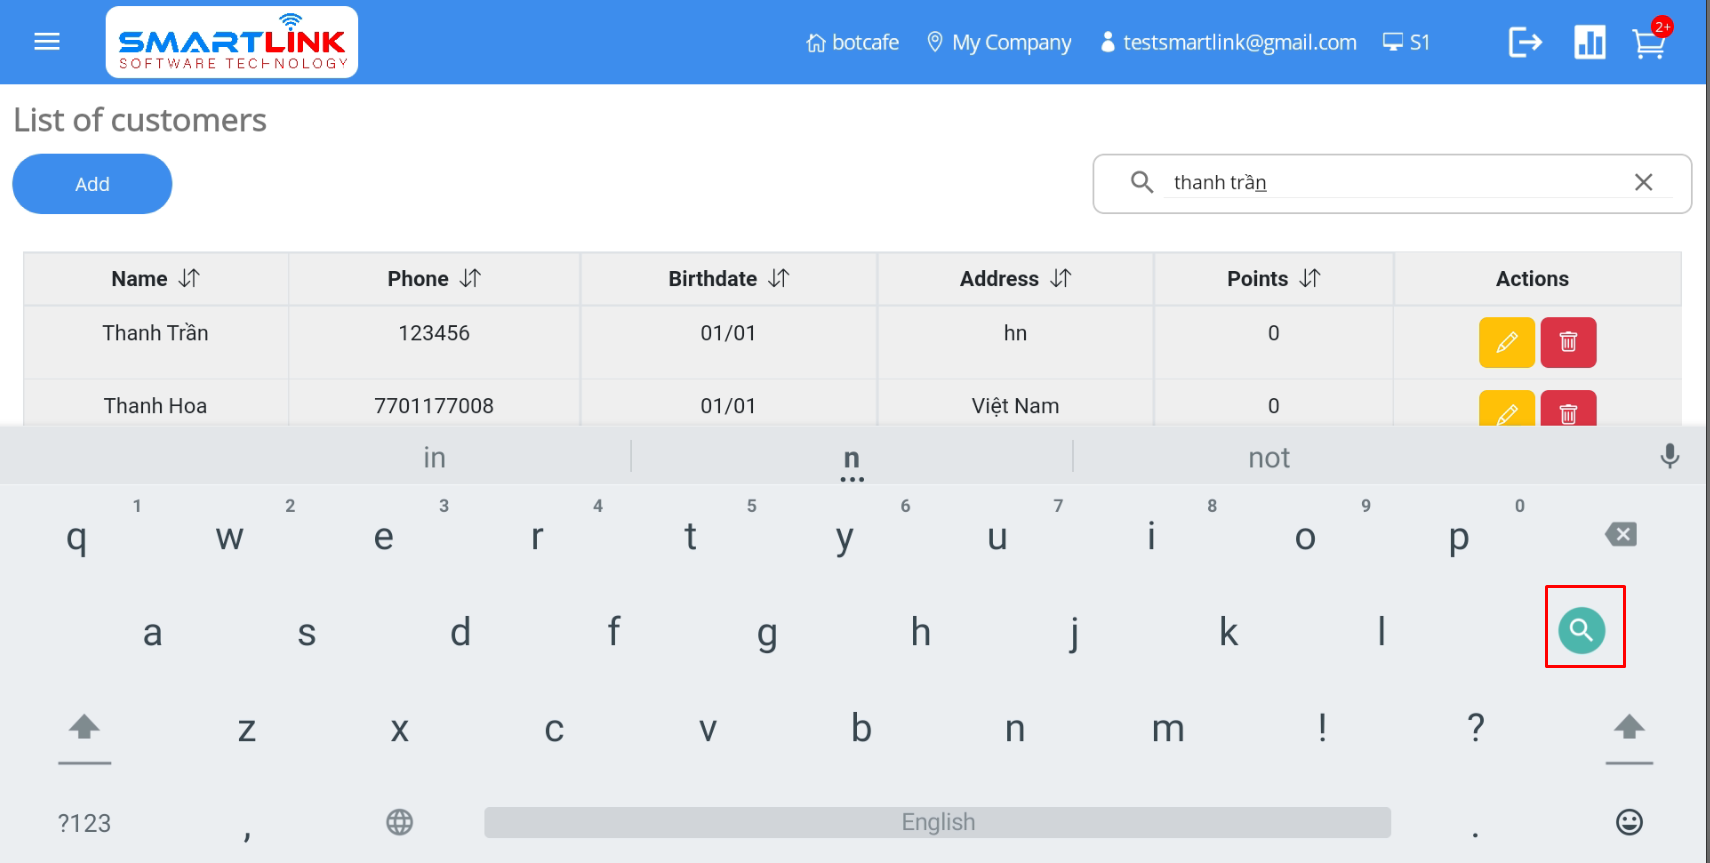
- Step 3: The system returns results that related the search information.
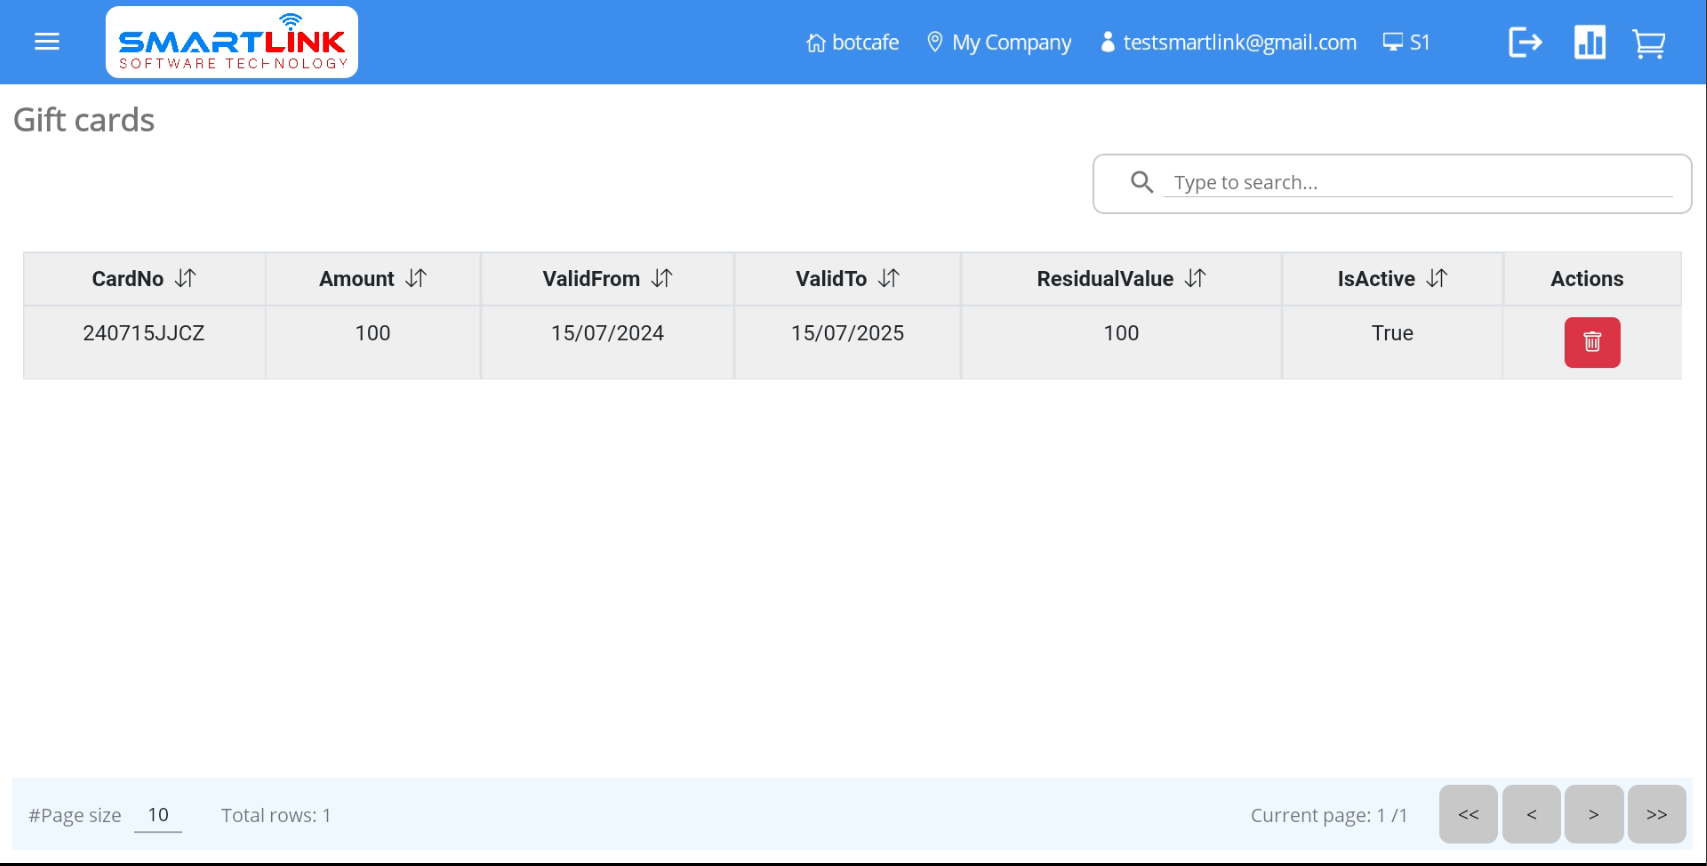
Gift card management
Information about gift cards sold to customers will be displayed on the gift card screen.
To manage gift cards, follow these steps:
- Step 1: Press the Menu button on the left corner of the
screen.

● The system displays a side-bar.

- Step 2:
● Press the Gift card category.
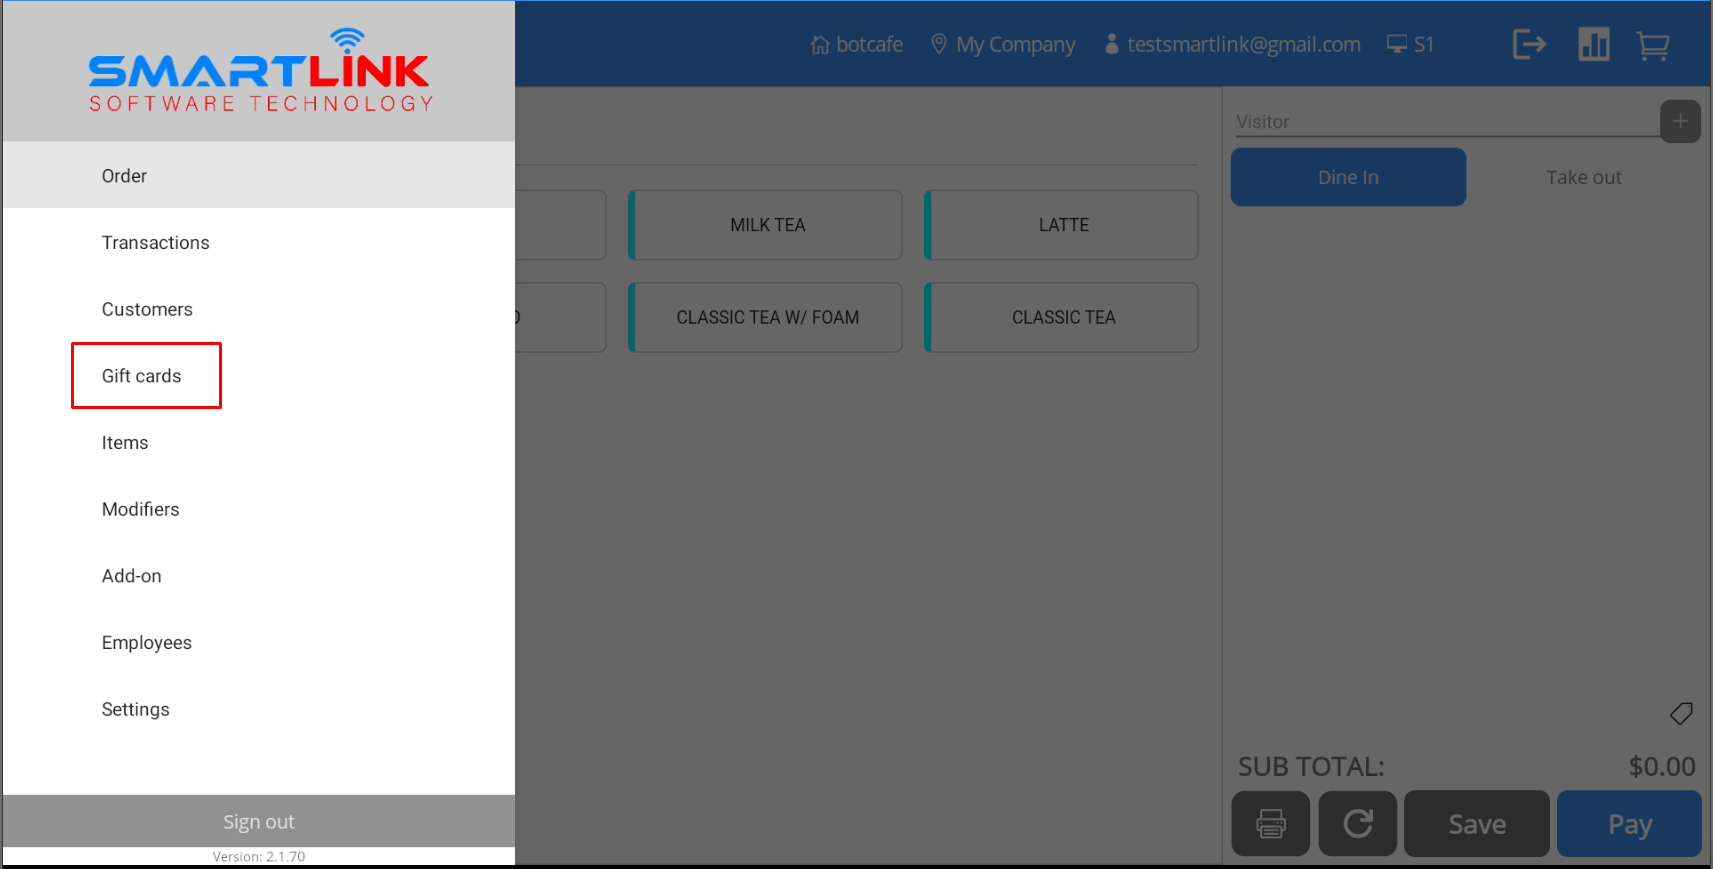
● The system displays a list of gift cards.

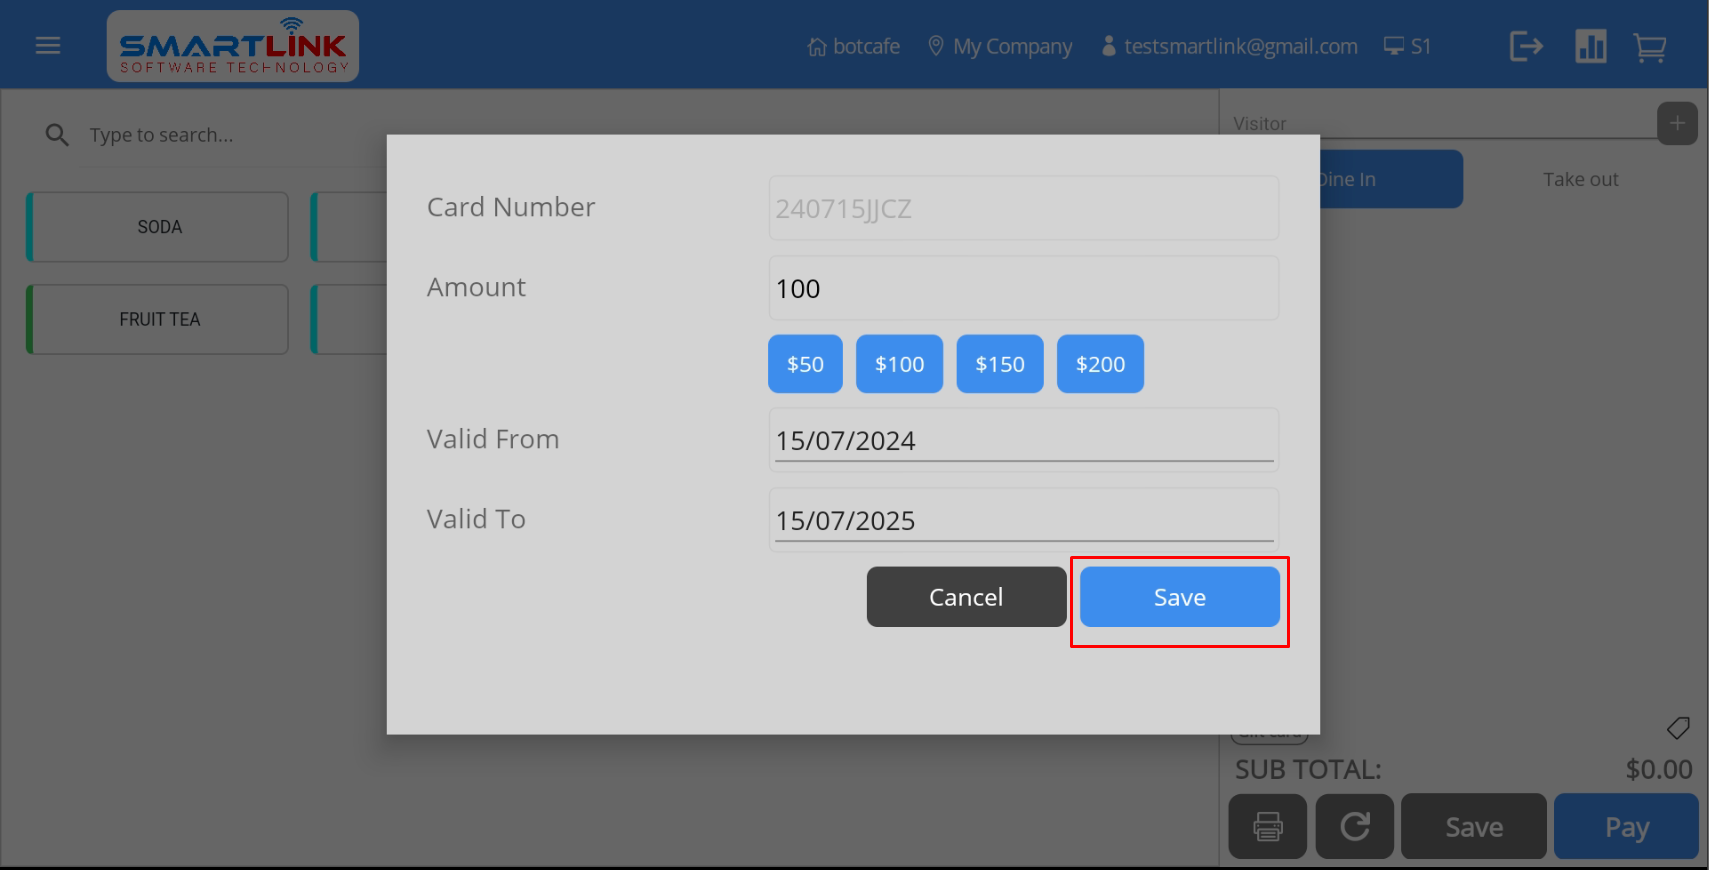
4.1. Add new gift card
To add new gift card information, follow these steps:
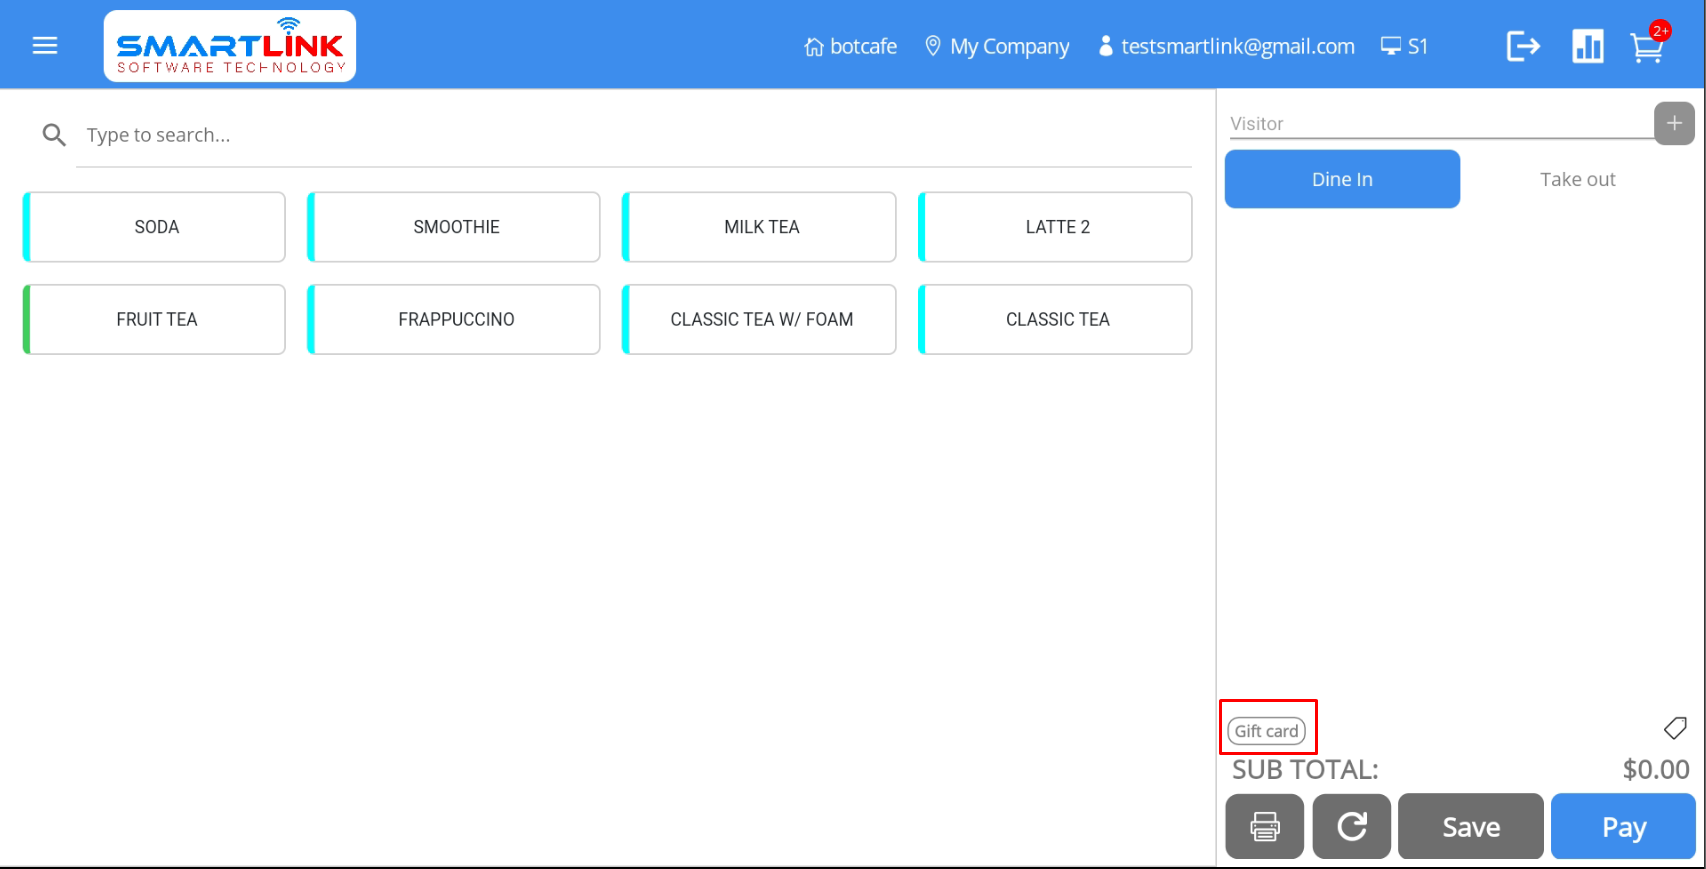
- Step 1: On the Main screen, press the Gift card
button.

● The system displays a the gift card purchase screen.
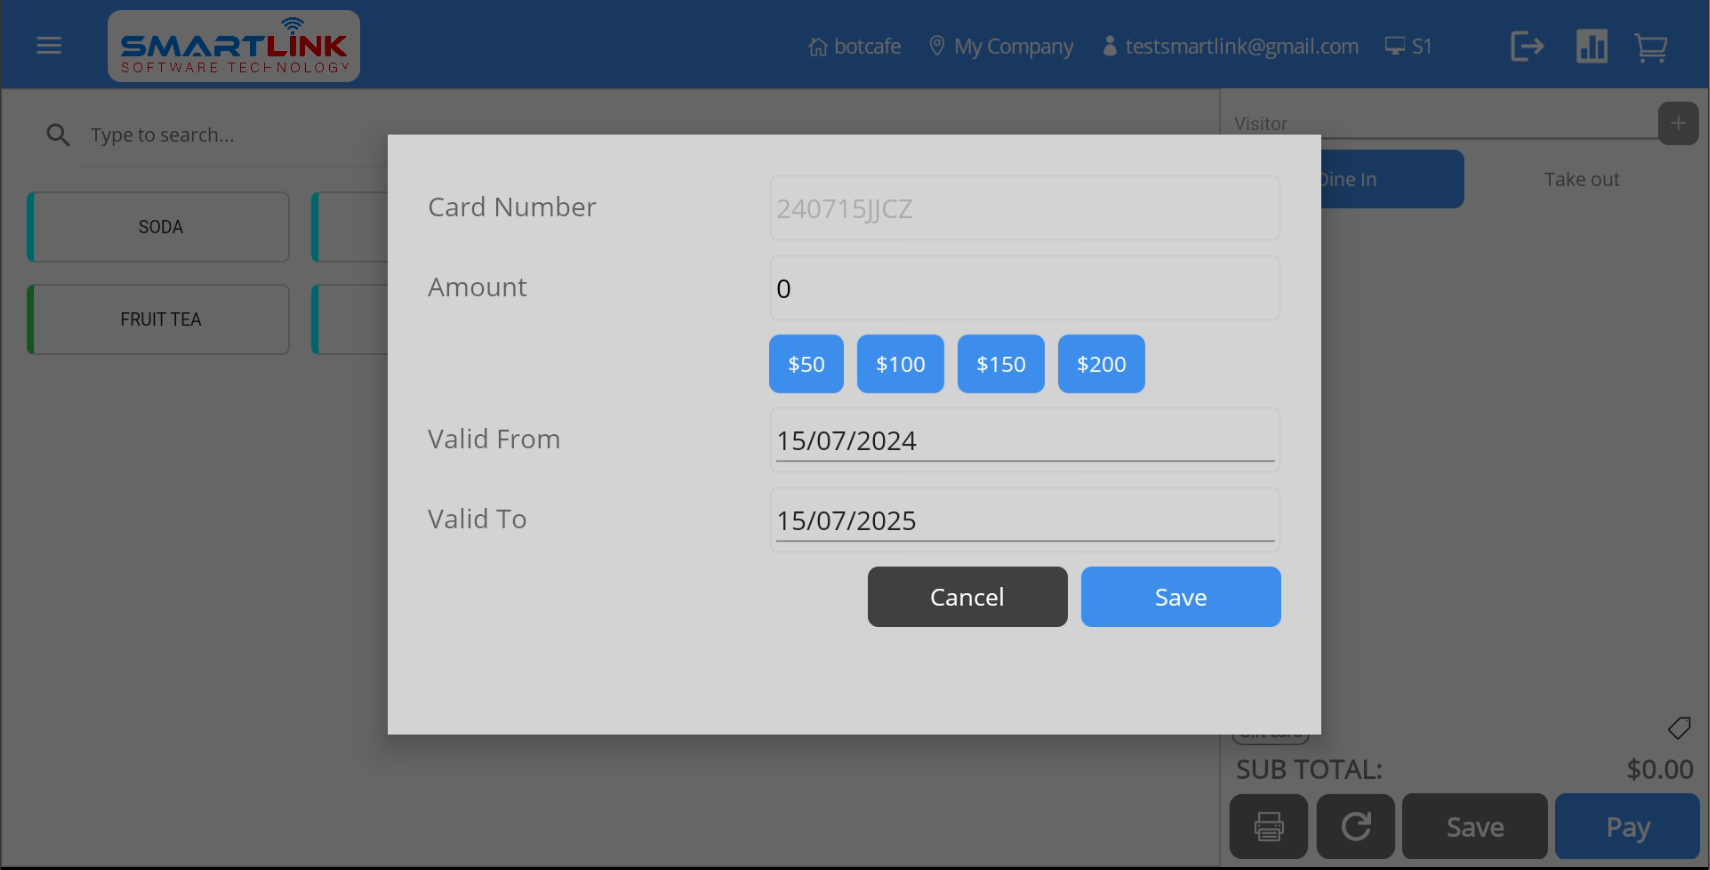
- Step 2: Enter complete gift card information into the fields
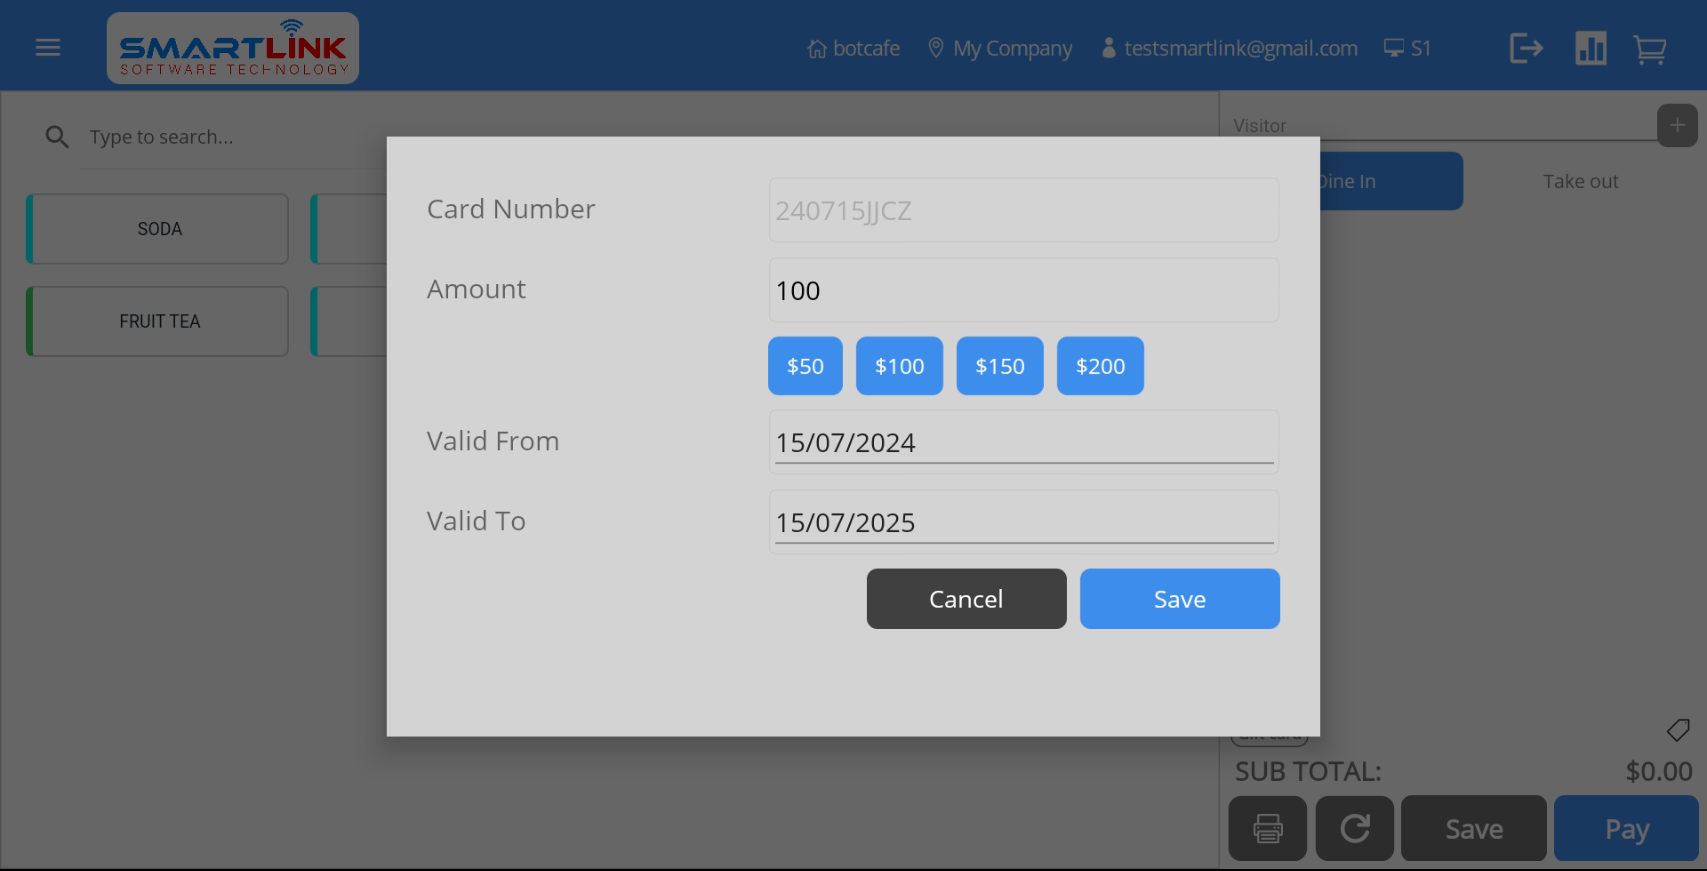
- Step 3: Press the Save button to save a new gift card. If not,
press the Cancel
button.
- Step 4: After successfully purchasing a gift card, gift card information is displayed on the
gift card list screen.
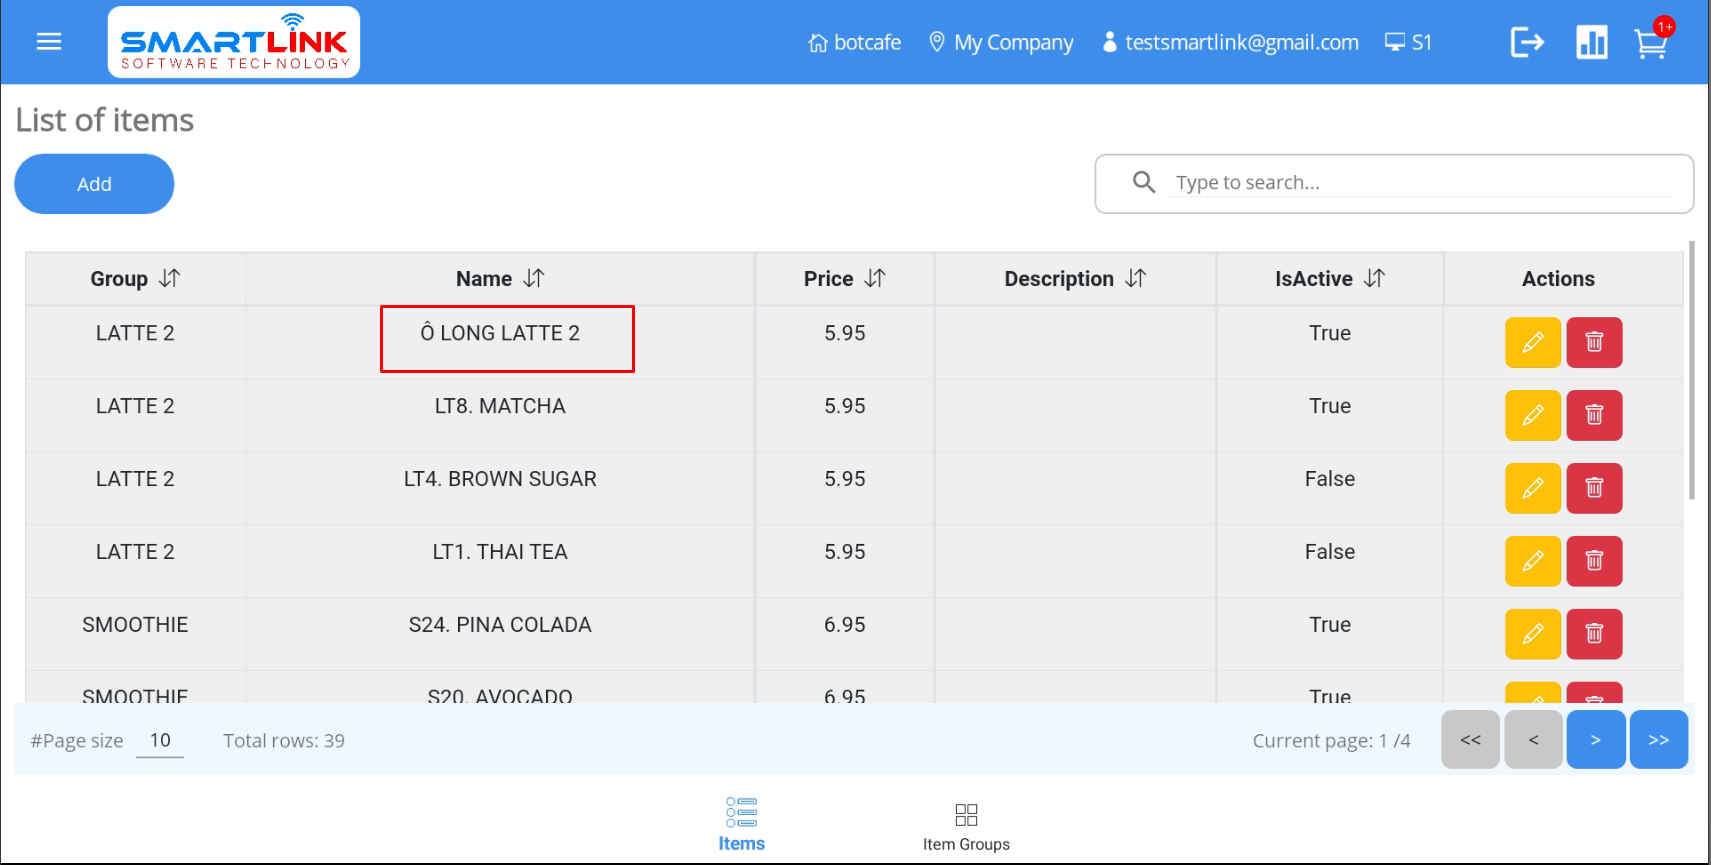
Items & item groups management
5.1. Items
To manage items, follow these steps:
- Step 1: Press the Menu button on the left corner of the
screen.

● The system displays a side-bar.
- Step 2:
● Press the Items category.

● The system displays a list of items.

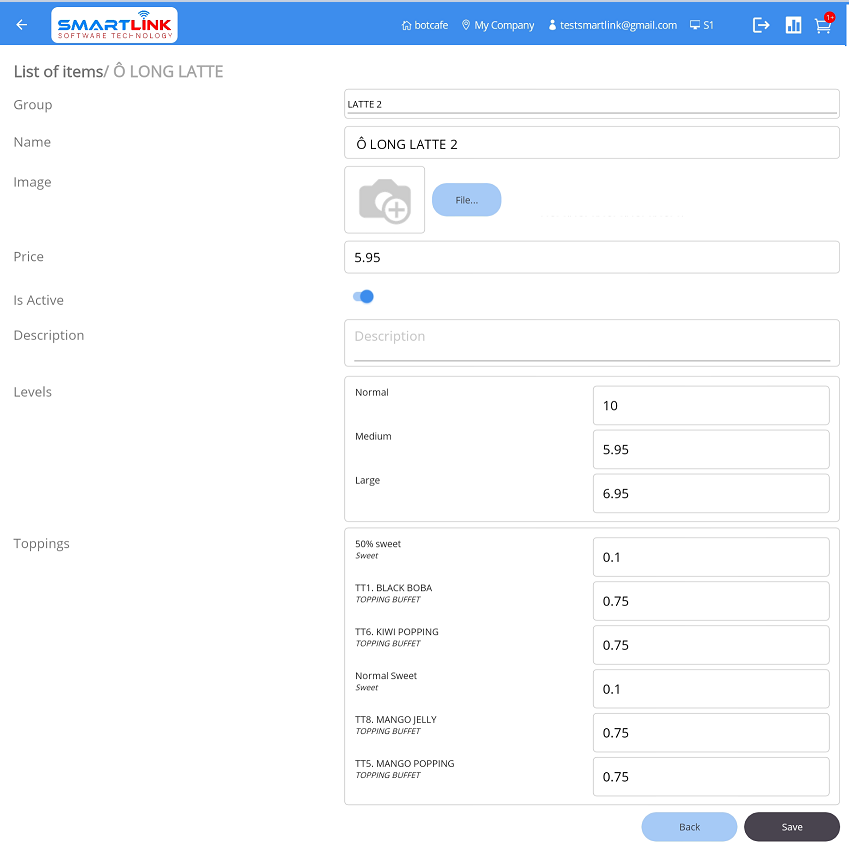
5.1.1. Add new item
To add new item, follow these steps:
- Step 1: On the Items screen, press the Add
button.
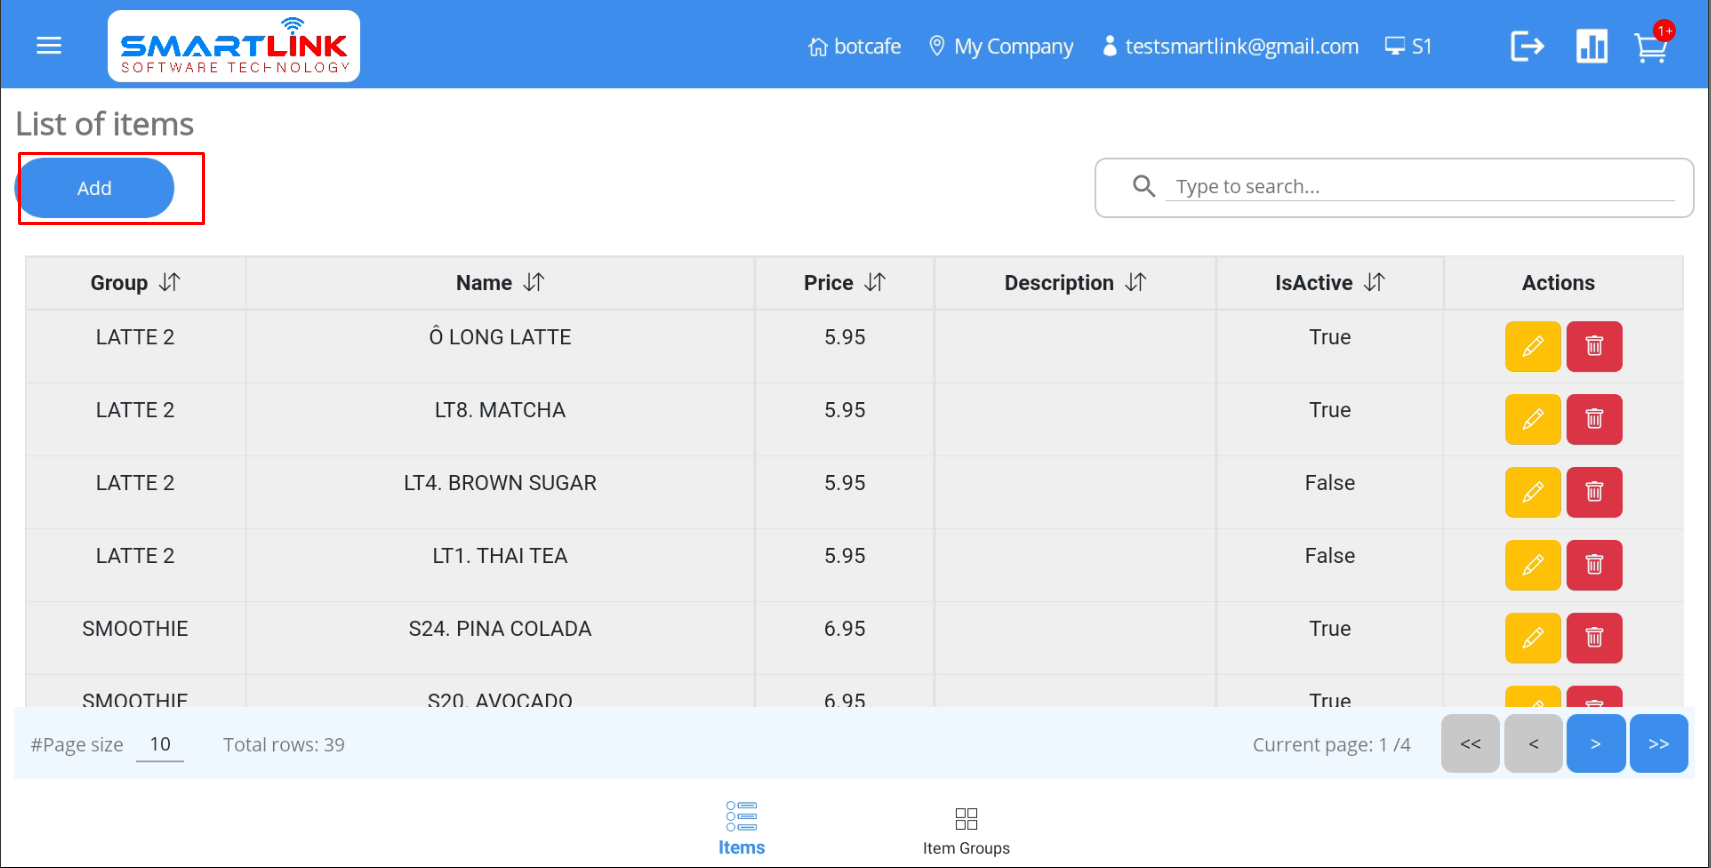
● The system displays a screen to add new item.
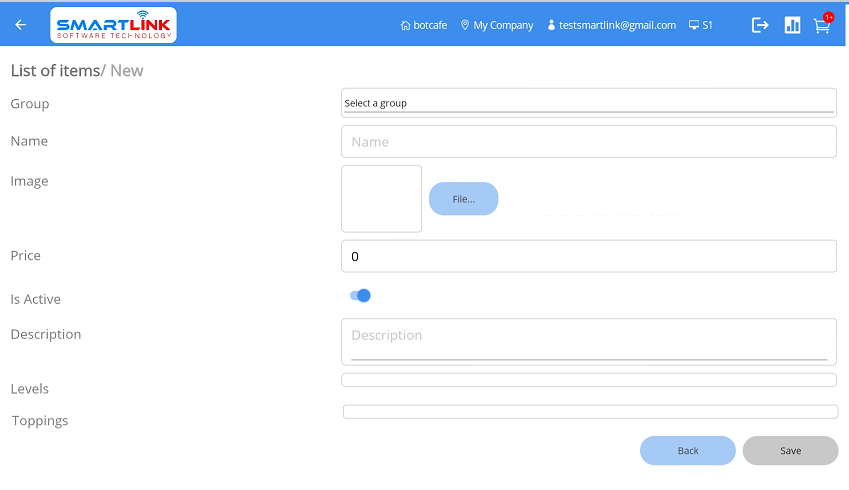
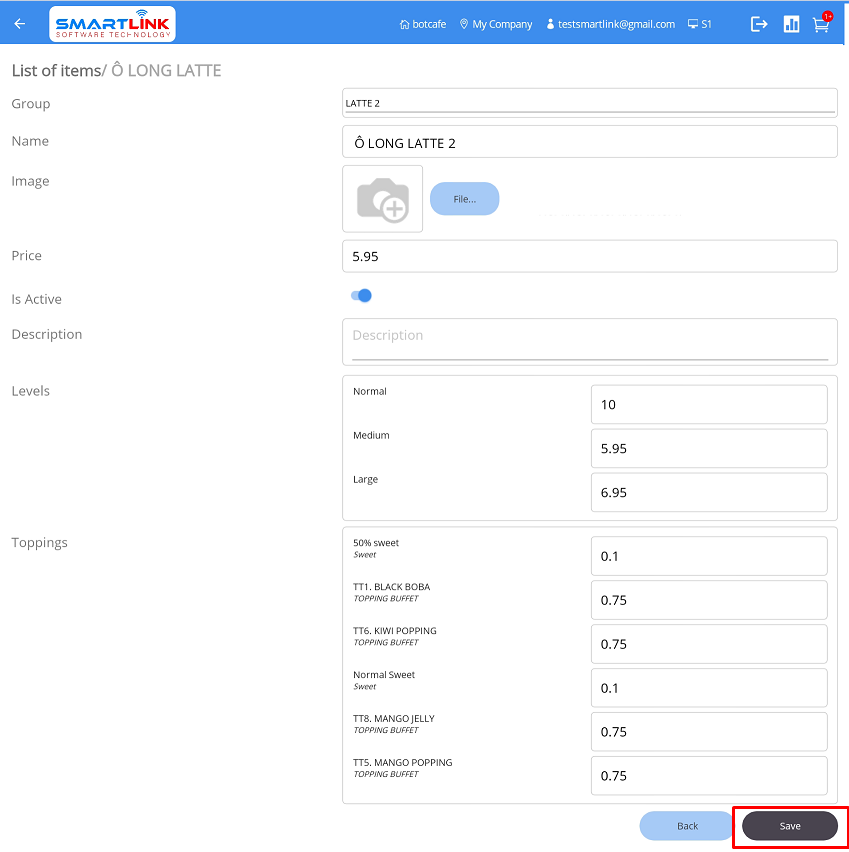
- Step 2: Enter complete information into the fields.
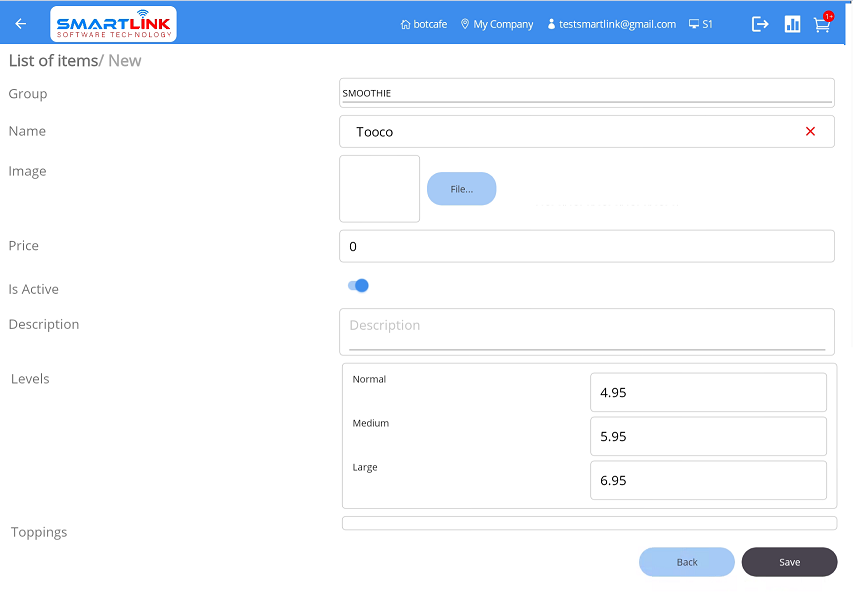
- Step 3: Press the Save button to save a new item. Press the Back
button to cancel.
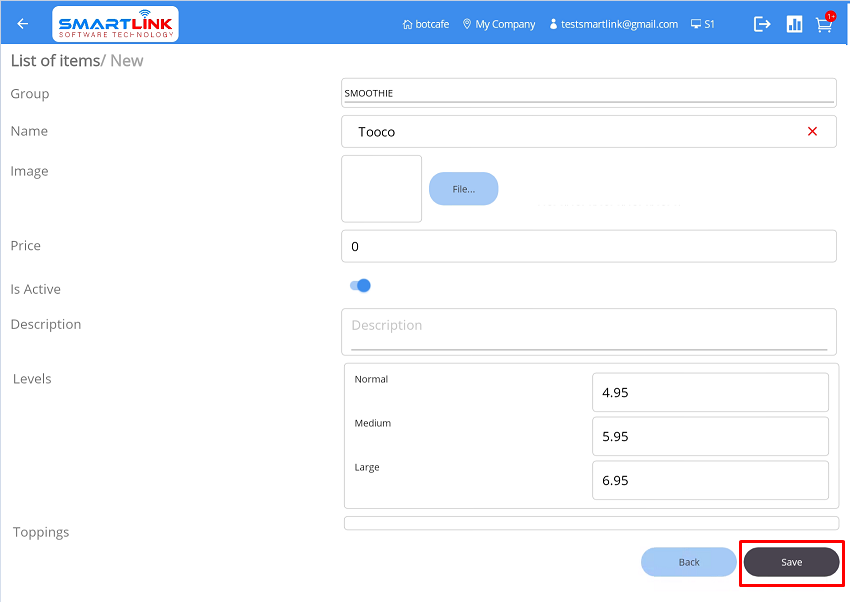
- Step 4: Successfully added new item, the system displays the newly created item on the customer
list.

Note:
● In the same item group, item names cannot be the same.
● The user forces step to create at least one item group before creating the item.
● Modifiers and Add-ons will be automatically
received
according
to the item group that the user selects.
● The price of modifiers will be the selling price of the item.
● Items with a status of Inactive will not be displayed on the main transaction screen
and
vice
versa.
5.1.2 Edit item
To edit an item, follow these steps:
- Step 1: On the Items screen, press the Edit
button.
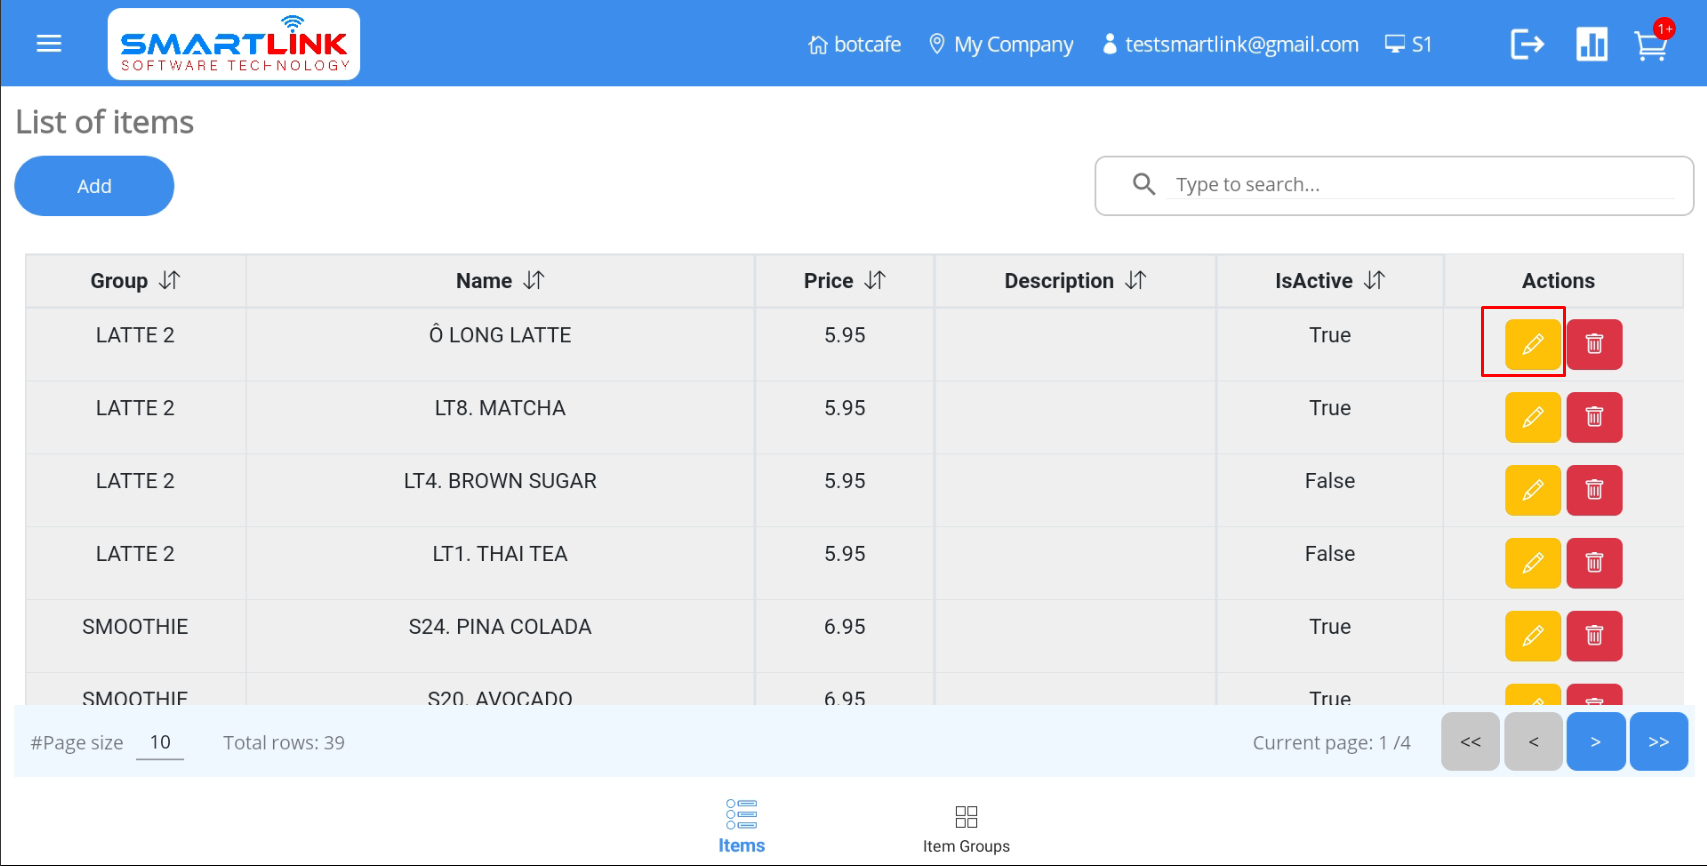
● The system displays detailed information.

- Step 2: Enter the information to be edited
- Step 3: Press the Save button to save the item. Press the Back
button to cancel.
- Step 4: The newly edited item information will be updated in the database.
Note:
● Users are not allowed to edit the group of this item.
5.1.3. Delete item
To delete an item, follow these steps:
- Step 1: On the Items screen, press the Delete
button.
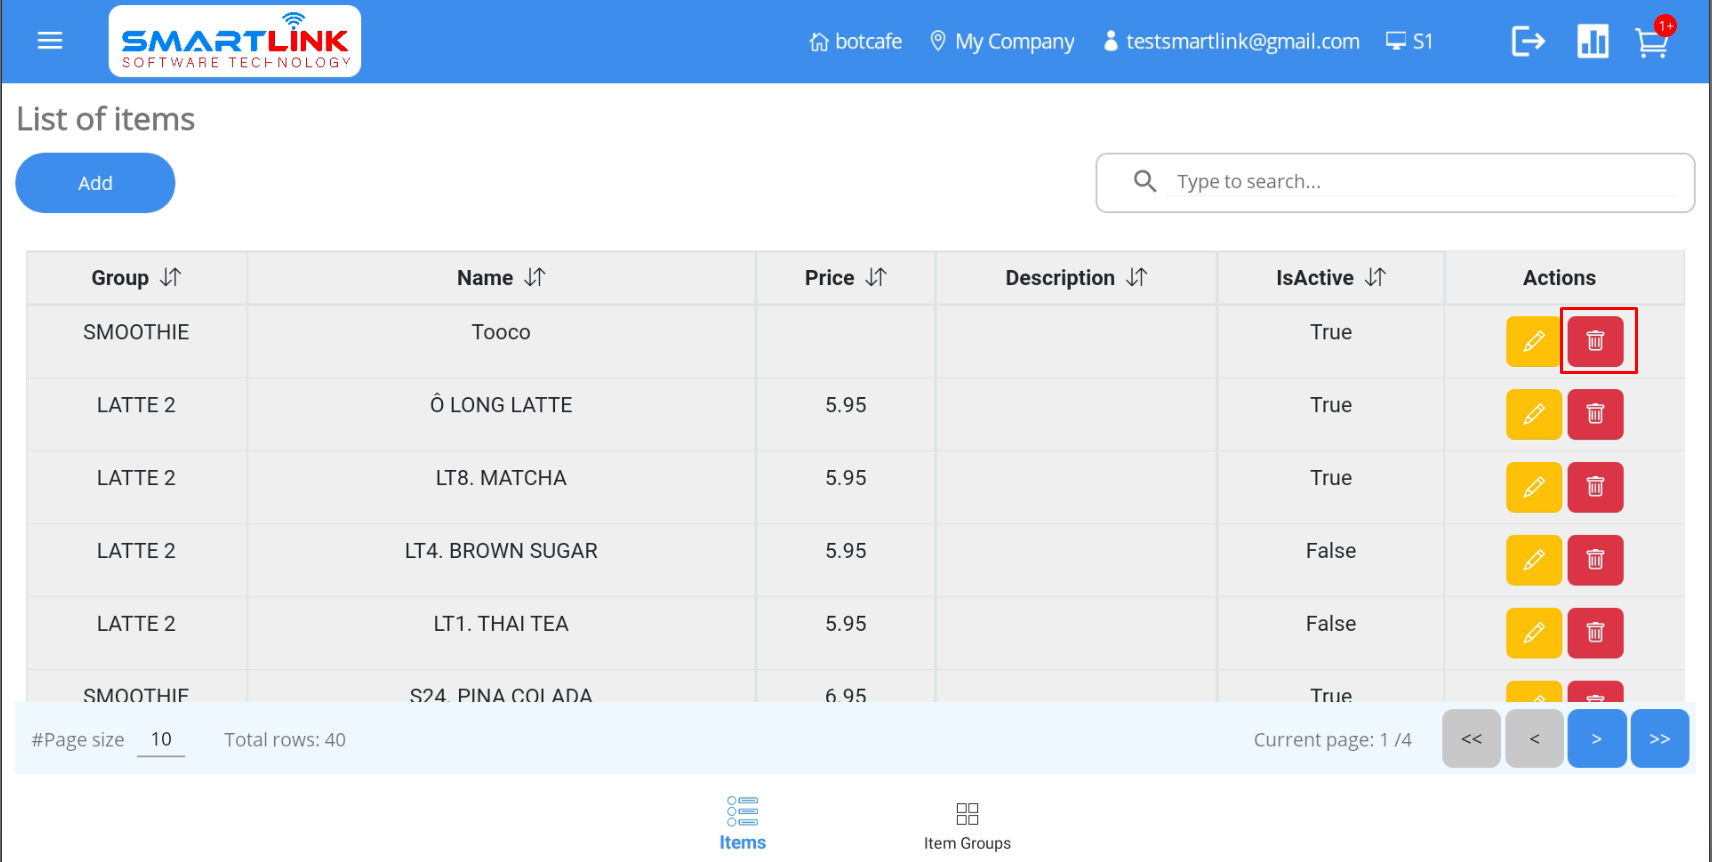
● The system displays a confirmation pop-up.
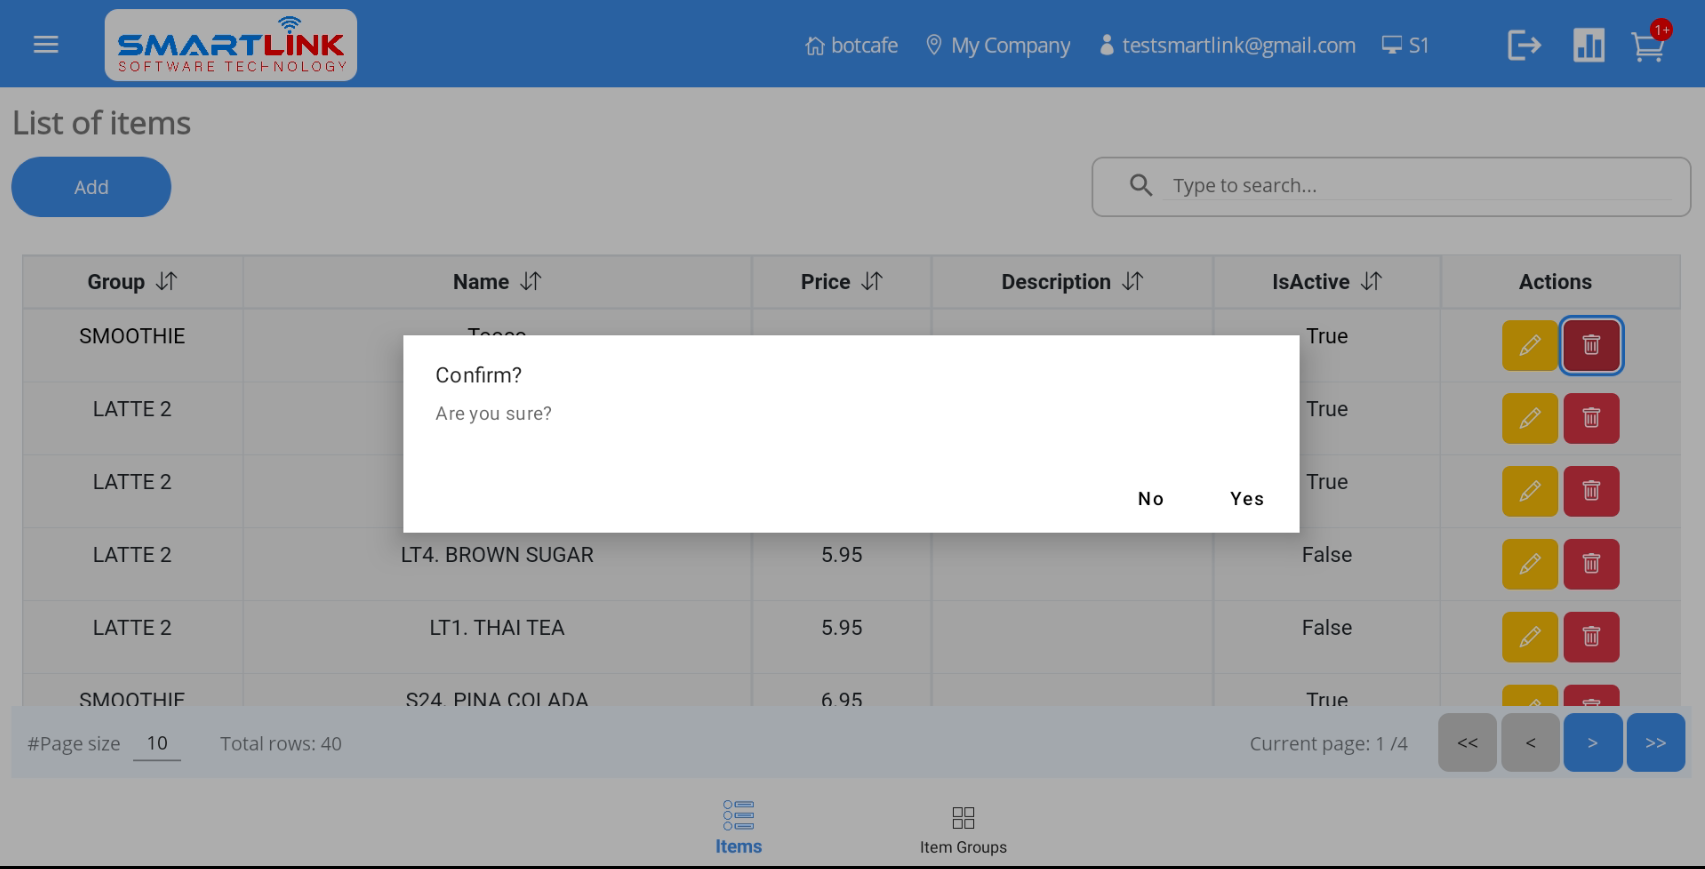
- Step 2: Press the Yes button to delete the item. Press the No
button to cancel.
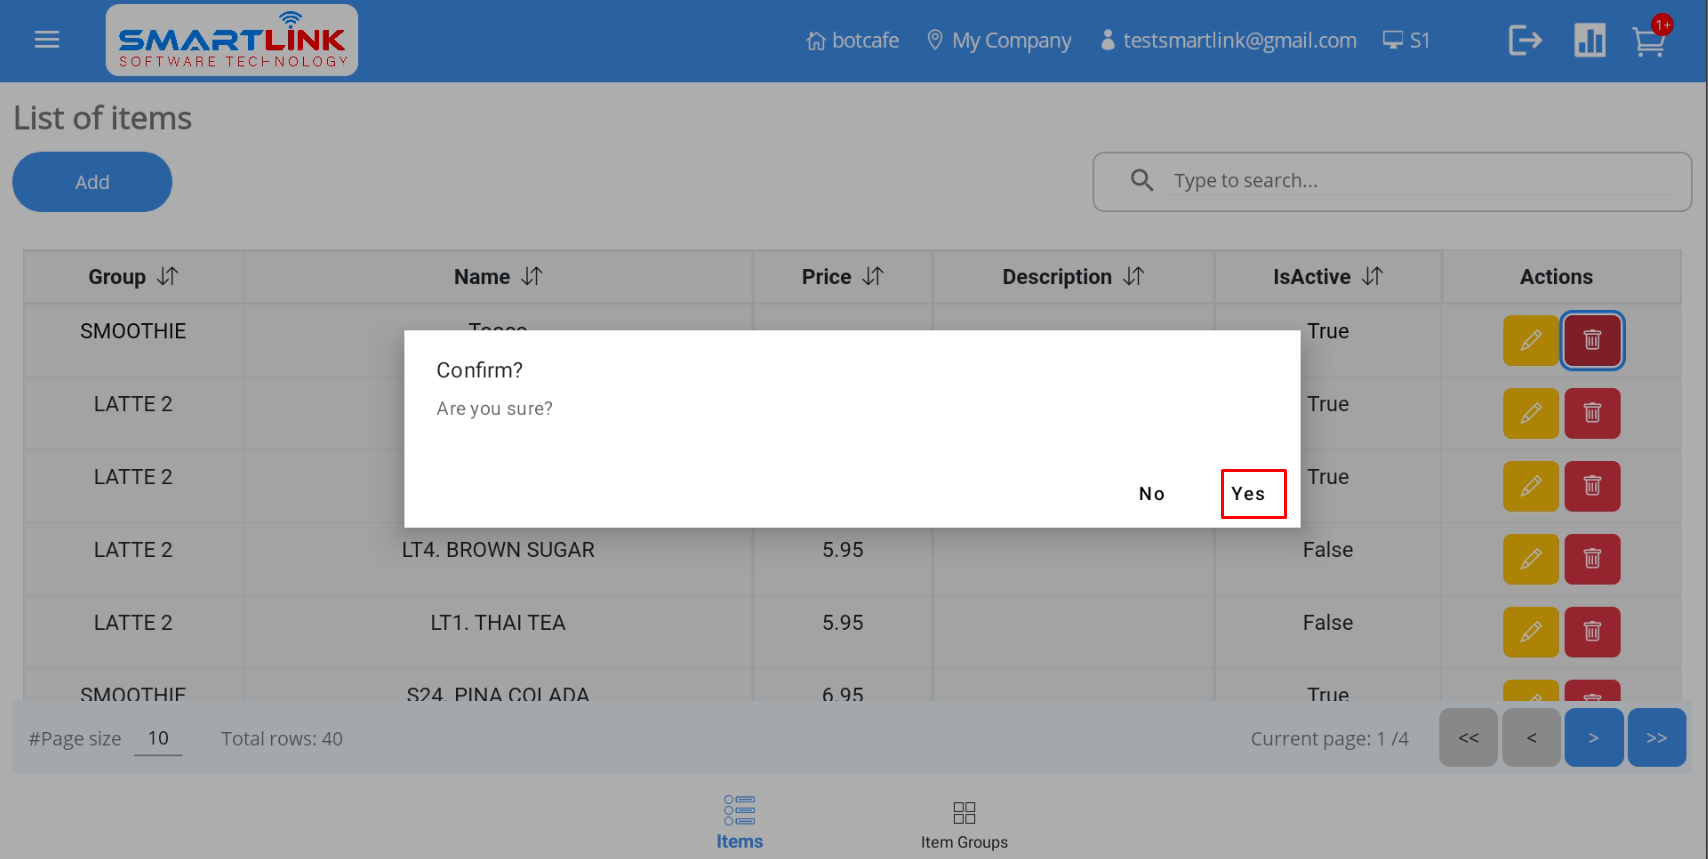
- Step 4: After successfully deleting the item, the system displays a list of items without the
deleted item.
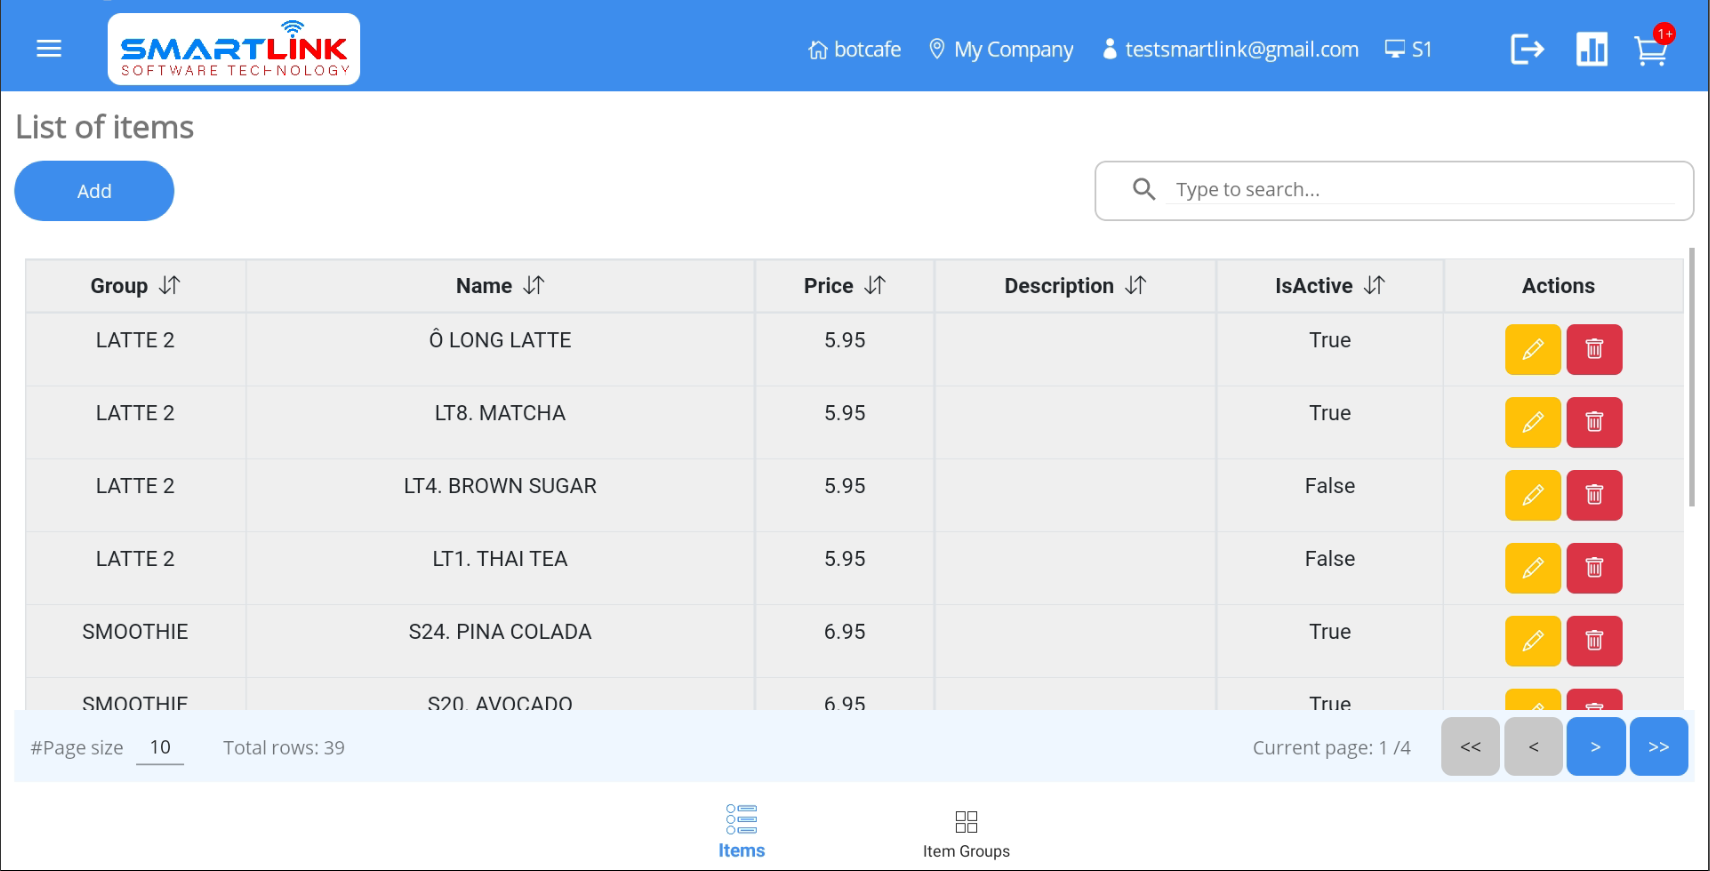
Note:
● Users are only allowed to delete the items that are in the Draff-status orders.
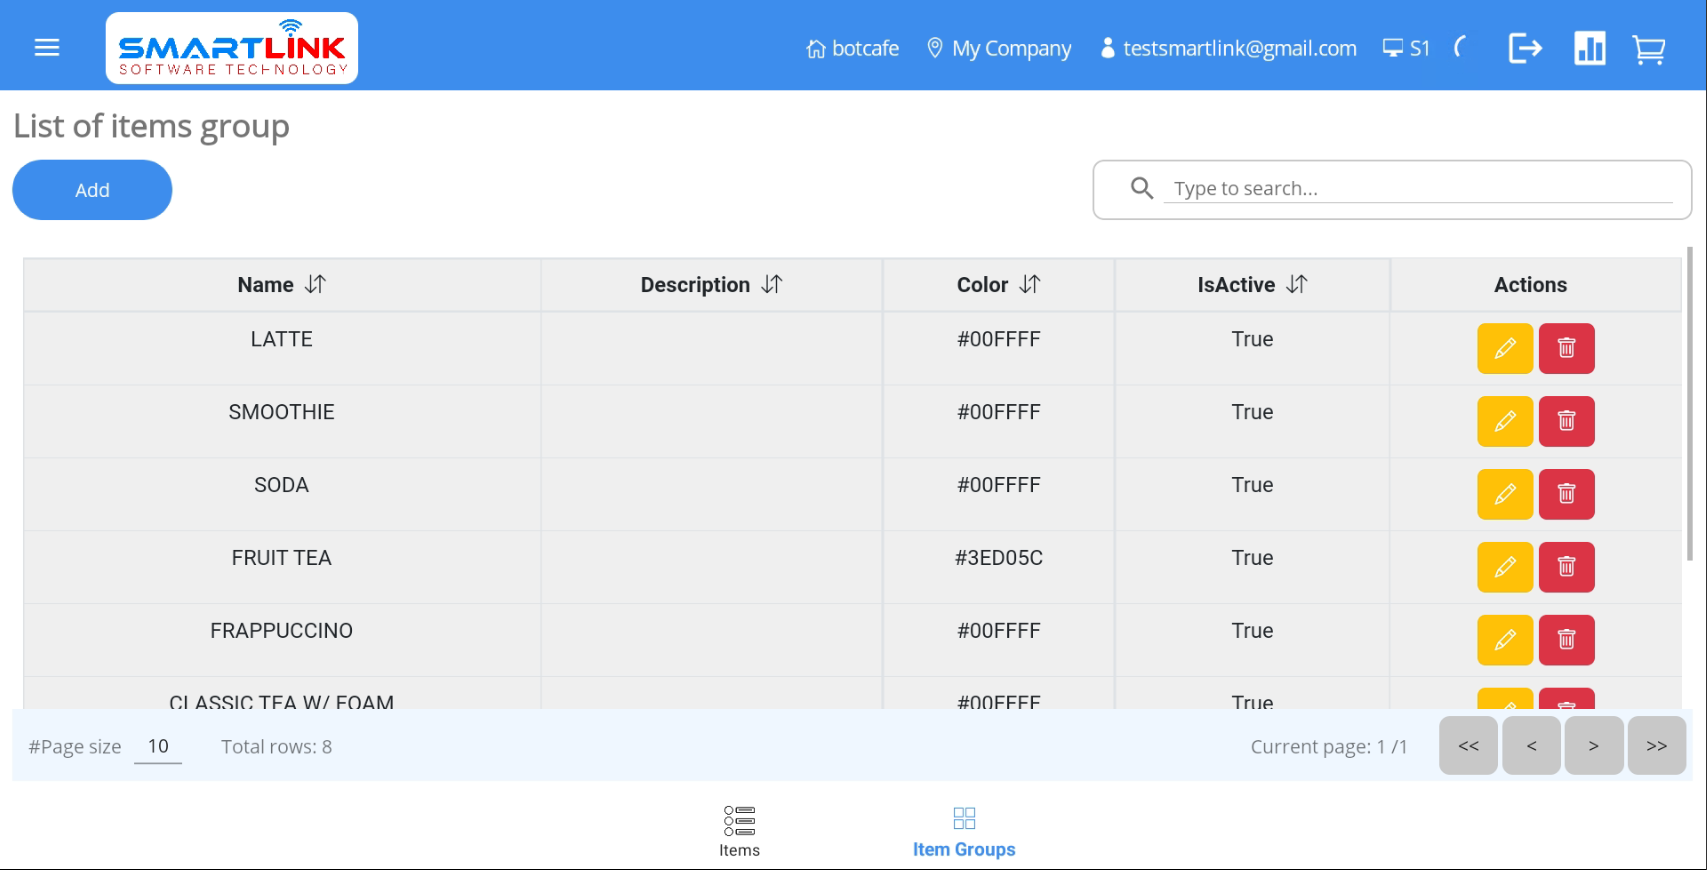
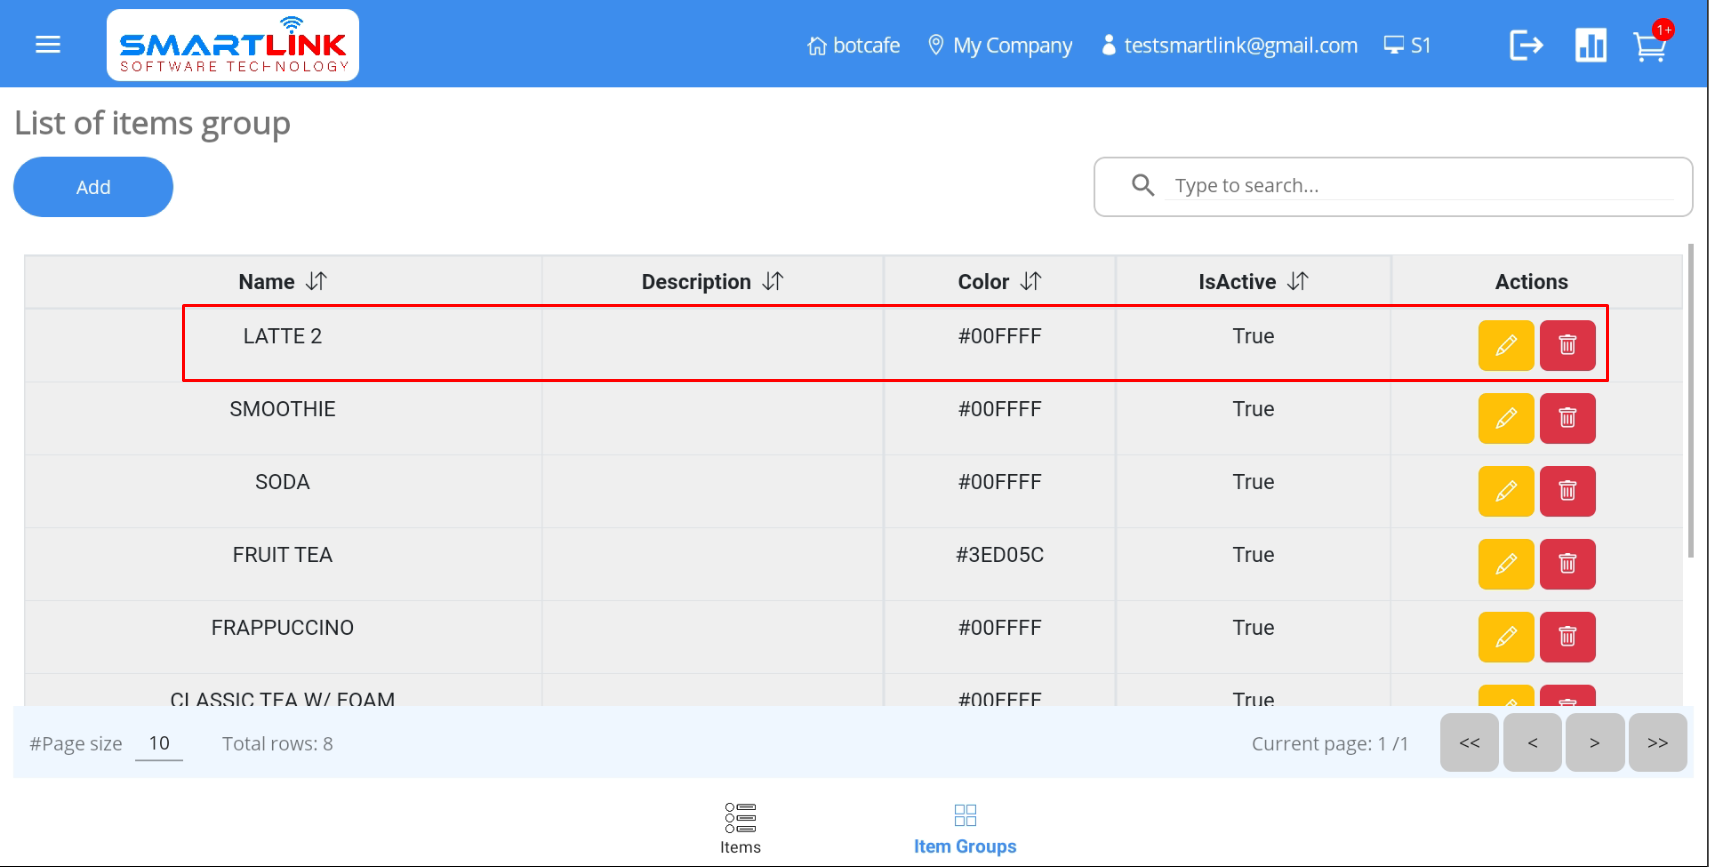
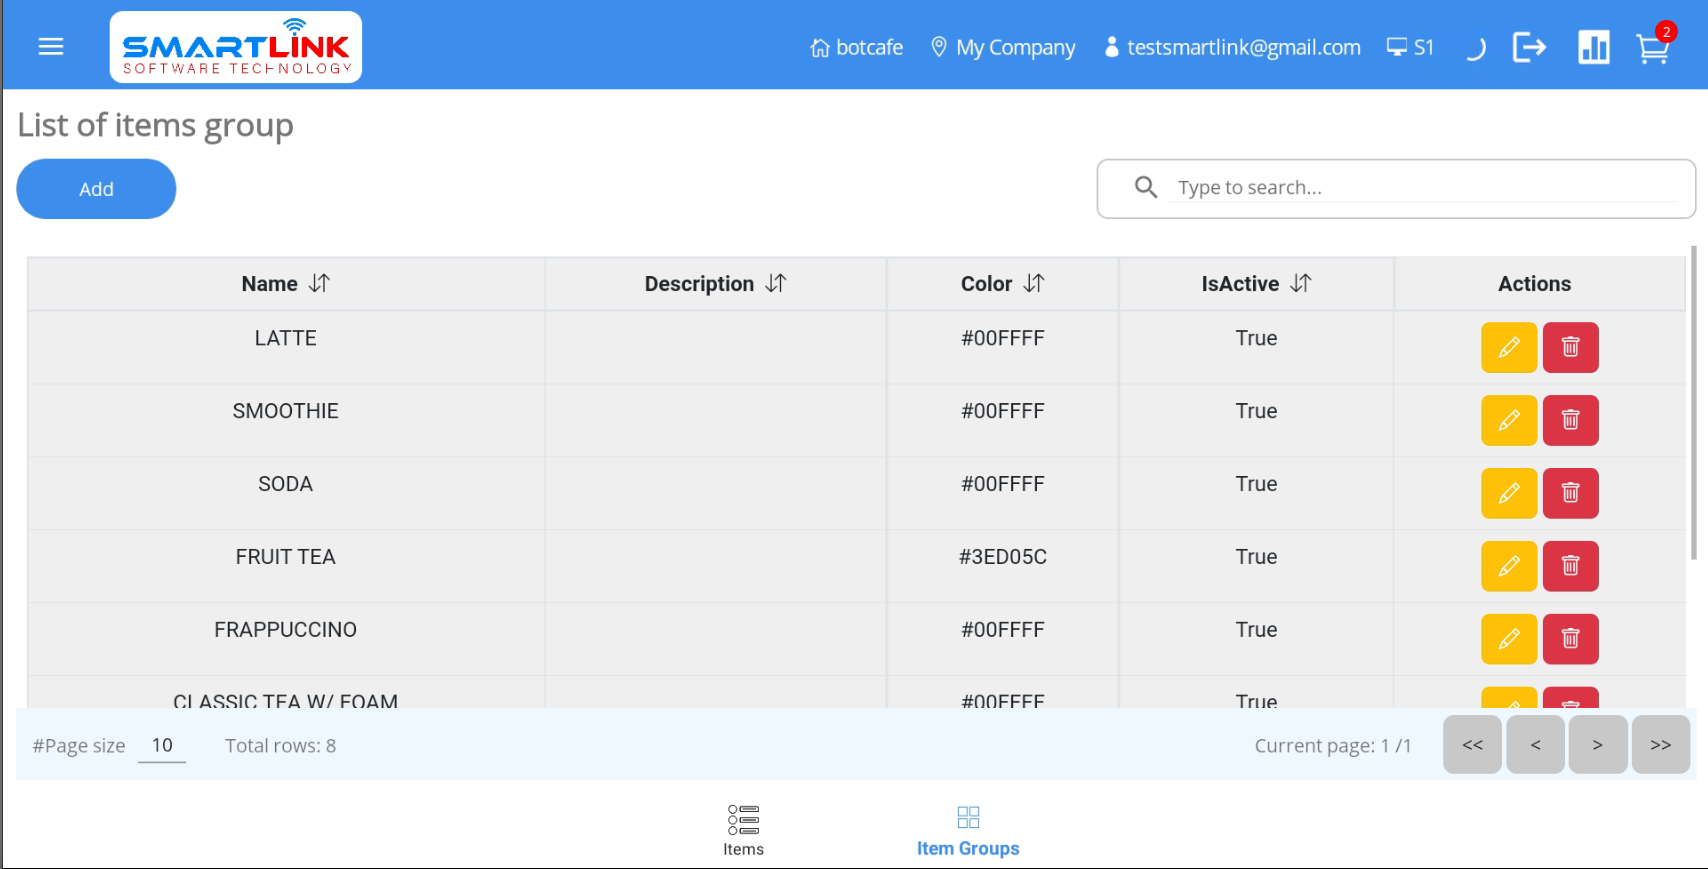
5.2. Item group
To manage item groups, follow these steps:
- Step 1: Press the Menu button on the left corner of the
screen. The system will display a
sidebar.

- Step 2: Press the Item category.

- Step 3: When the system displays a list of items, Press the Item
groups
button.
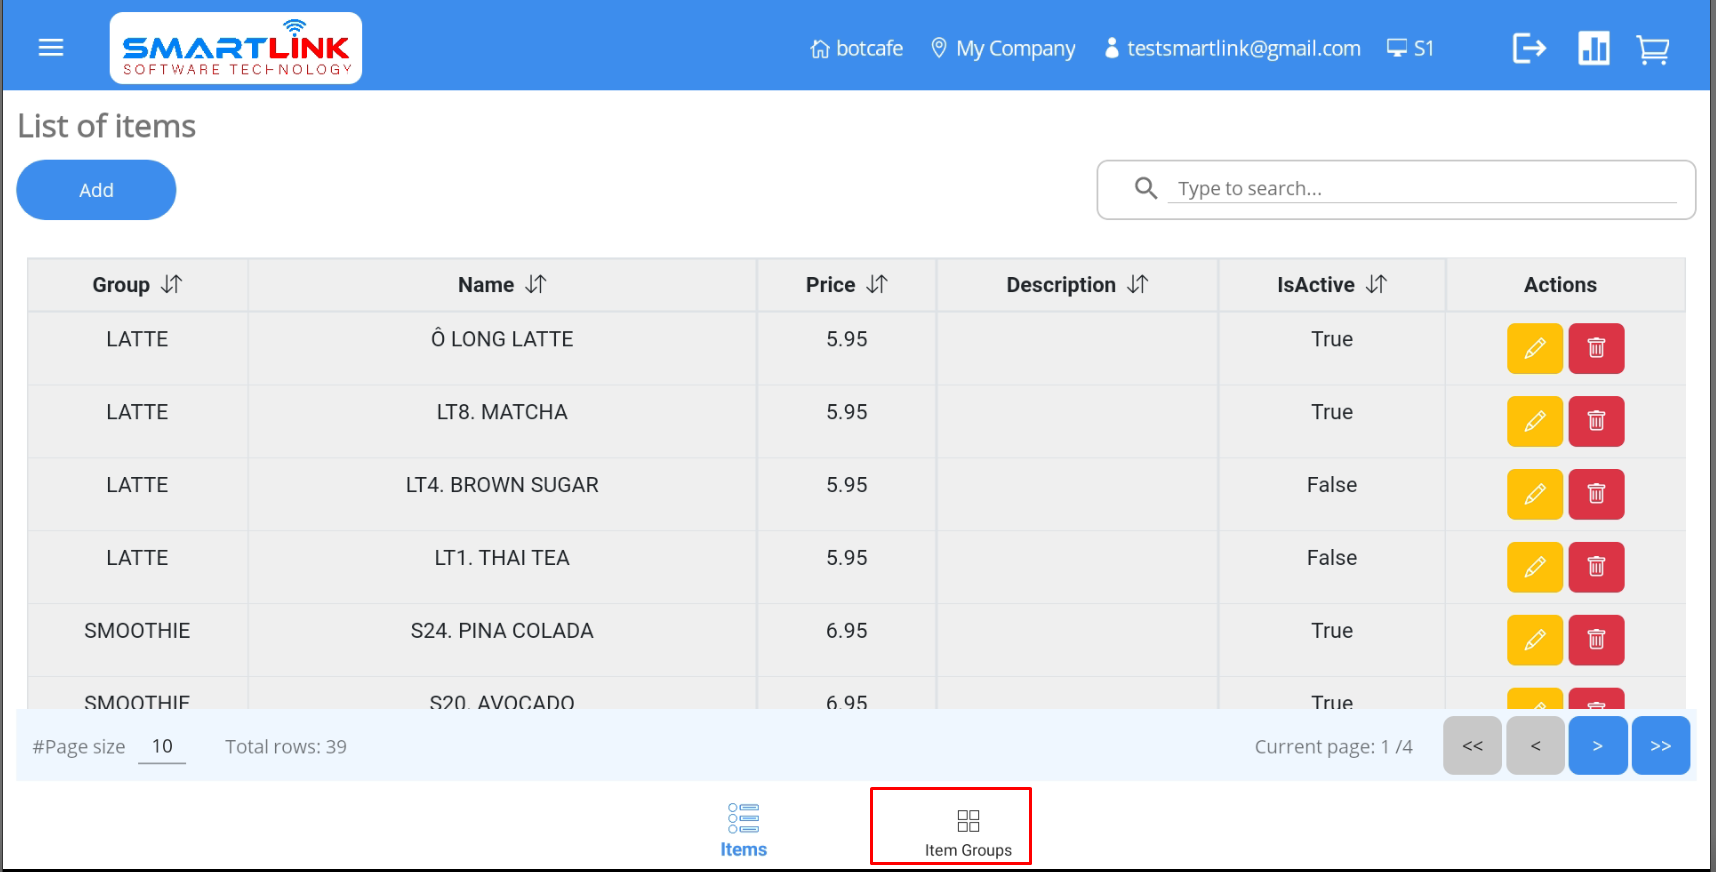
● The system displays a list of item groups
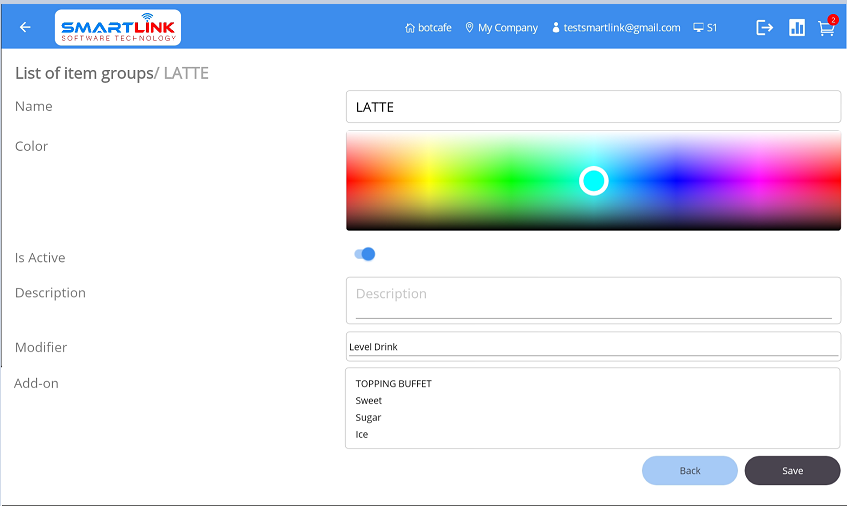
5.2.1. Add new item group
To add a new item group, follow these steps:
- Step 1: On the Items group screen, press the Add
button.
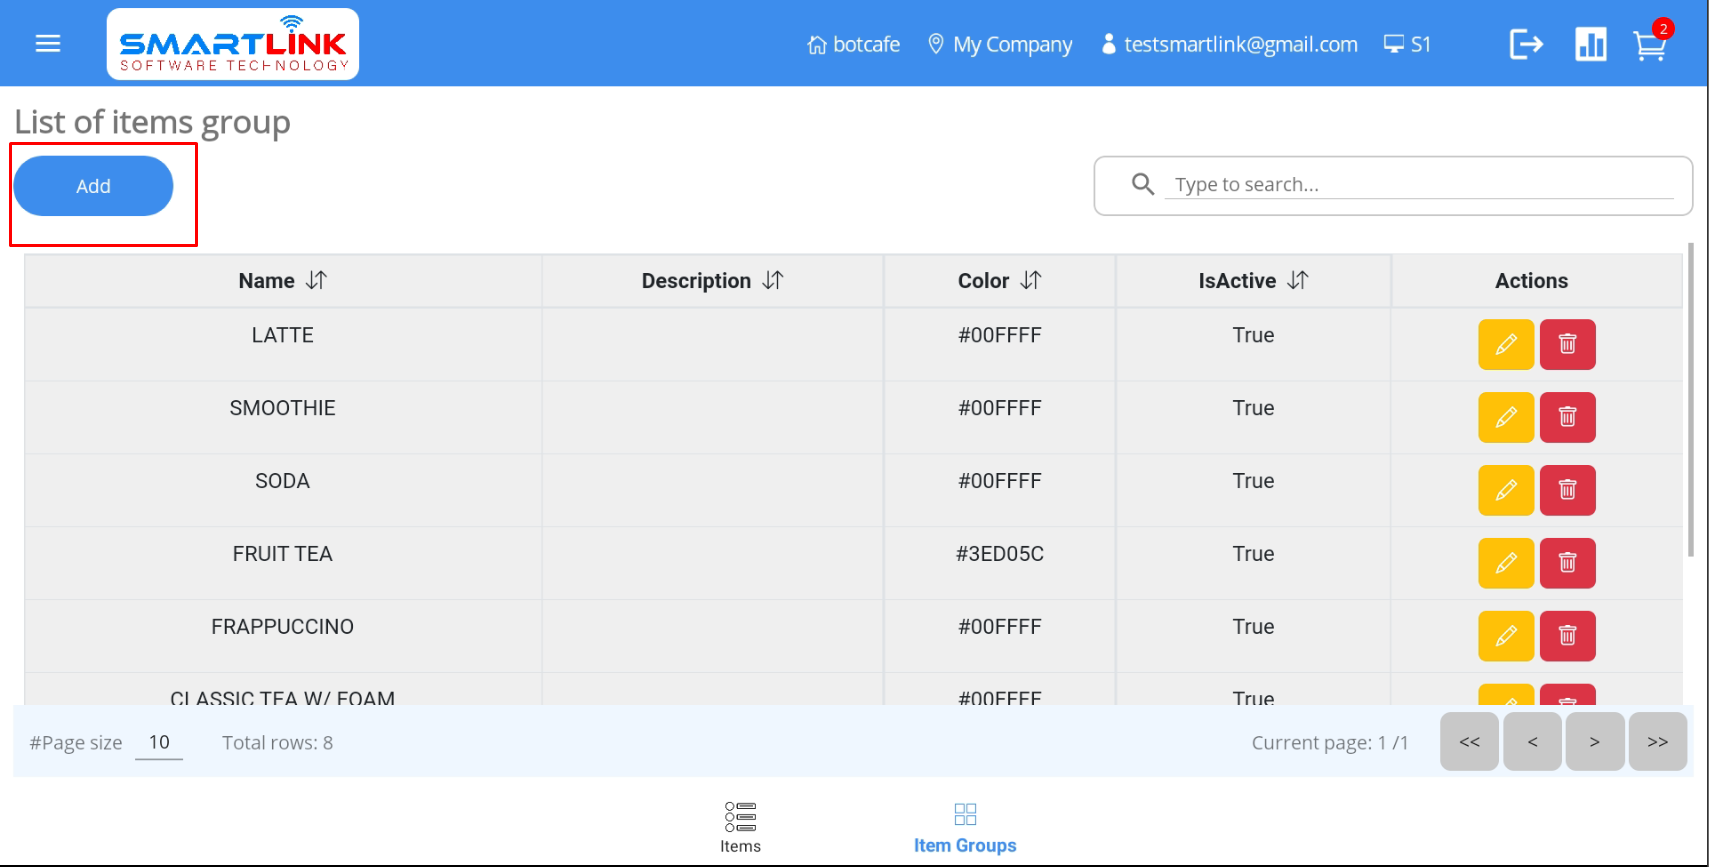
● The system displays a screen to add new item group.
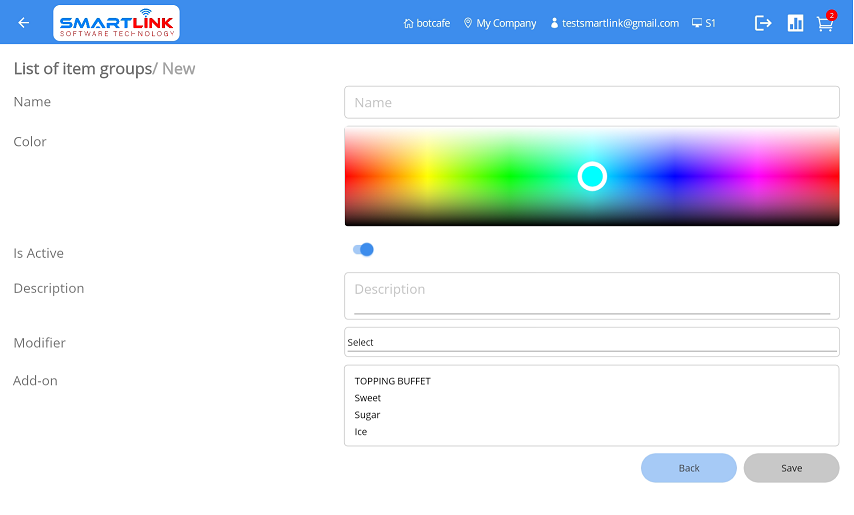
- Step 2: Enter complete information into the fields then press the
Save
button to save a new item group. Press the Back
button to cancel.

- Step 3: Successfully added new item, the system displays the newly created item on the item
group
list.

Note:
● To initialize a new item group, the user forces Step to initialize the modifier group.
● Users are not allowed to select Modifier groups without modifiers.
● Item groups with Inactive status will not be displayed on the main transaction
screen
and
vice
versa.
● Item group names cannot overlap.
● Modifier groups and Add-on groups that are
inactive
will
not
to be displayed.
5.2.2 Edit item group
To edit an item group, follow these steps:
- Step 1: On the Item group screen, press the Edit
button of the
group that needs to be edited.
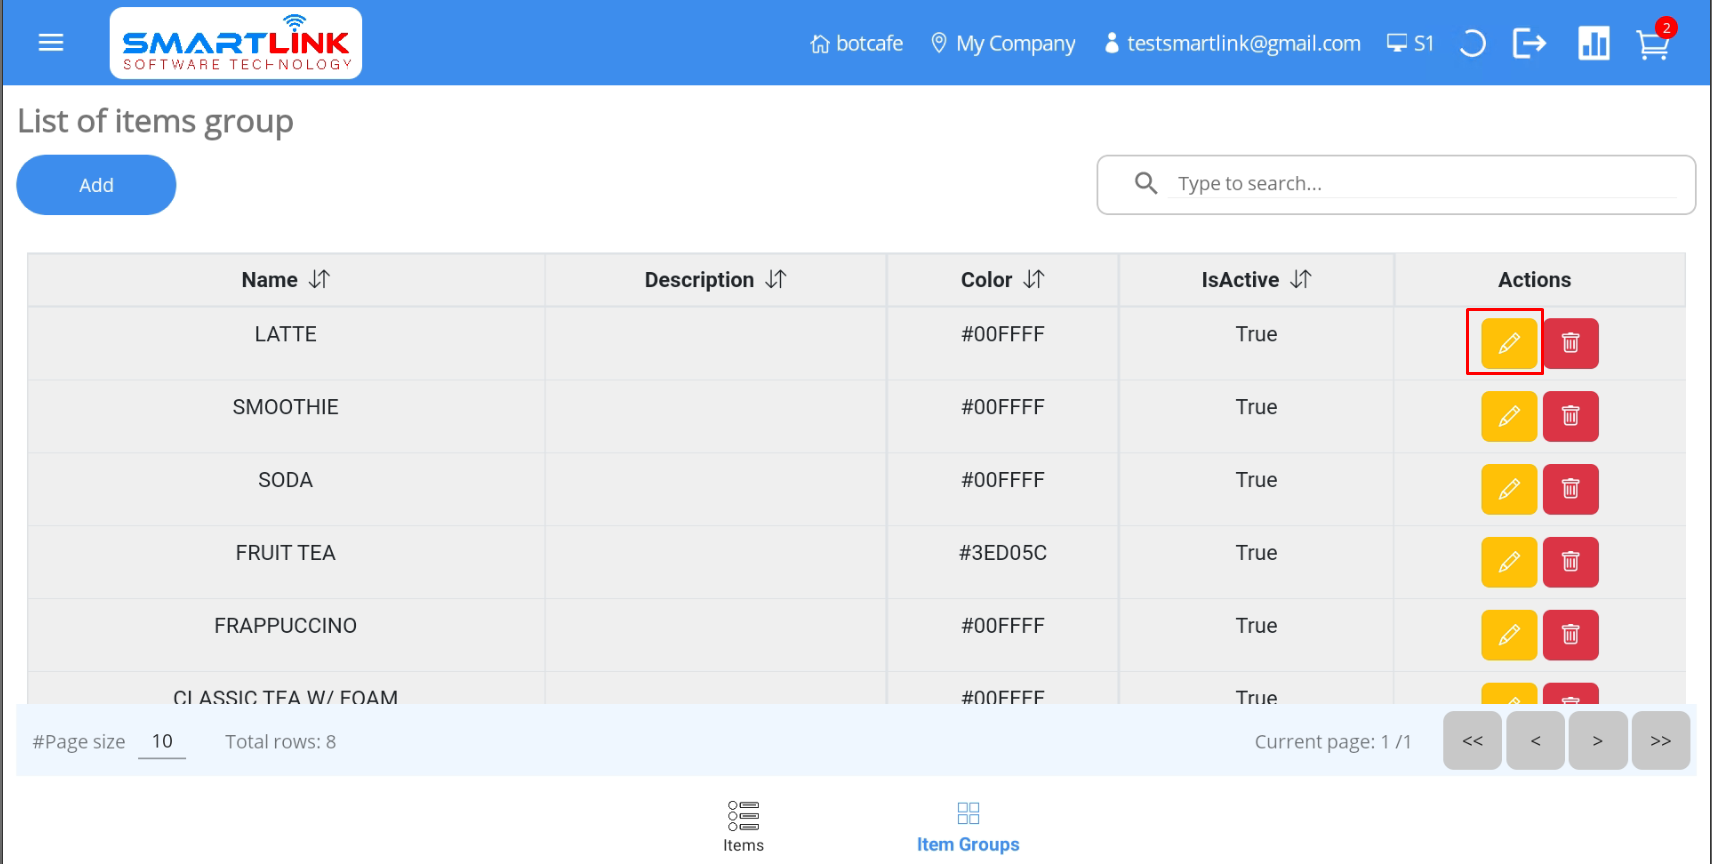
● The system displays detailed information.
- Step 2: Enter the information to be edited then press the Save button
to save the item. Press
the Back
button to cancel.

- Step 3: The newly edited item information will be updated in the database.
Note:
● Users are not allowed to edit the Modifier.
● For old items in the item group that have edited the Add-on field, users need to
press
the Save
to save the newly updated Add-on information.
5.2.3. Delete item group
To delete an item group, follow these steps:
- Step 1: On the Item groups screen, press the Delete
button.
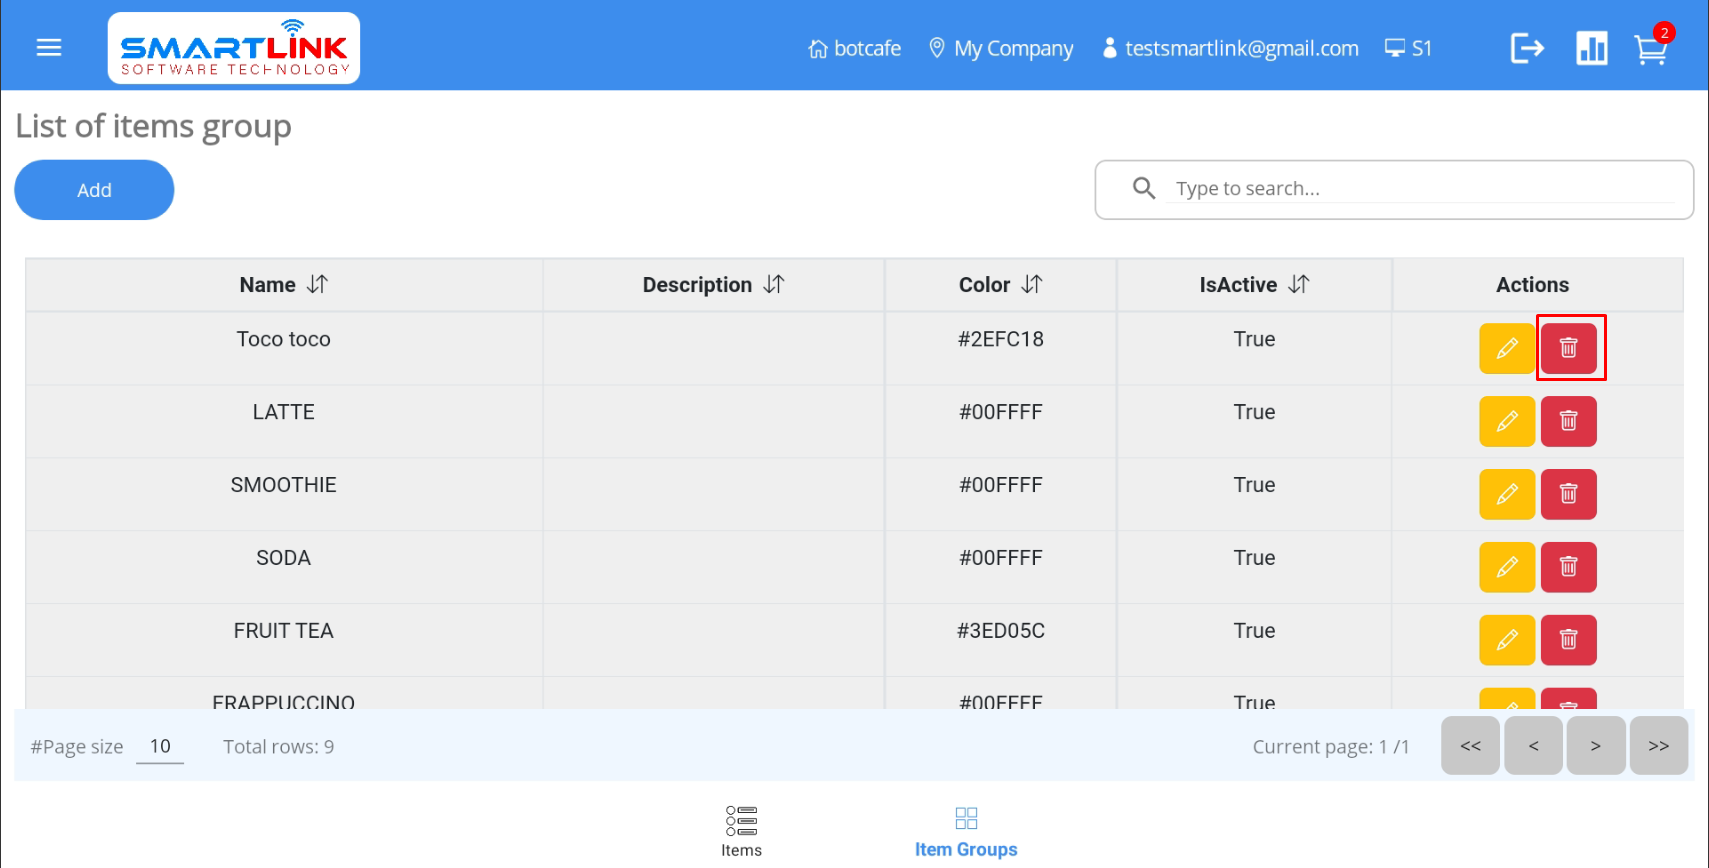
● The system displays a confirmation pop-up.

- Step 2: Press the Yes button to delete the item group. Press
the No
button to cancel.
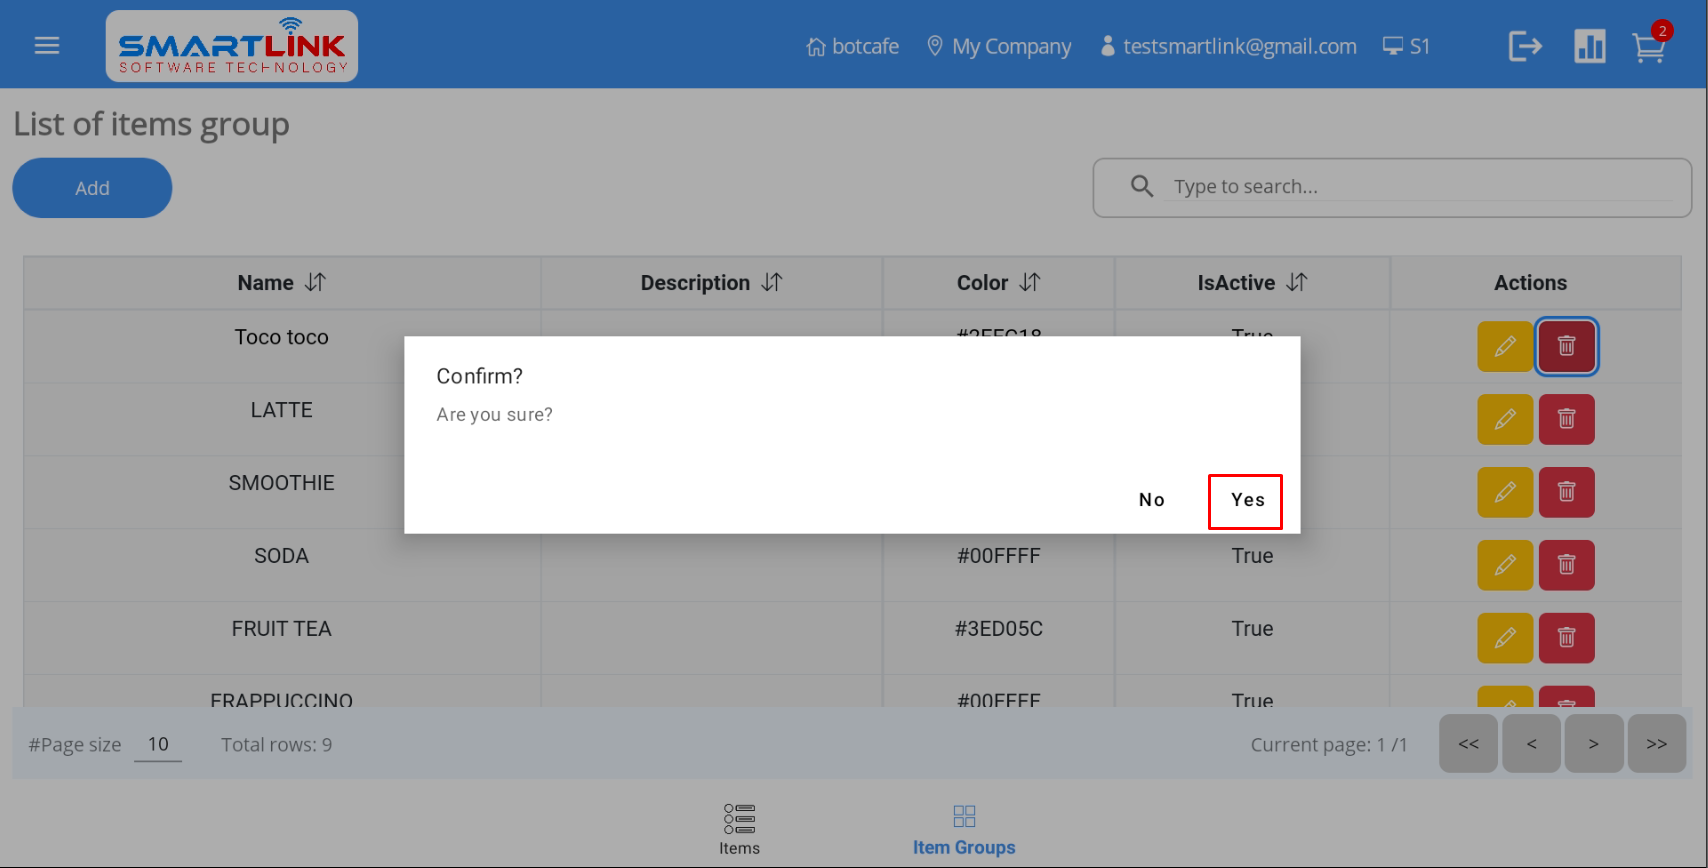
- Step 4: After successfully deleting the item, the system displays a list of item groups without
the deleted group.
Note:
● Users are only allowed to delete the item groups that do not contain items.
Modifiers & modifier groups management
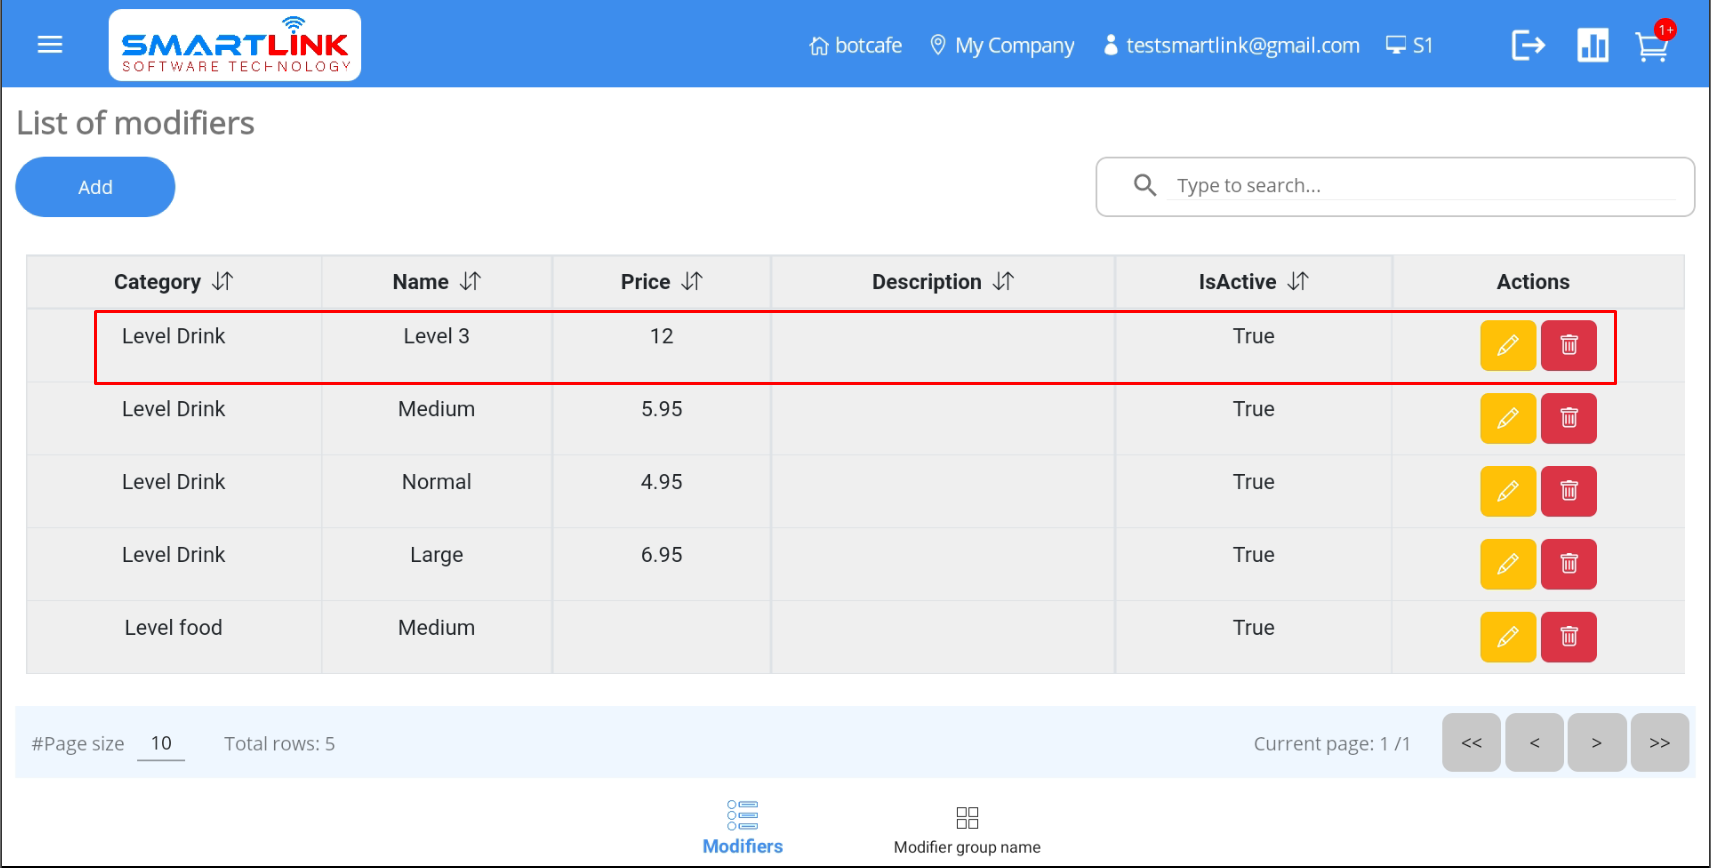
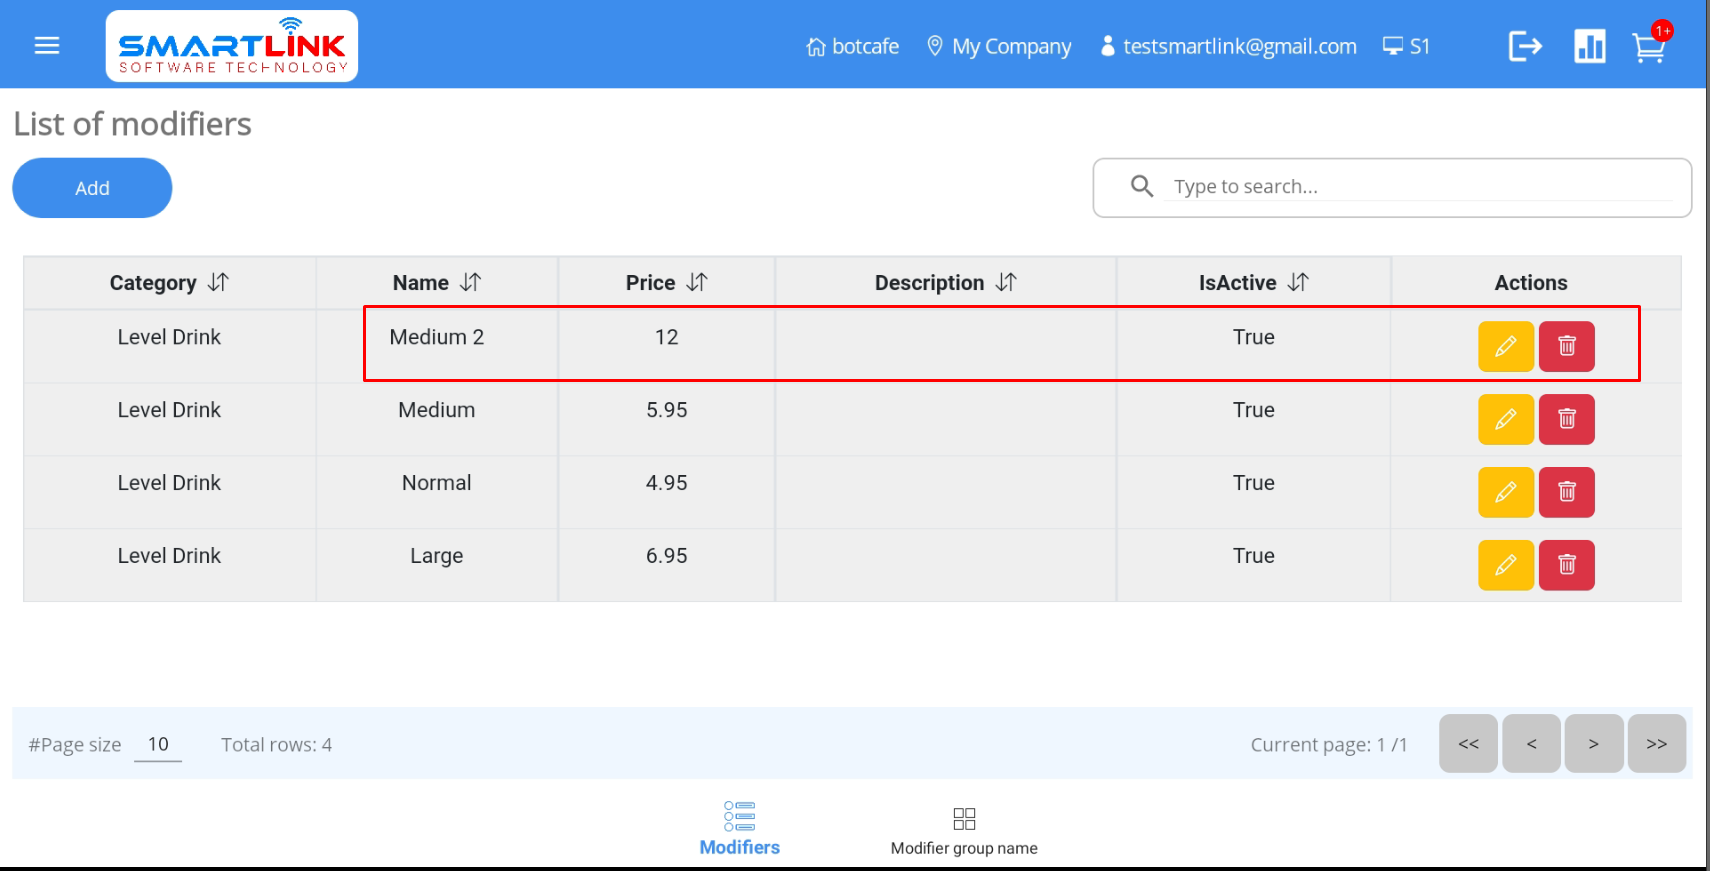
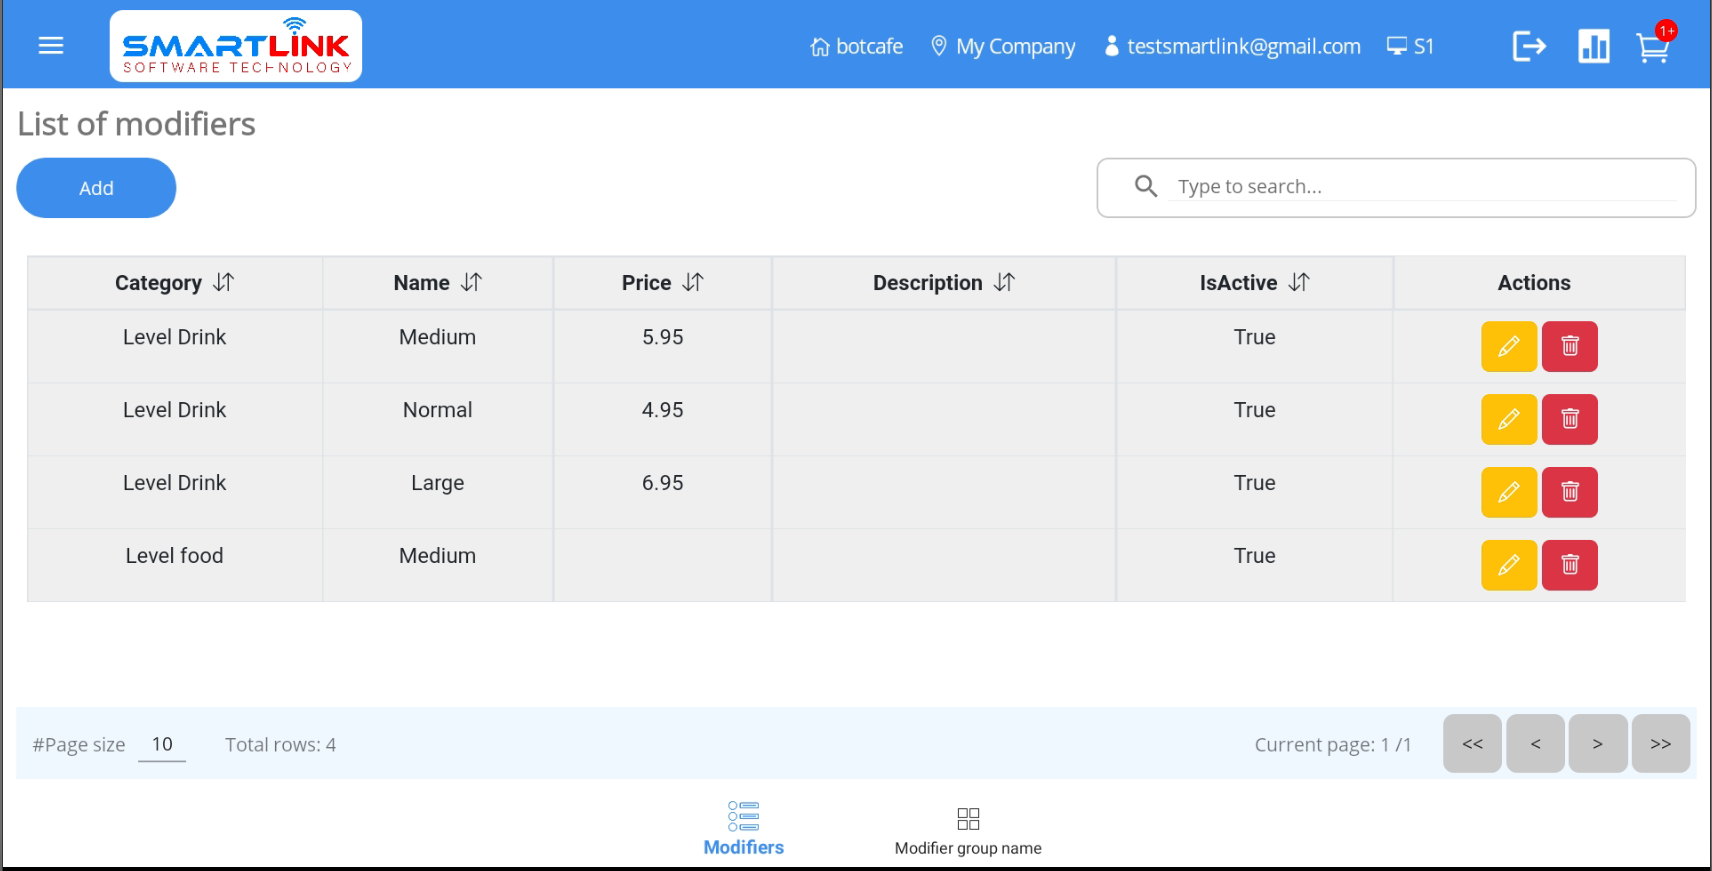
6.1. Modifiers
To manage modifiers, follow these steps:
- Step 1: Press the Menu button on the left corner of the
screen.

● The system displays a side-bar.

- Step 2:
● Press the Modifiers category.
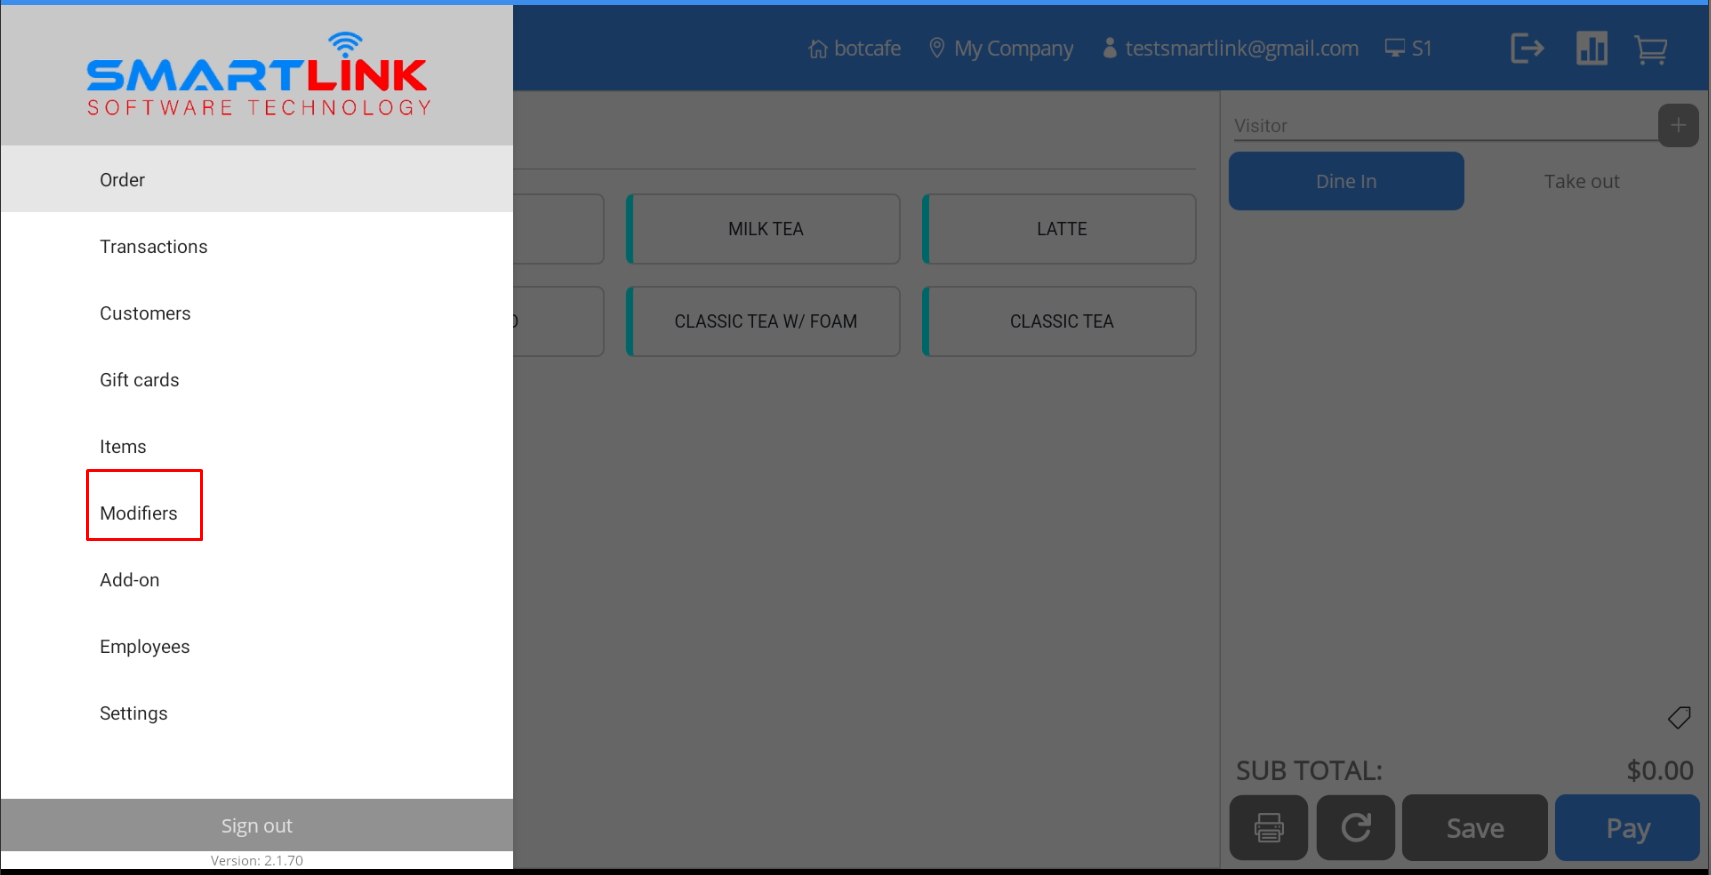
● The system displays a list of modifiers.
6.1.1. Add new modifier
To add new modifier, follow these steps:
- Step 1: On the Modifiers screen, press the Add
button.

● The system displays a screen to add new modifier.
- Step 2: Enter complete information into the fields.
- Step 3: Press the Save button to save a new modifiers. Press
the Back
button to cancel.
- Step 4: After successfully adding new modifier, the system displays the modifier list with the
created modifier.
Note:
● The user forces step to create at least one modifier group before creating the modifier.
● In the same modifier group, modifier names cannot be the same and users cannot Inactivate all modifiers.
● Modifiers and Add-ons will be automatically
received
according
to the item group that the user selects.
● Modifiers with Inactive status will not be displayed on the main transaction screen
and
vice
versa.
6.1.2 Edit modifier
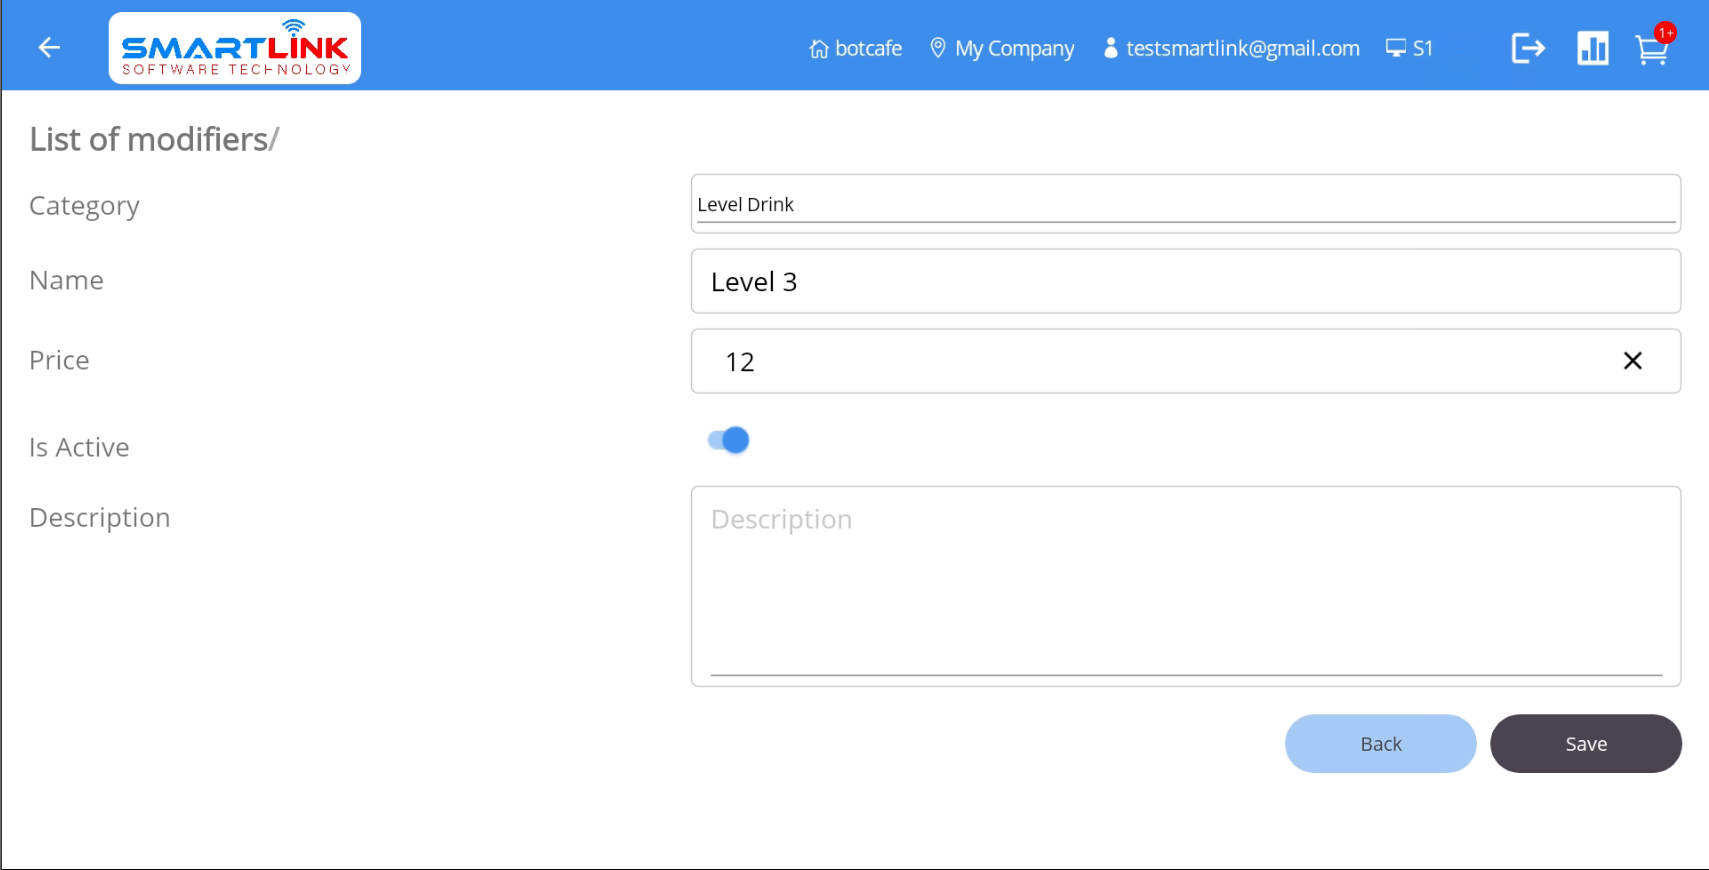
To edit an modifier, follow these steps:
- Step 1: On the Modifiers screen, press the Edit
button.
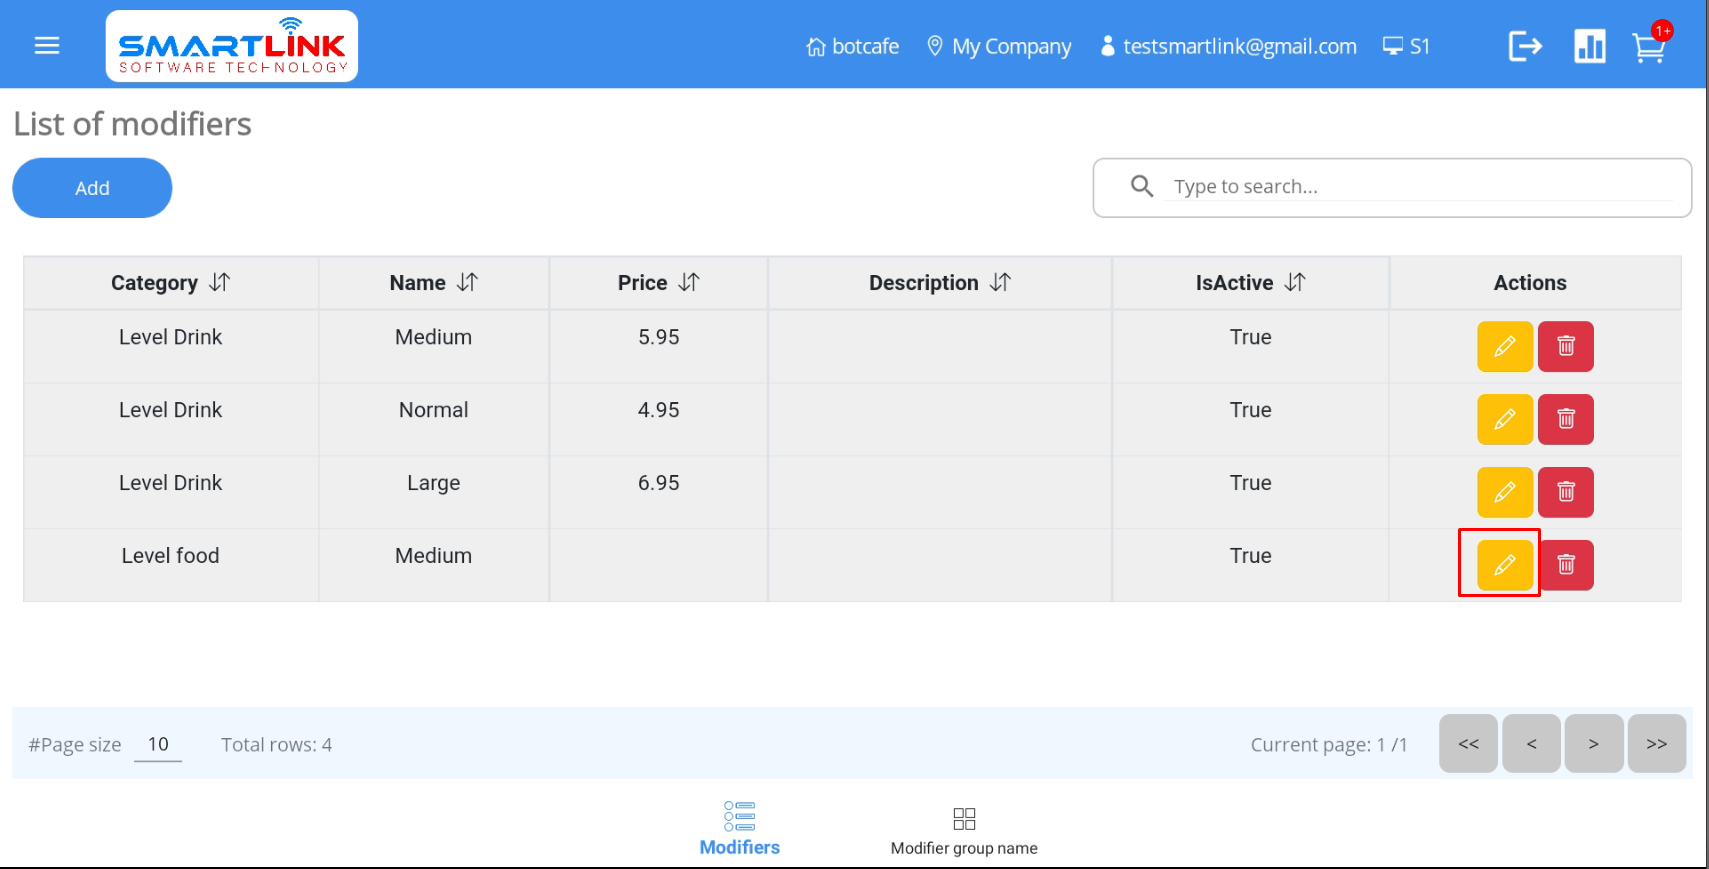
● The system displays detailed information.
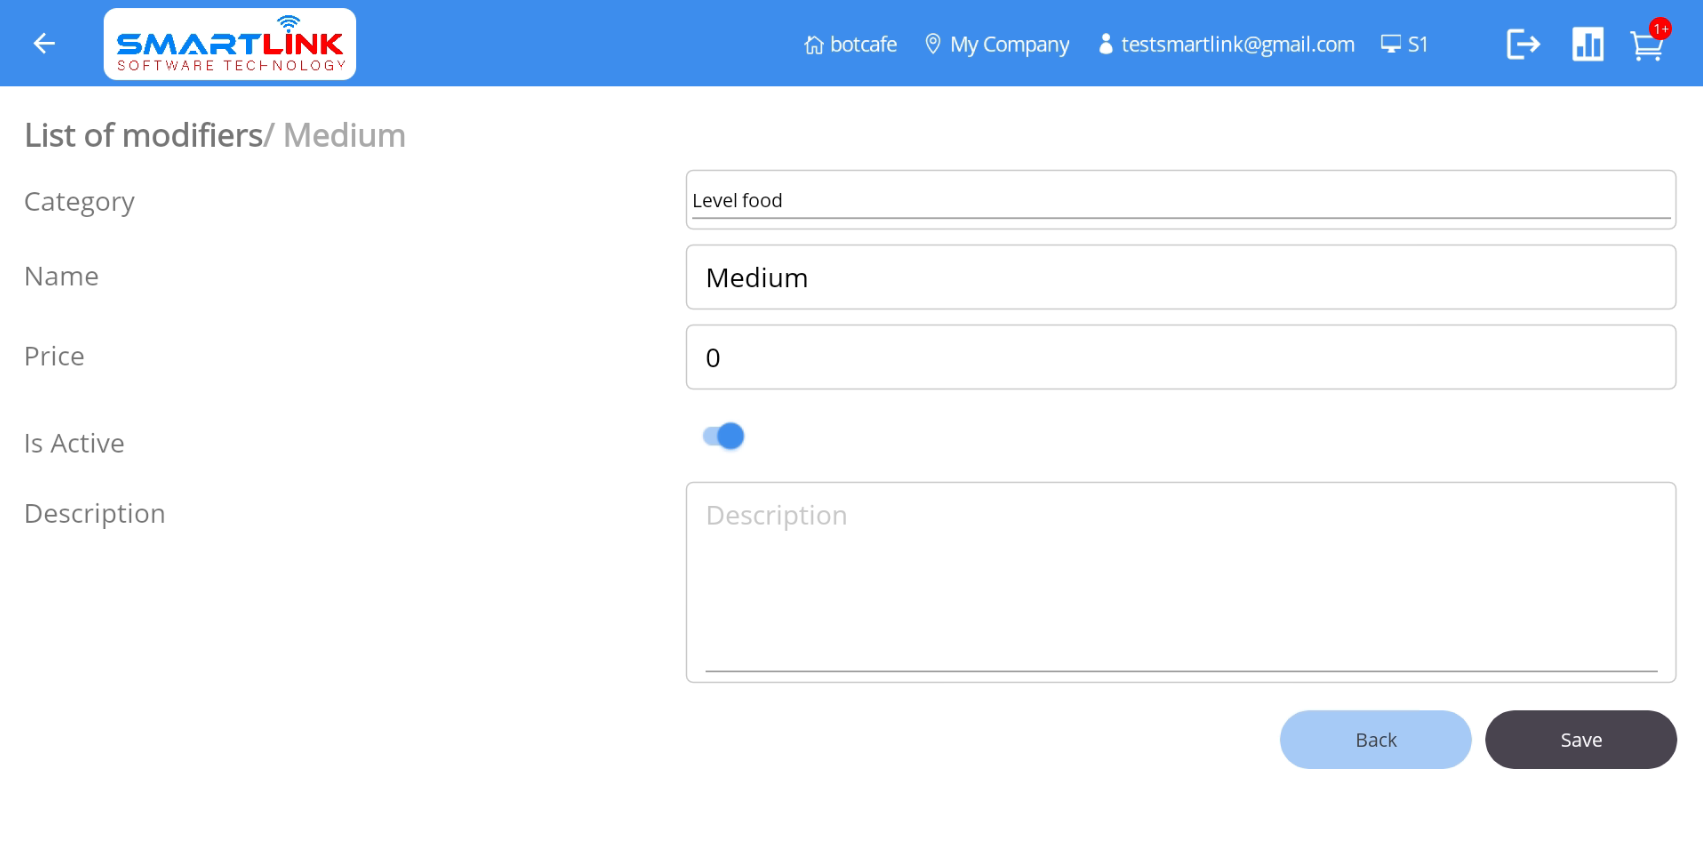
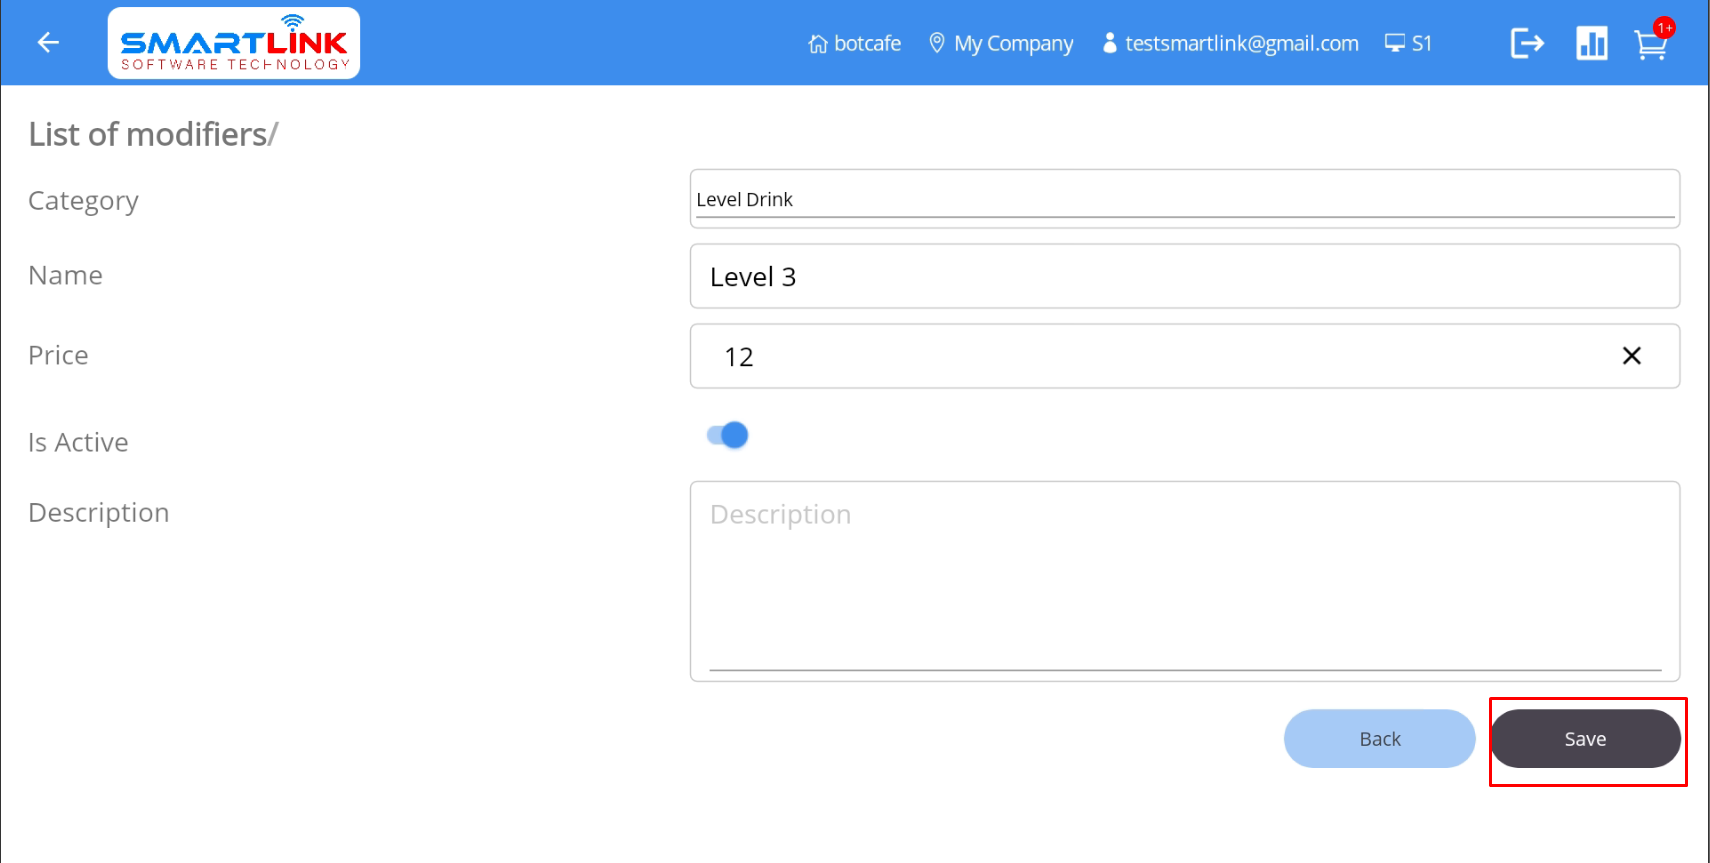
- Step 2: Enter the information to be edited then press the Save button
to save the modifier. Press the Back
button to cancel.
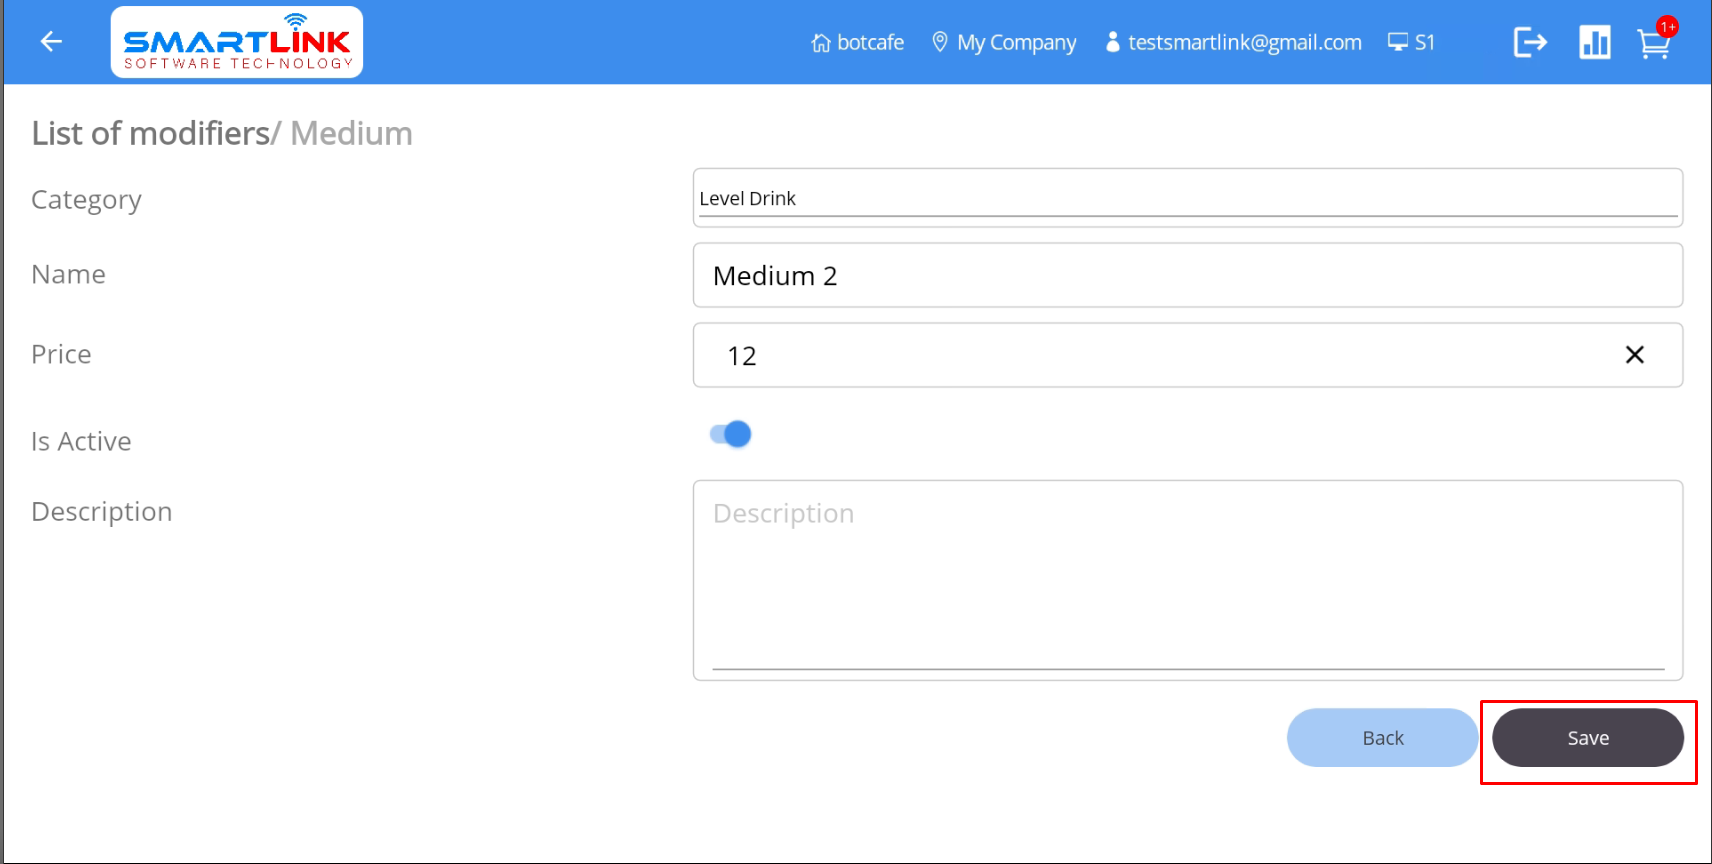
- Step 4: The newly edited modifier information will be updated in the database.
Note:
● Users are not allowed to edit the group of this modifier.
6.1.3. Delete modifier
To delete an modifier, follow these steps:
- Step 1: On the Modifiers screen, press the Delete
button.

● The system displays a confirmation pop-up.
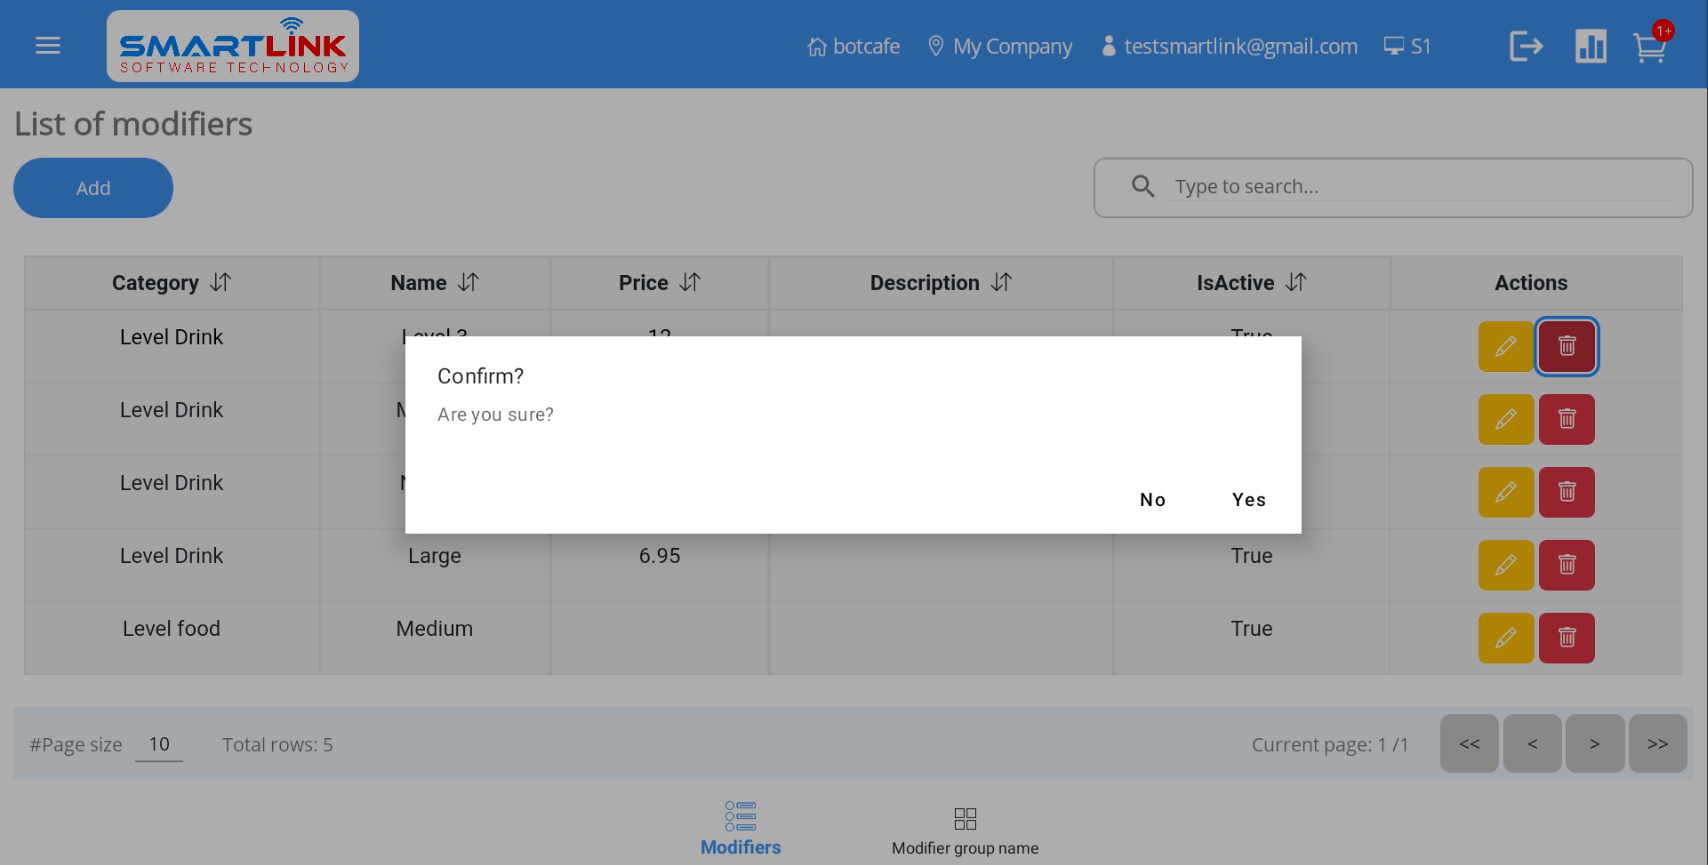
- Step 2: Press the Yes button to delete the modifier. Press the No
button to cancel.

- Step 4: After successfully deleting the modifier, the system displays a list of modifiers
without the deleted modifier.
Note:
● Users are only allowed to delete the modifiers that are in the Draff-status orders.
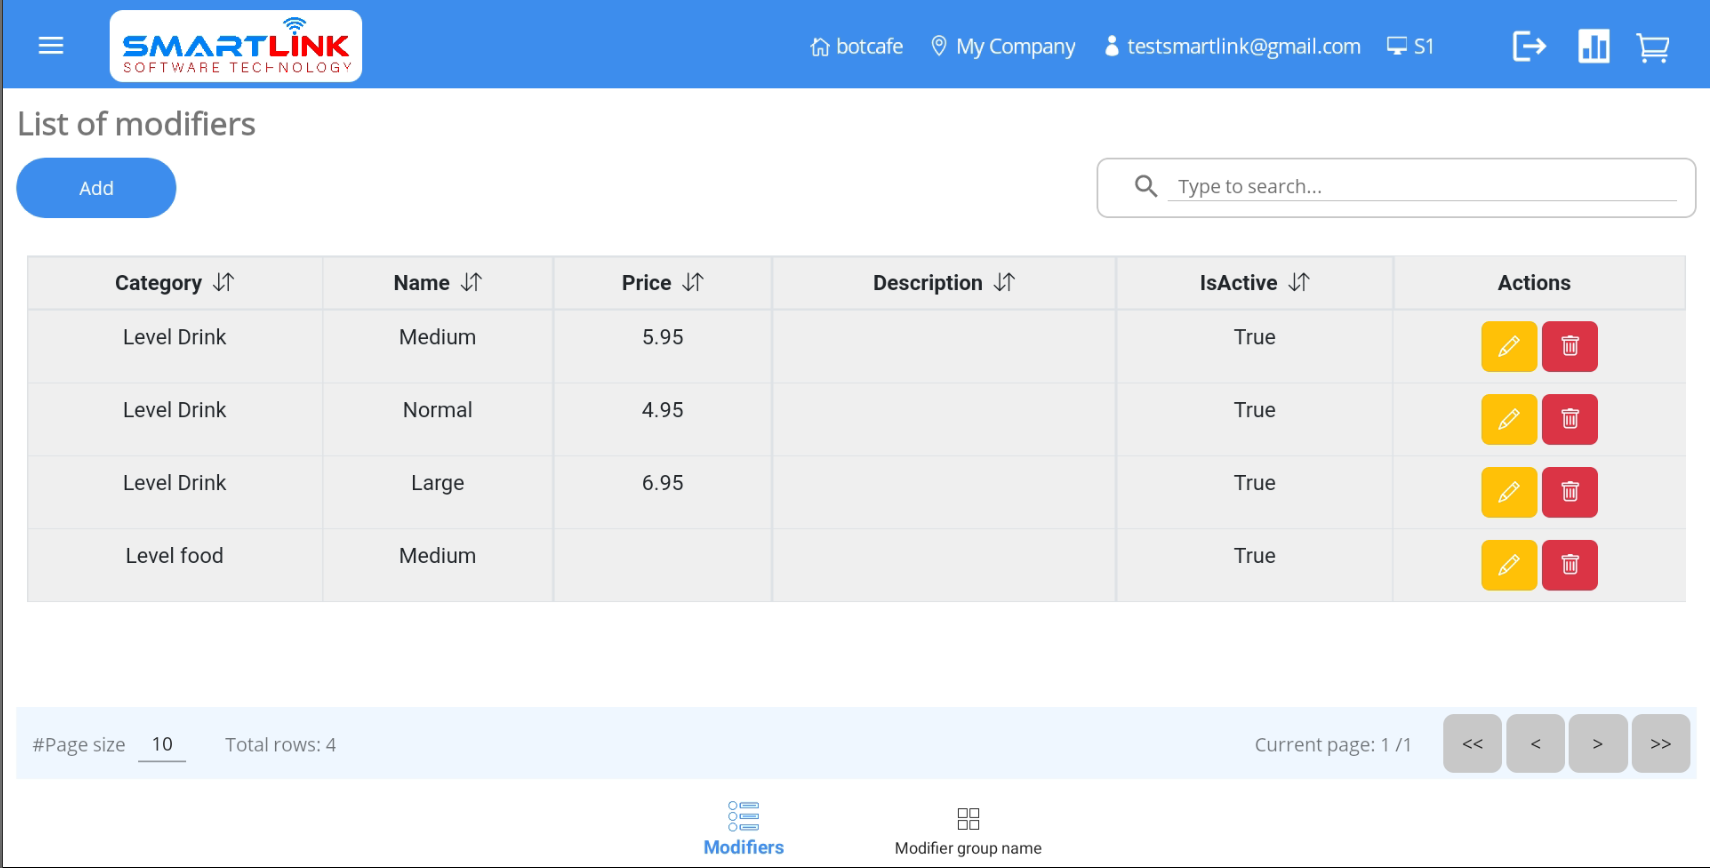
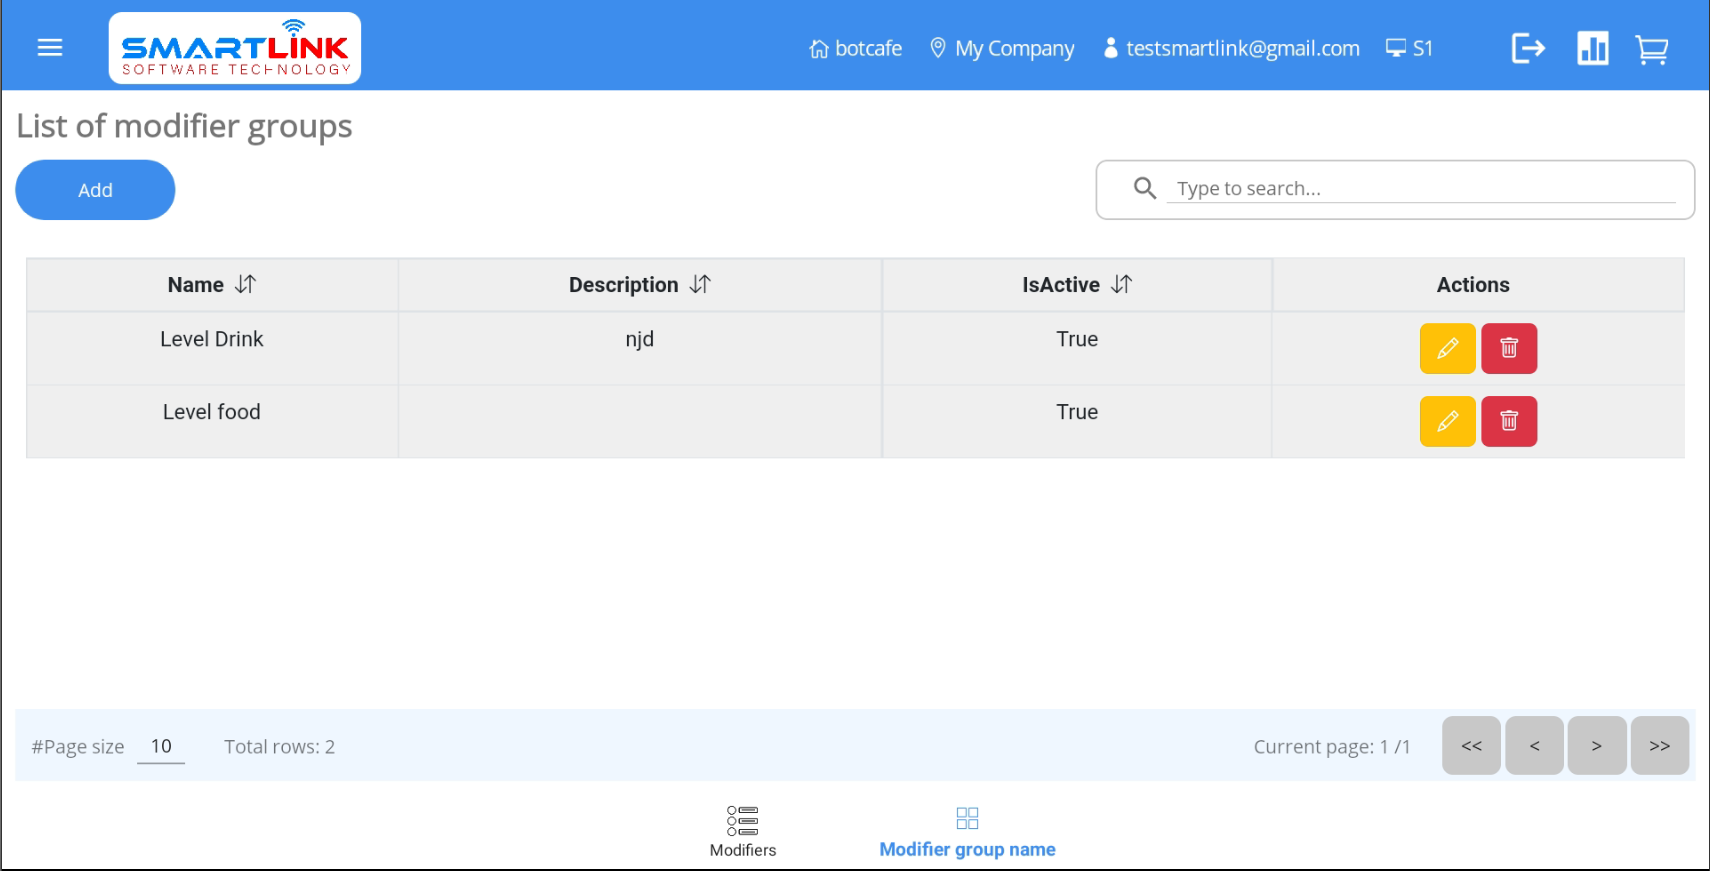
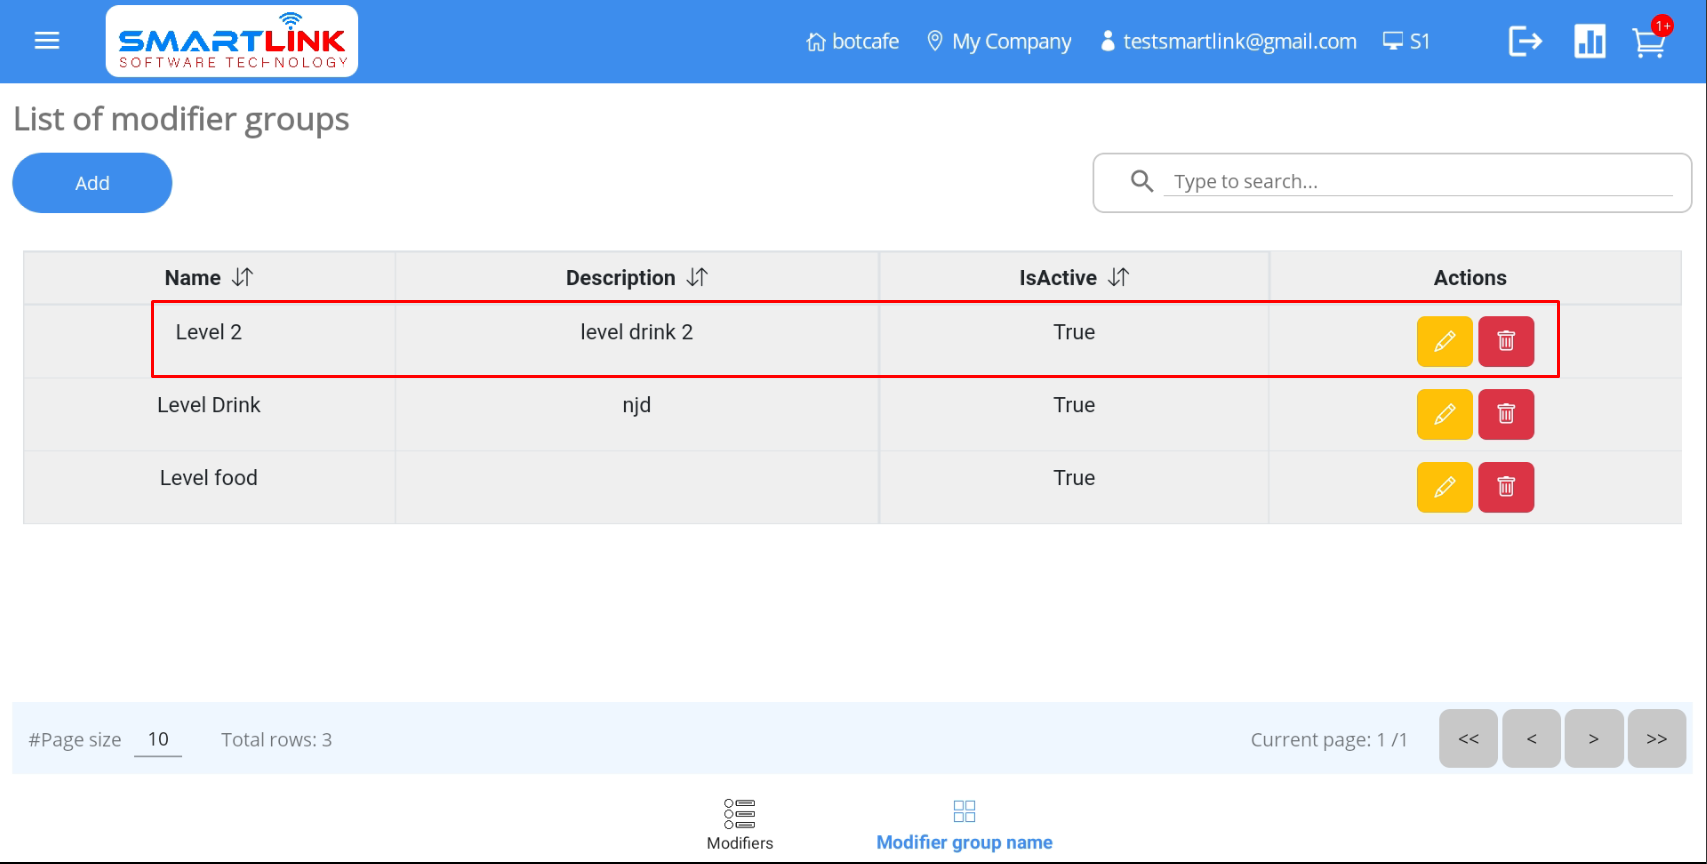
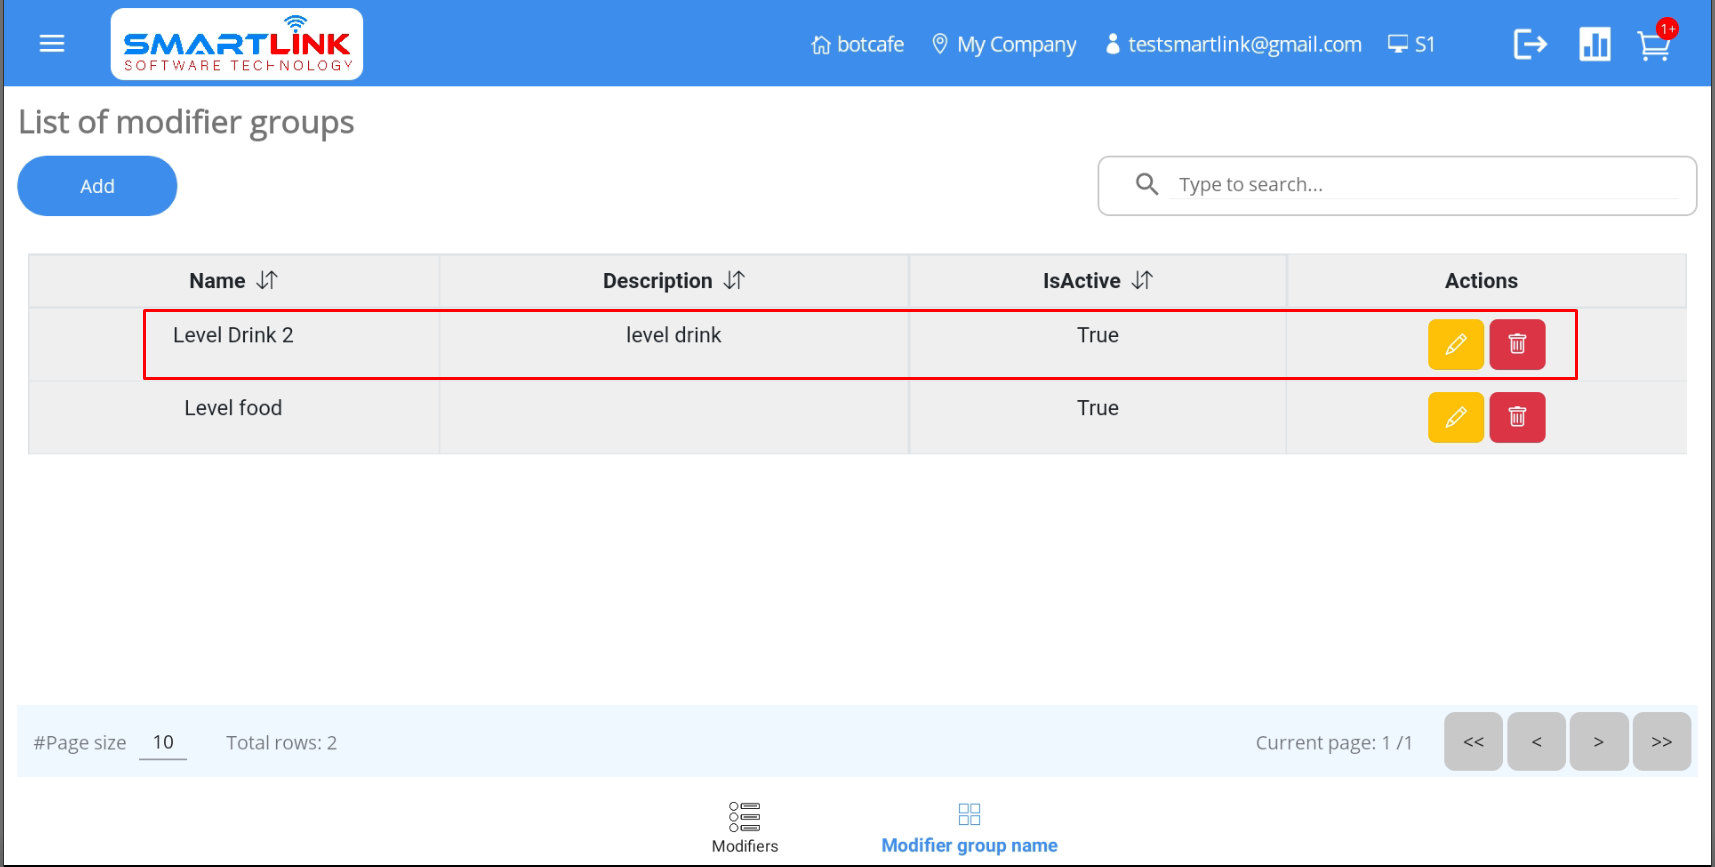
6.2. Modifier groups
To manage modifier groups, follow these steps:
- Step 1: Press the Menu button on the left corner of the
screen. The system will display a
sidebar.

- Step 2: Press the Modifiers category.

- Step 3: When the system displays a list of modifiers, Press the
Modifier group name
button.

● The system displays a list of modifier groups
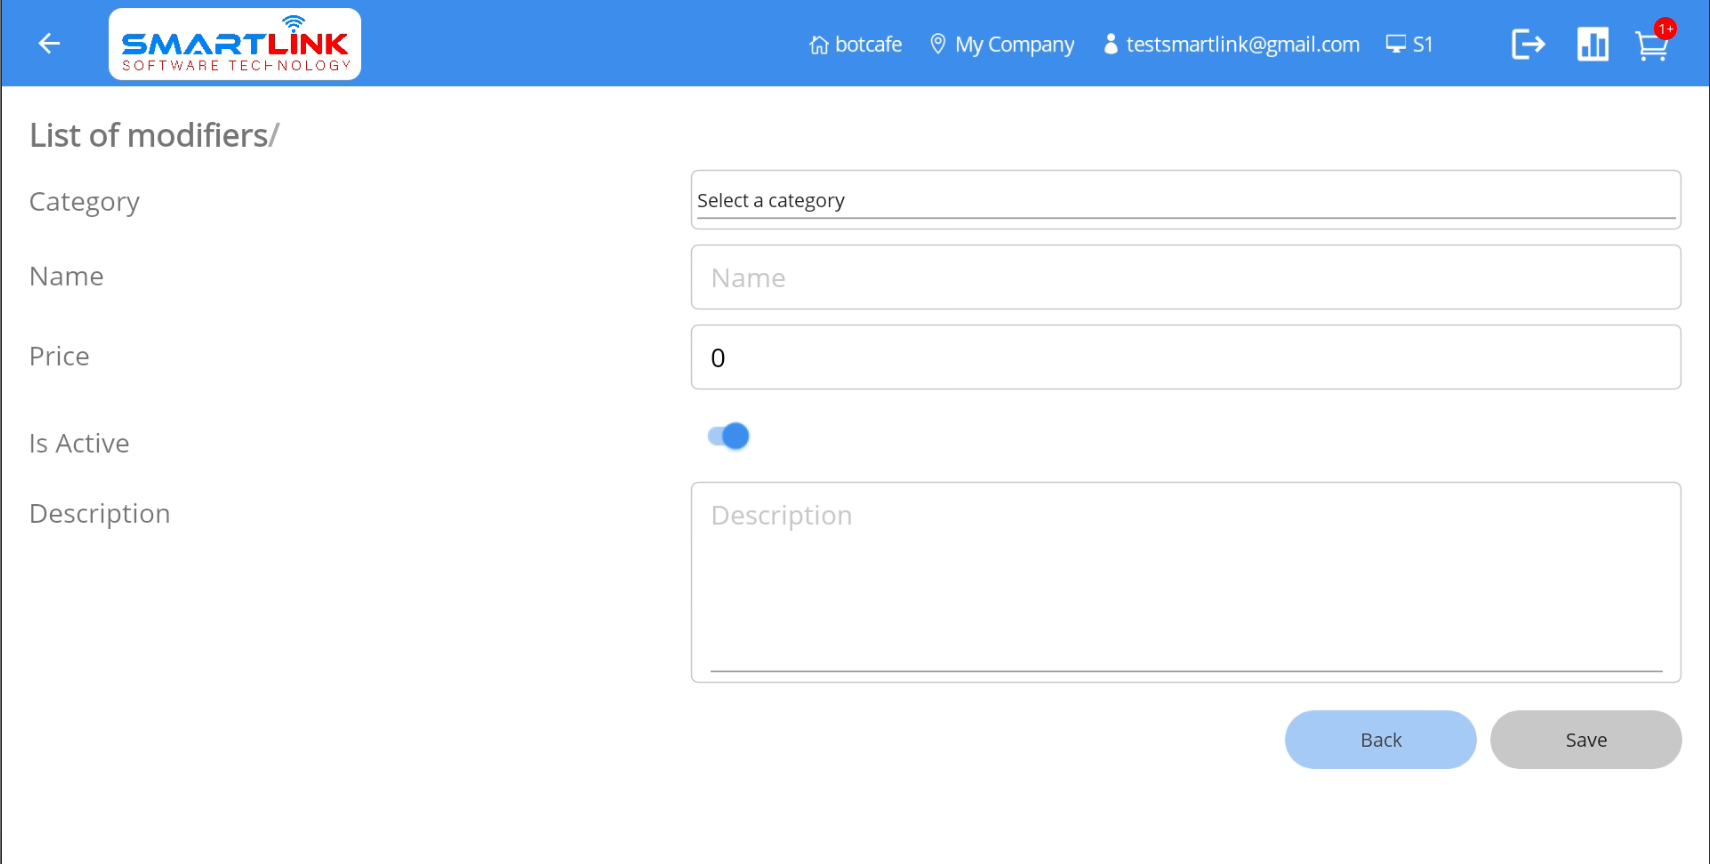
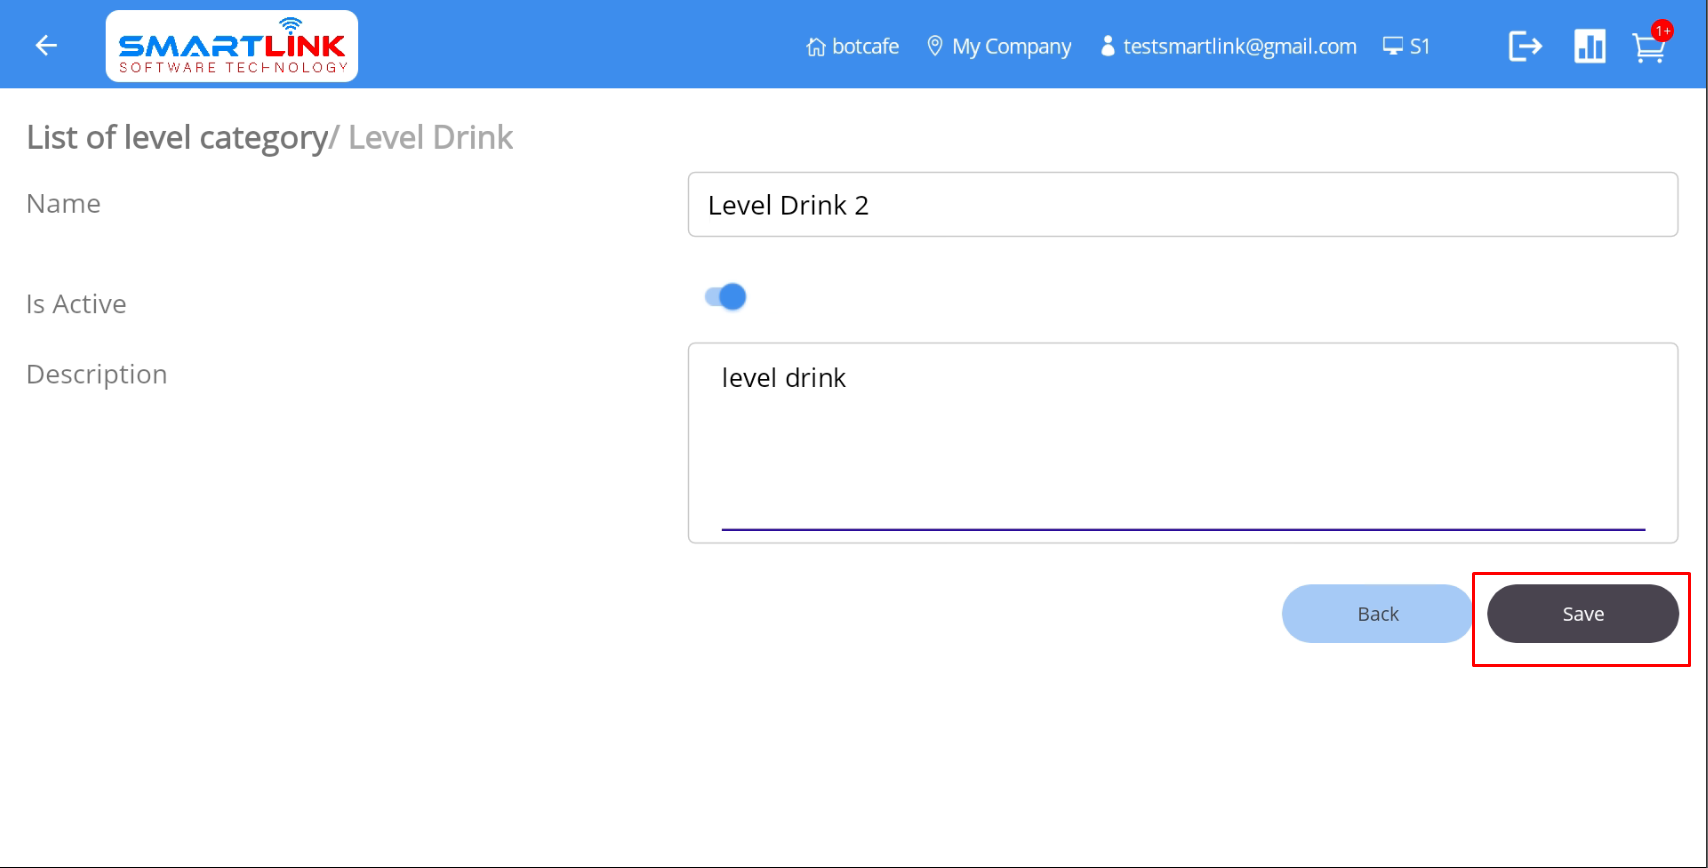
6.2.1. Add new modifier group
To add a new modifier group, follow these steps:
- Step 1: On the Modifier groups screen, press the Add
button.
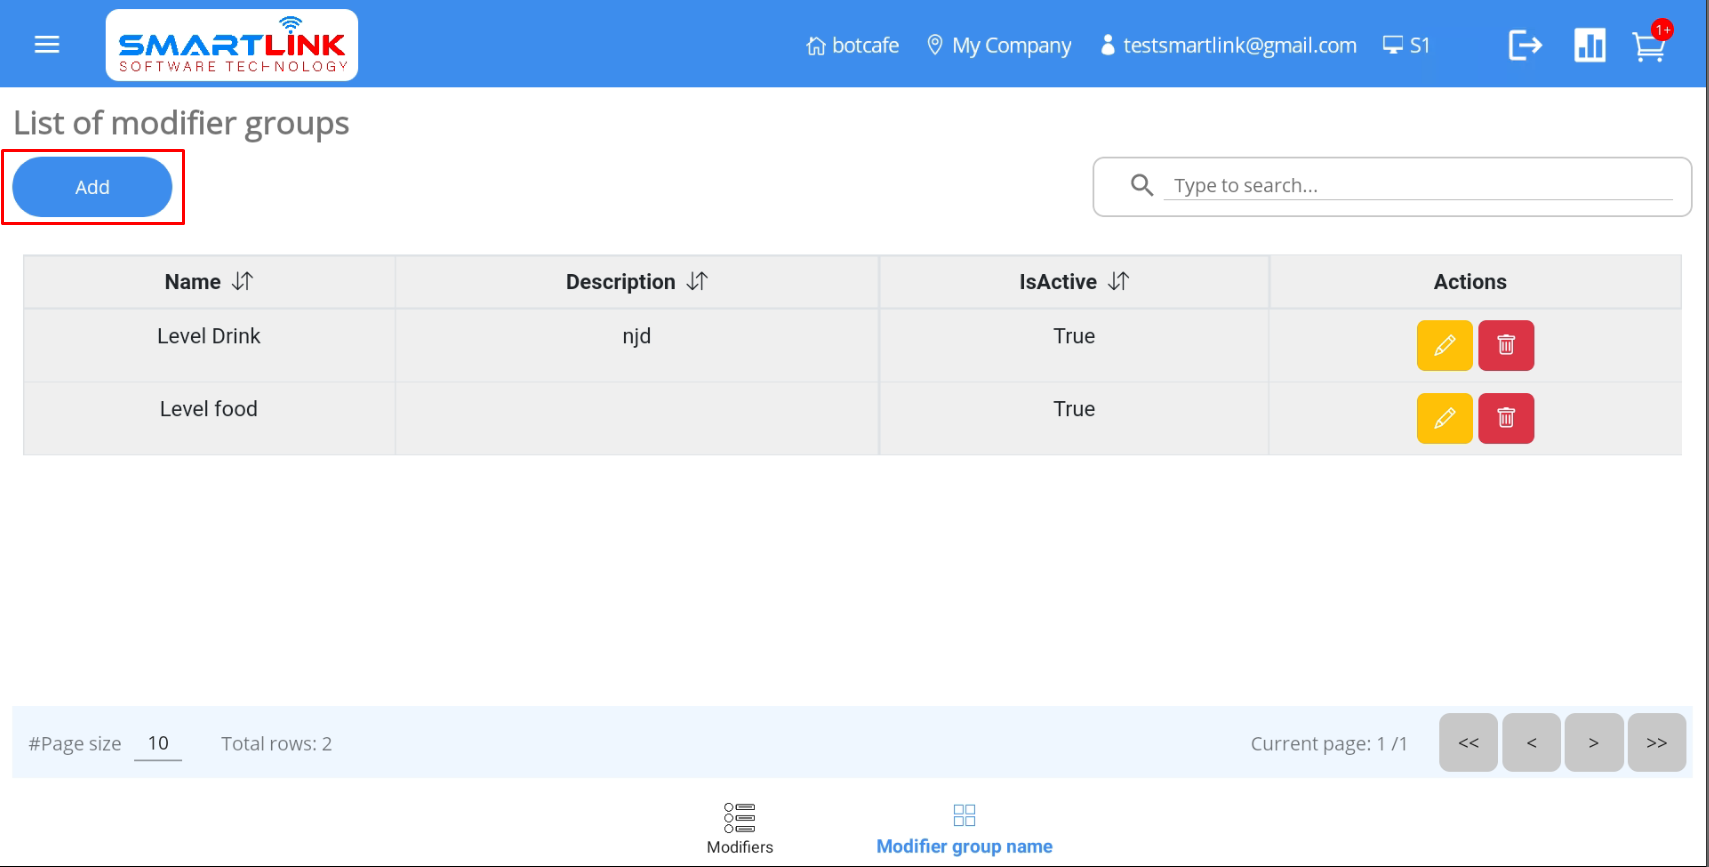
● The system displays a screen to add new modifier group.
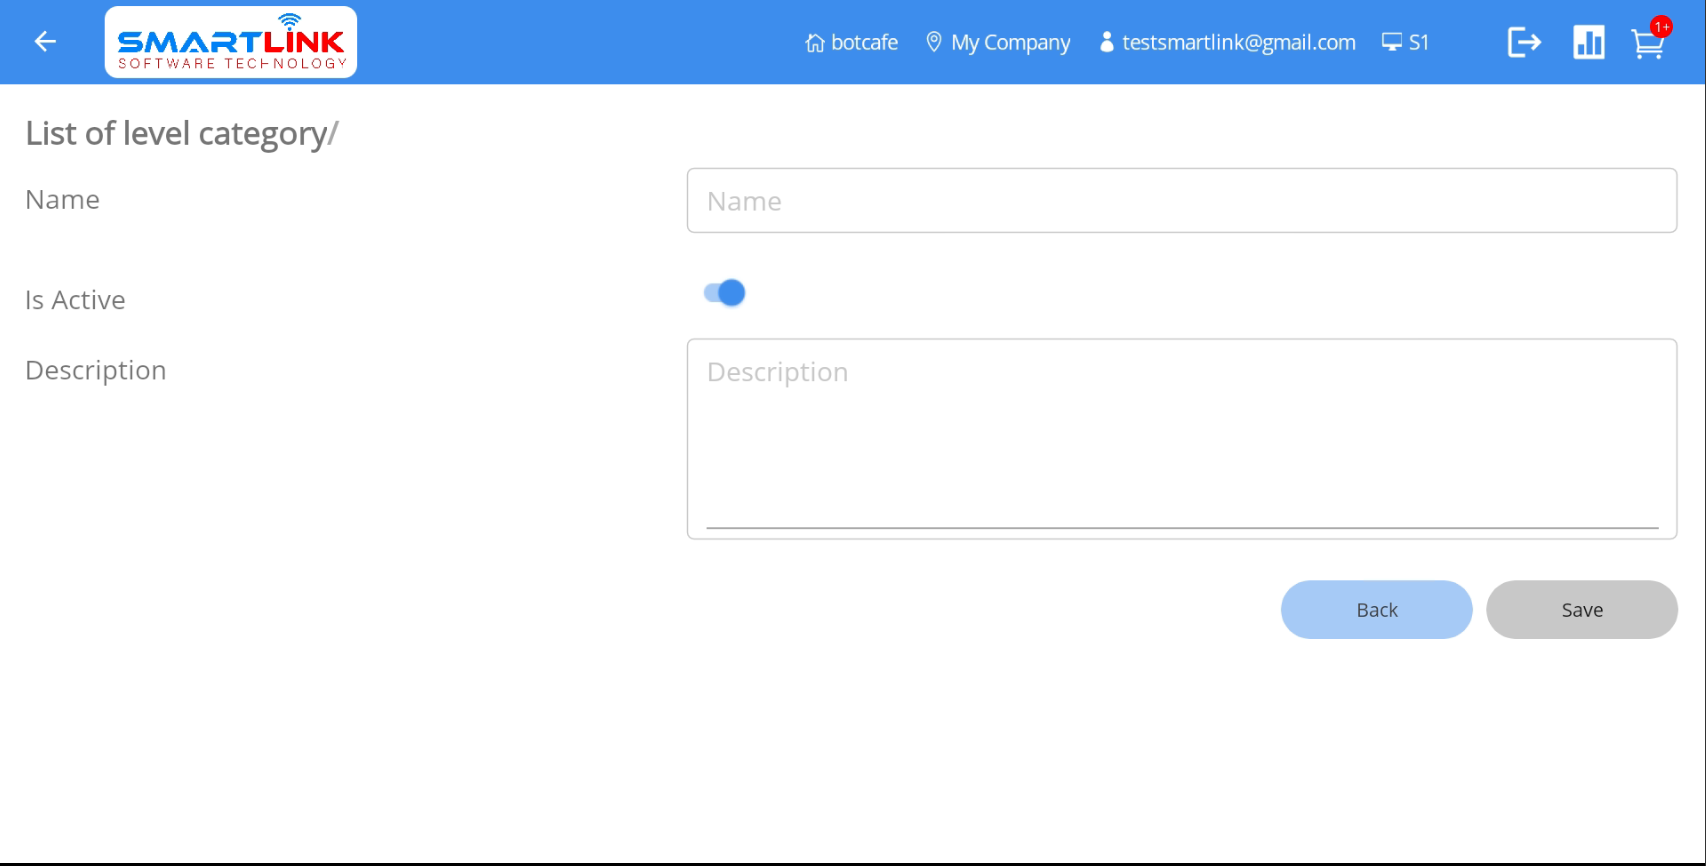
- Step 2: Enter complete information into the fields then press the
Save
button to save a new modifier group. Press the Back
button to cancel.
- Step 3: After successfully adding a new modifier group, the system displays it on the modifier
group list.
list.
Note:
● Modifier group names cannot overlap.
● Modifier groups and Add-on groups that are
inactive
will
not
to be displayed.
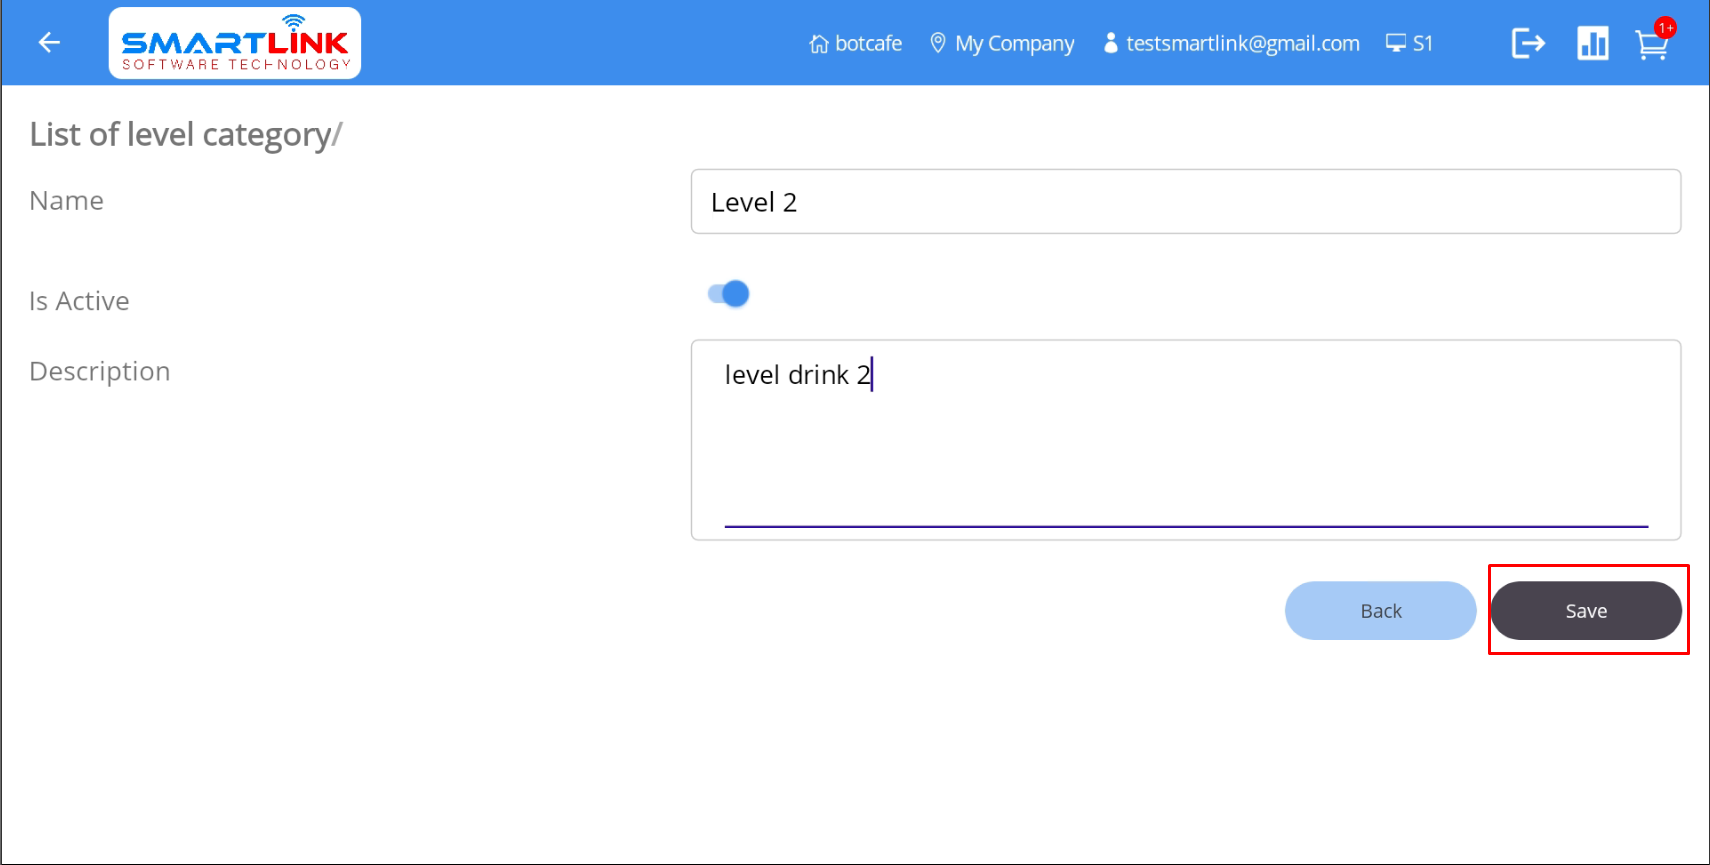
6.2.2 Edit modifier group
To edit an modifier group, follow these steps:
- Step 1: On the Modifier groups screen, press the Edit
button of the
group that needs to be edited.
● The system displays detailed information.
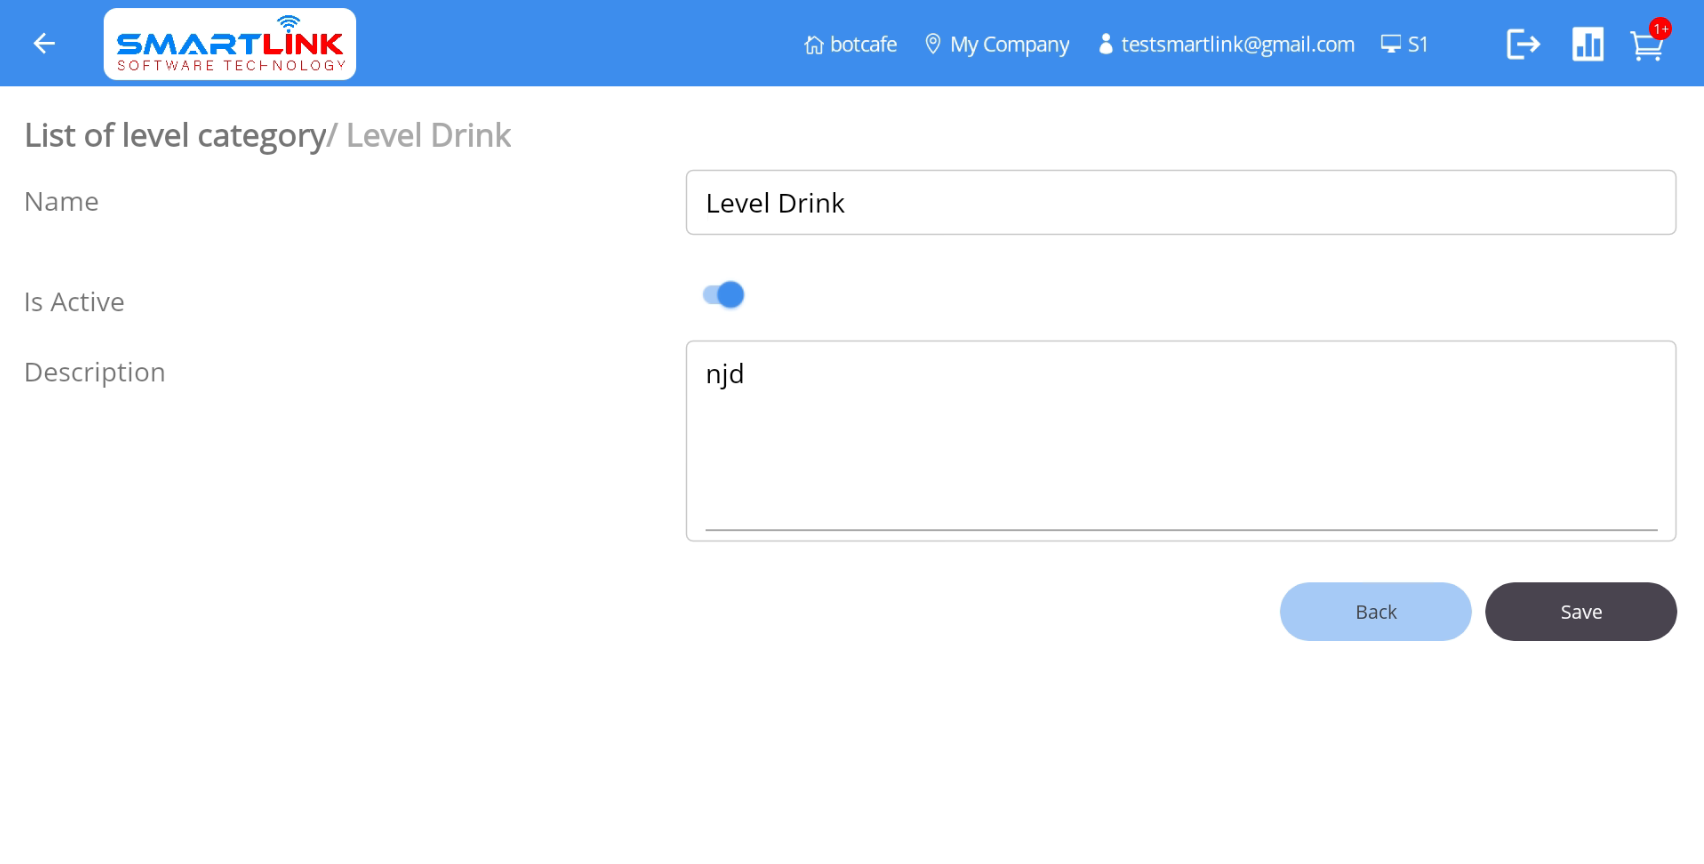
- Step 2: Enter the information to be edited then press the Save button
to save the modifier group. Press
the Back
button to cancel.
- Step 3: The newly edited information will be updated in the database.
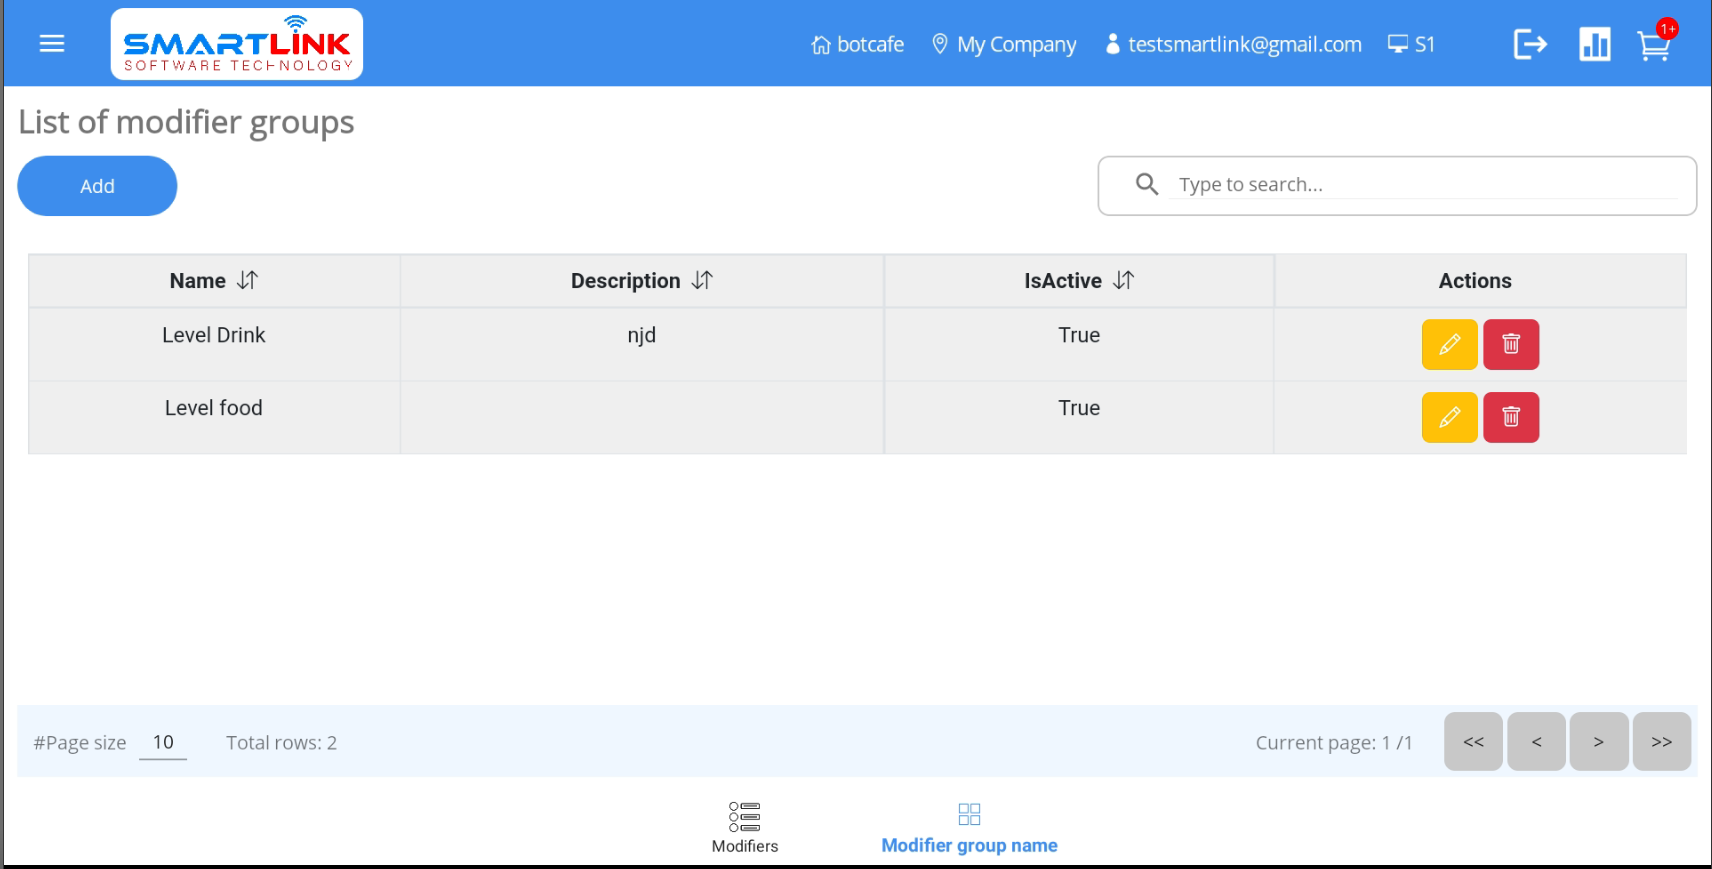
6.2.3. Delete modifier group
To delete an modifier group, follow these steps:
- Step 1: On the Modifier groups screen, press the Delete
button.
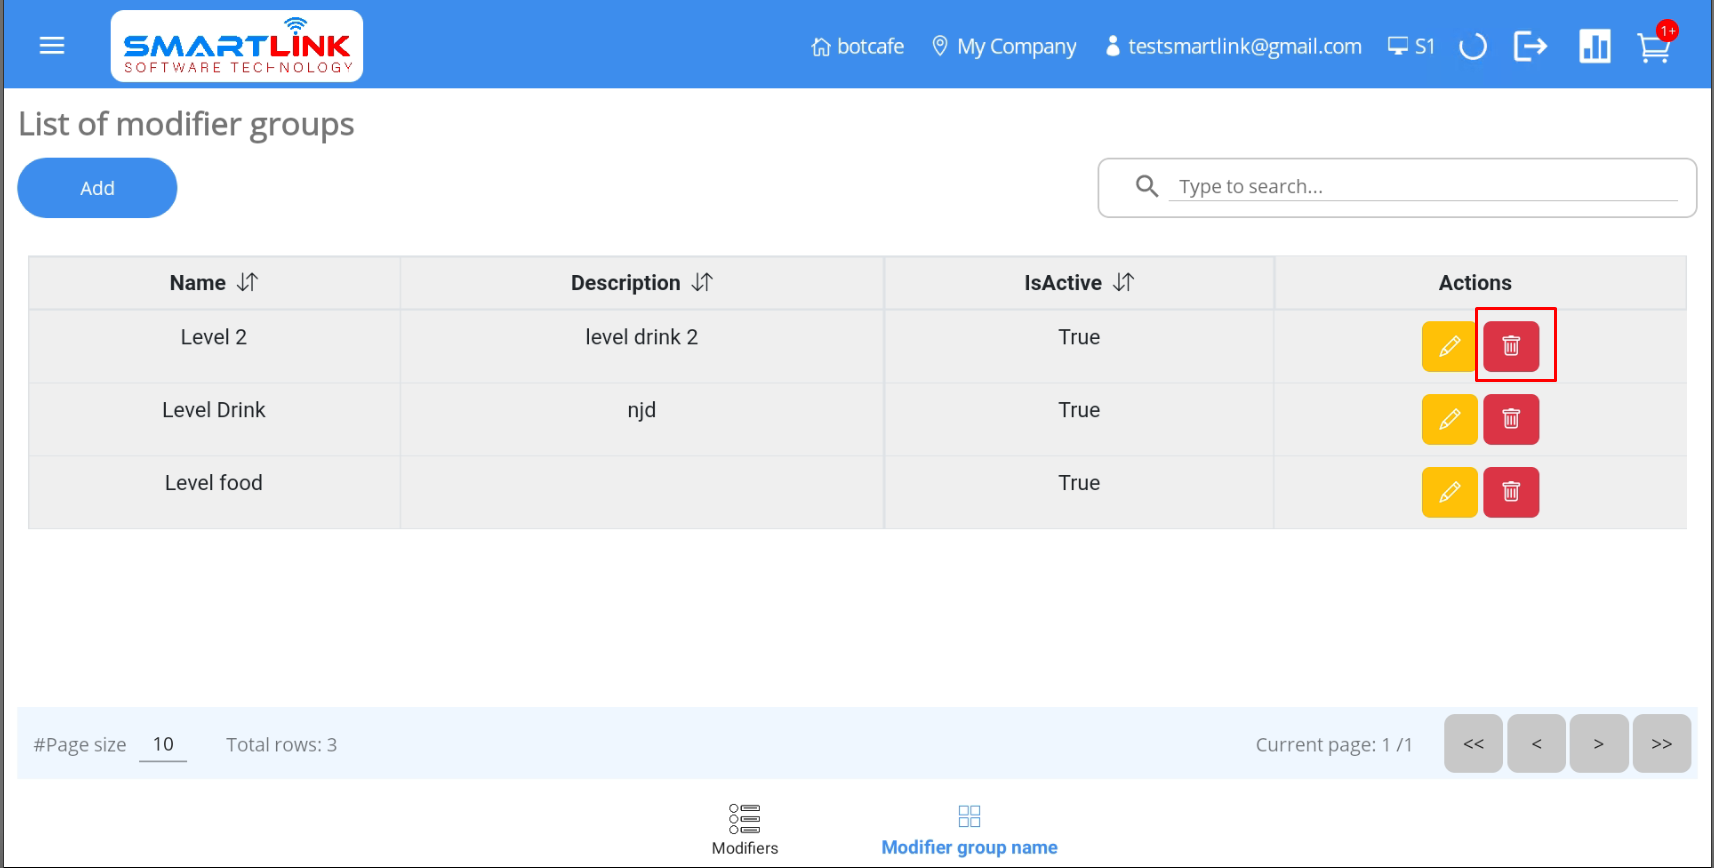
● The system displays a confirmation pop-up.
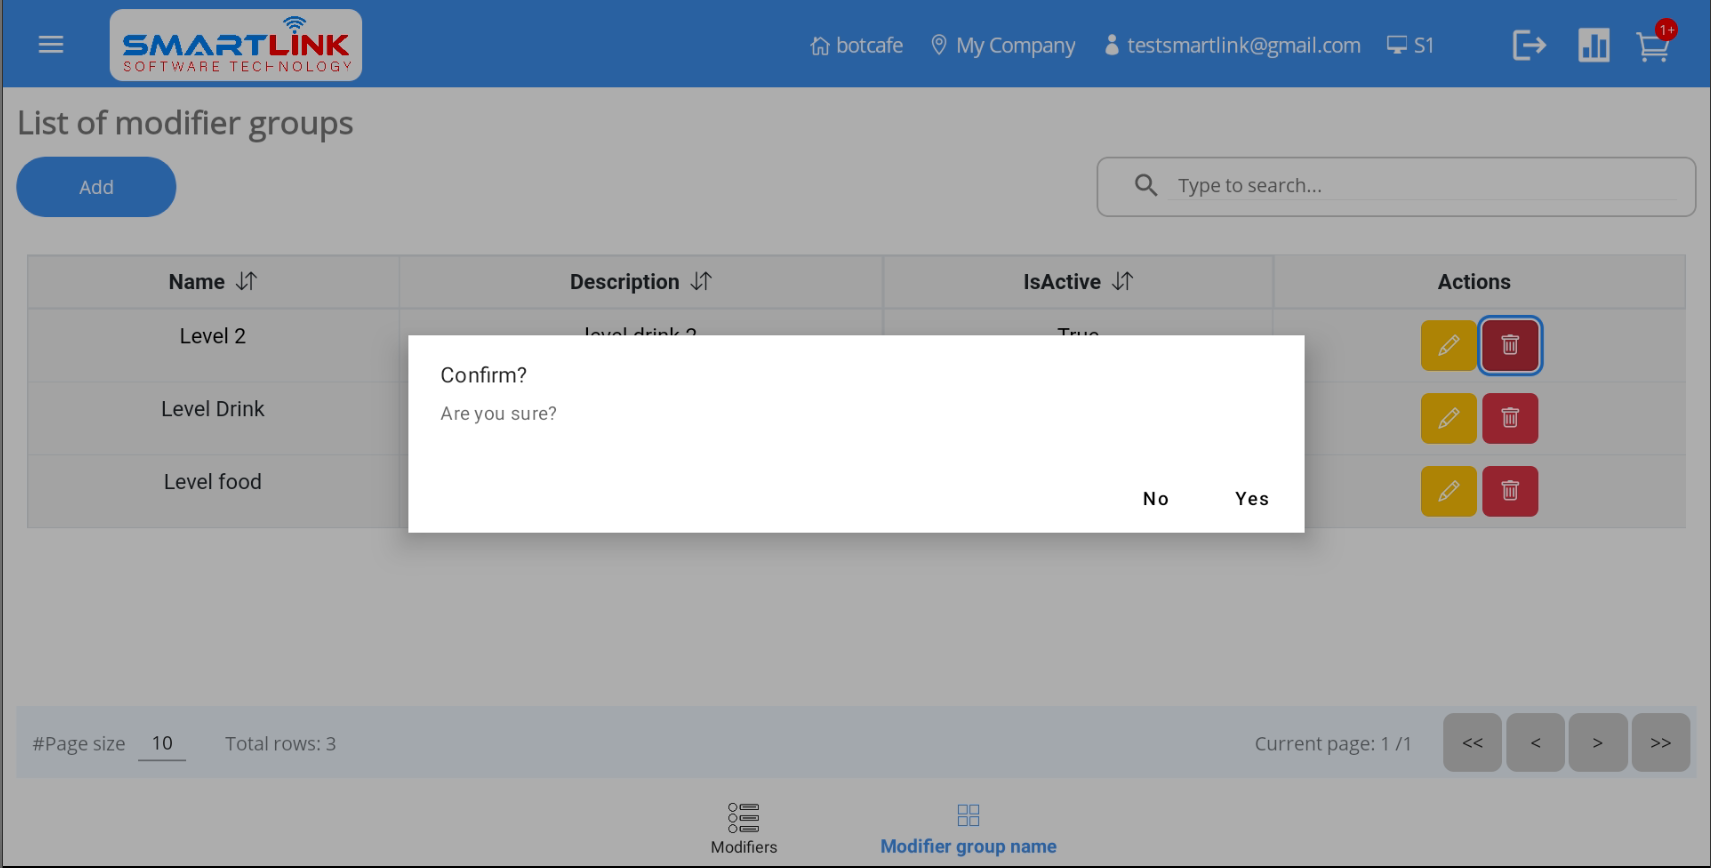
- Step 2: Press the Yes button to delete the modifier group.
Press the No
button to cancel.
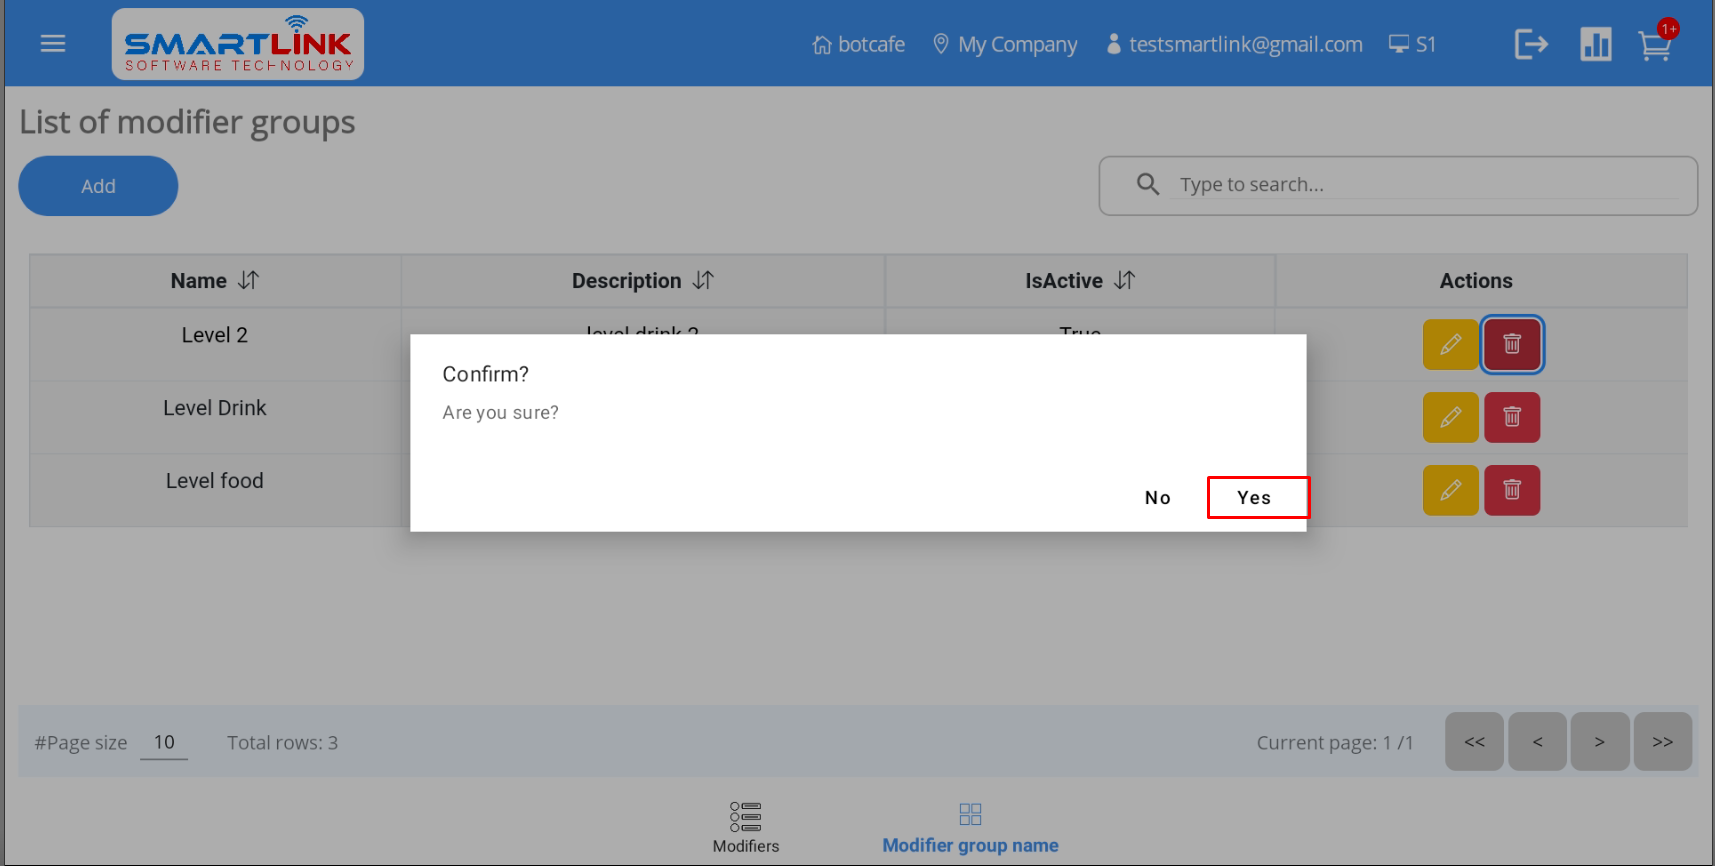
- Step 4: After successfully deleting the modifier group, the system displays a list of modifier
groups without the deleted group.
Note:
● Users are only allowed to delete the modifier groups that do not contain modifiers.
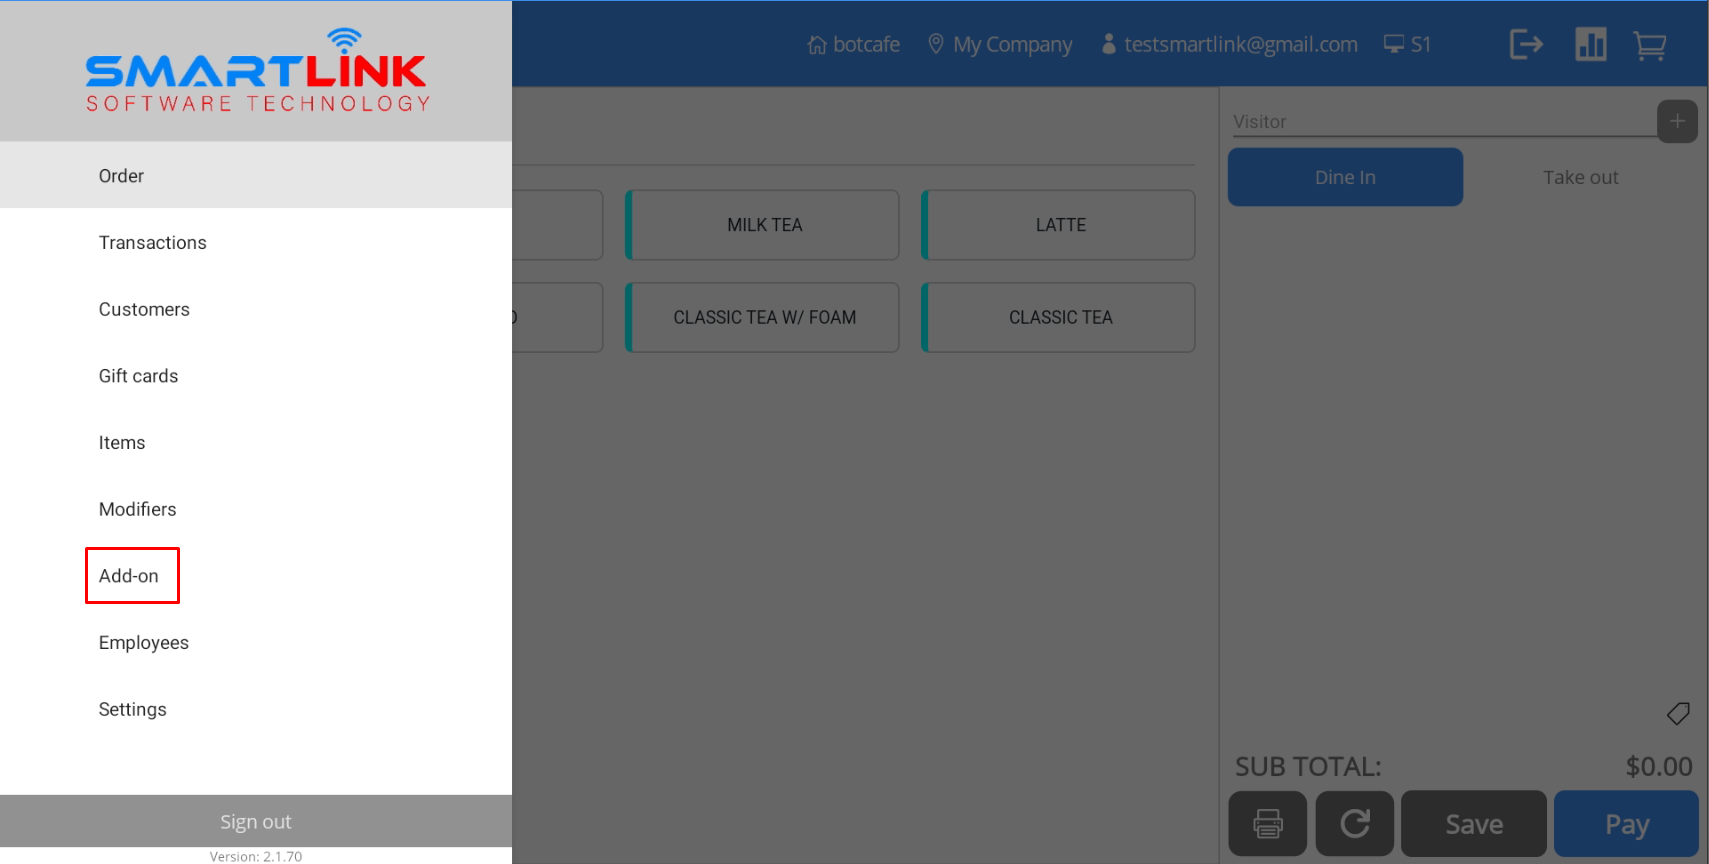
Add-ons & Add-on groups management
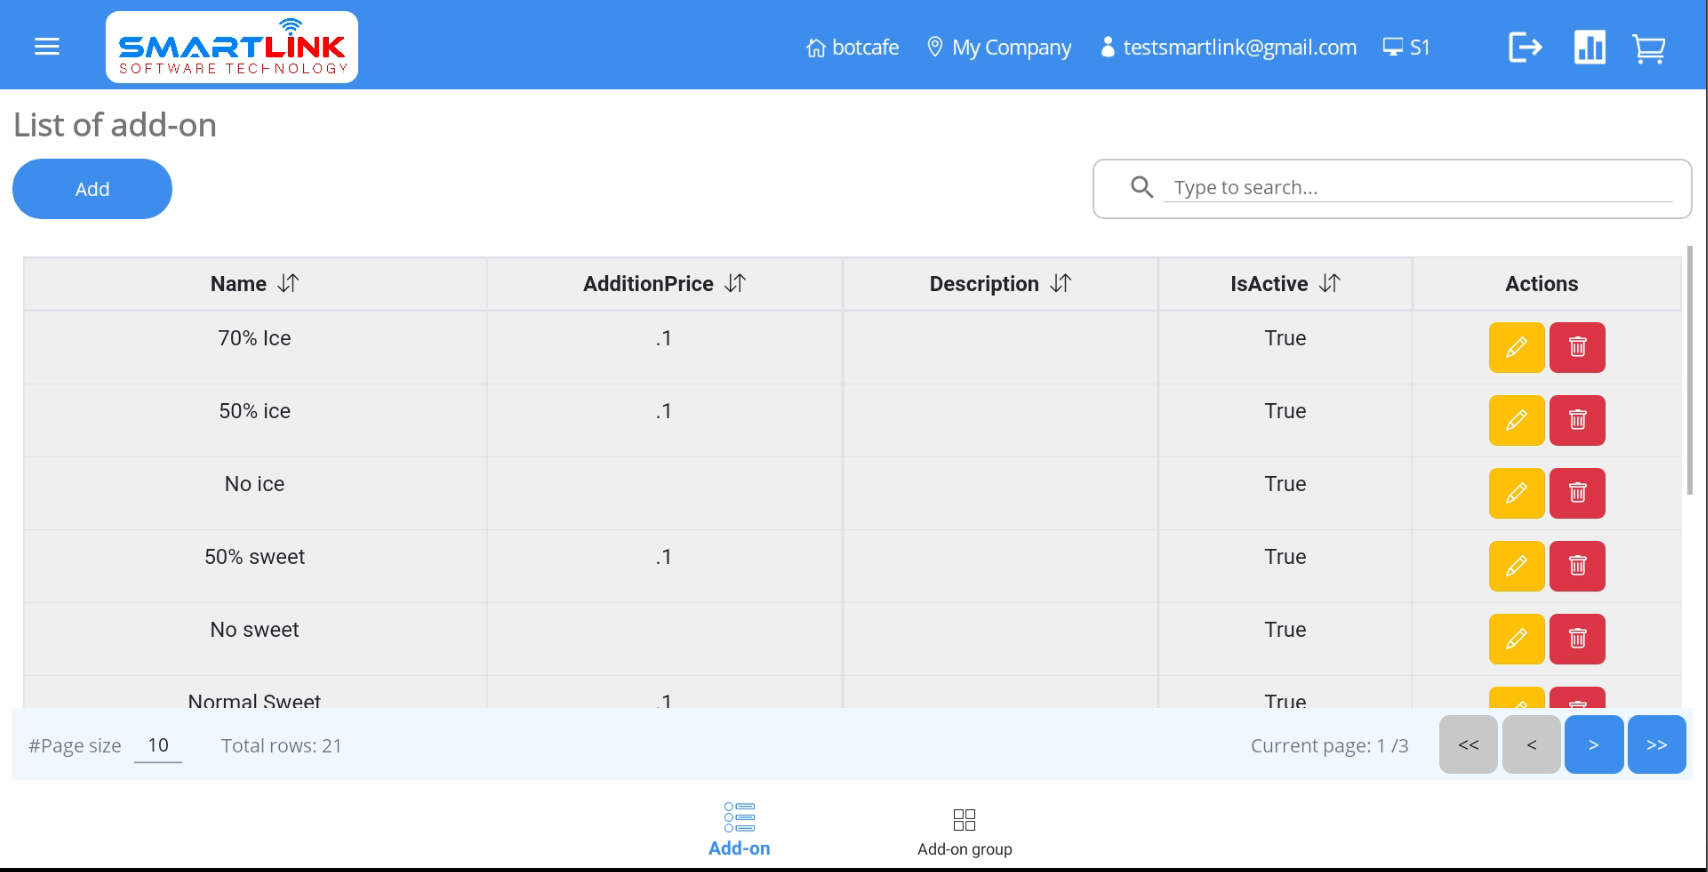
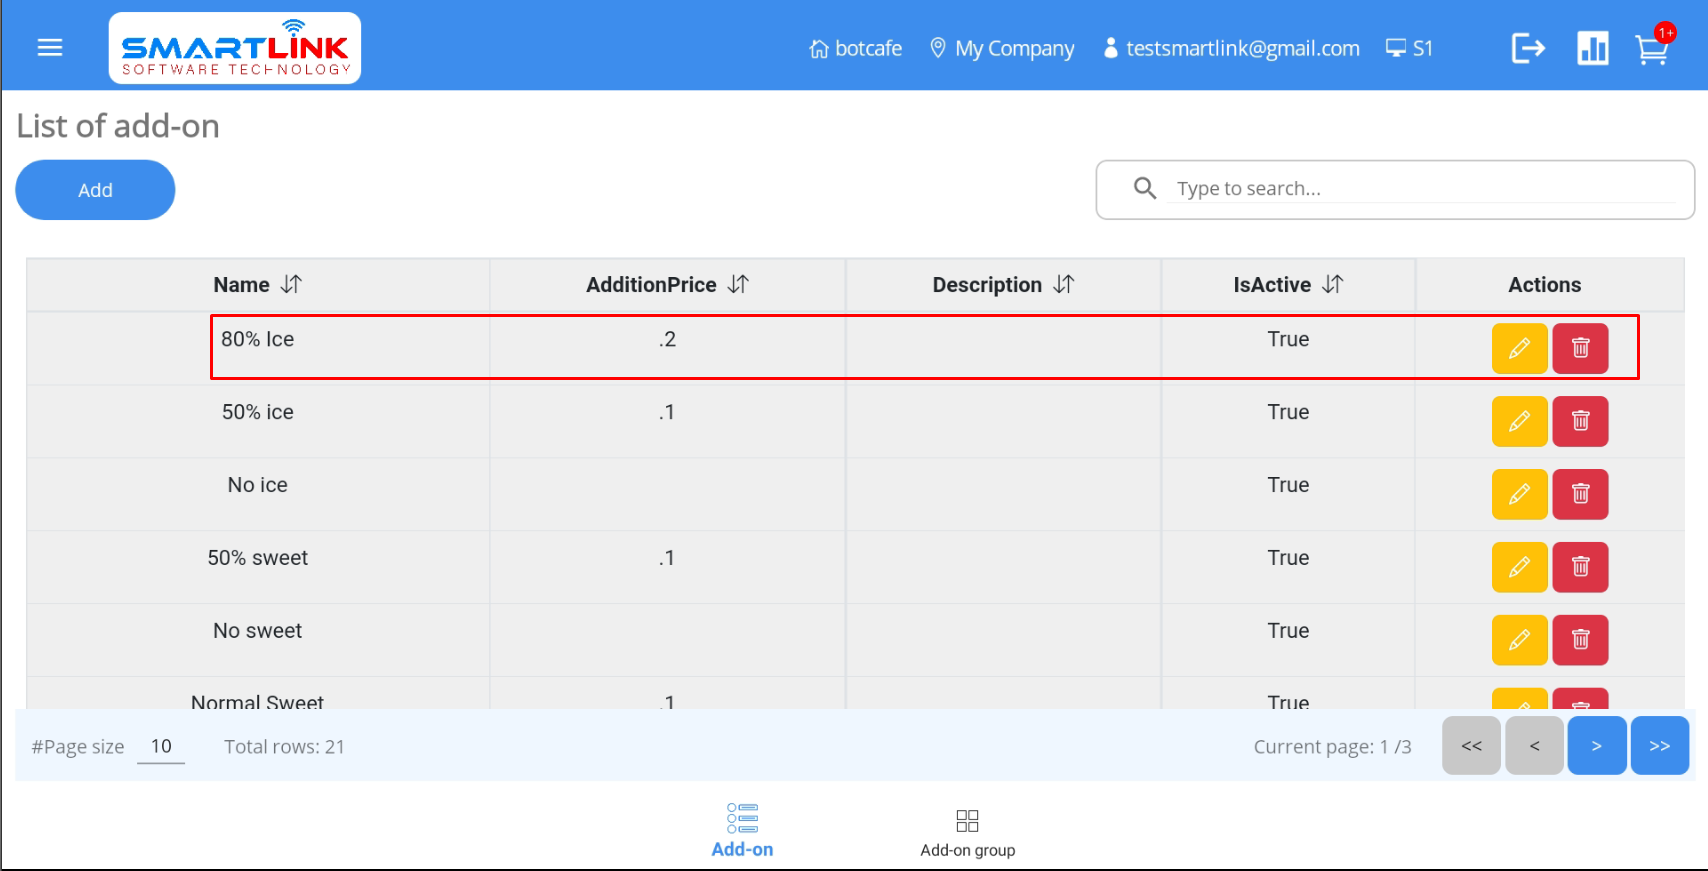
7.1. Add-ons
To manage add-ons, follow these steps:
- Step 1: Press the Menu button on the left corner of the
screen.

● The system displays a side-bar.

- Step 2:
● Press the Add-ons category.

● The system displays a list of add-ons.
7.1.1. Add new add-on
To add new add-on, follow these steps:
- Step 1: On the Add-ons screen, press the Add
button.

● The system displays a screen to add new add-on.

- Step 2: Enter complete information into the fields.
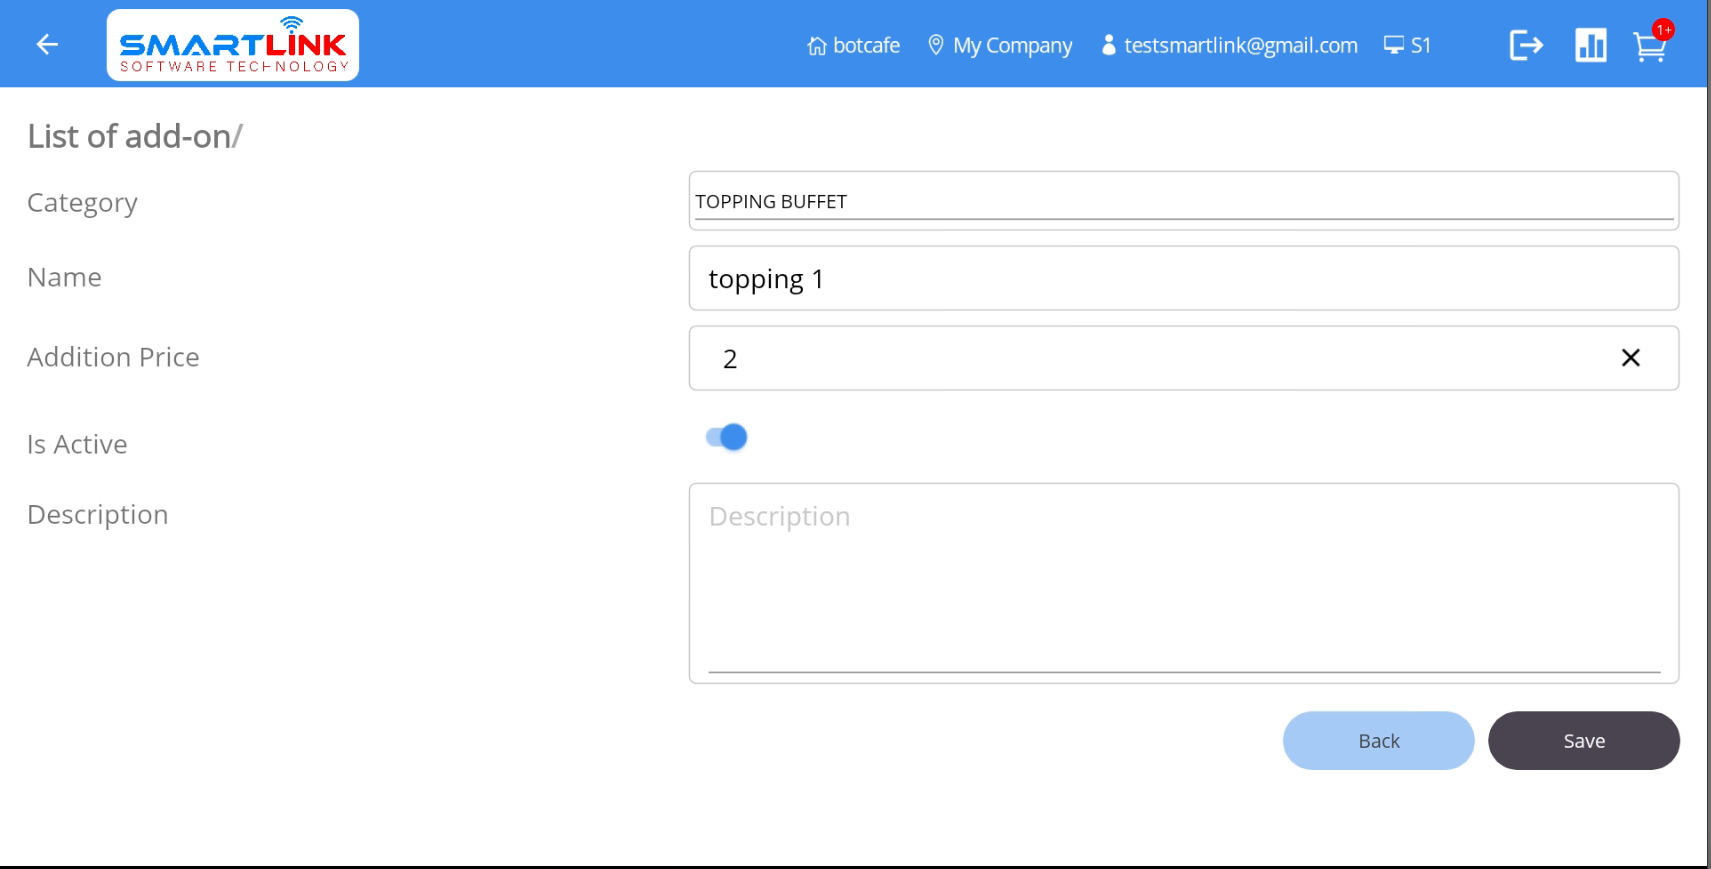
- Step 3: Press the Save button to save a new add-ons. Press
the Back
button to cancel.
- Step 4: After successfully adding new add-on, the system displays the add-on list with the
created add-on.

Note:
● The user forces step to create at least one add-on group before creating the add-on.
● In the same add-on group, add-on names cannot be the same and users cannot Inactivate all add-ons.
● Add-ons and Add-ons will be automatically received
according
to the item group that the user selects.
● Add-ons with Inactive status will not be displayed on the main transaction screen
and
vice
versa.
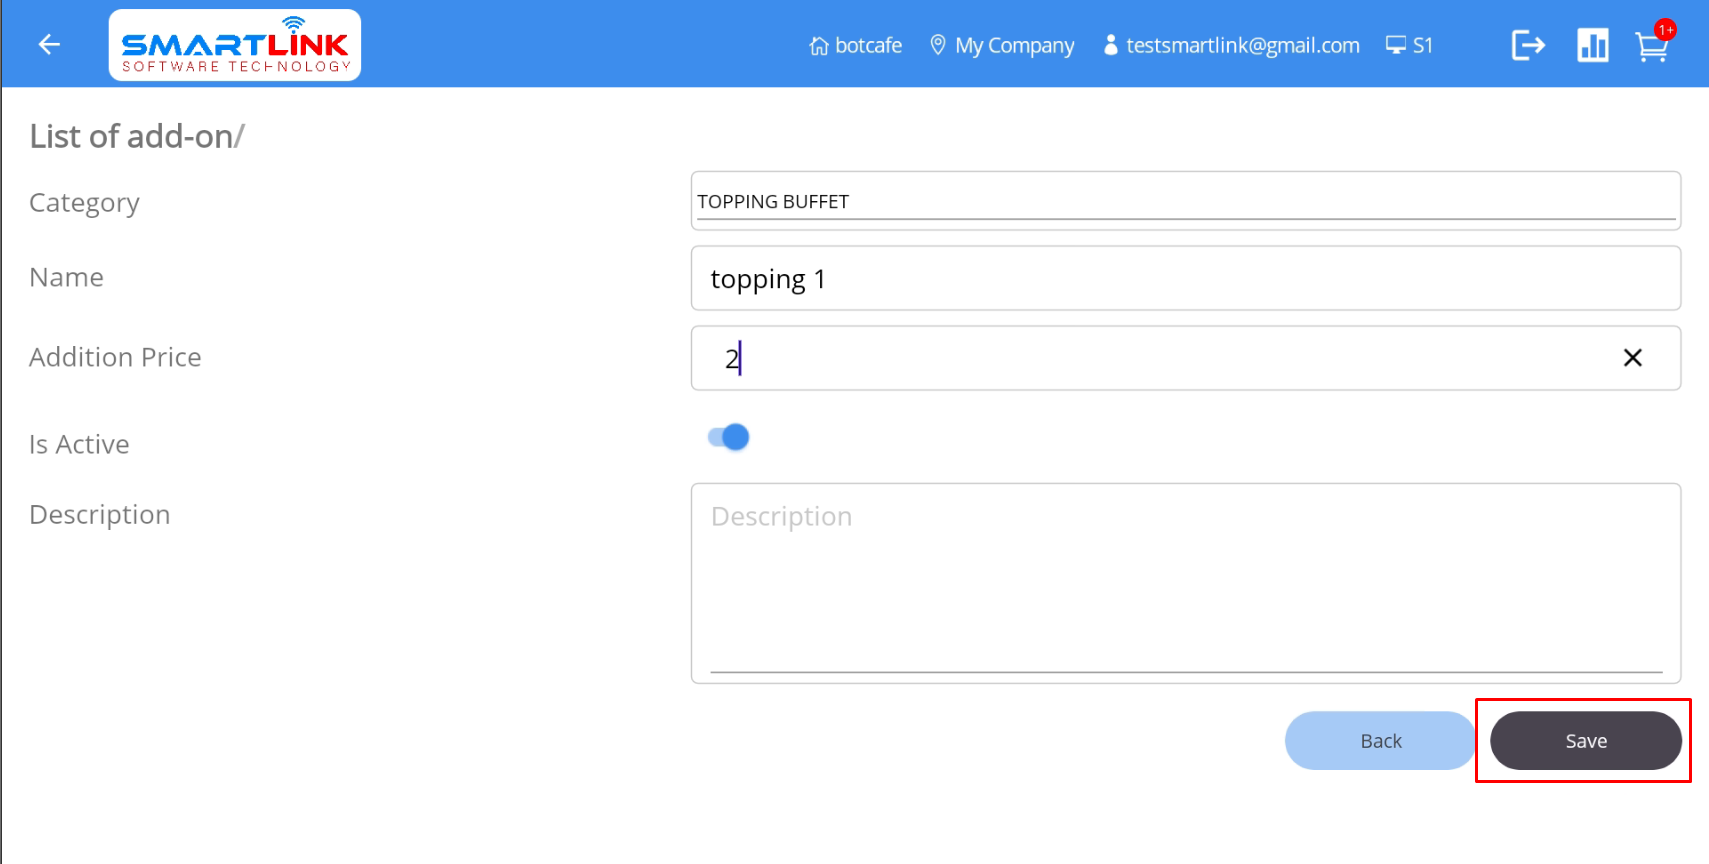
7.1.2 Edit add-on
To edit an add-on, follow these steps:
- Step 1: On the Add-ons screen, press the Edit
button.

● The system displays detailed information.
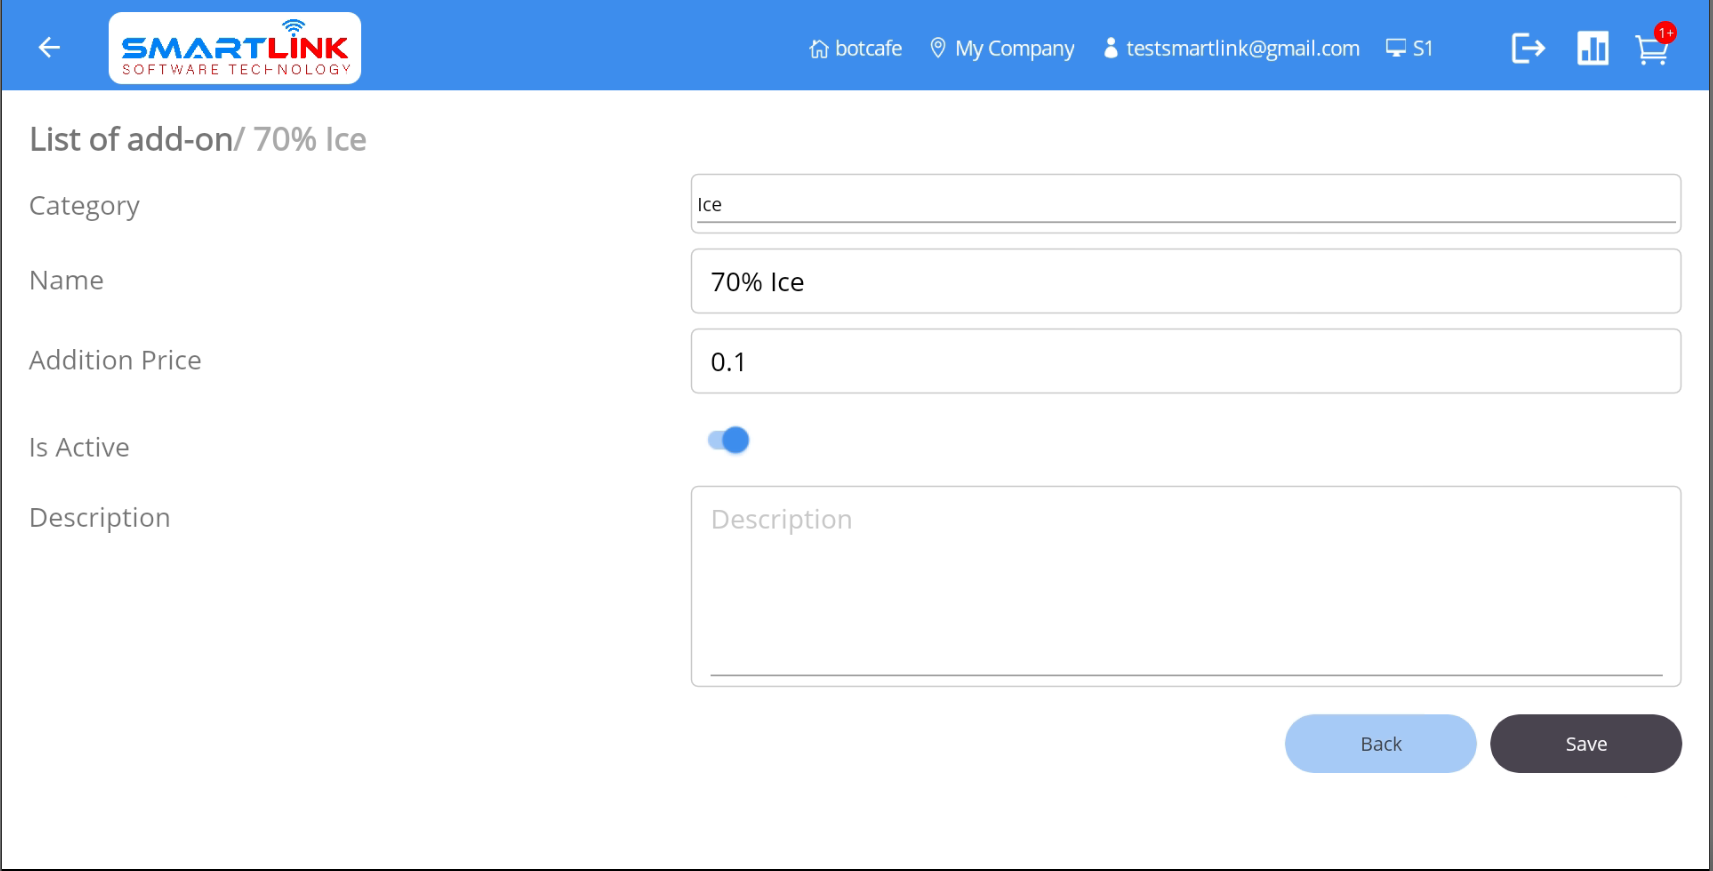
- Step 2: Enter the information to be edited then press the Save button
to save the add-on. Press the Back
button to cancel.
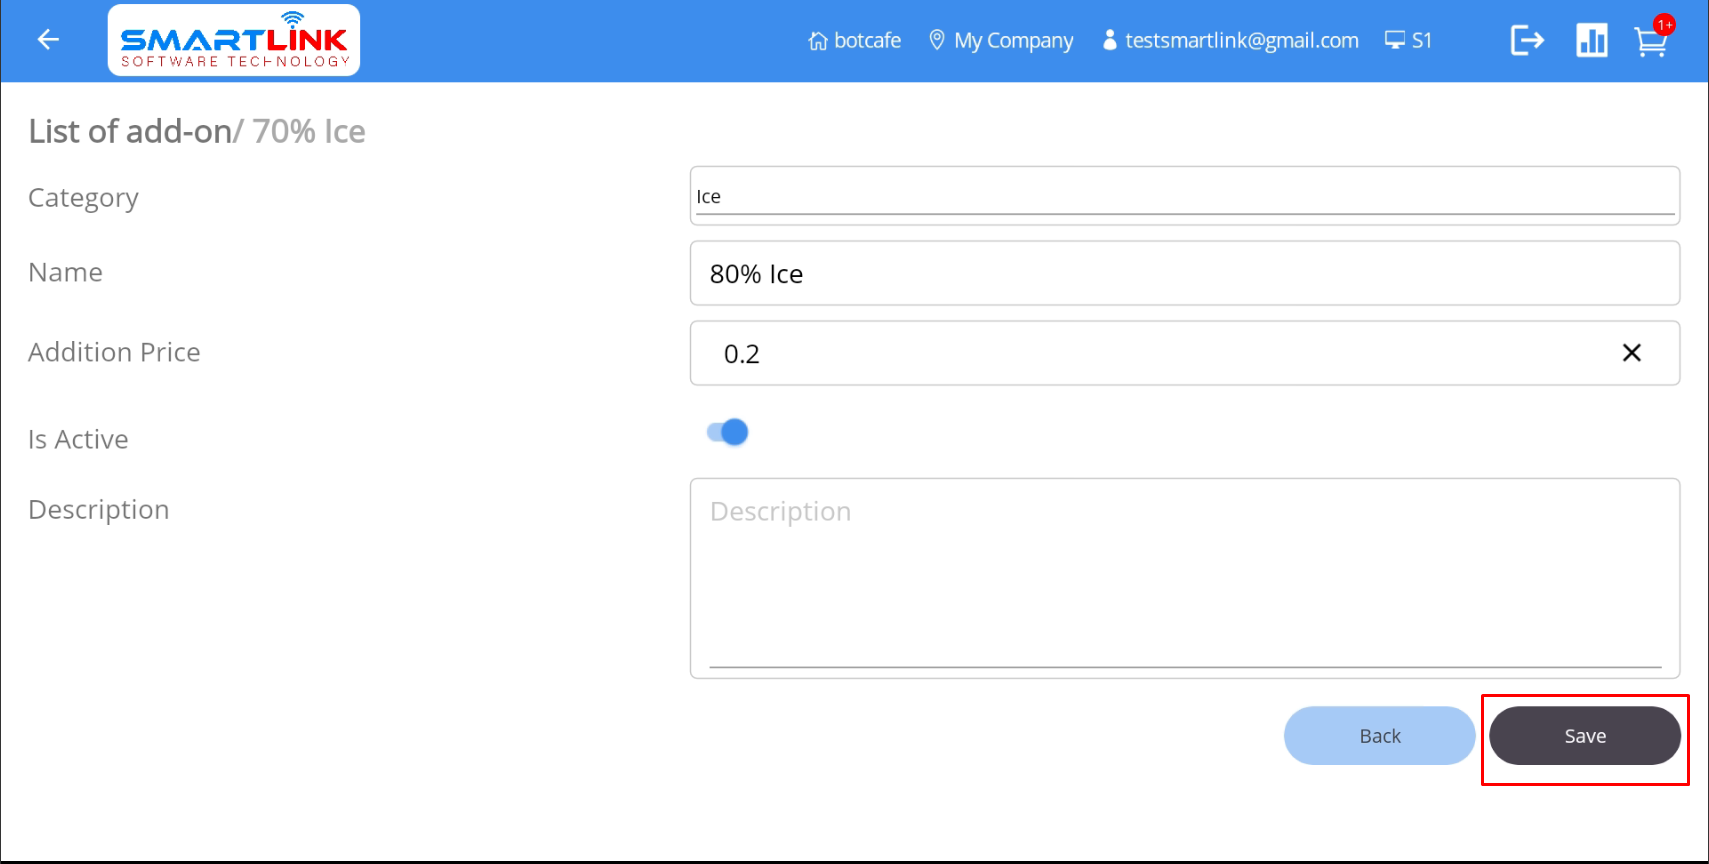
- Step 4: The newly edited add-on information will be updated in the database.
Note:
● Users are not allowed to edit the group of this add-on.
7.1.3. Delete add-on
To delete an add-on, follow these steps:
- Step 1: On the Add-ons screen, press the Delete
button.

● The system displays a confirmation pop-up.
- Step 2: Press the Yes button to delete the add-on. Press the No
button to cancel.
- Step 4: After successfully deleting the add-on, the system displays a list of add-ons
without the deleted add-on.

Note:
● Users are only allowed to delete the add-ons that are in the Draff-status orders.
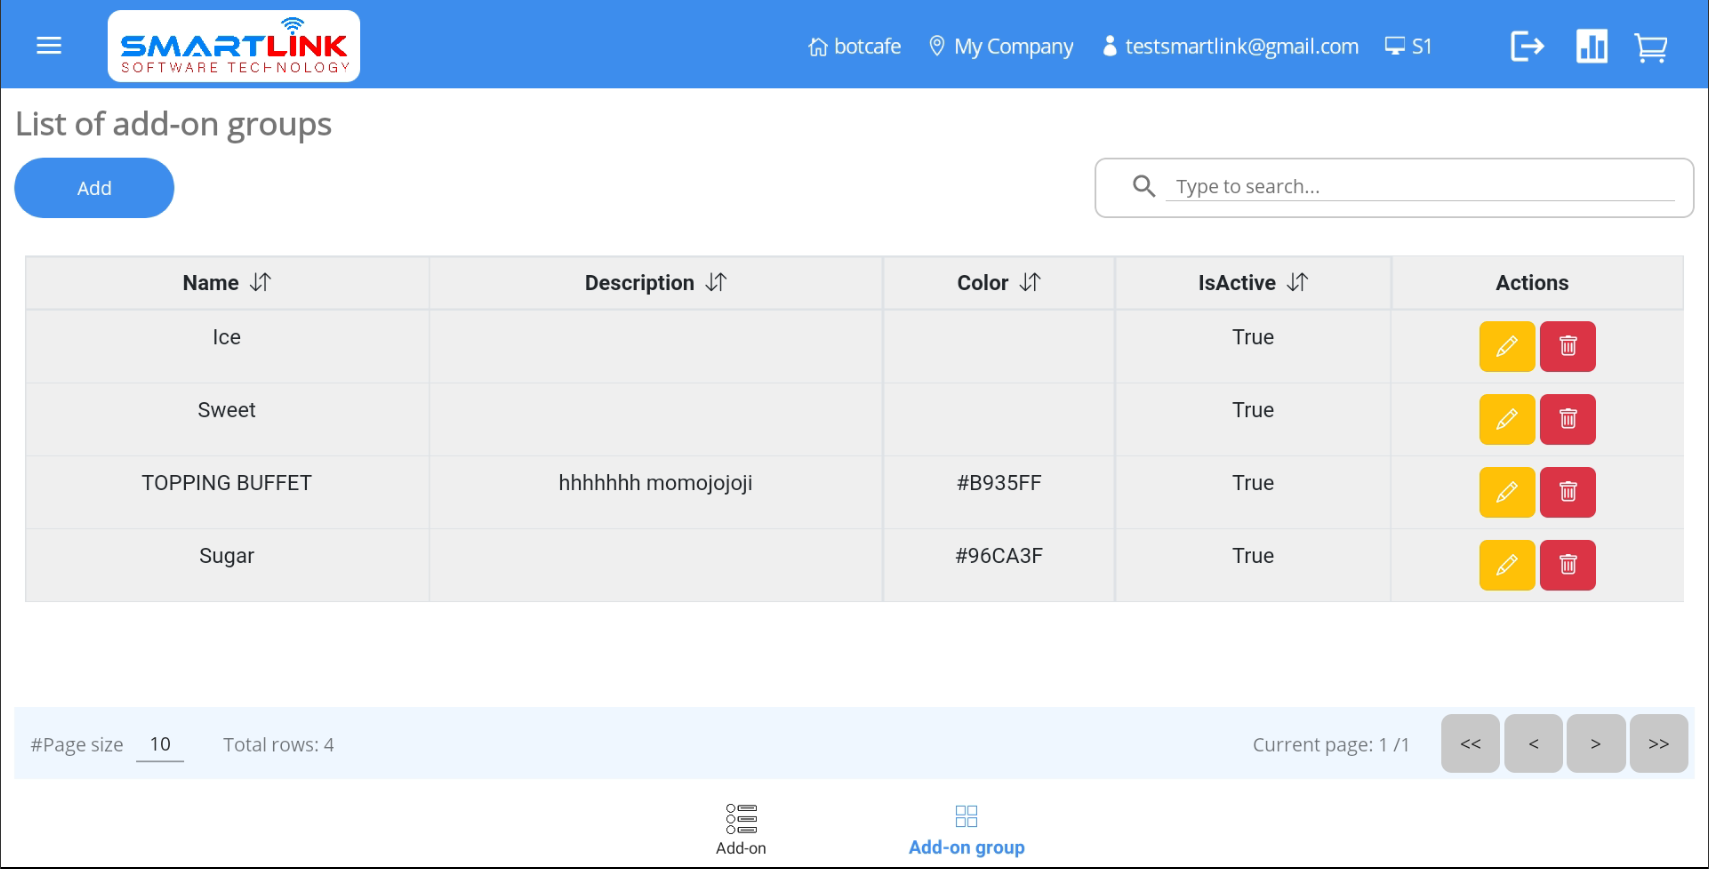
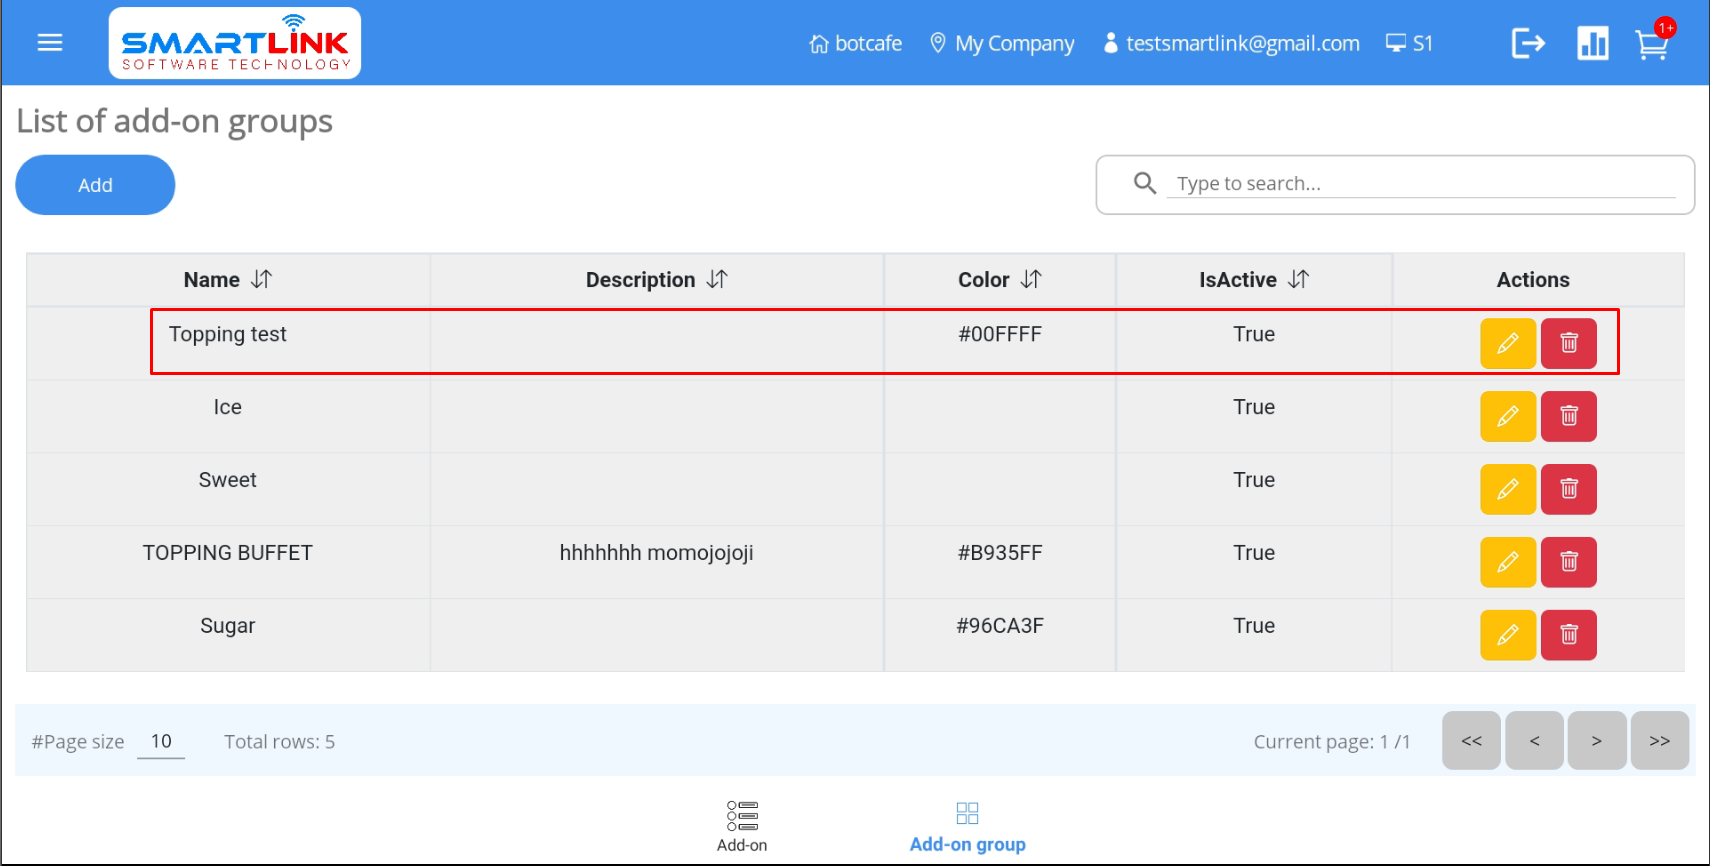
7.2. Add-on groups
To manage add-on groups, follow these steps:
- Step 1: Press the Menu button on the left corner of the
screen. The system will display a
sidebar.
- Step 2: Press the Add-ons category.
- Step 3: When the system displays a list of add-ons, Press the
Add-on group name
button.

● The system displays a list of add-on groups
7.2.1. Add new add-on group
To add a new add-on group, follow these steps:
- Step 1: On the Add-on groups screen, press the Add
button.
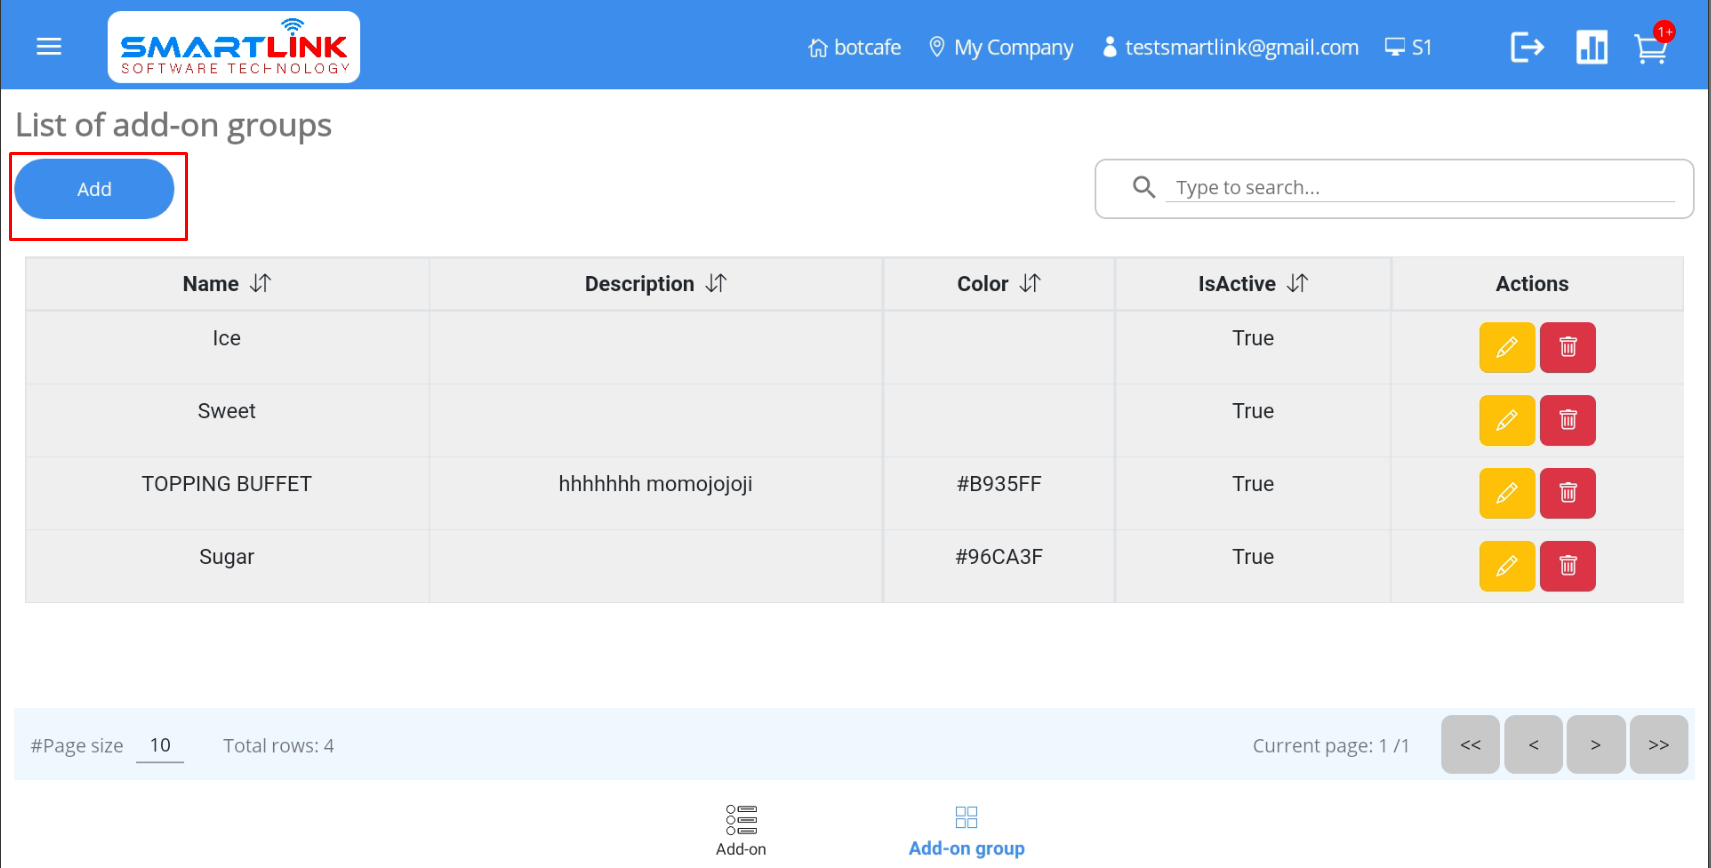
● The system displays a screen to add new add-on group.
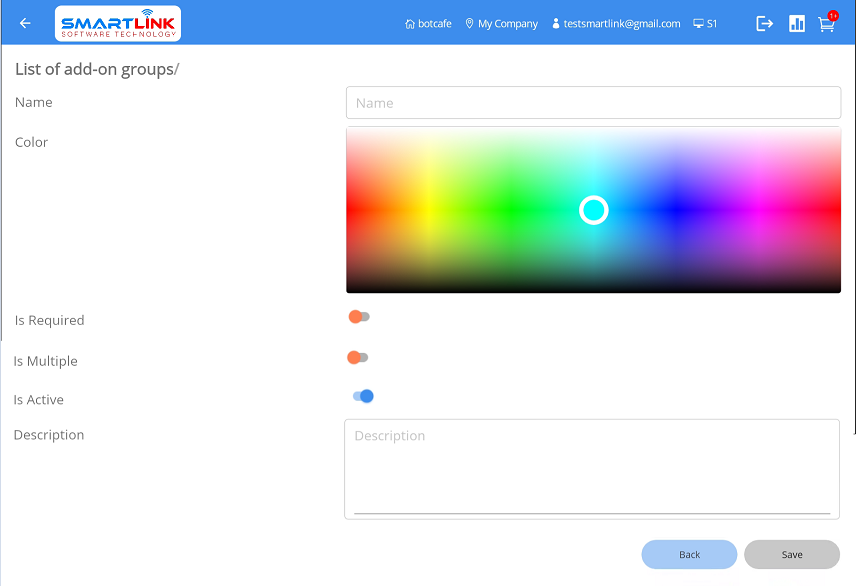
- Step 2: Enter complete information into the fields then press the
Save
button to save a new add-on group. Press the Back
button to cancel.
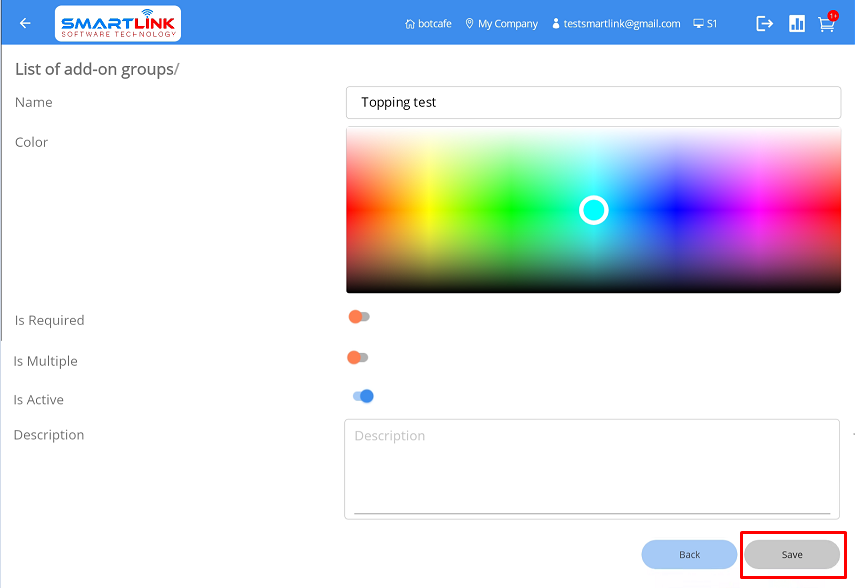
- Step 3: After successfully adding a new add-on group, the system displays it on the add-on
group list.
list.
Note:
● Add-on group names cannot overlap.
● Add-on groups and Add-on groups that are inactive
will
not
to be displayed.
7.2.2 Edit add-on group
To edit an add-on group, follow these steps:
- Step 1: On the Add-on groups screen, press the Edit
button of the
group that needs to be edited.
● The system displays detailed information.
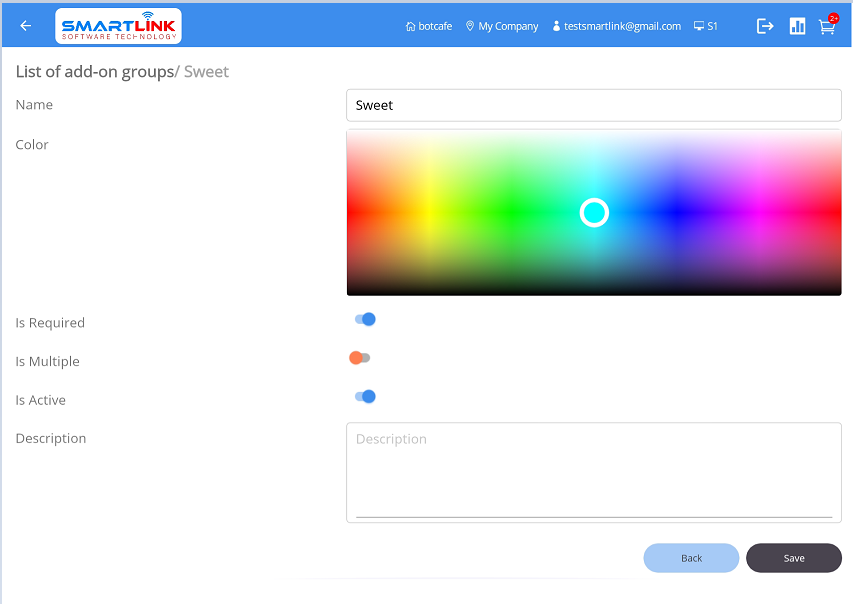
- Step 2: Enter the information to be edited then press the Save button
to save the add-on group. Press
the Back
button to cancel.
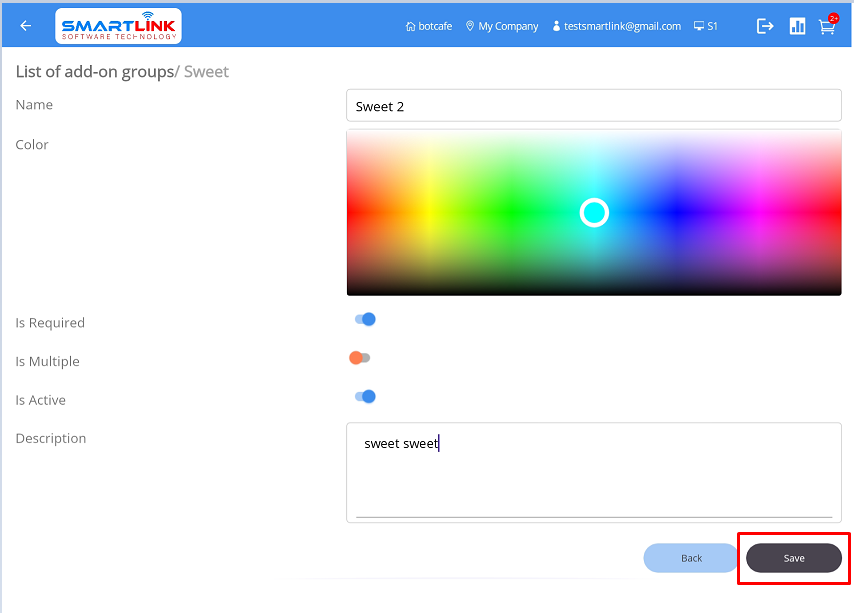
- Step 3: The newly edited information will be updated in the database.

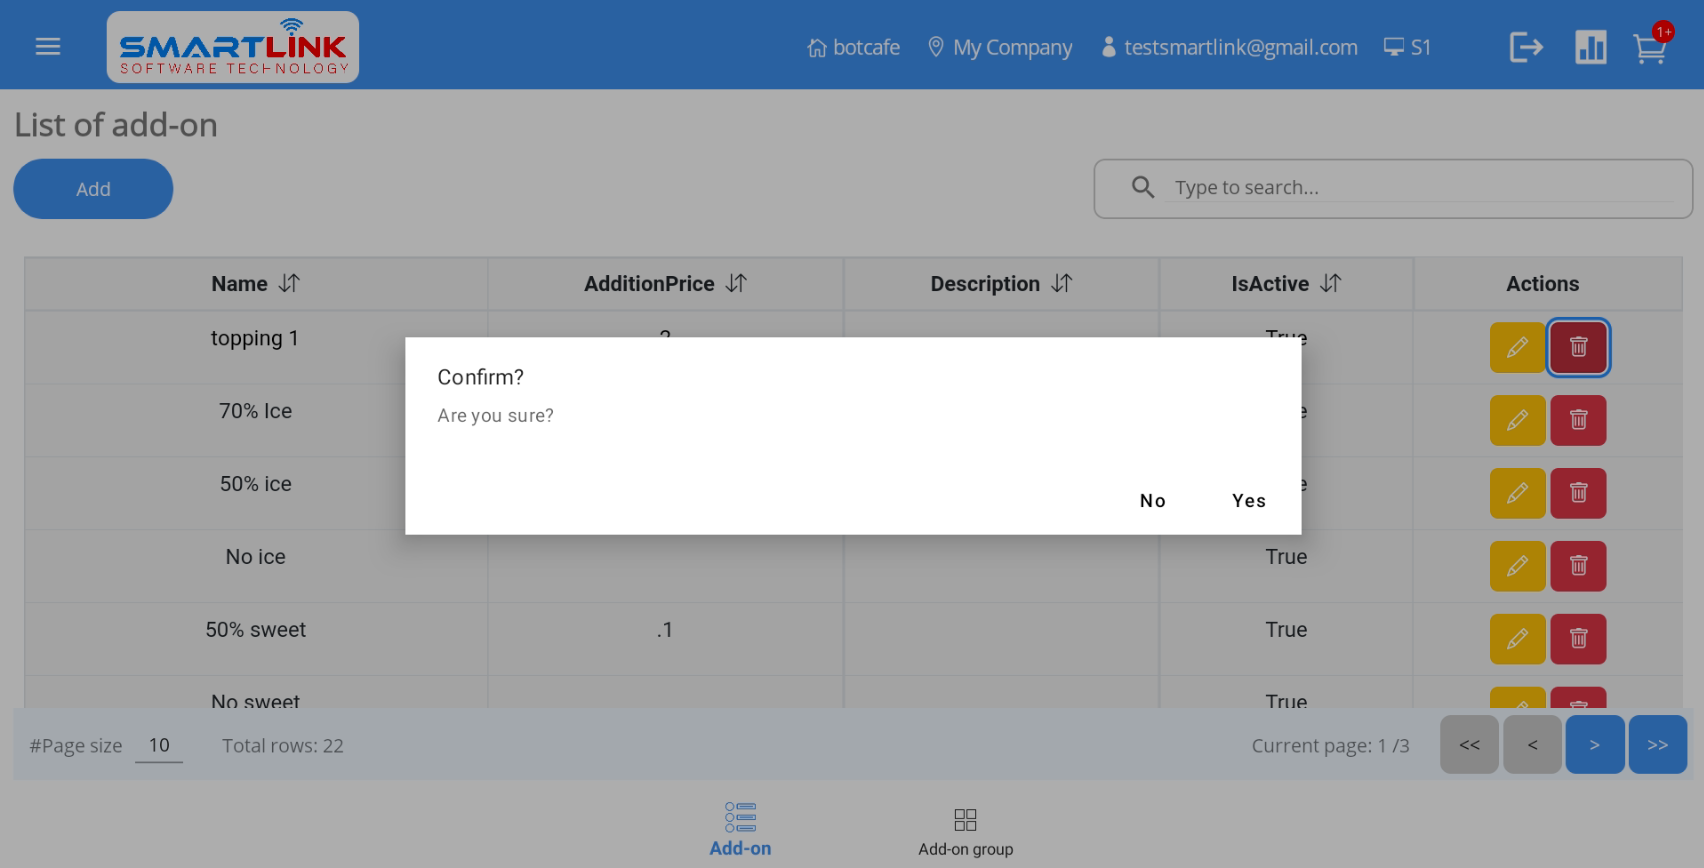
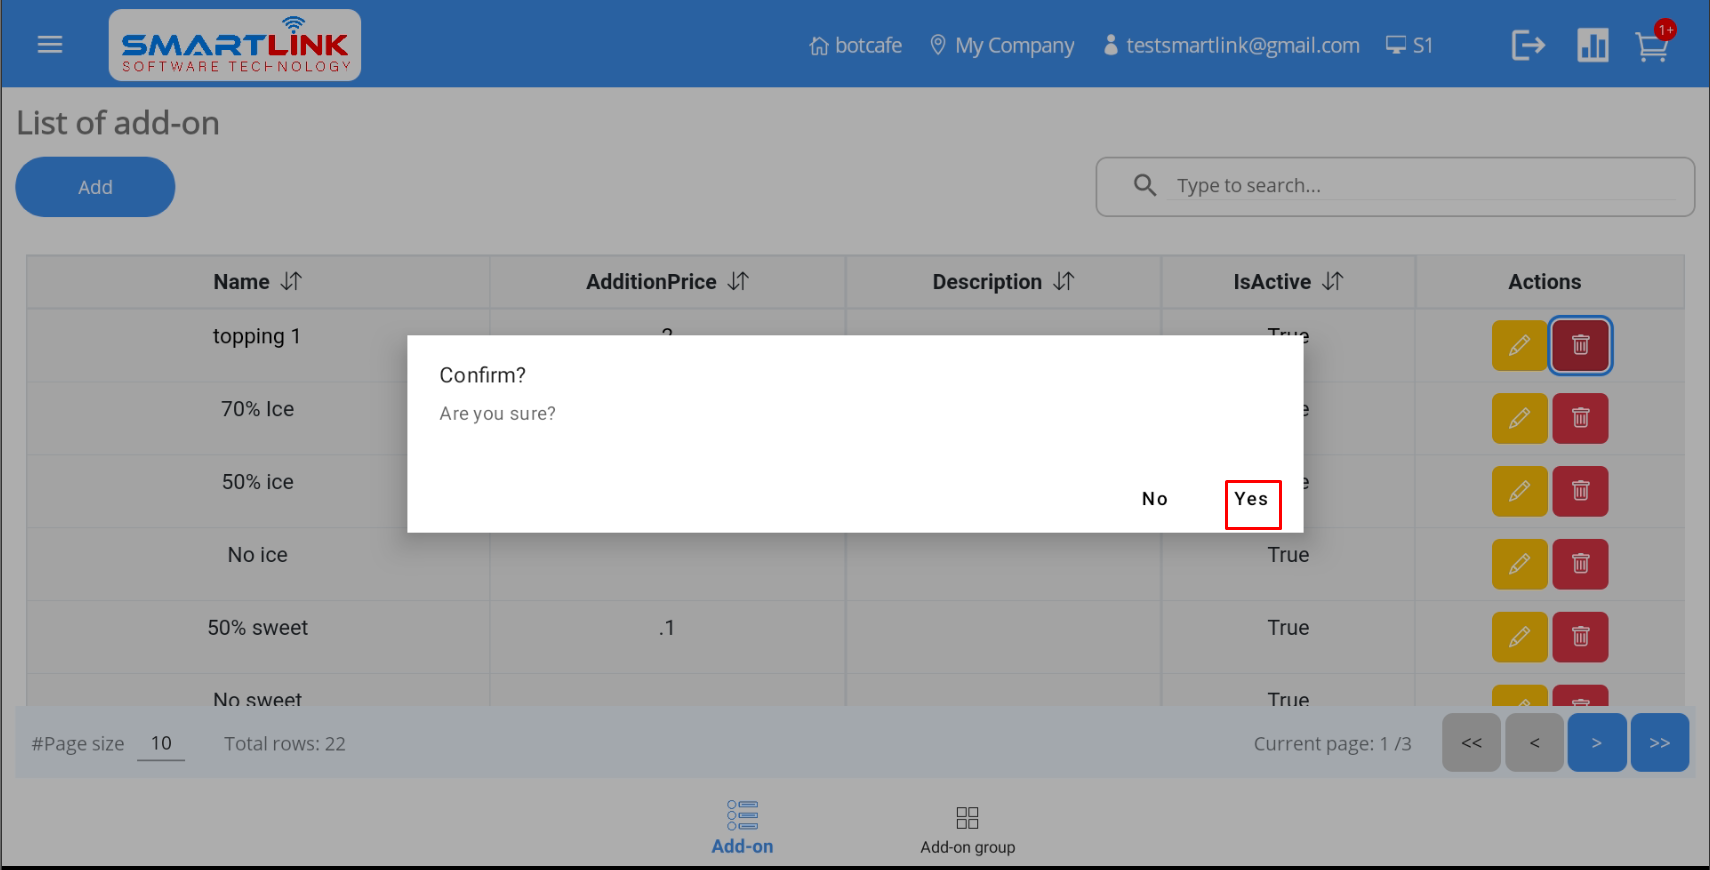
7.2.3. Delete add-on group
To delete an add-on group, follow these steps:
- Step 1: On the Add-on groups screen, press the Delete
button.

● The system displays a confirmation pop-up.

- Step 2: Press the Yes button to delete the add-on group.
Press the No
button to cancel.

- Step 4: After successfully deleting the add-on group, the system displays a list of add-on
groups without the deleted group.

Note:
● Users are only allowed to delete the add-on groups that do not contain add-ons.
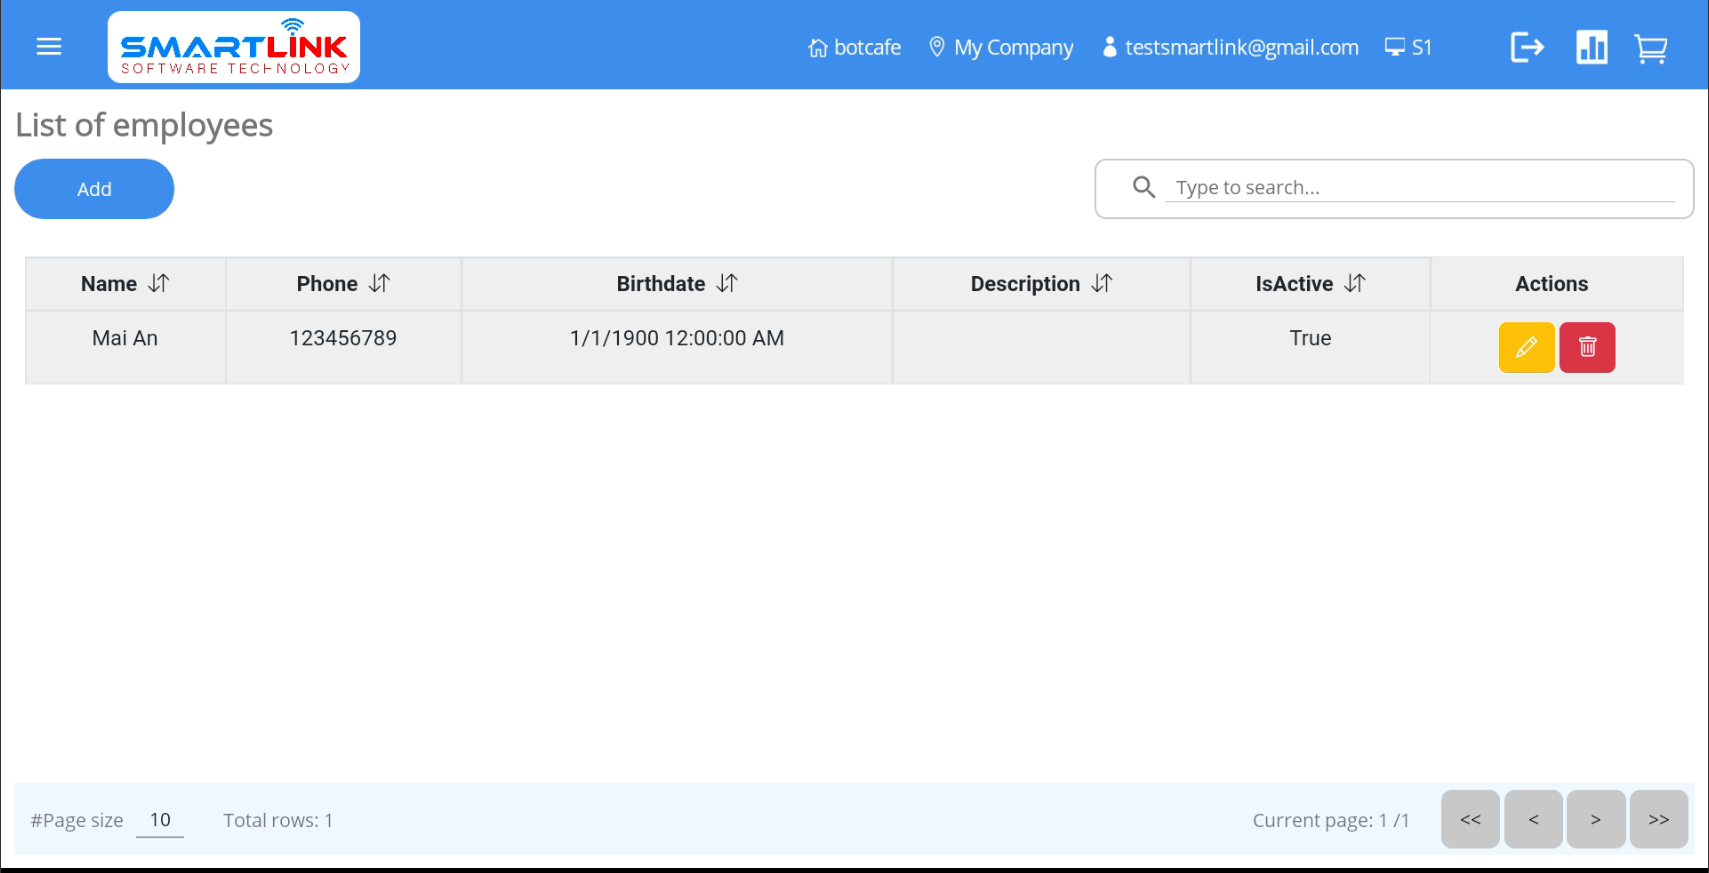
Employee management
To manage employees, follow these steps:
- Step 1: Press the Menu button on the left corner of the
screen.

● The system displays a side-bar.

- Step 2:
● Press the Employee category.
8.1. Add new employee
To add new employee information, follow these steps:
- Step 1: On the Employee screen, press the Add
button.
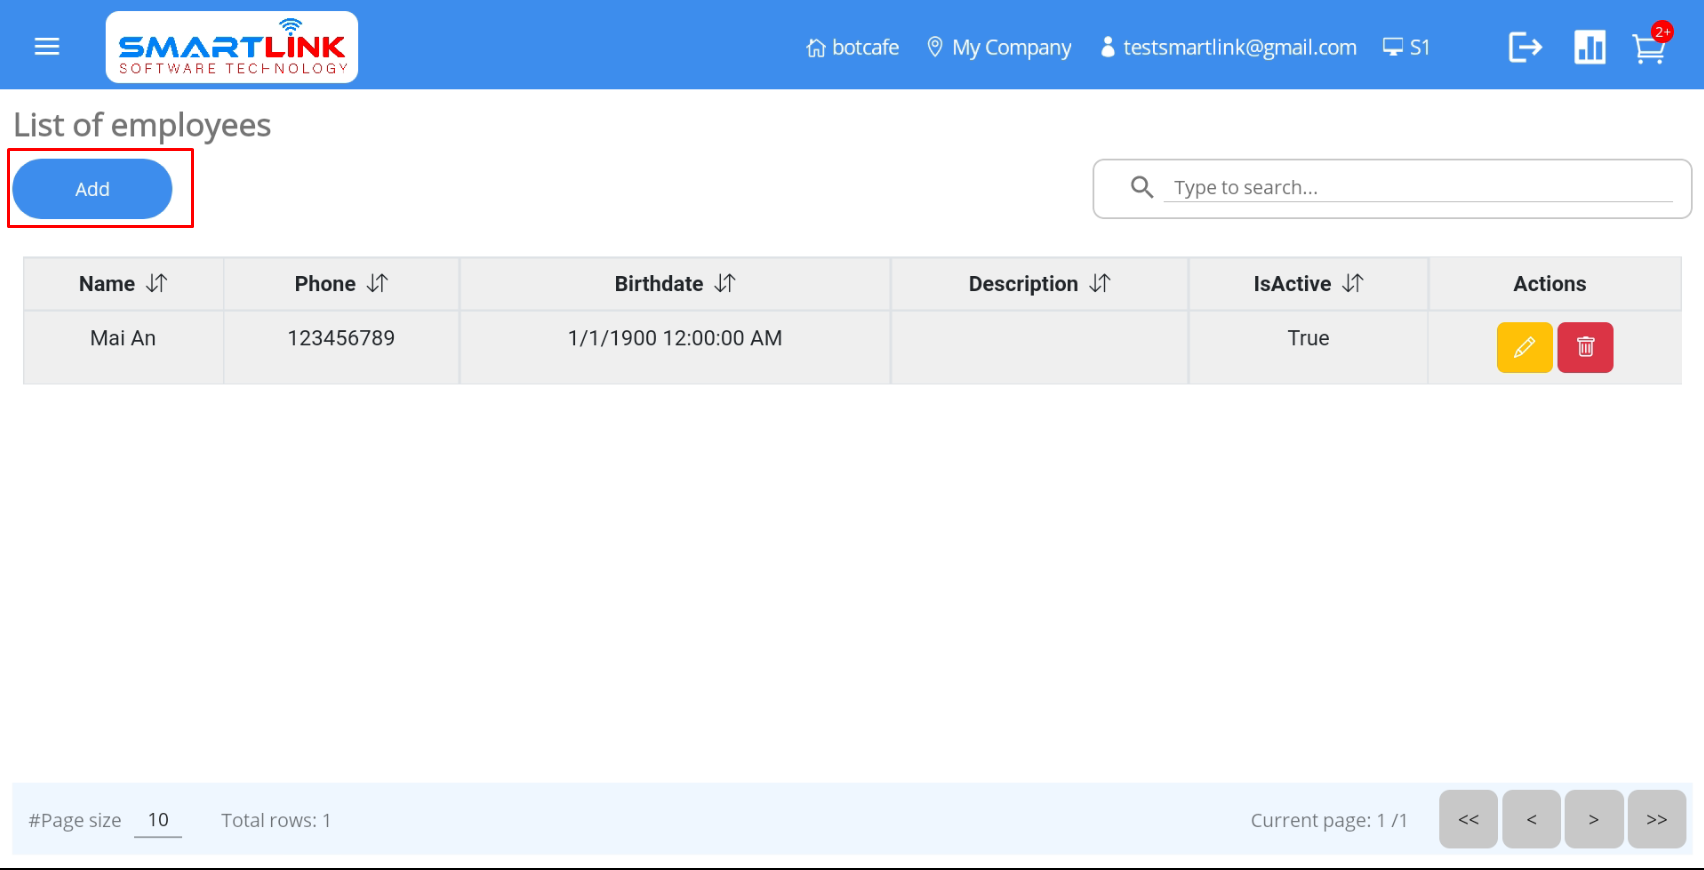
● The system displays a screen to add new employee information.
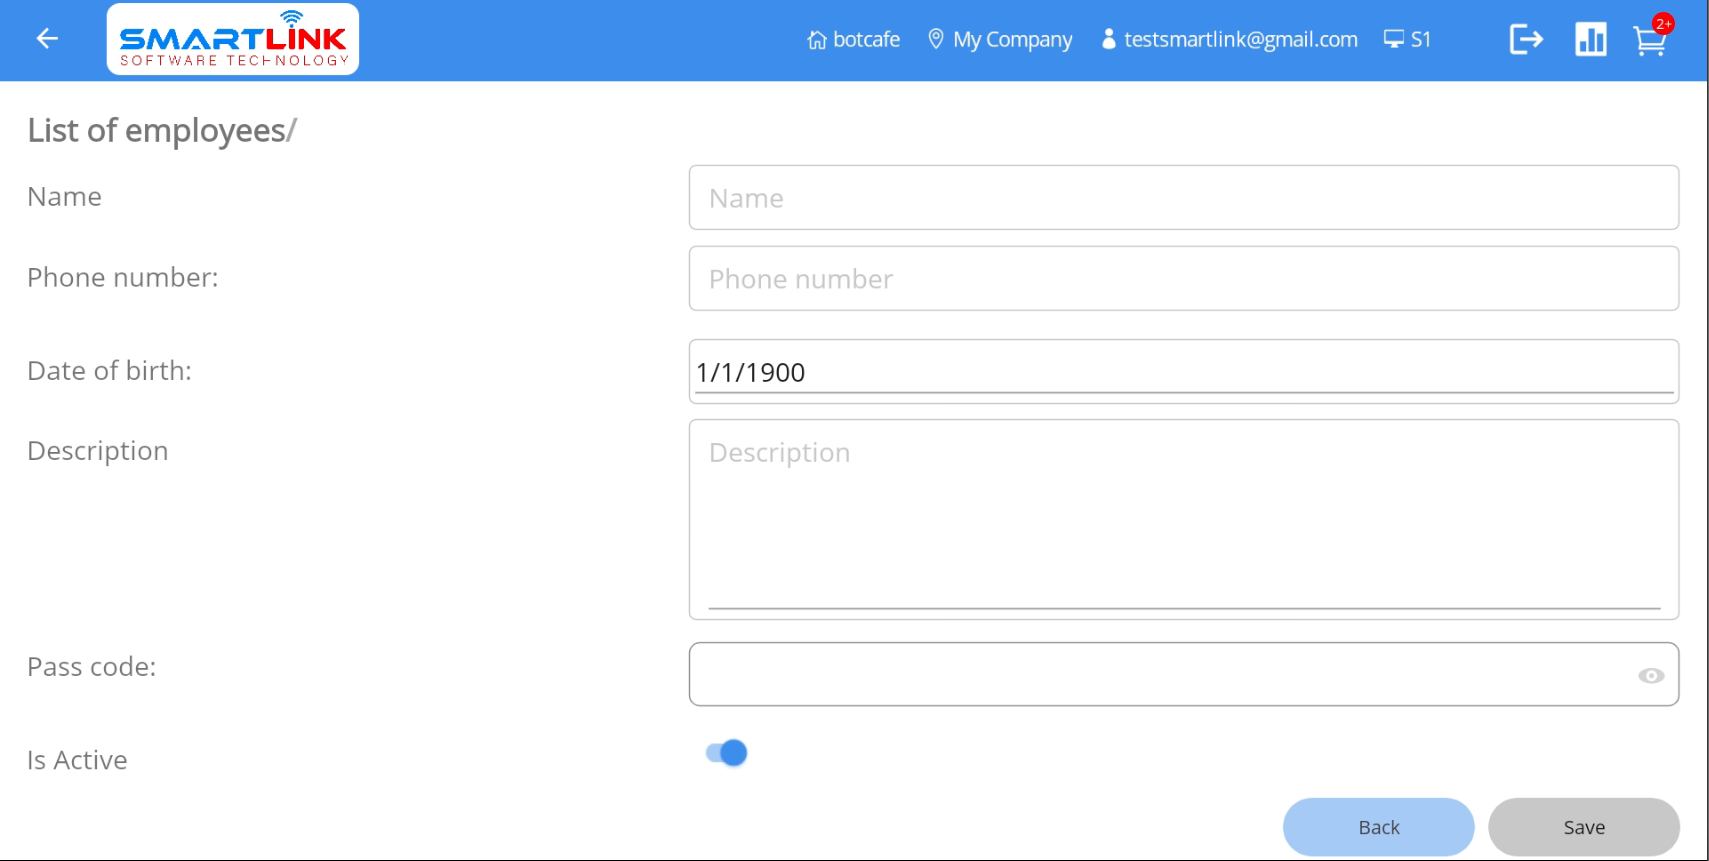
- Step 2: The user enters complete employee information into the fields such as Name,
Phone number

- Step 3: Press the Save button to save a new employee
information. Press the Back
button if you want to cancel.

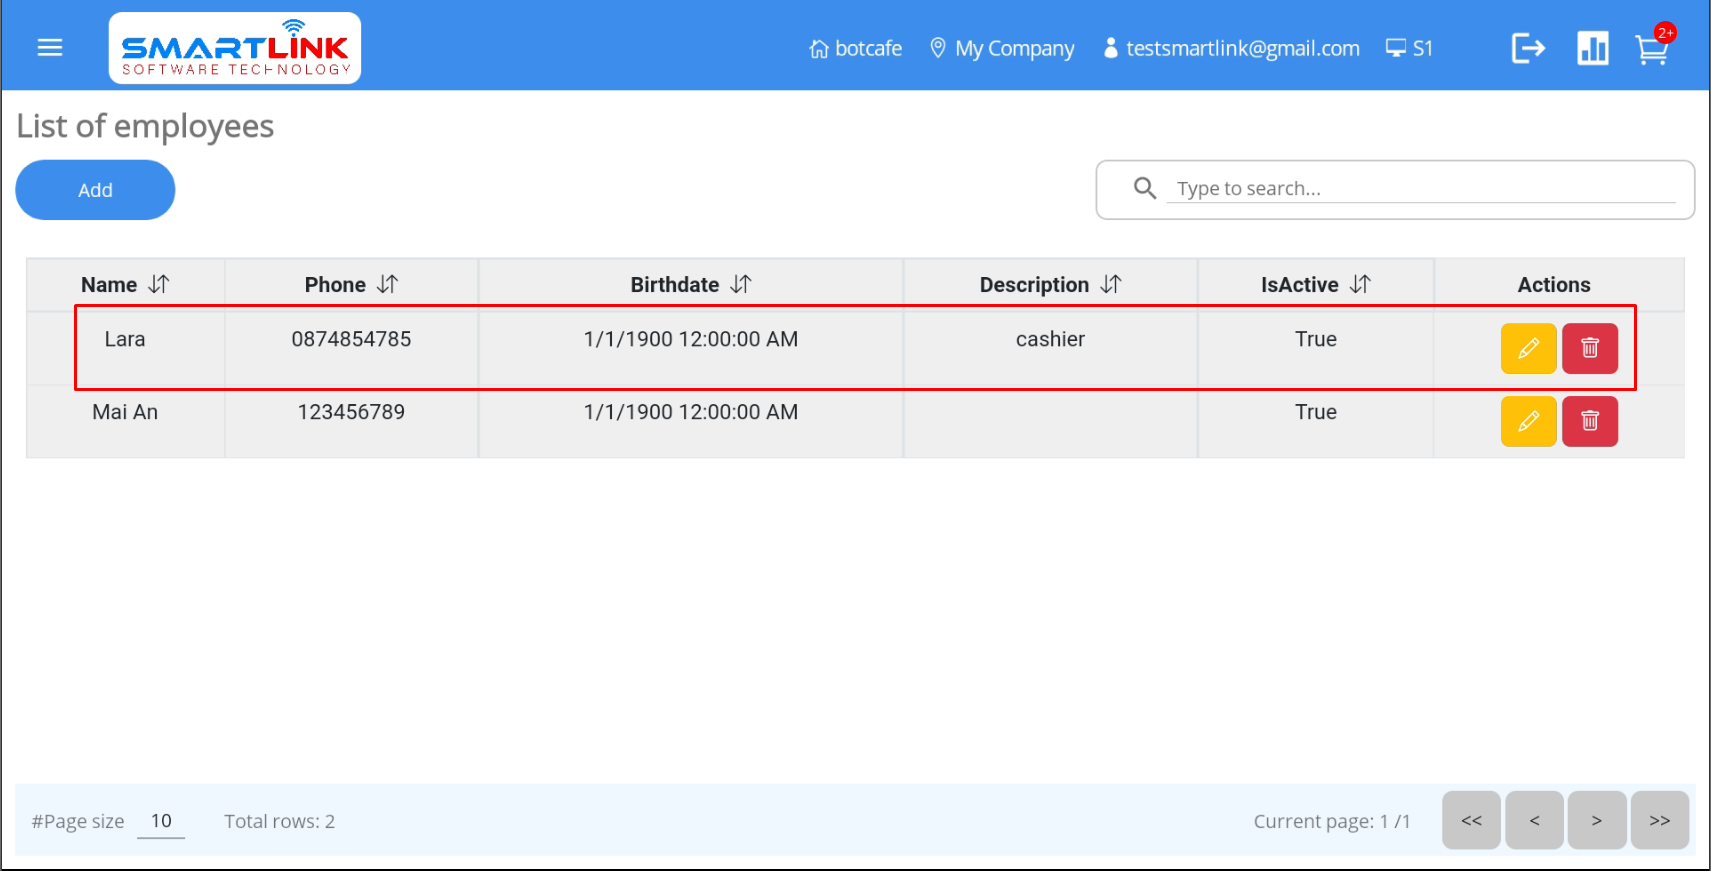
- Step 4: Successfully added new employee information, the system displays the newly created
employee information on the employee
list.
8.2. Edit employee information
To edit employee information, follow these steps:
- Step 1: On the Employee screen, press the Edit
button.
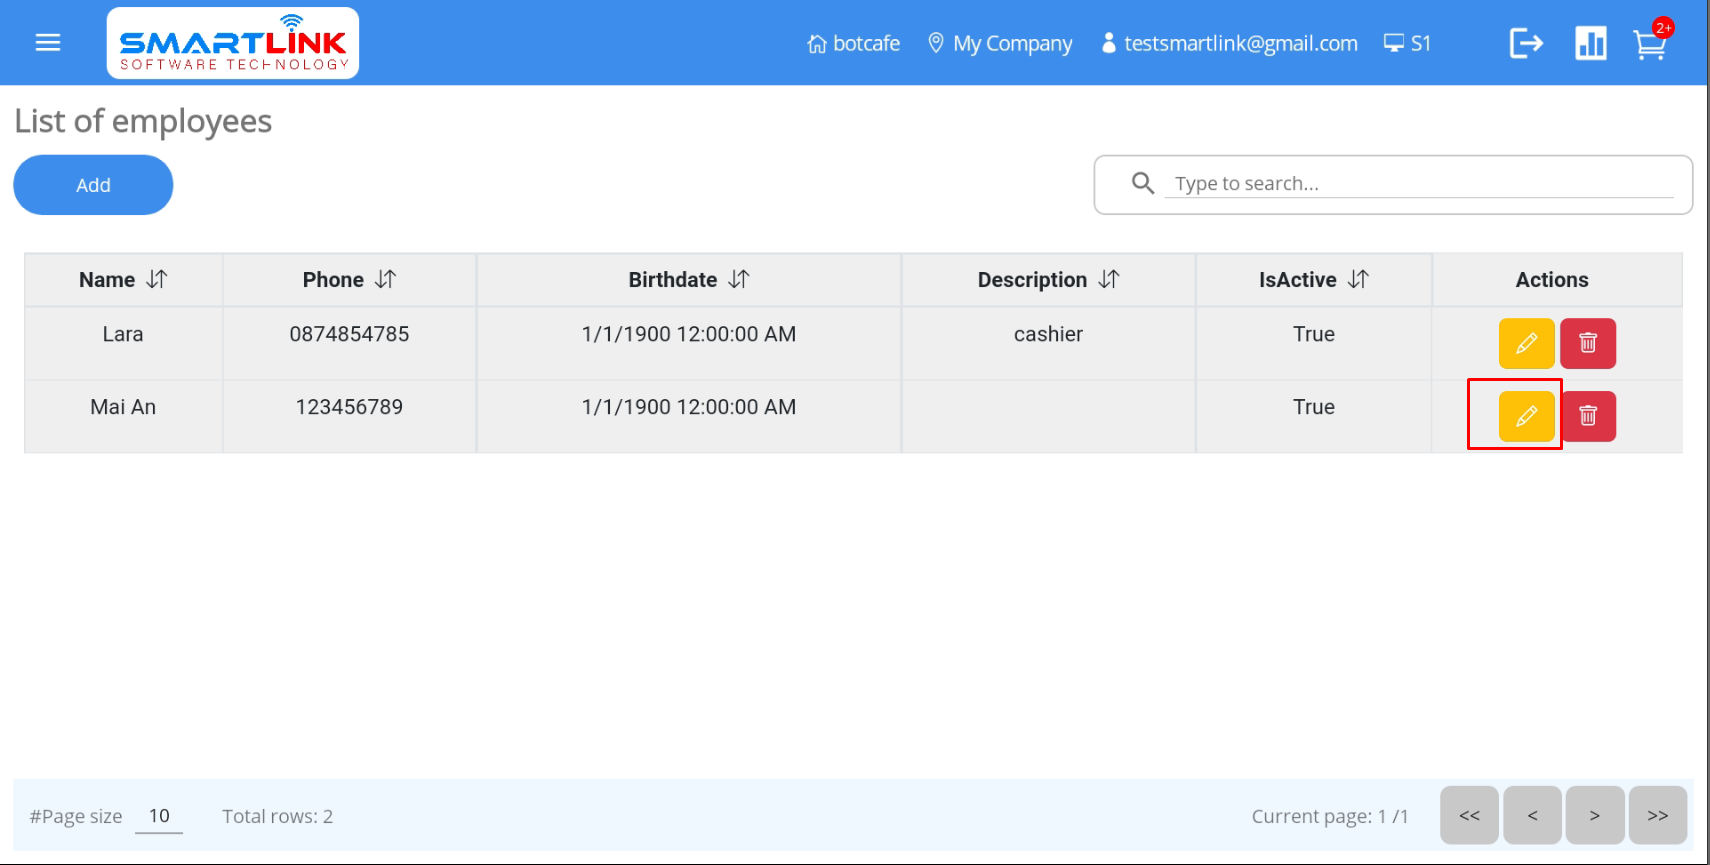
● The system displays detailed employee information.
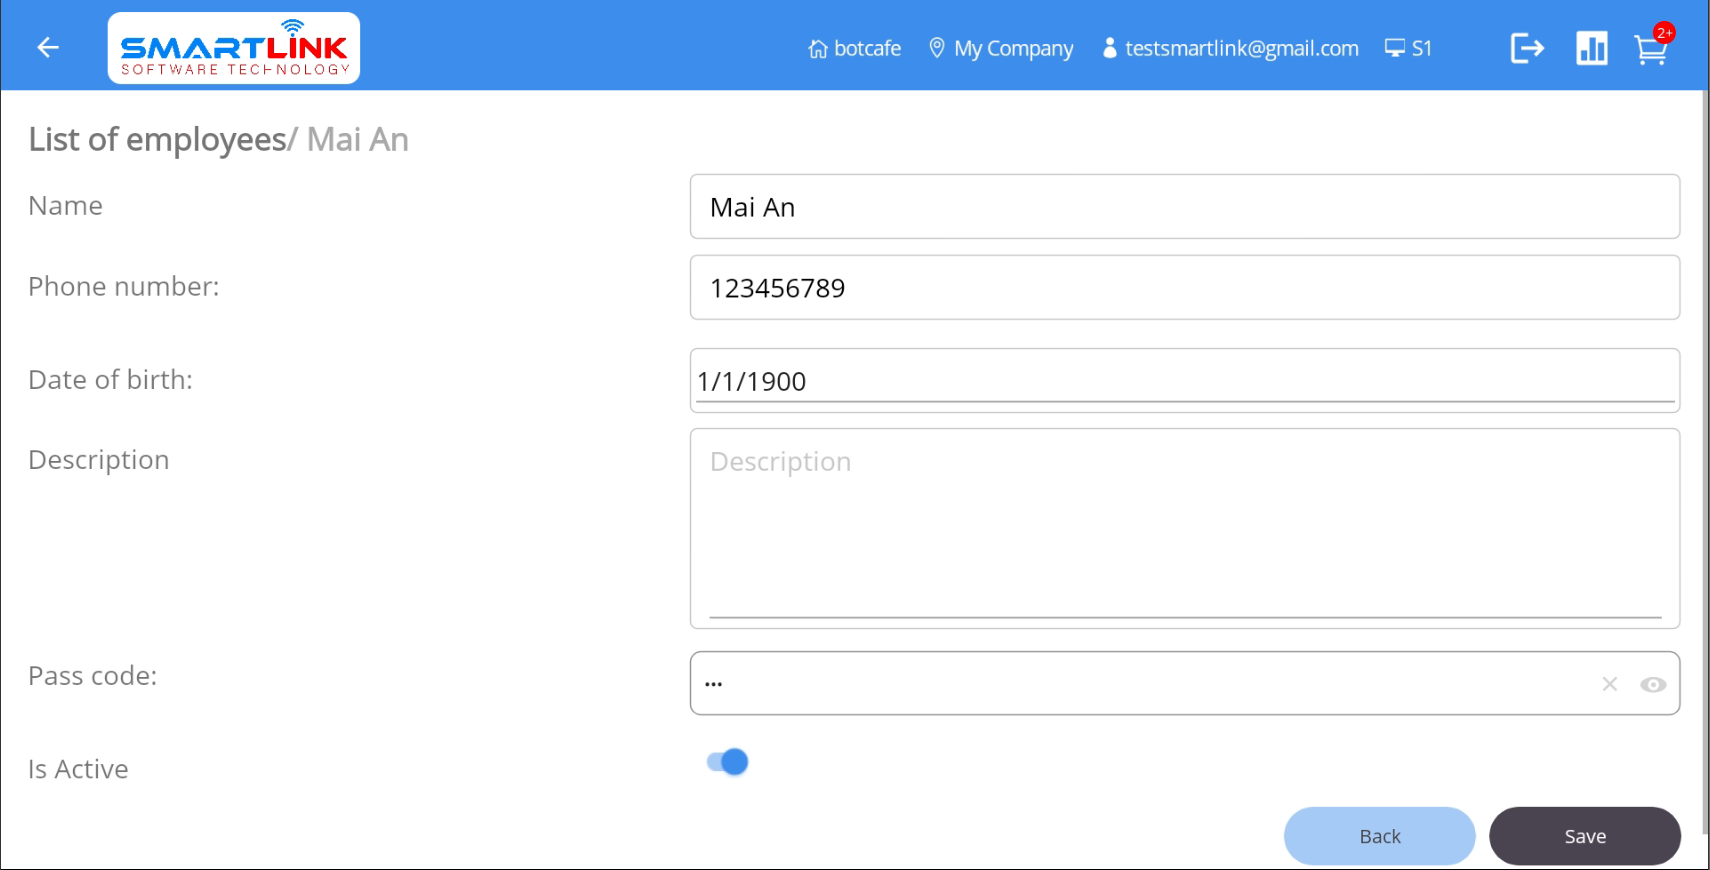
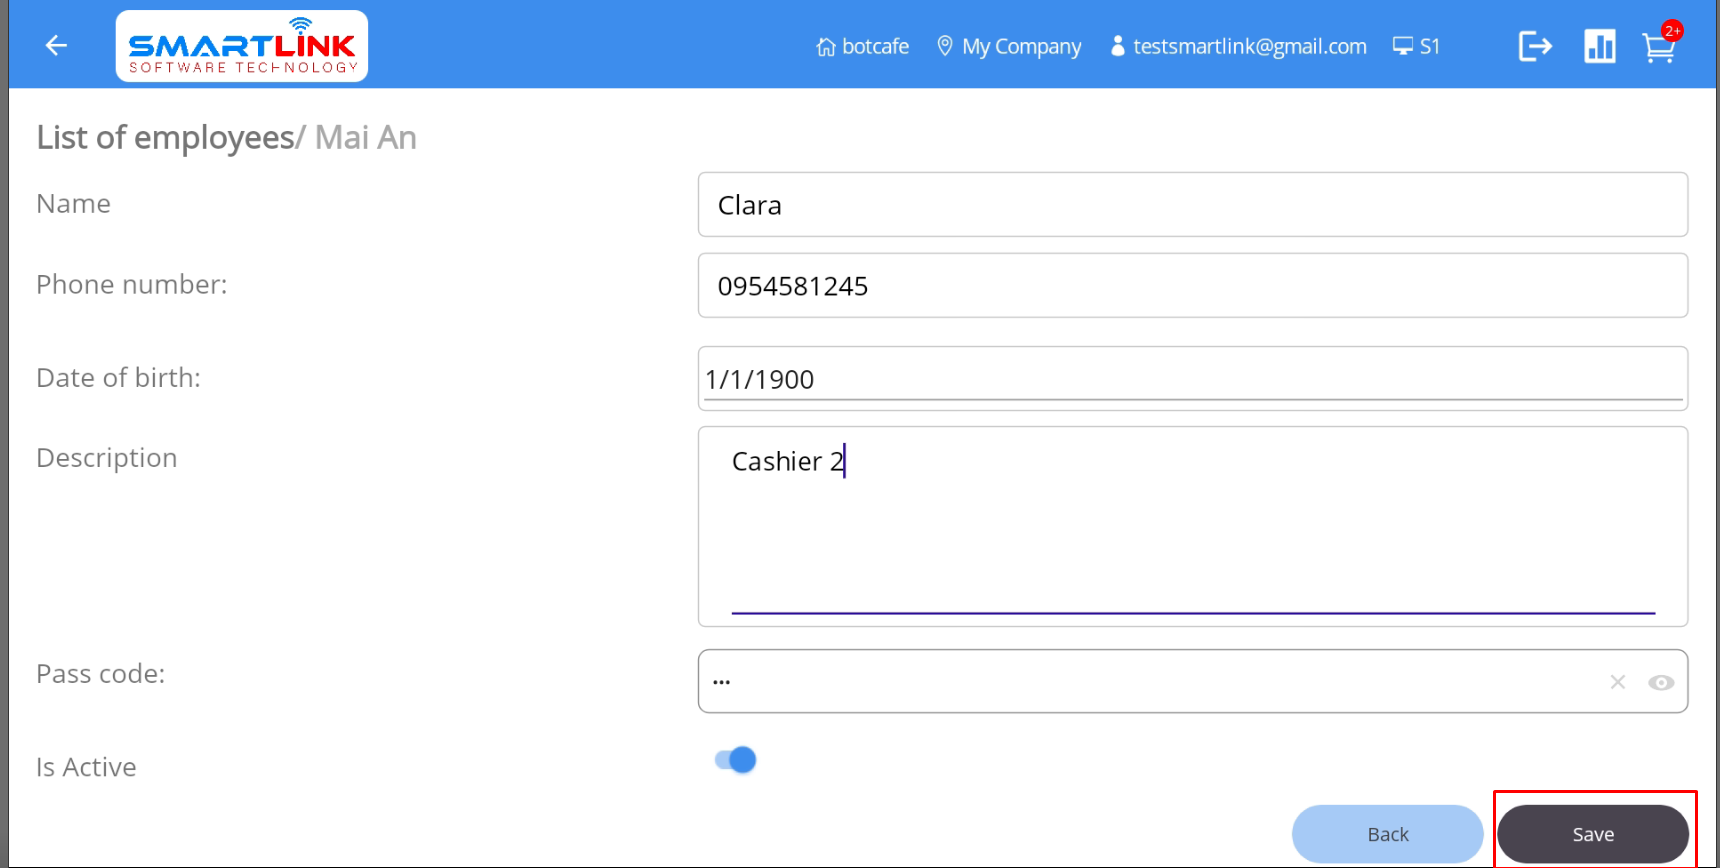
- Step 2: Enter the information to be edited

- Step 3: Press the Save button to save a new employee
information. Press the Back
button if you want to cancel.
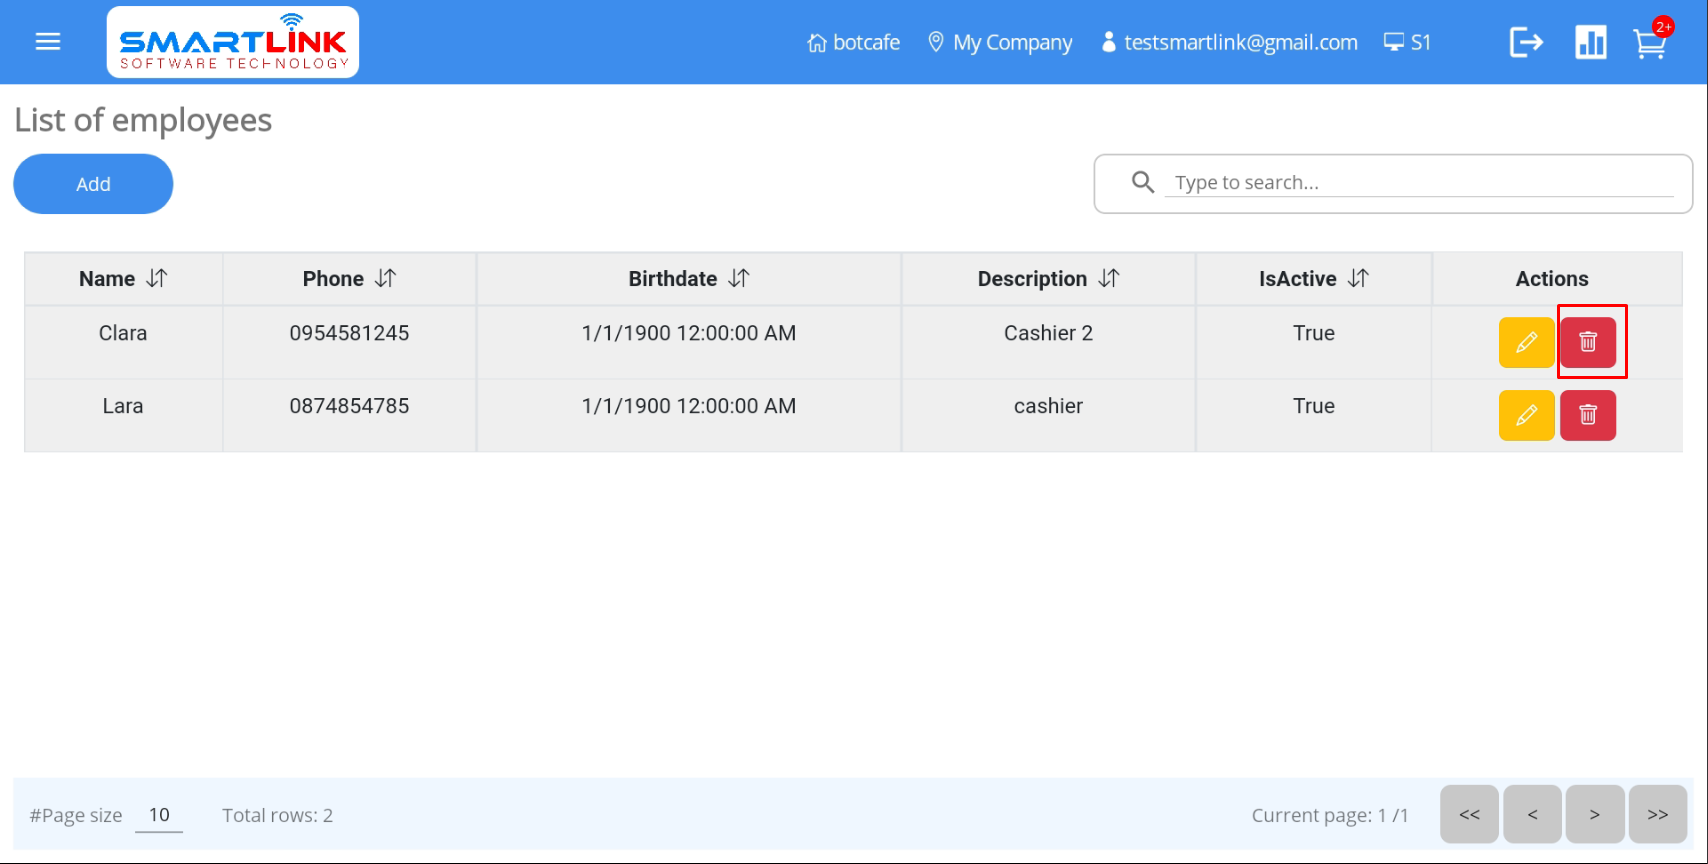
- Step 4: Successfully edited new employee information, the system displays the newly edited
employee information on the employee
list.

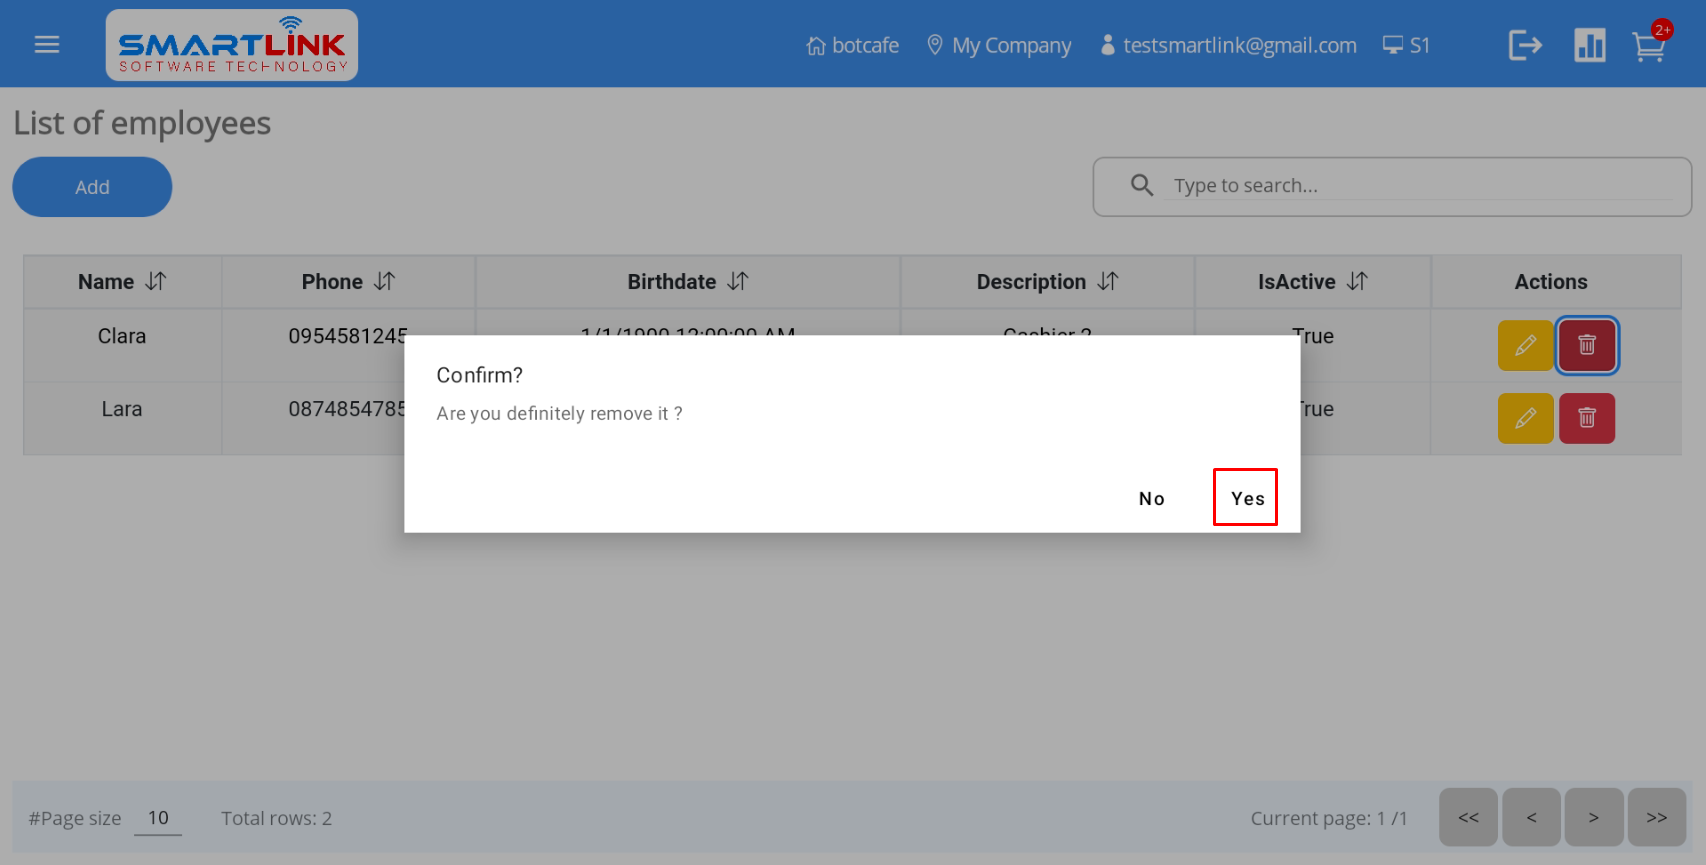
8.3. Delete employee information
To delete employee information, follow these steps:
- Step 1: On the Employee screen, press the Delete
button.
● The system displays a confirmation screen to delete employee information.

- Step 2: Press the Yes button to delete employee information.
Press the No
button to cancel.
- Step 3: After successfully deleting new employee information, the system returns to the employee
screen without the deleted
employee information.

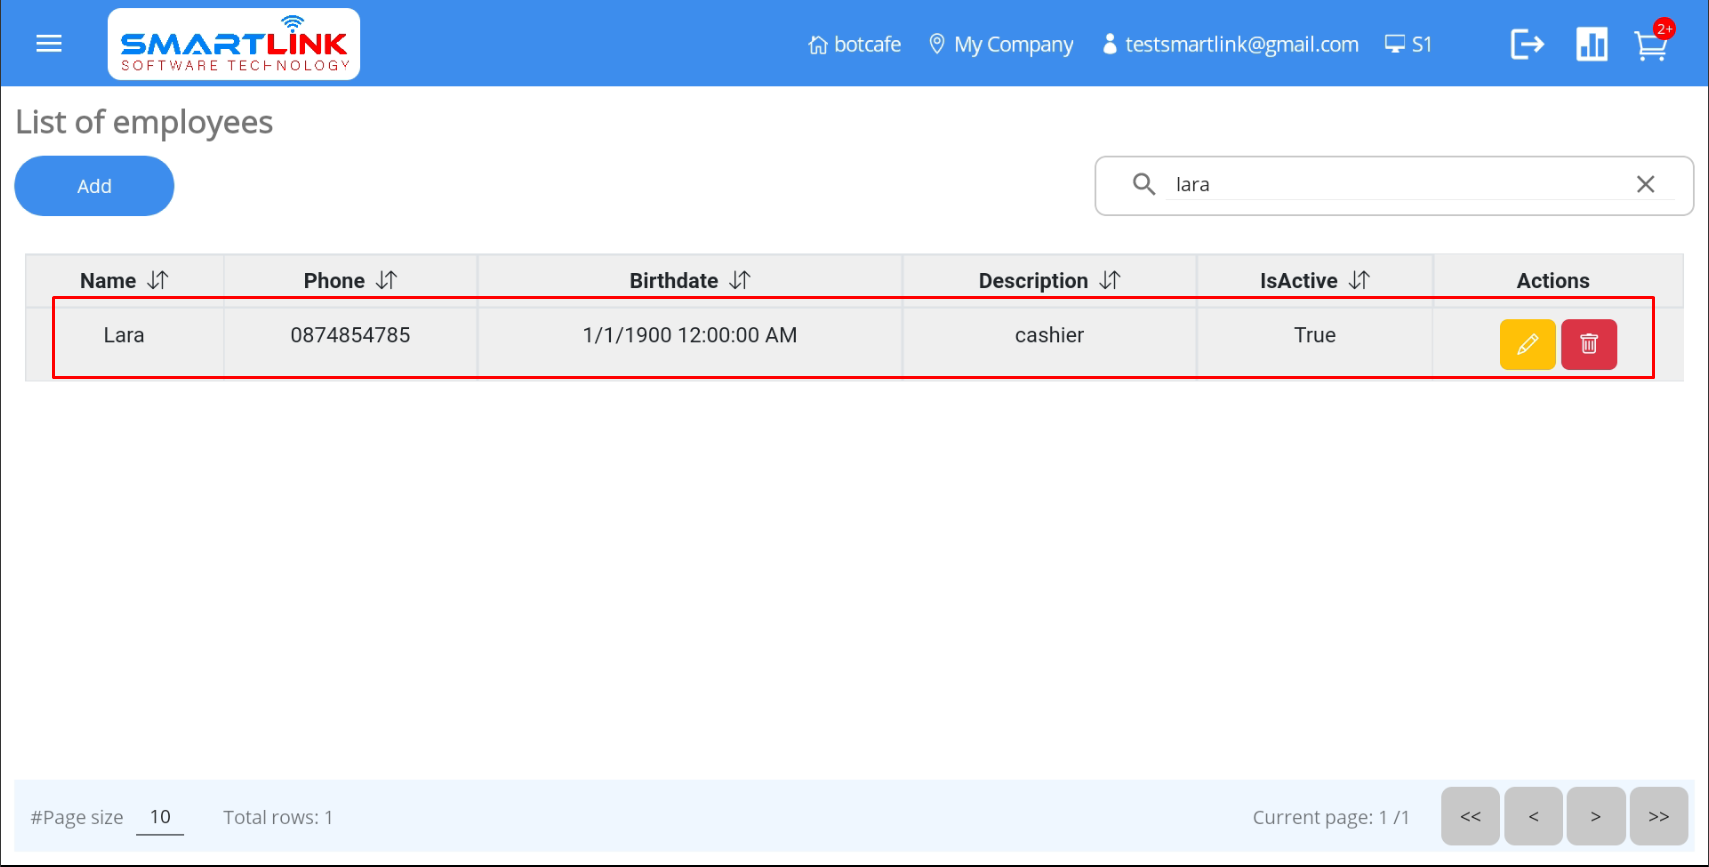
8.4. Search for employee information
To search for employee information, follow these steps:
- Step 1: Users enter employee search information into the search bar.
● Search employee information by employee name
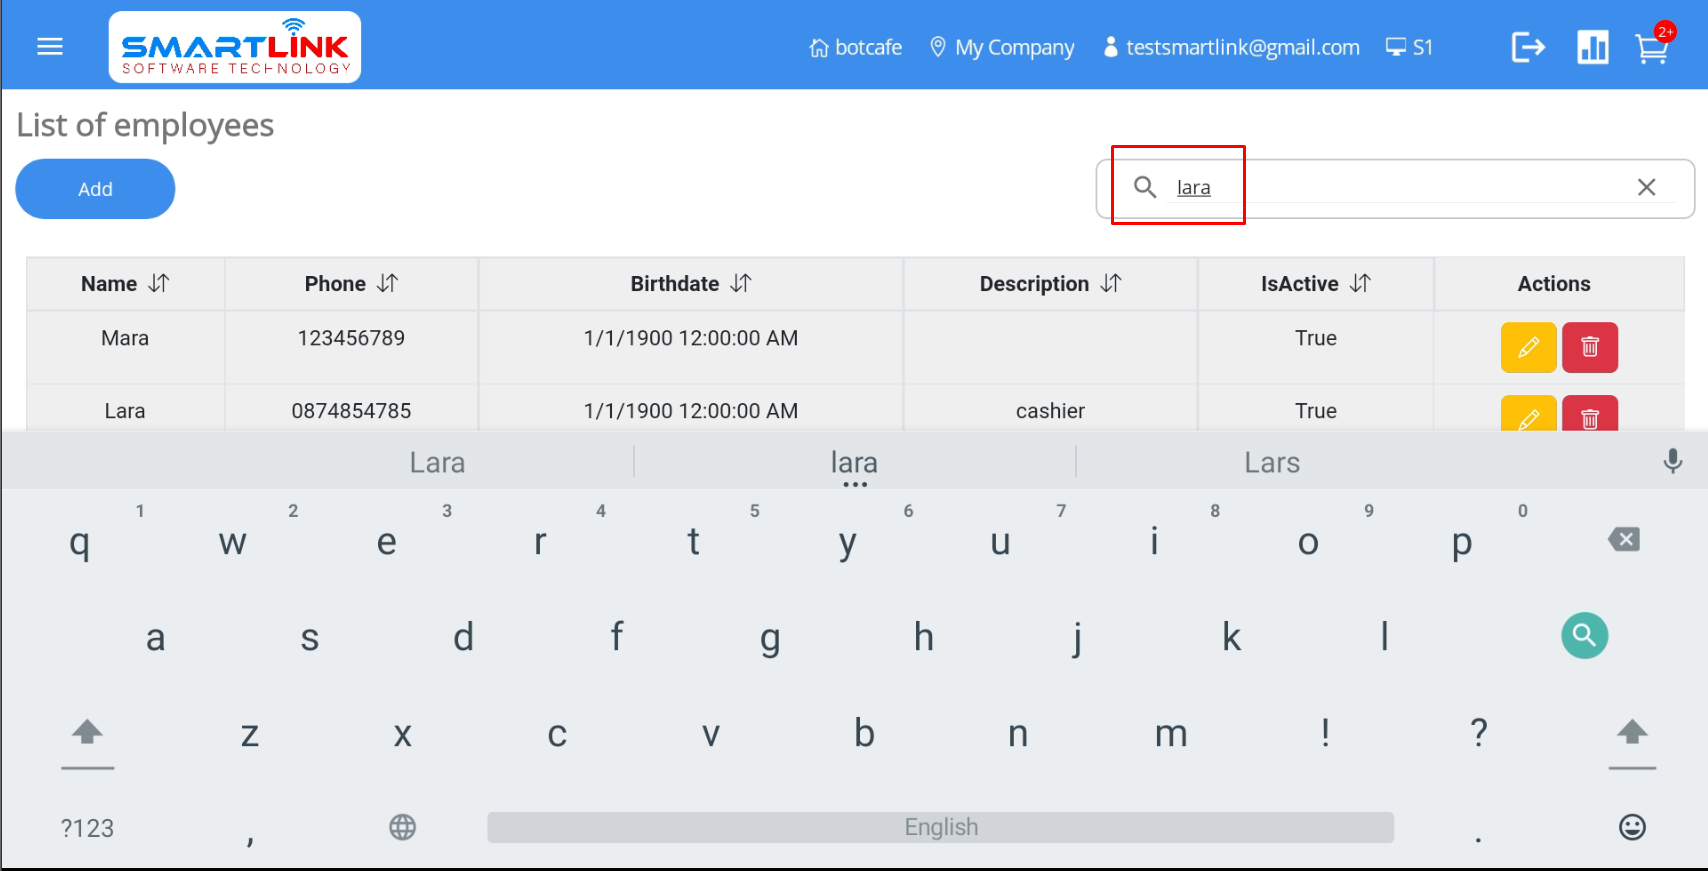
- Step 2: Press the Search button on the keyboard.

- Step 3: The system returns results that related the search information.
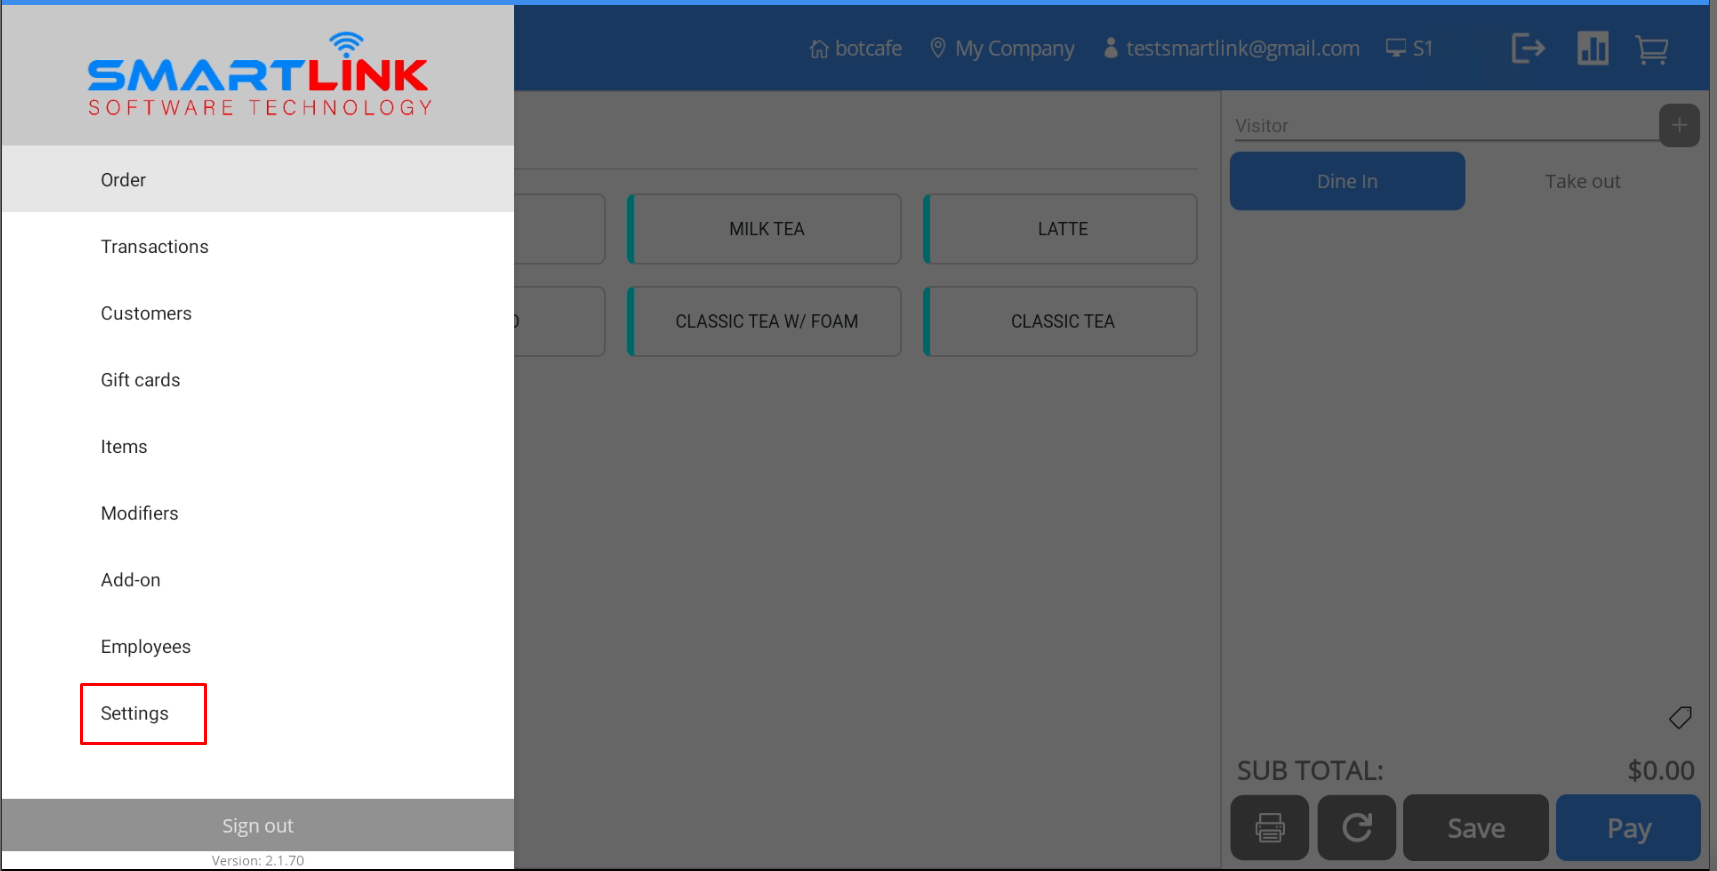
Settings management
To manage settings, follow these steps:
- Step 1: Press the Menu button on the left corner of the
screen.

● The system displays a side-bar.

- Step 2:
● Press the Settings category.
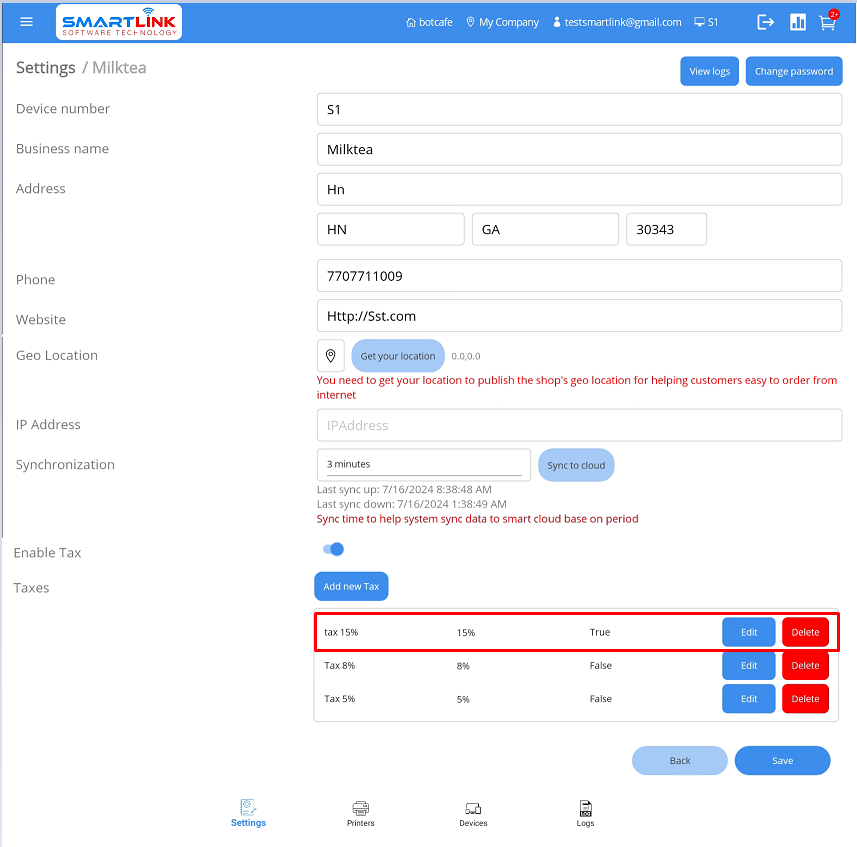
9.1. Tax
9.1.1. Enable tax
To enable tax, follow these steps:
- Step 1: On the Settings screen, press the Enable
button in Enable tax field.
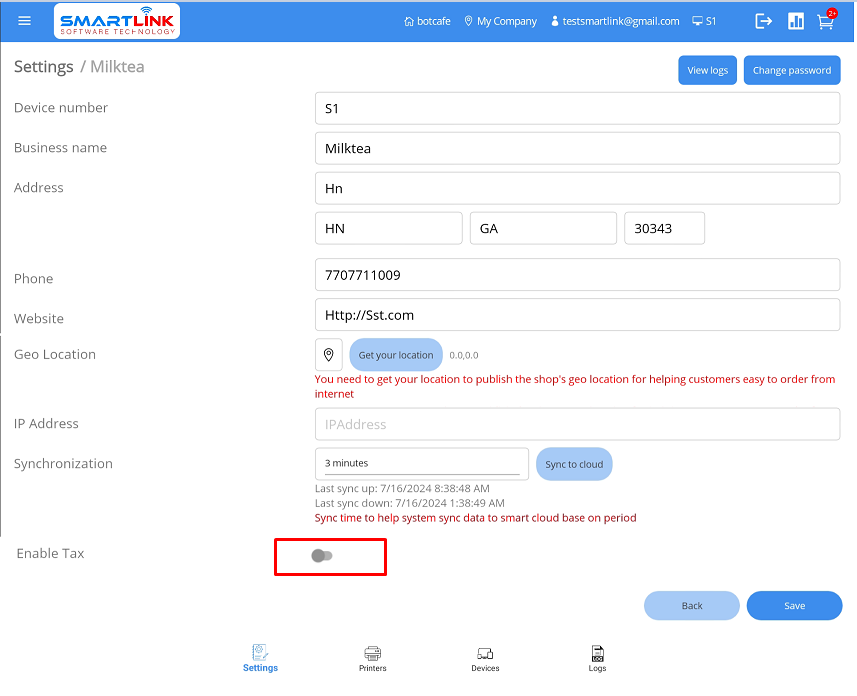
● The system displays some tax values.
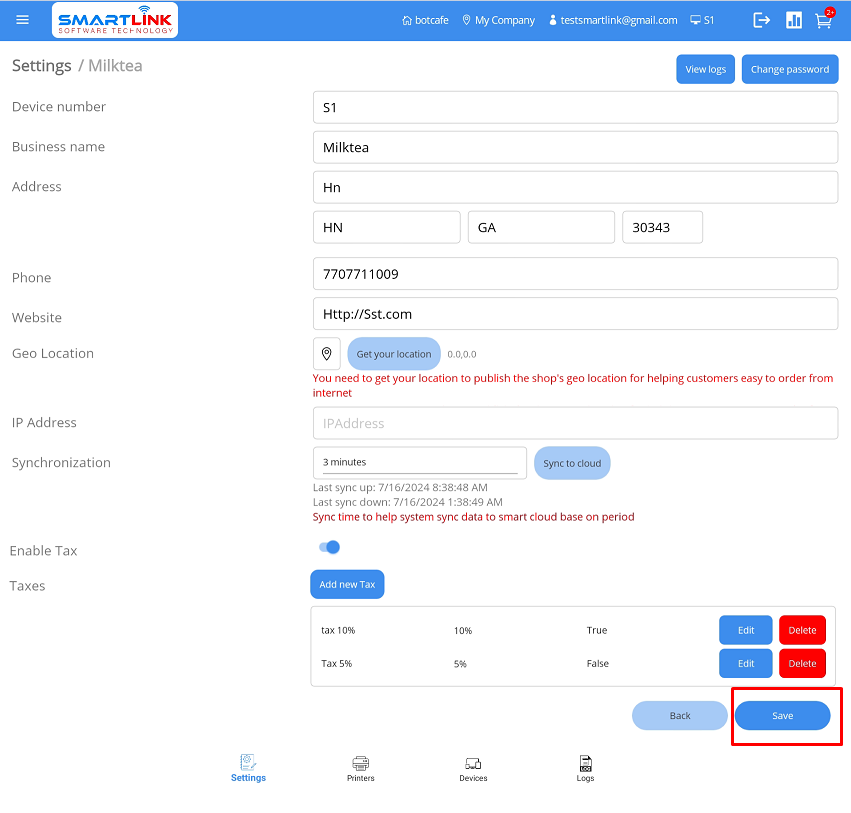
- Step 2: Press the Save button.
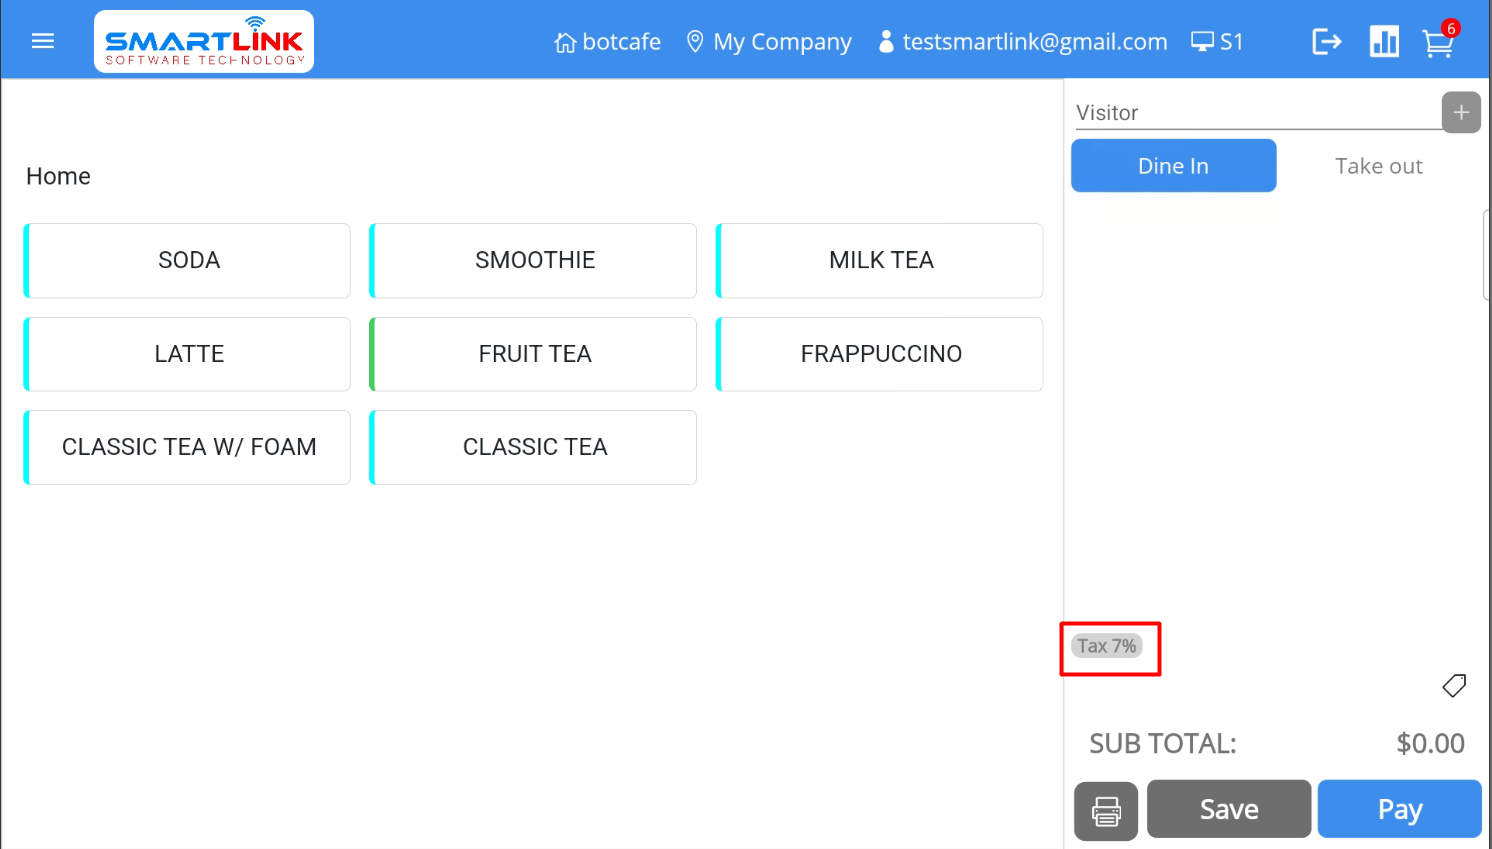
● After being enabled, taxes will be displayed on the main screen
Note:
● Tax after enable will be automatically applied to the entire order.
● Users who force step must click Save to save the setup information.
● Taxes with Active status will be automatically applied to all orders.
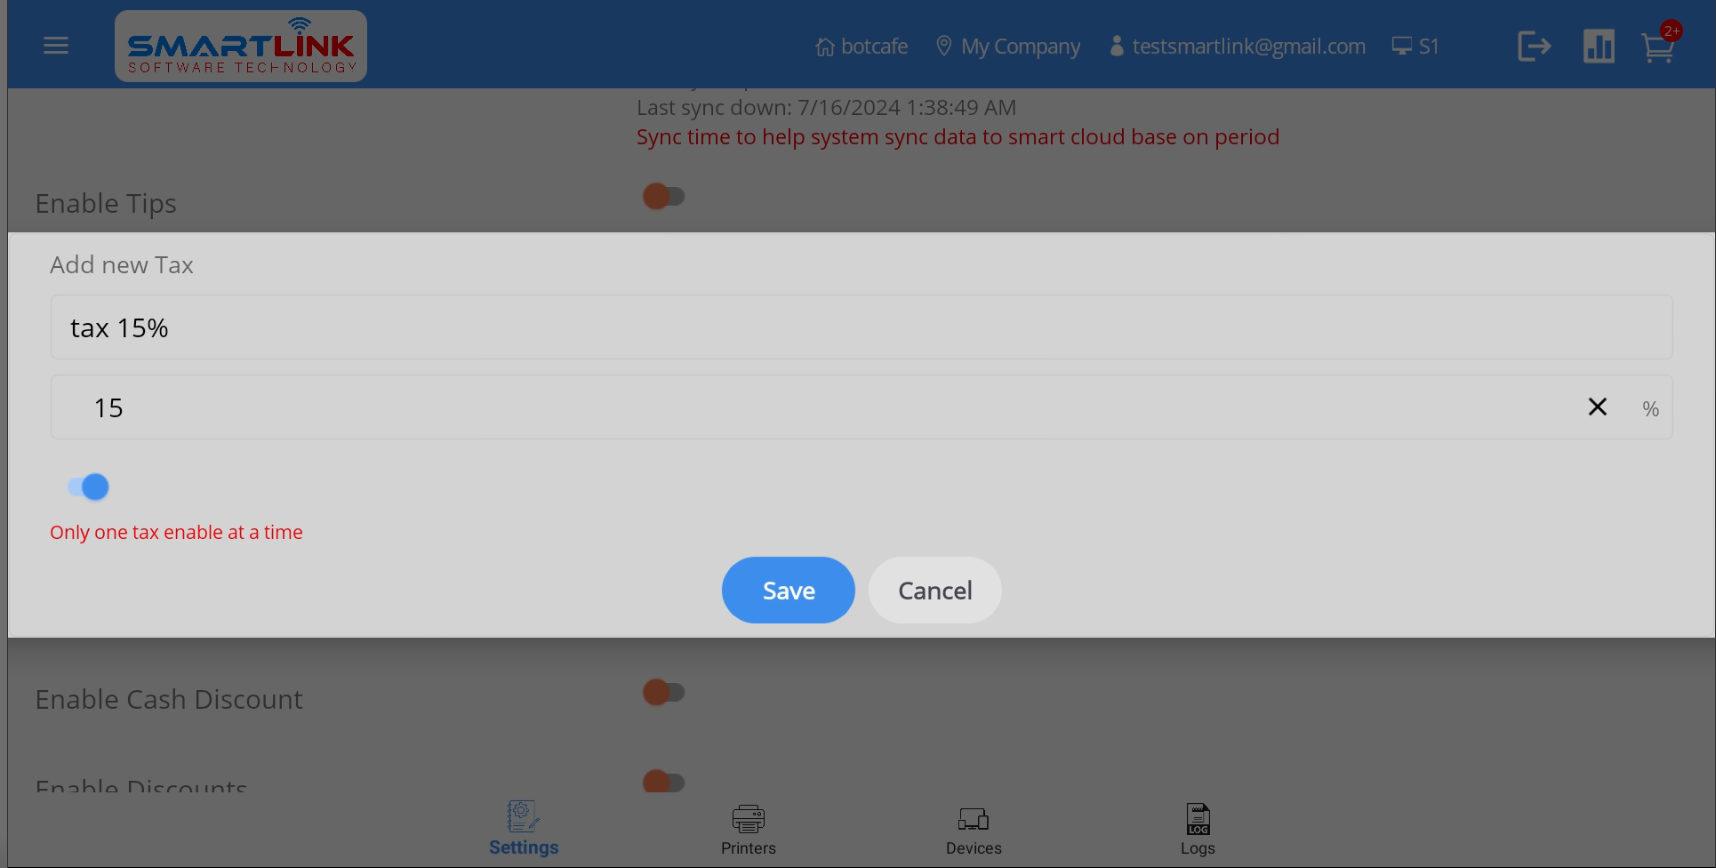
9.1.2. Add new tax
To add new tax information, follow these steps:
- Step 1: On the Tax screen, press the Add
button.
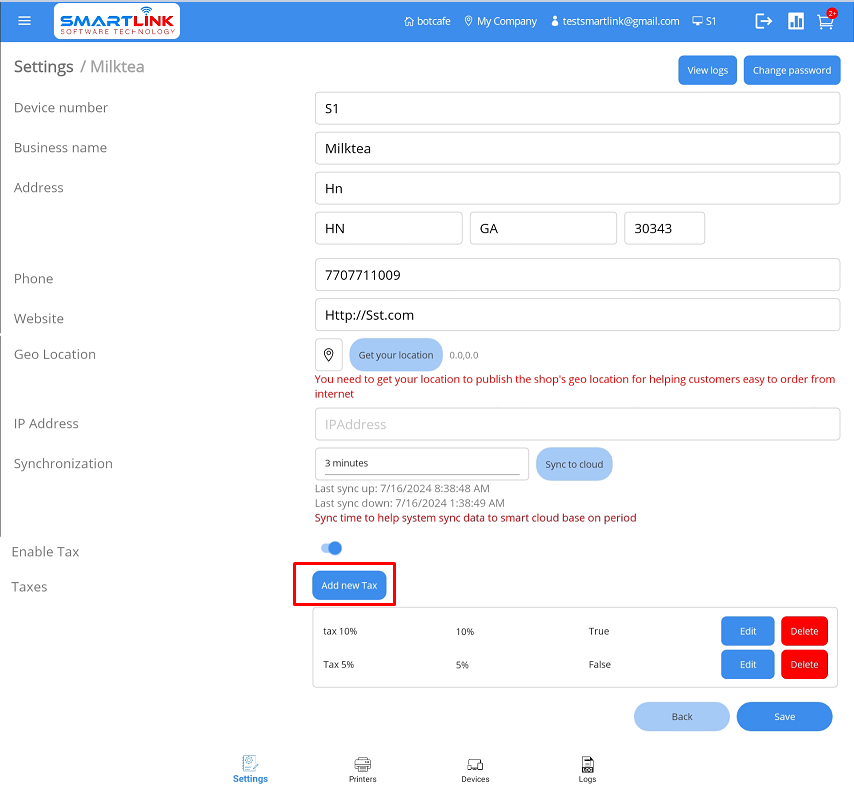
● The system displays a screen to add new tax information.

- Step 2: The user enters complete tax information.
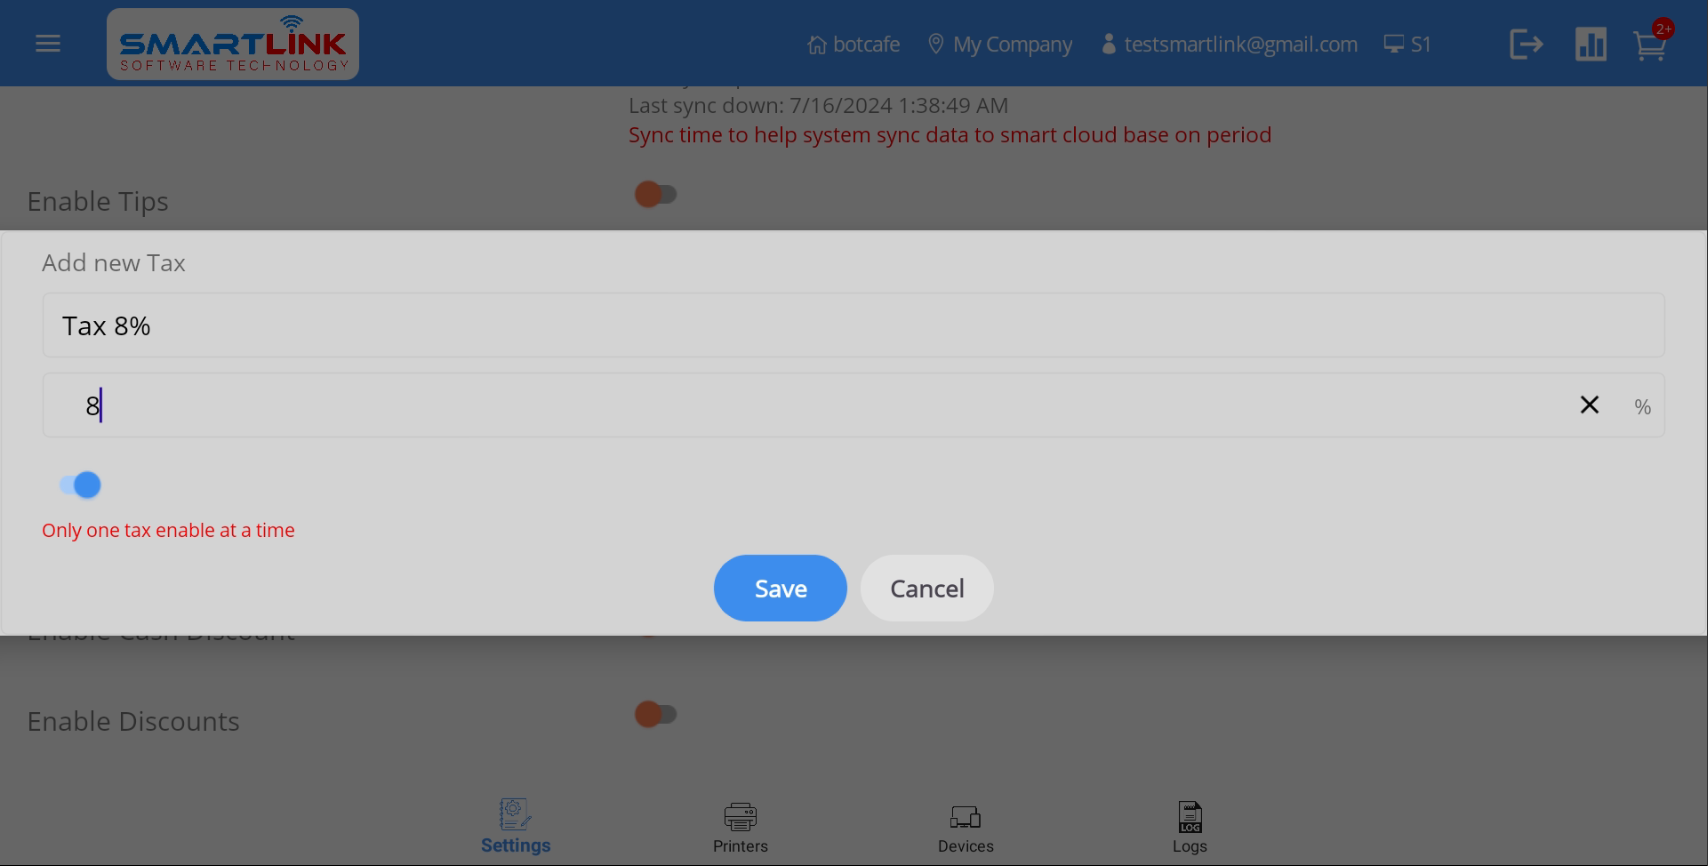
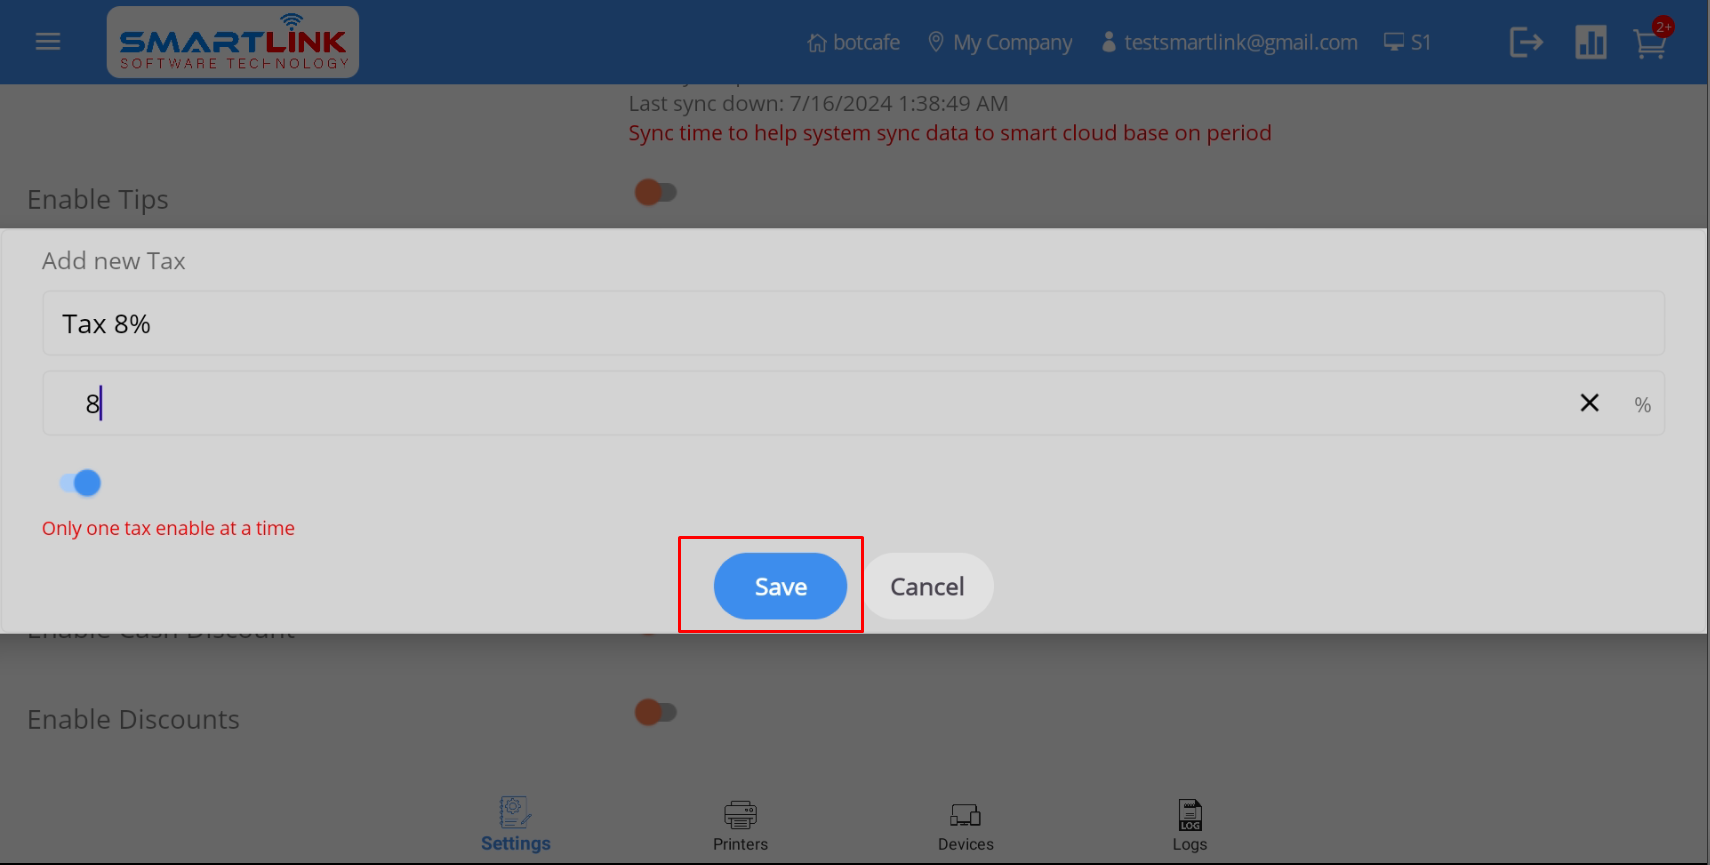
- Step 3: Press the Save button to save a new tax
information. Press the Back
button if you want to cancel.
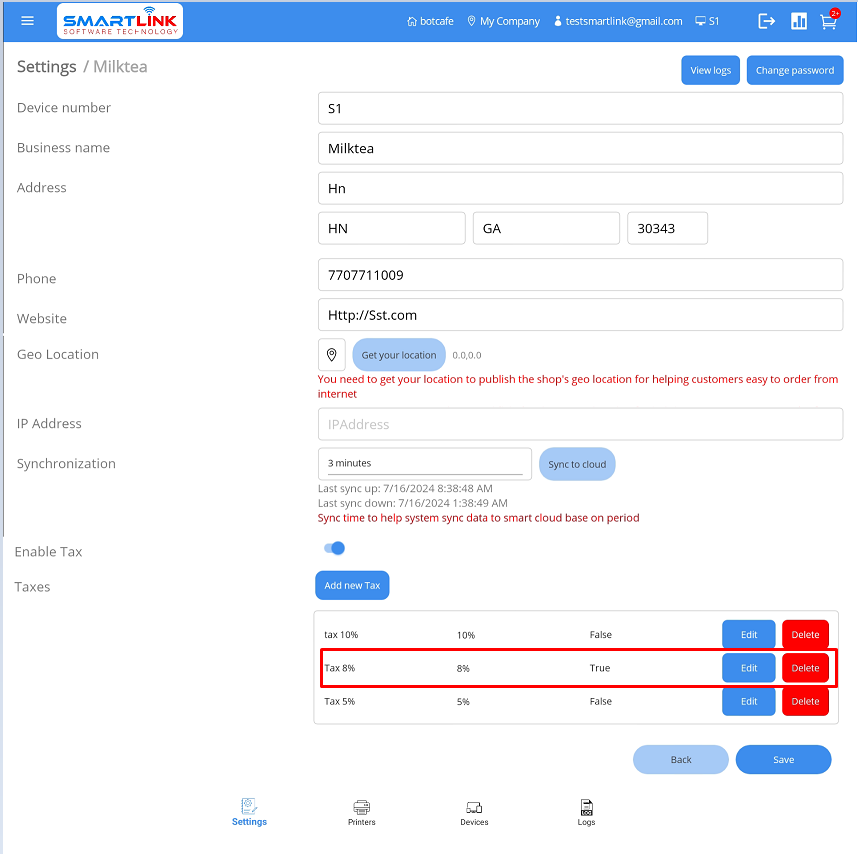
- Step 4: Successfully added new tax information, the system displays the newly created
tax information on the tax
list.
- Step 5: Press the Save button to save the setup information.
Note:
● Tax values cannot overlap.
● Users can apply up to 2 types of taxes at the same time.
● Taxes with Active status will be automatically applied to all orders.
9.1.3. Edit tax information
To edit tax information, follow these steps:
- Step 1: On the Tax screen, press the Edit
button.

● The system displays detailed tax information.

- Step 2: Enter the information to be edited
- Step 3: Press the Save button to save a new tax
information. Press the Back
button if you want to cancel.

- Step 4: Successfully edited new tax information, the system displays the newly edited
tax information on the tax
list.
- Step 5: Press the Save button to save the setup information.
9.1.4. Delete tax information
To delete tax information, follow these steps:
- Step 1: On the Tax screen, press the Delete
button.
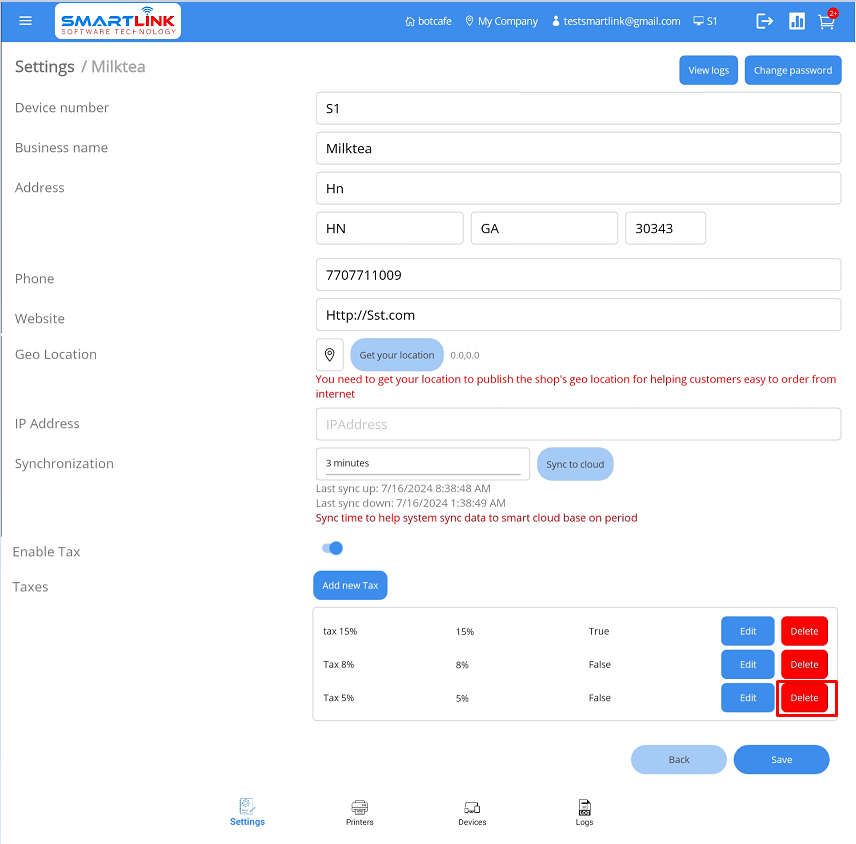
● The system displays a confirmation screen to delete tax information.
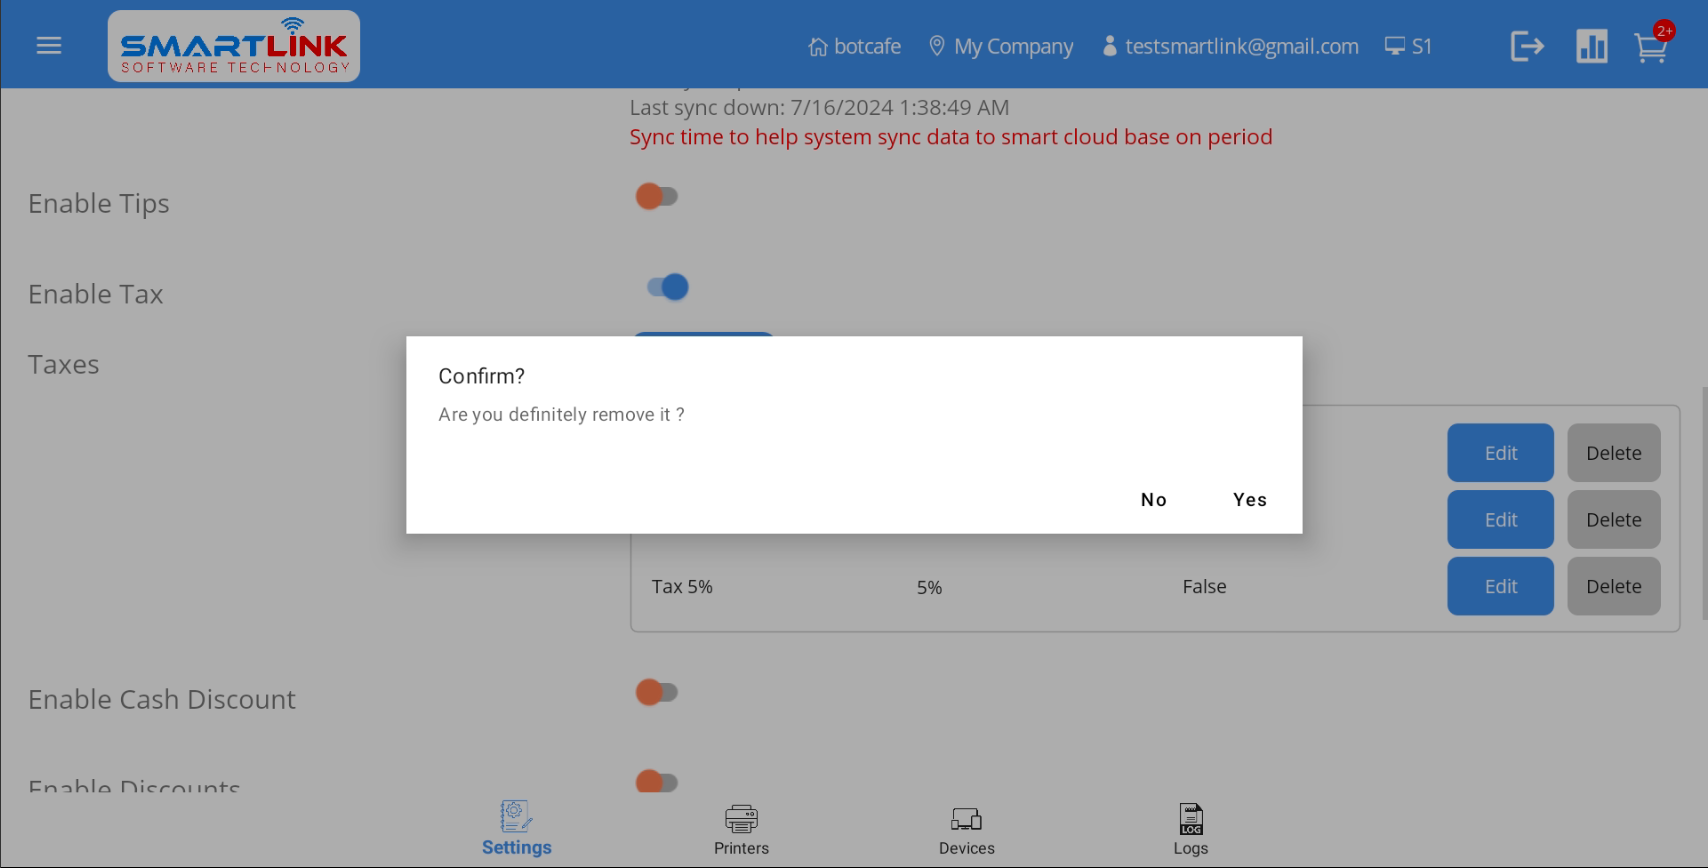
- Step 2: Press the Yes button to delete tax information.
Press the No
button to cancel.
- Step 3: After successfully deleting new tax information, the system returns to the tax
screen without the deleted
tax information.

- Step 4: Press the Save button to save the setup information.
9.2. Tip
9.2.1. Enable tip
To enable tip, follow these steps:
- Step 1: On the Settings screen, press the Enable
button in Enable tip field.
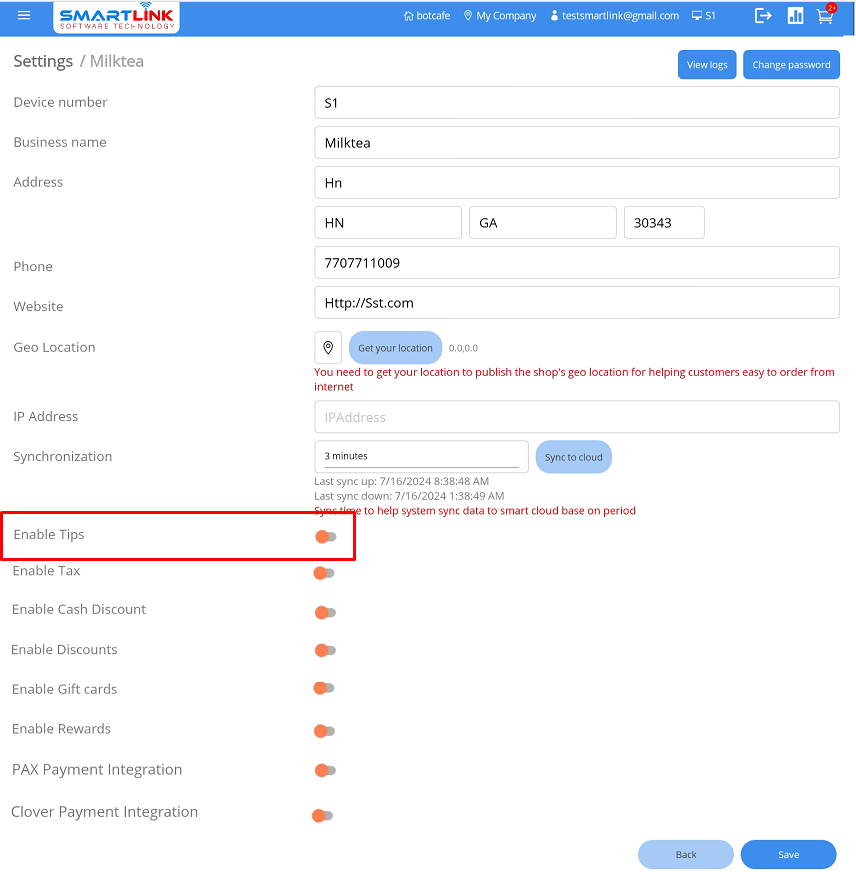
● The system displays some tip values.
- Step 2: Press the Save button.
● After being enabled, tip will be displayed on the main screen
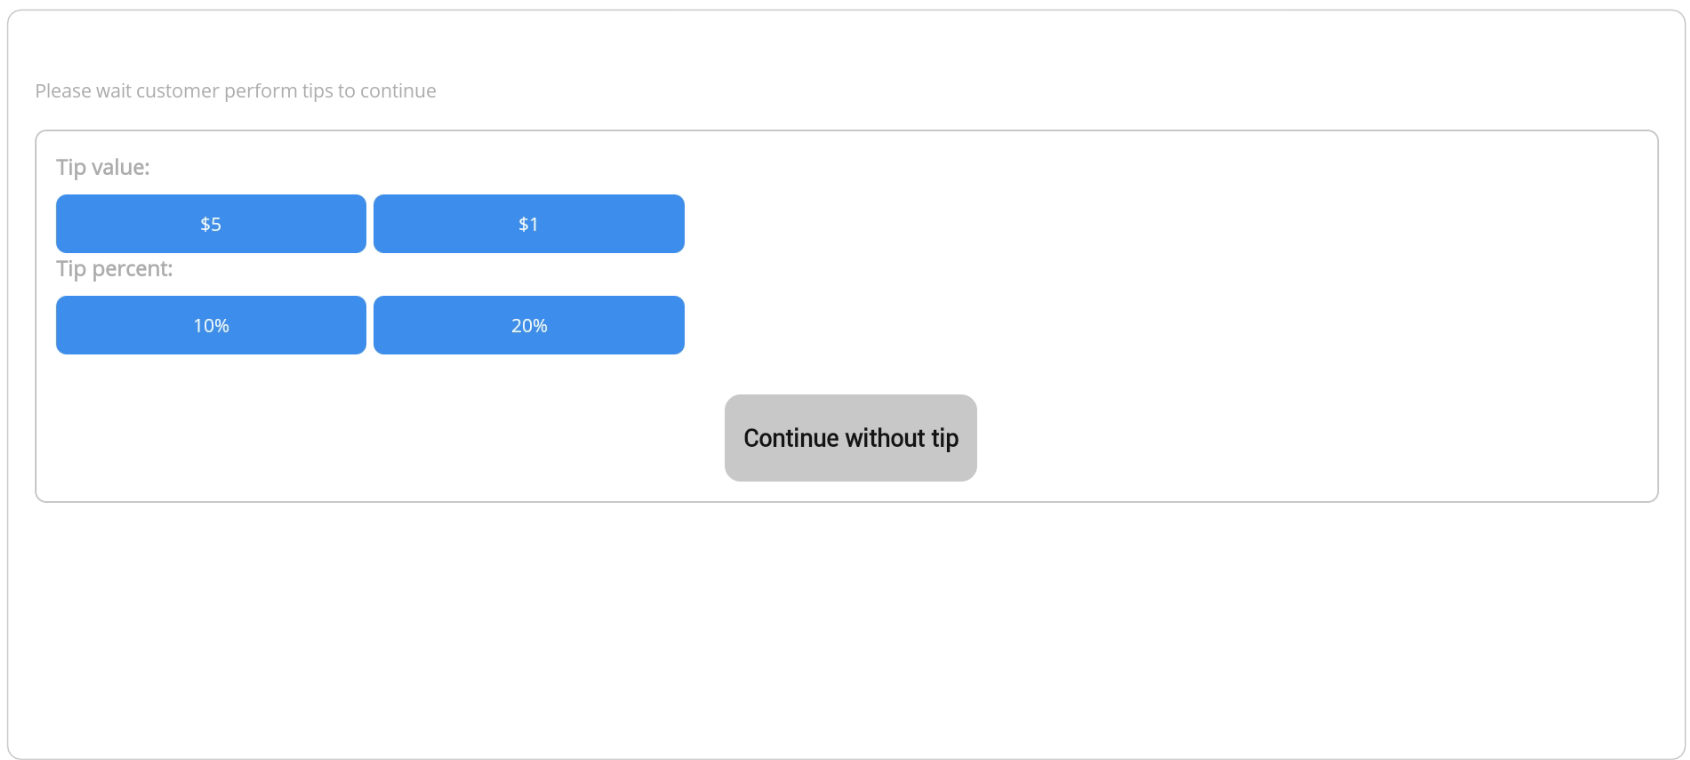
Note:
● Tip after enable will be displayed on the secondary screen and customers can choose the pre-installed value.
● Users who force Step must press Save to save the setup information.
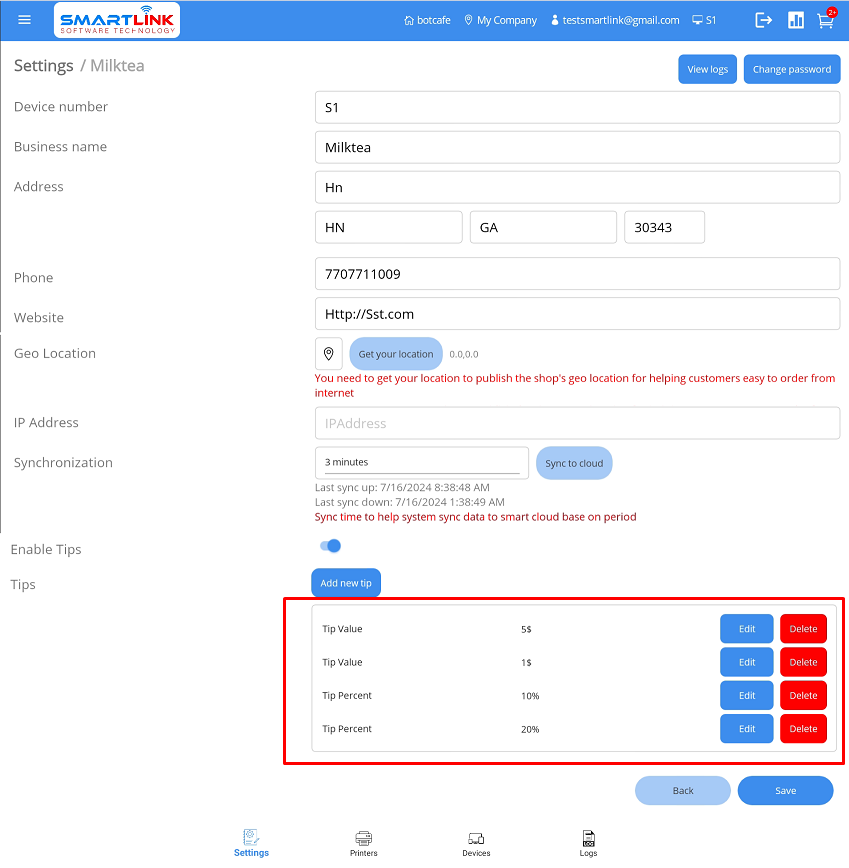
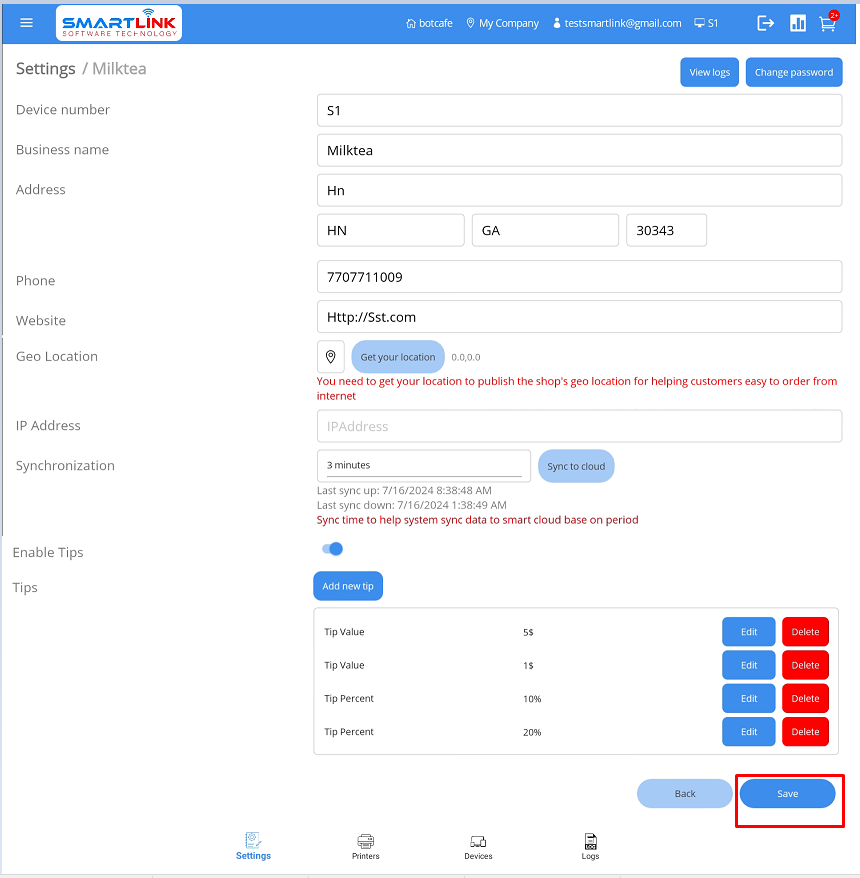
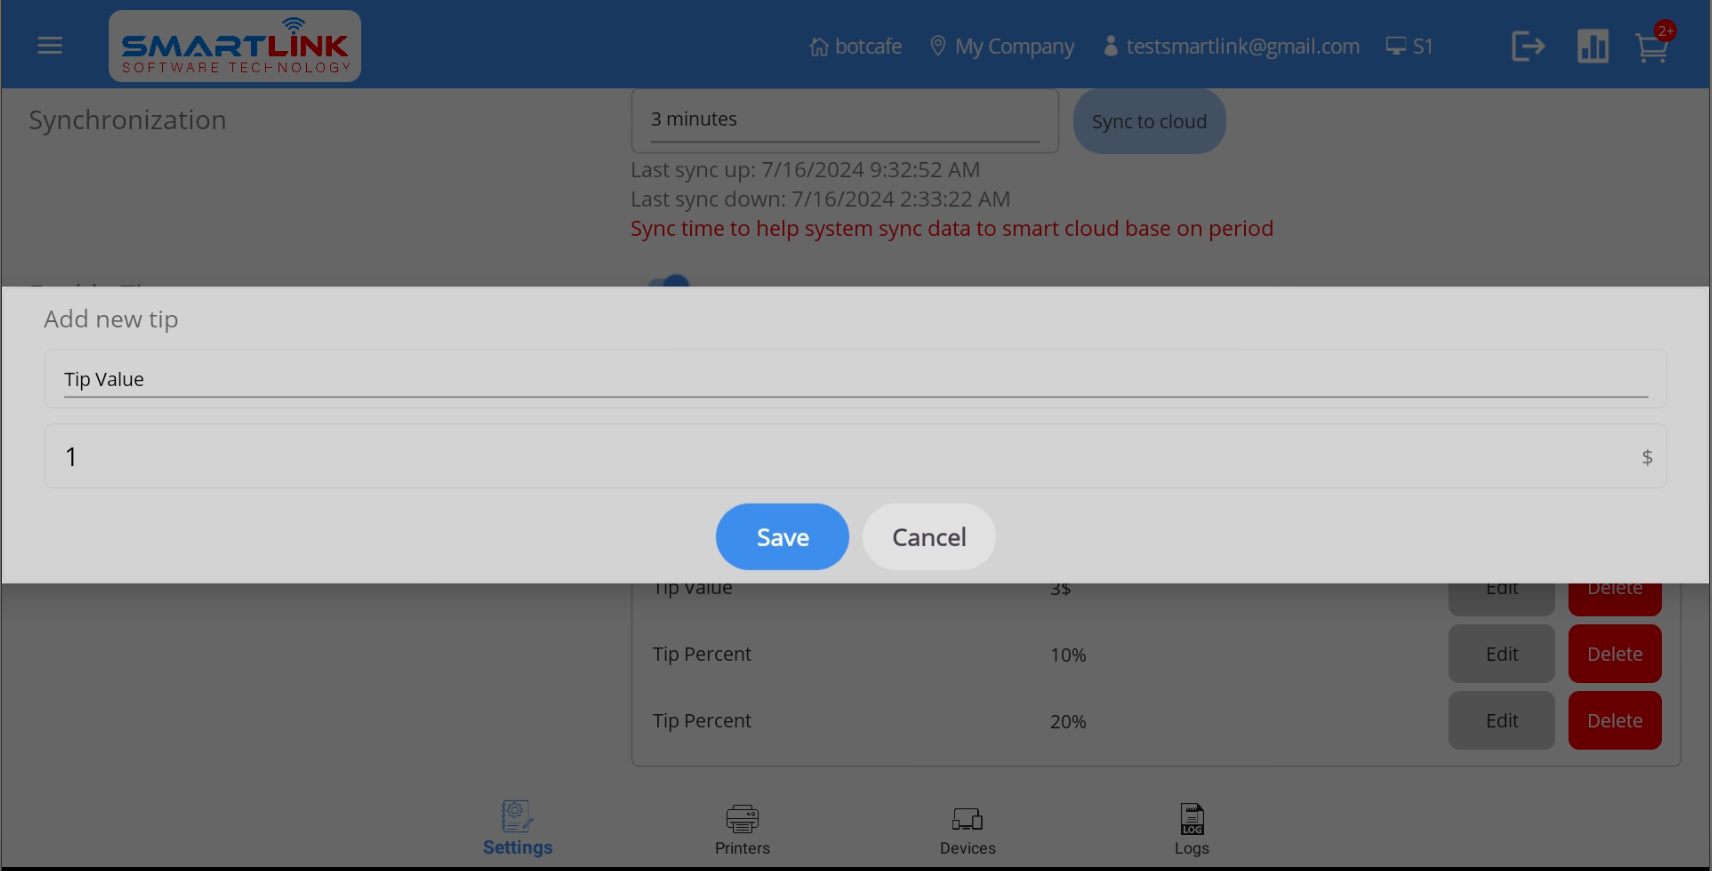
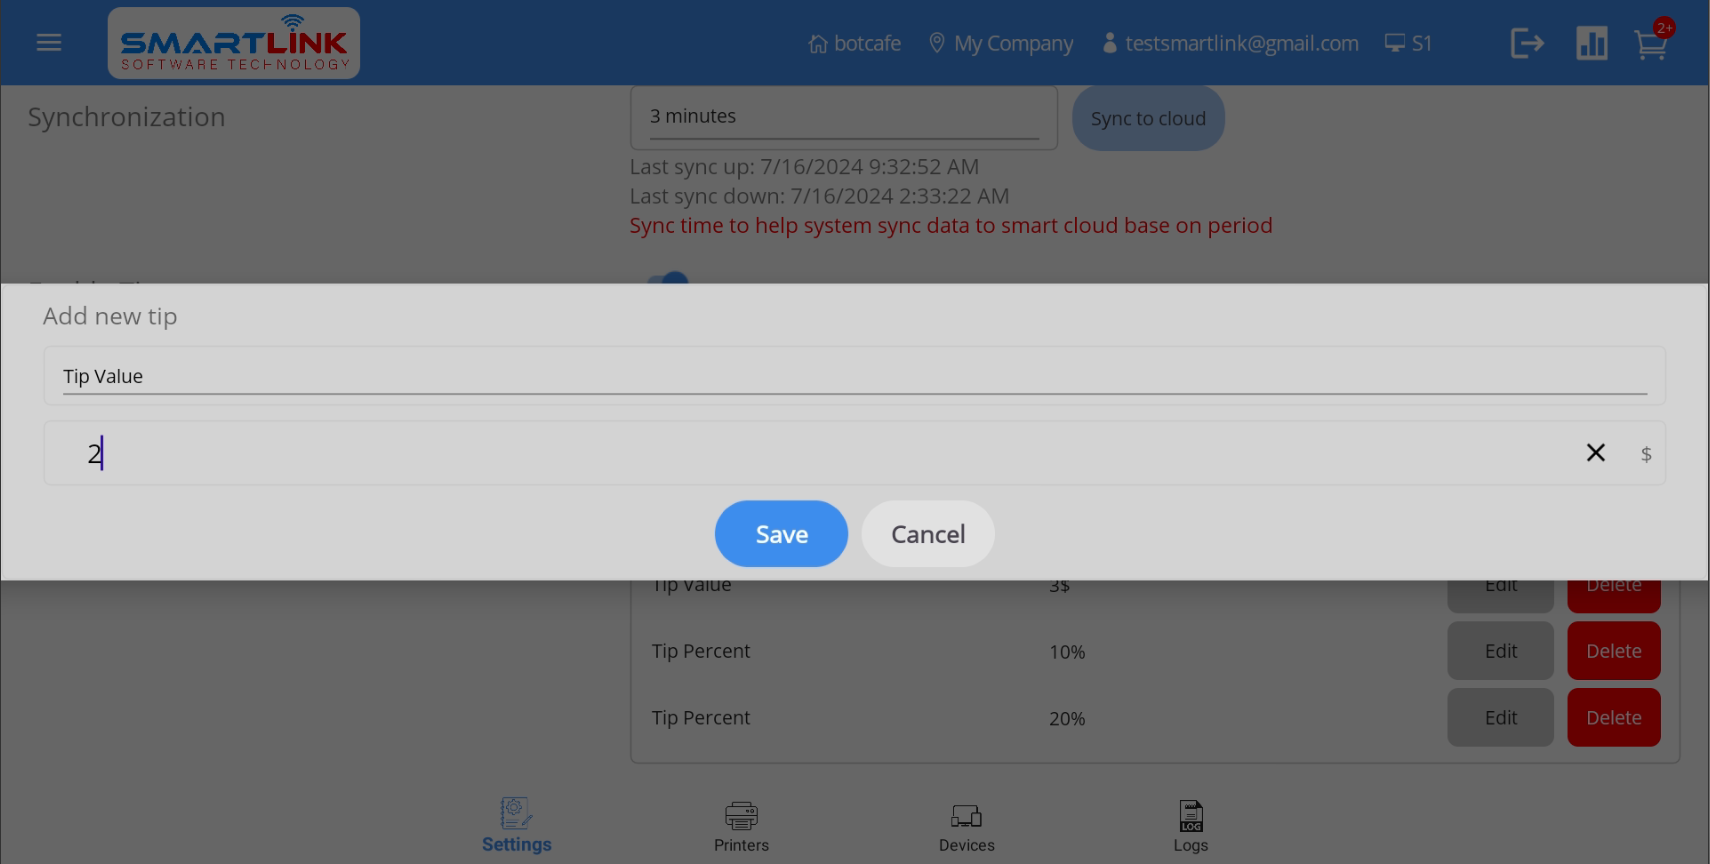
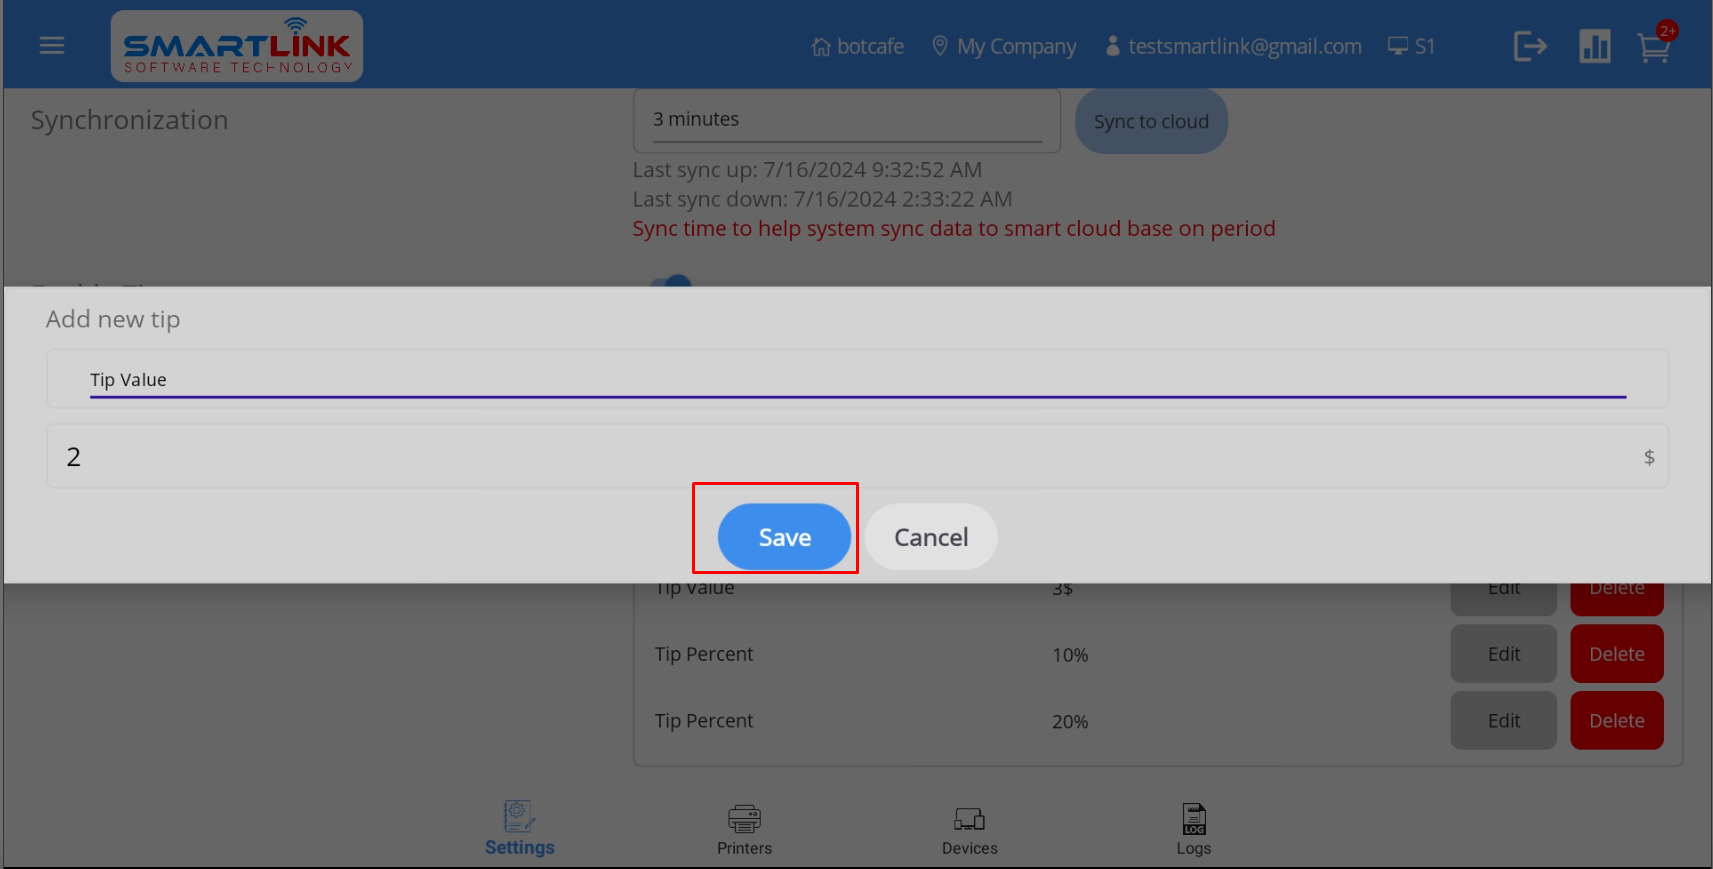
9.2.2. Add new tip
To add new tip information, follow these steps:
- Step 1: On the Tip screen, press the Add
button.
● The system displays a screen to add new tip information.
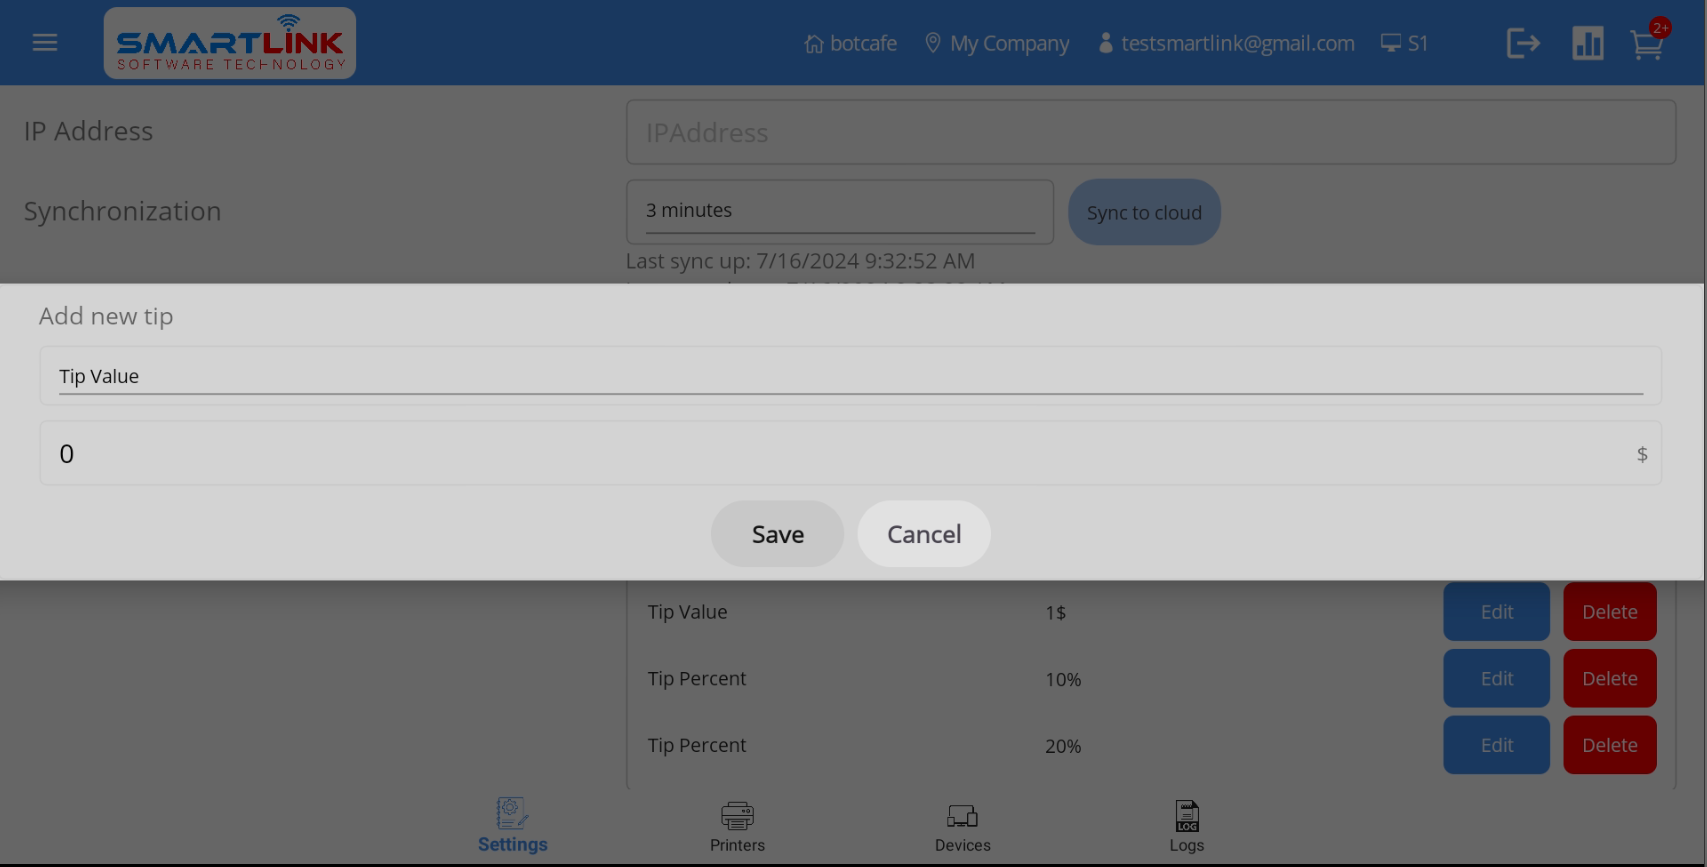
- Step 2: The user enters complete tip information.
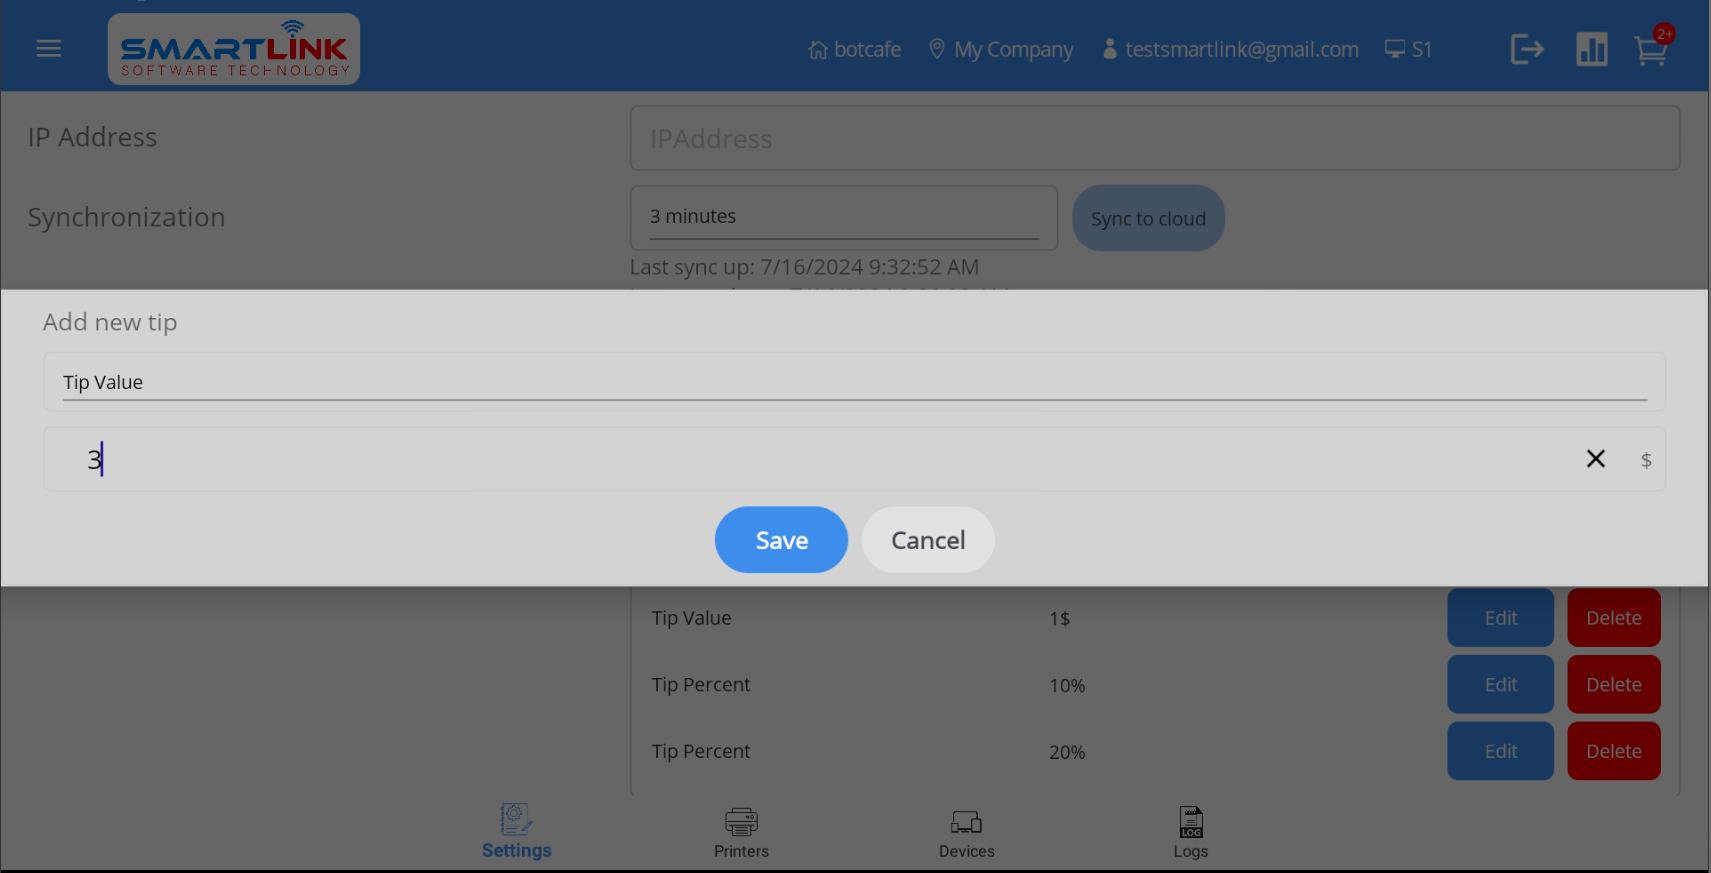
● Users can choose 1 of 2 tips: Tip value or Tip percent
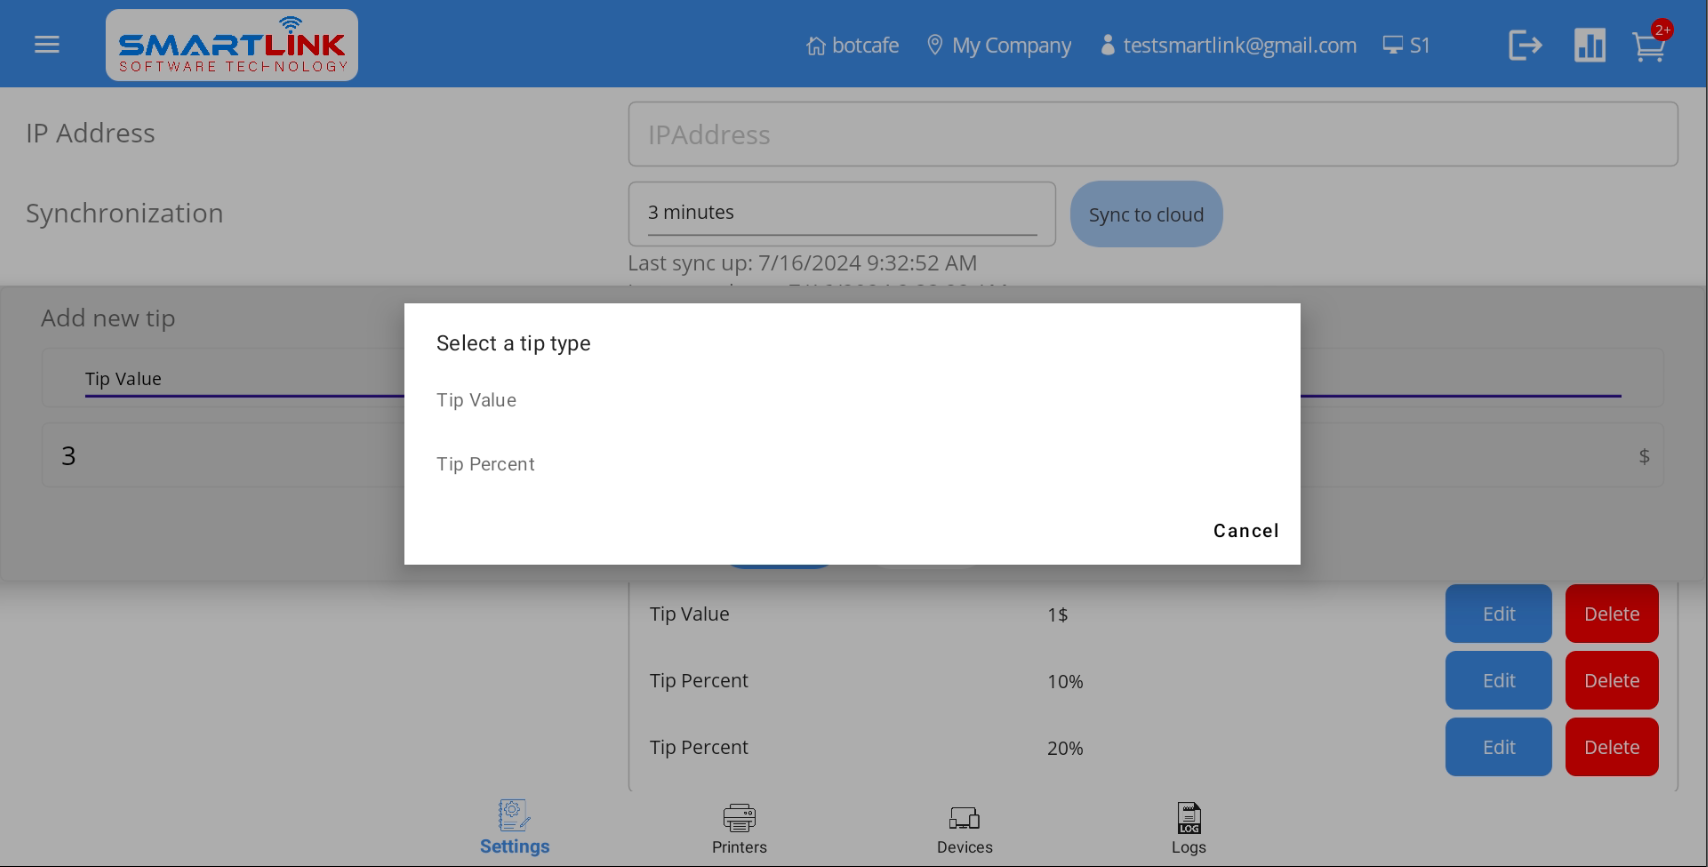
- Step 3: Press the Save button to save a new tip
information. Press the Cancel
button to cancel.
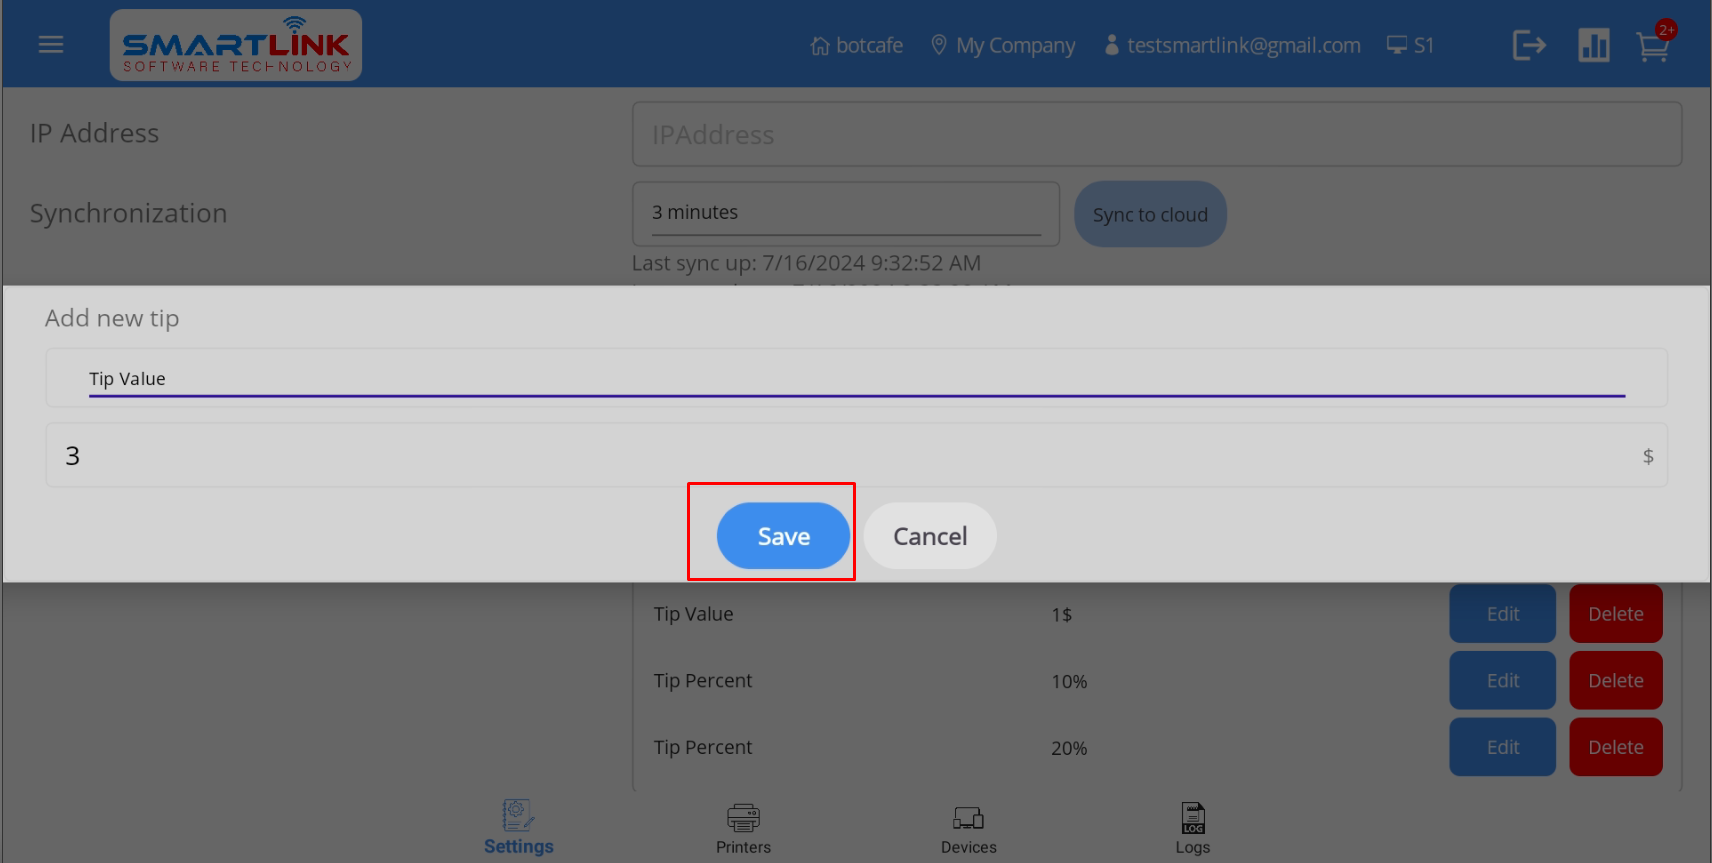
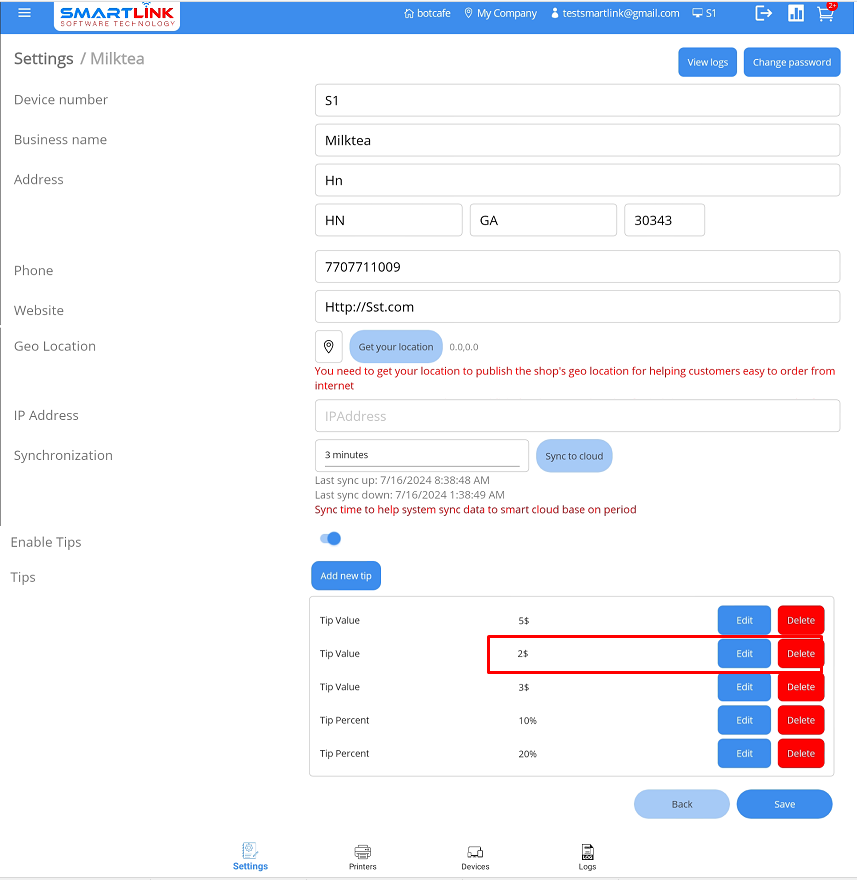
- Step 4: Successfully added new tip information, the system displays the newly created
tip information on the tip list.
- Step 5: Press the Save button to save the setup information.
Note:
● Tip values cannot overlap.
● Customers can only choose a maximum of 1 tip value.
9.2.3. Edit tip information
To edit tip information, follow these steps:
- Step 1: On the Tip screen, press the Edit
button.
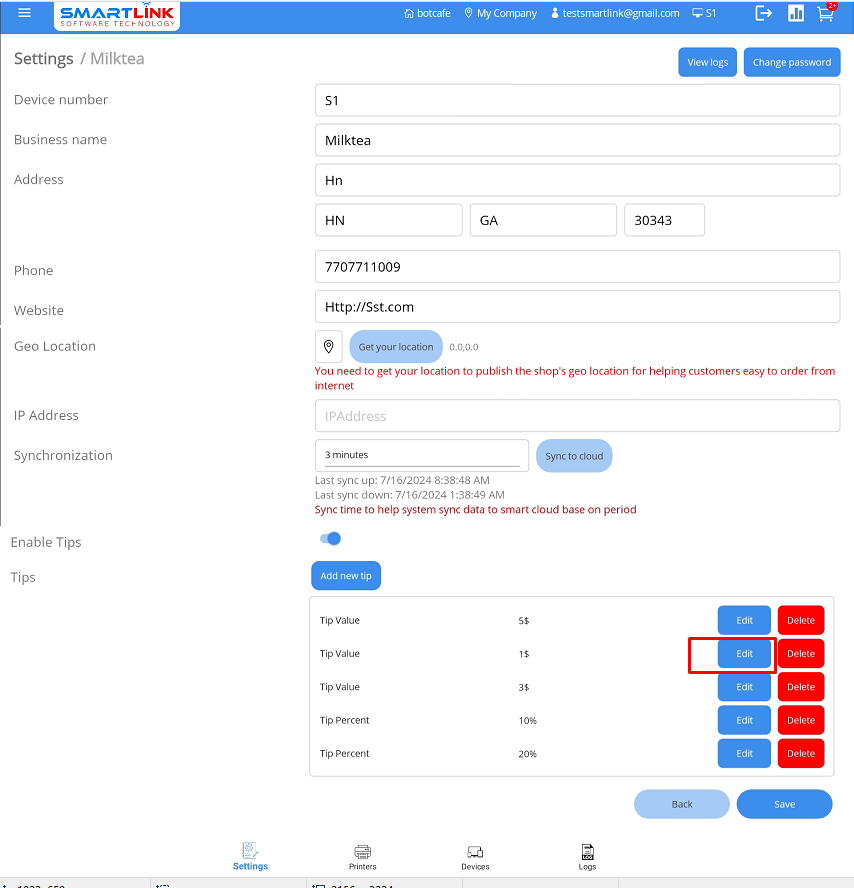
● The system displays detailed tip information.
- Step 2: Enter the information to be edited
- Step 3: Press the Save button to save a new tip
information. Press the Cancel
button to cancel.
- Step 4: Successfully edited new tip information, the system displays the newly edited
tip information on the tip
list.
- Step 5: Press the Save button to save the setup information.
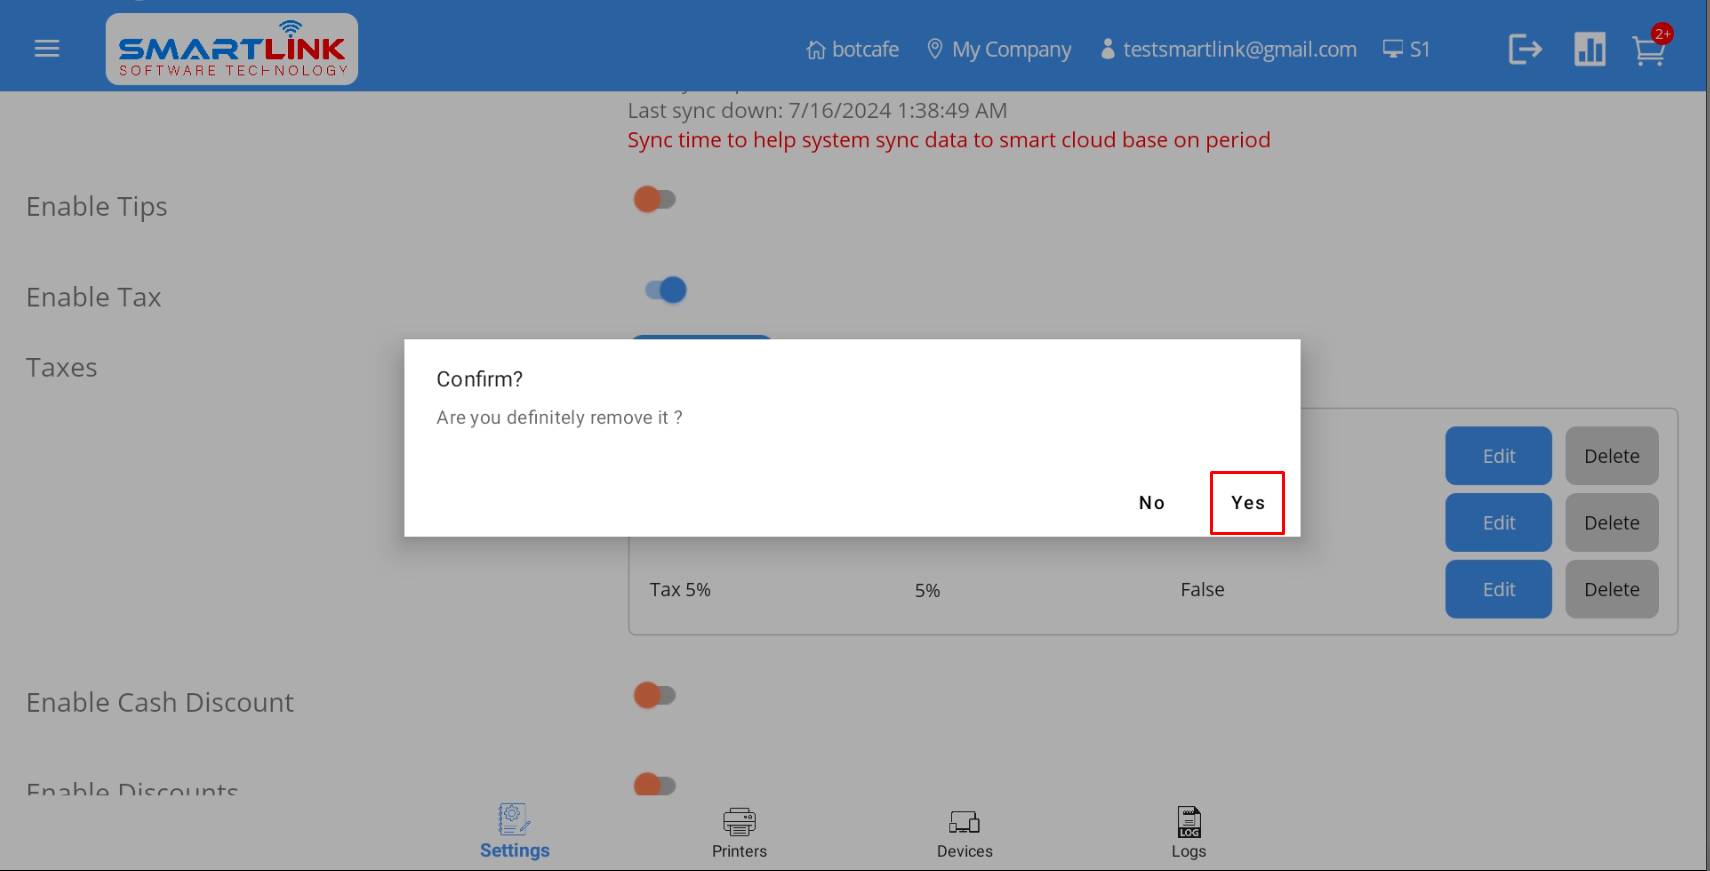
9.2.4. Delete tip information
To delete tip information, follow these steps:
- Step 1: On the Tip screen, press the Delete
button.
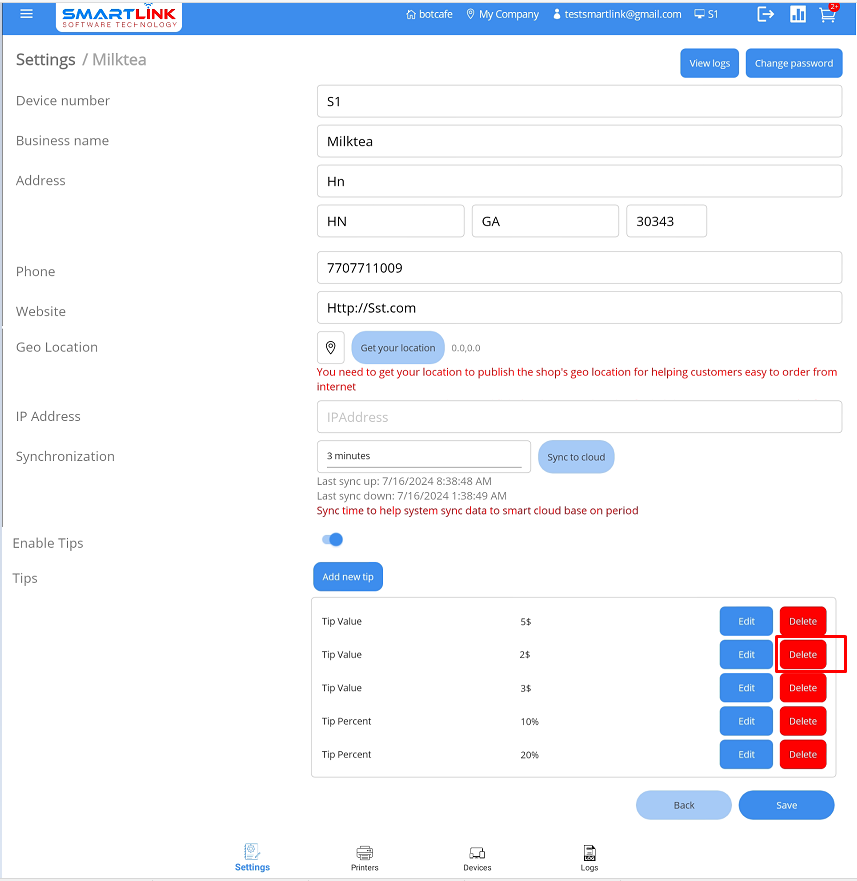
● The system displays a confirmation screen to delete tip information.
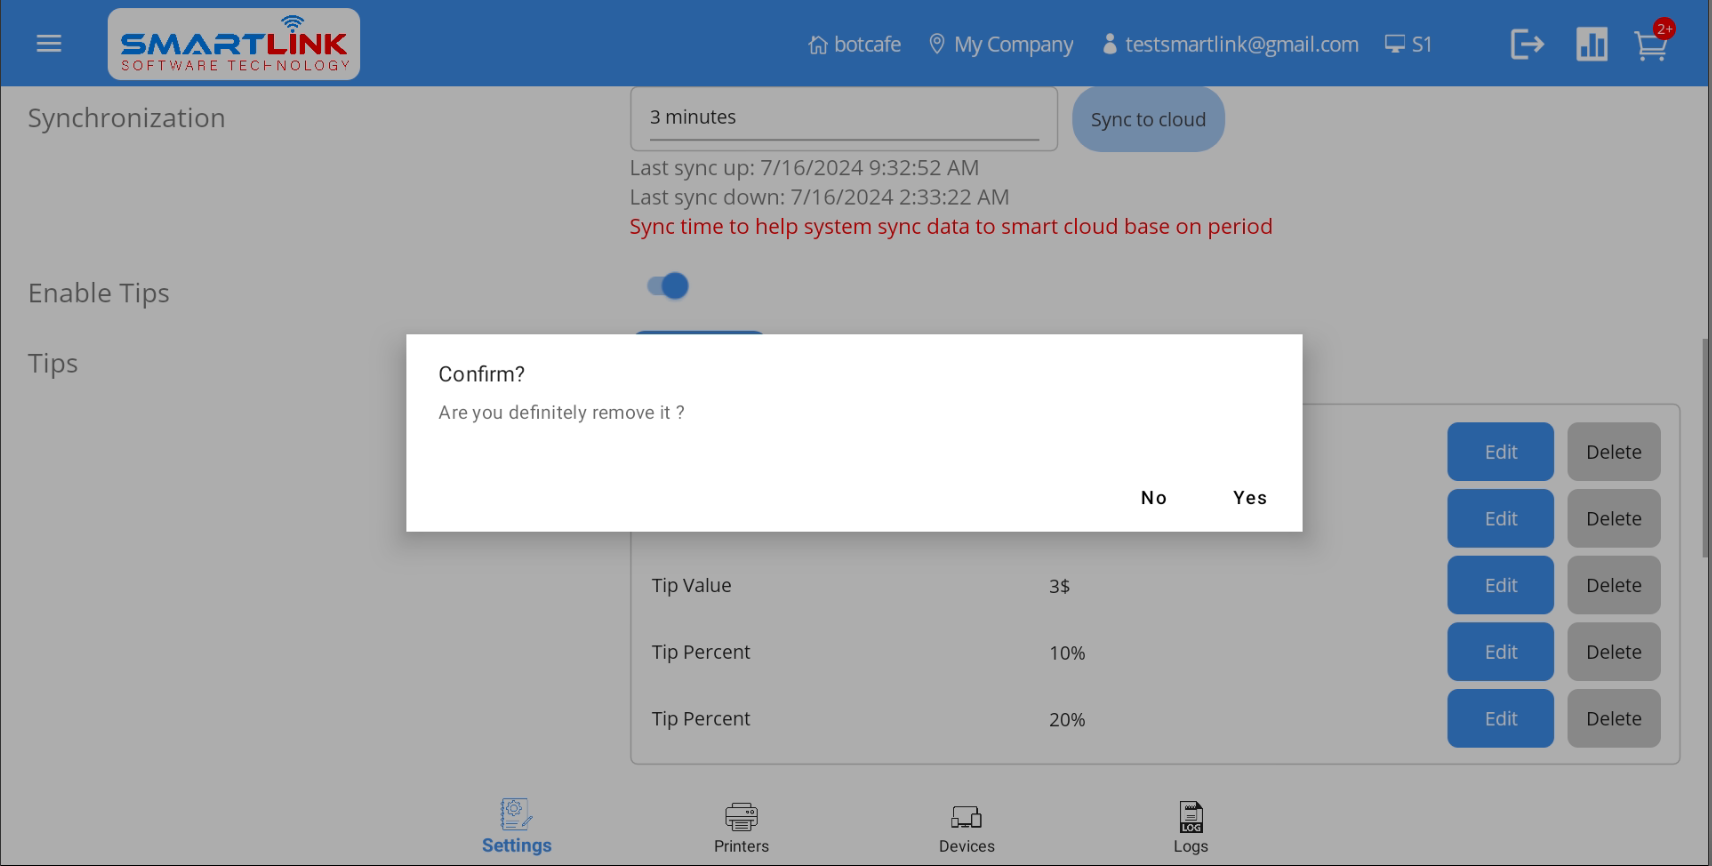
- Step 2: Press the Yes button to delete tip information.
Press the No
button to cancel.
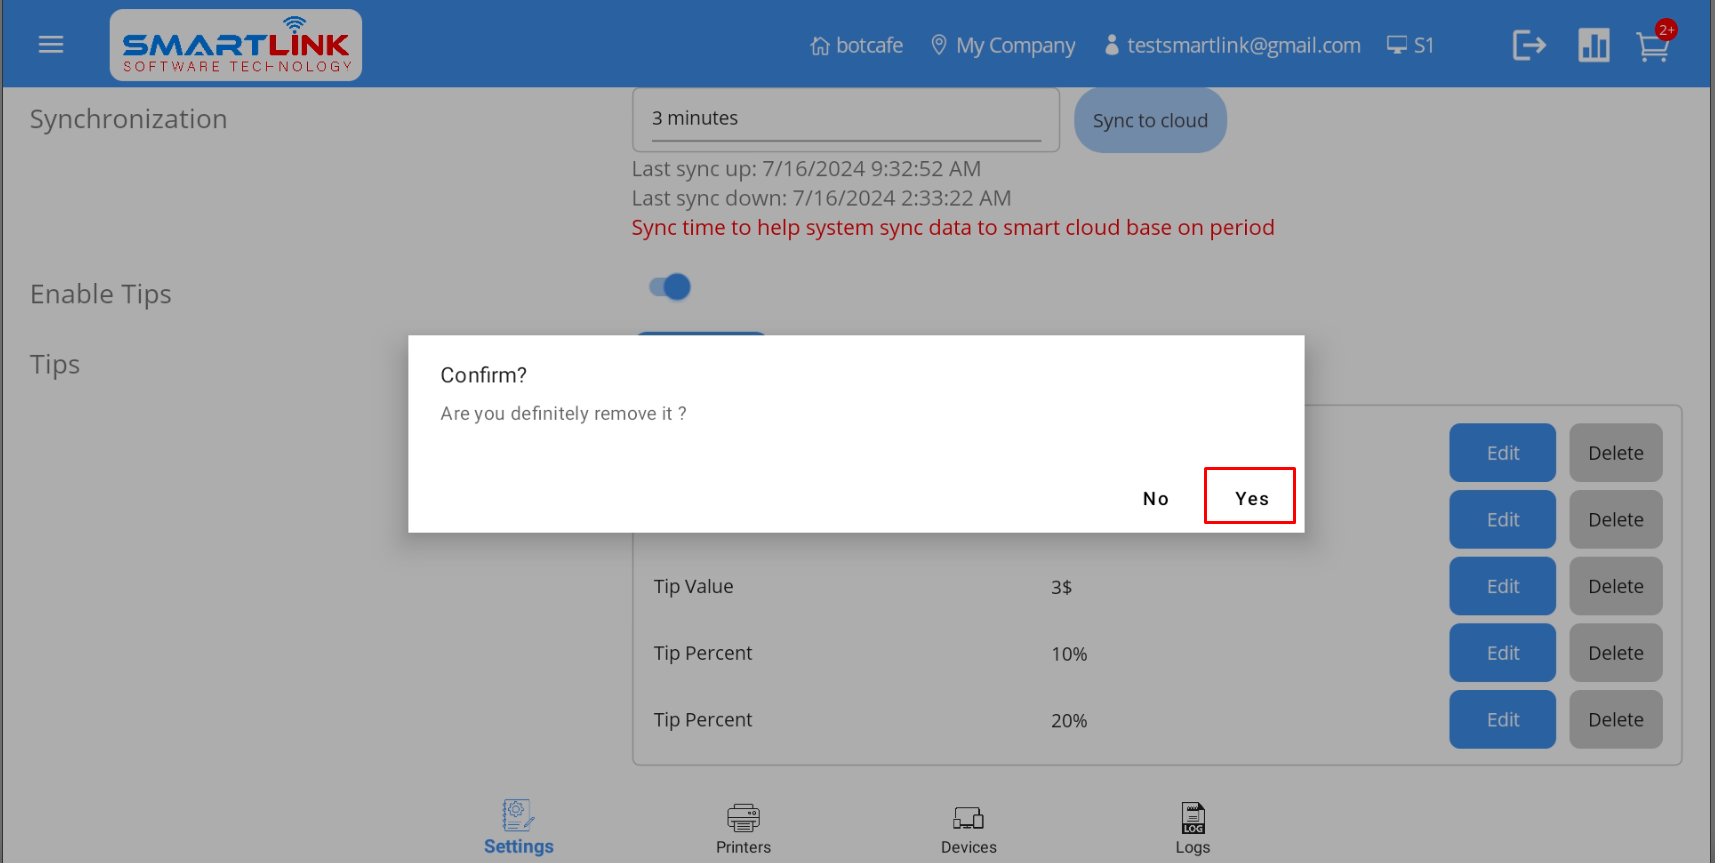
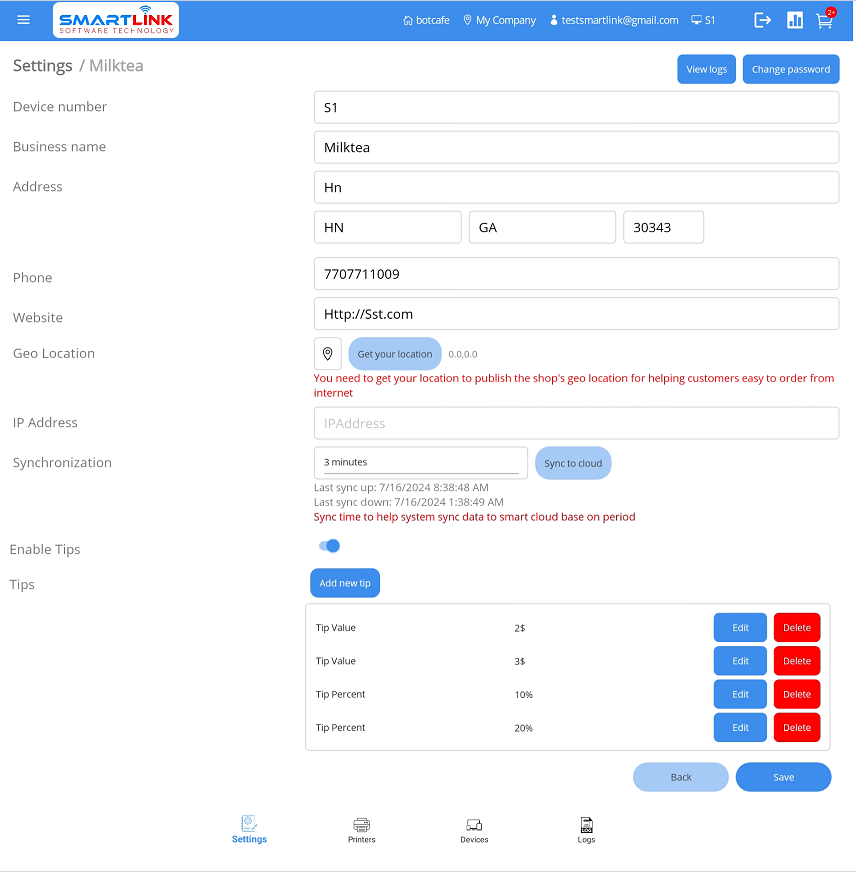
- Step 3: After successfully deleting new tip information, the system returns to the tip
screen without the deleted
tip information.
- Step 4: Press the Save button to save the setup information.
9.3. Cash discount
9.3.1. Enable cash discount
To enable cash discount, follow these steps:
- Step 1: On the Settings screen, press the Enable
button in Enable cash discount field.
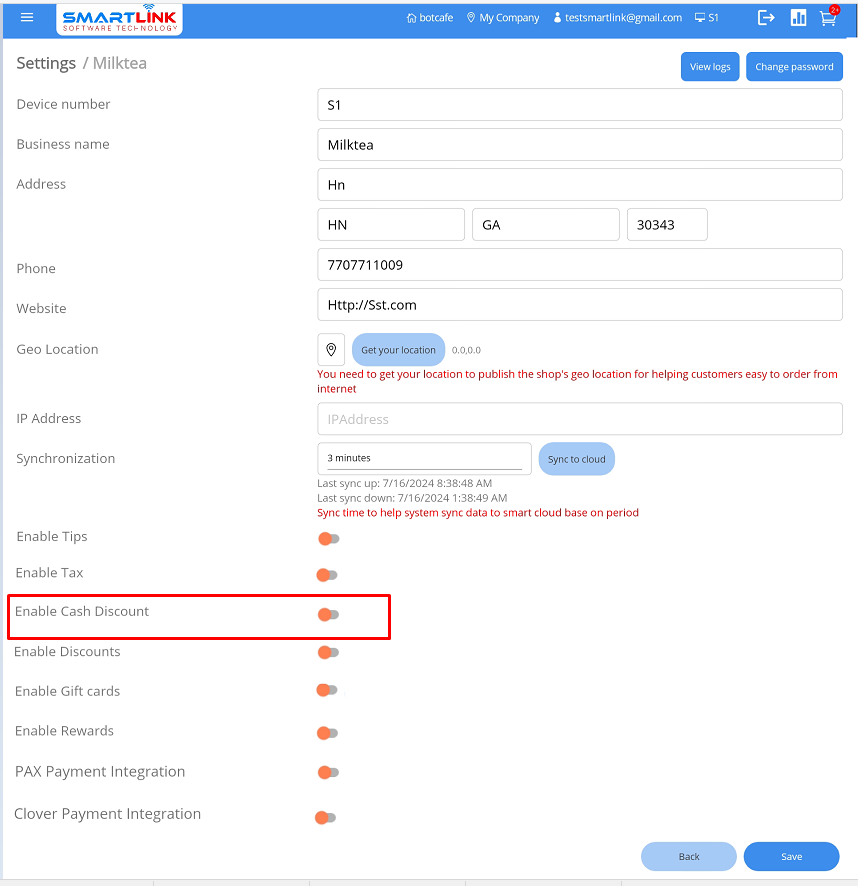
● The system displays some cash discount values.
- Step 2: Press the Save button.
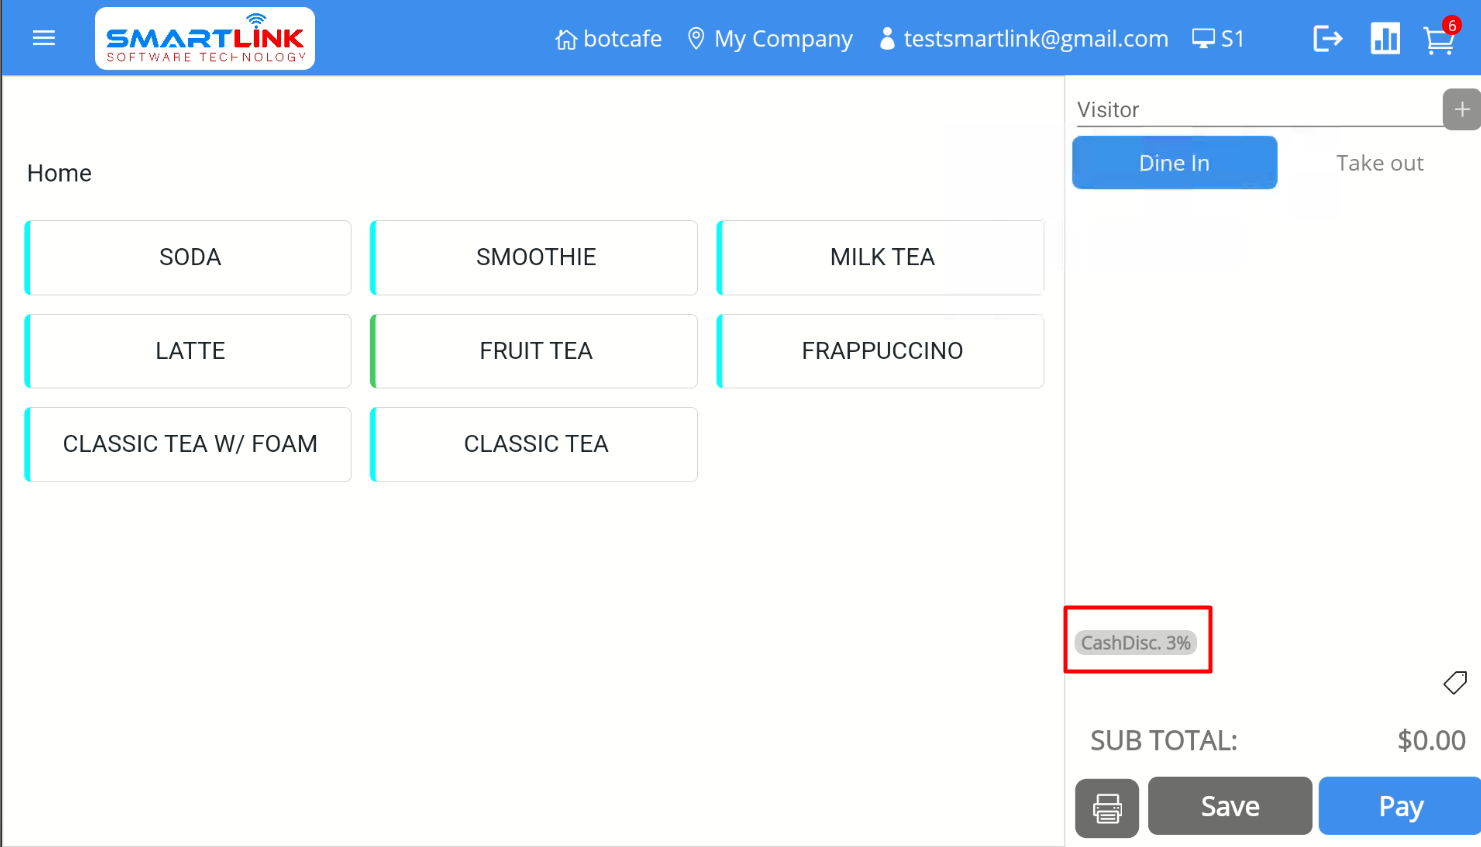
● After being enabled, cash discount will be displayed on the main screen
Note:
● Cash discount after enable will be automatically applied to all orders with Cash as payment method.
● Users who force Step must press Save to save the setup information.
● Cash discounts with Active status will be automatically applied to all orders with Cash
as payment method.
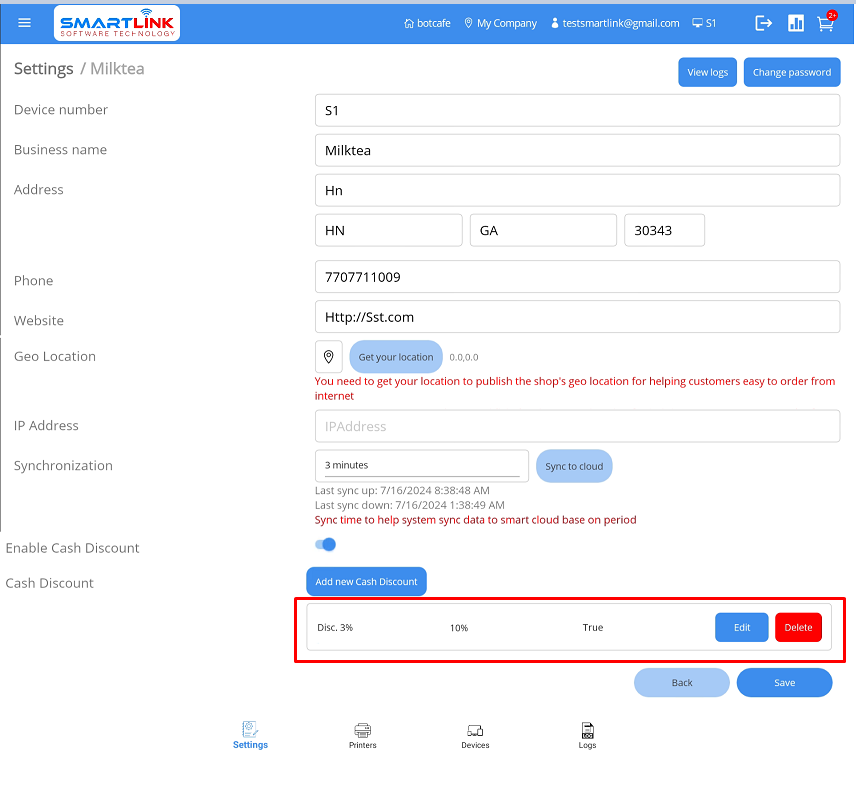
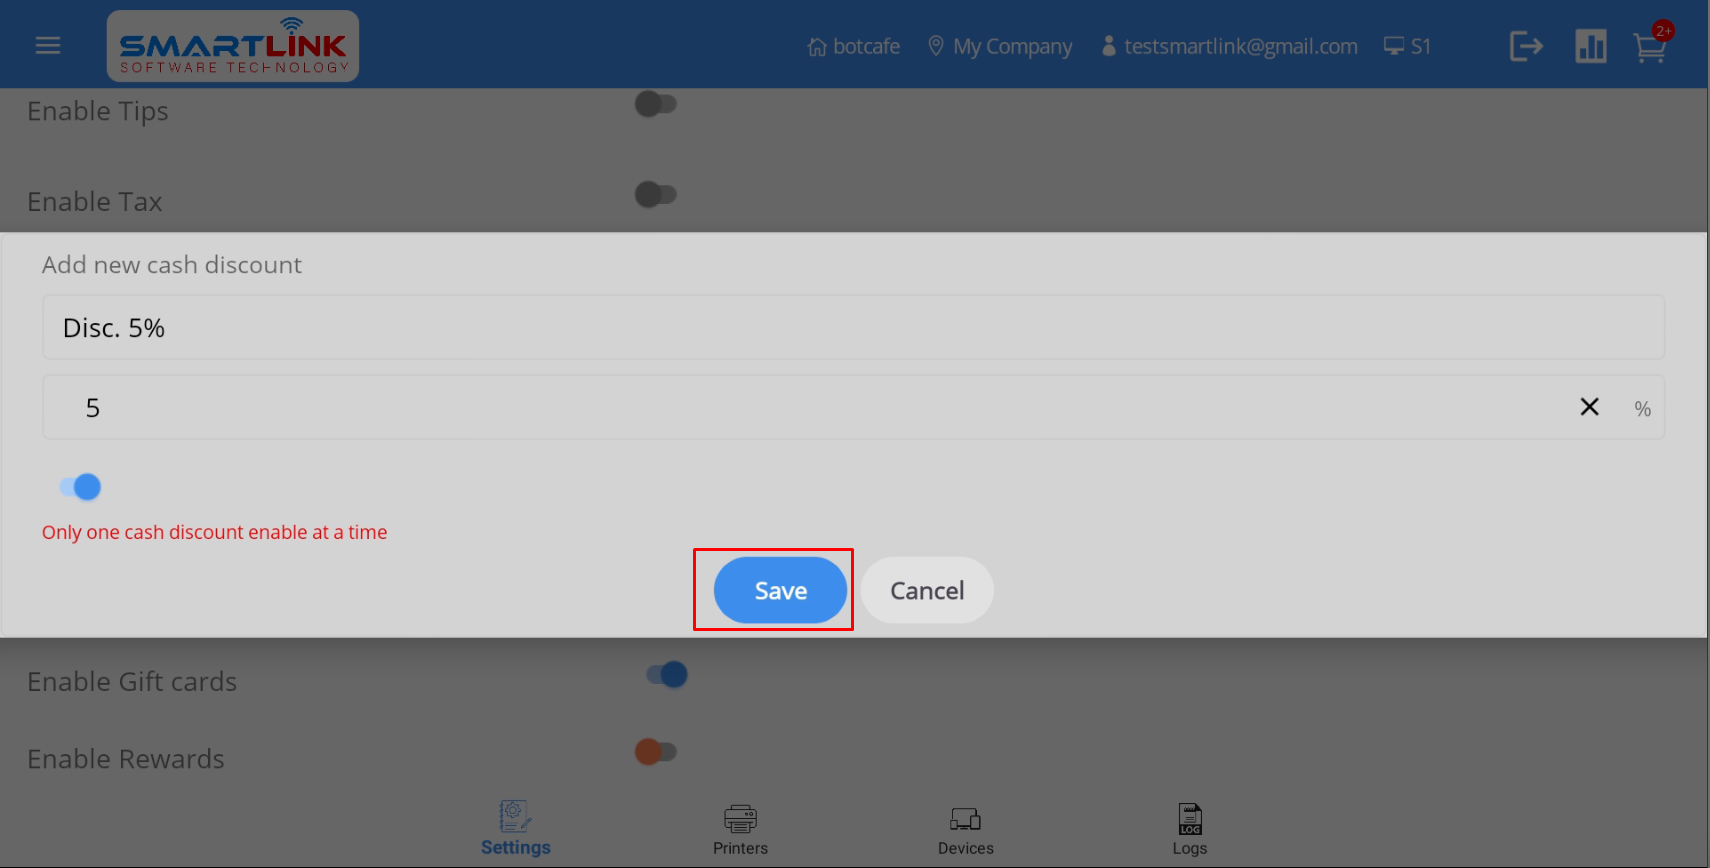
9.3.2. Add new cash discount
To add new cash discount information, follow these steps:
- Step 1: On the Cash discount screen, press the Add
button.
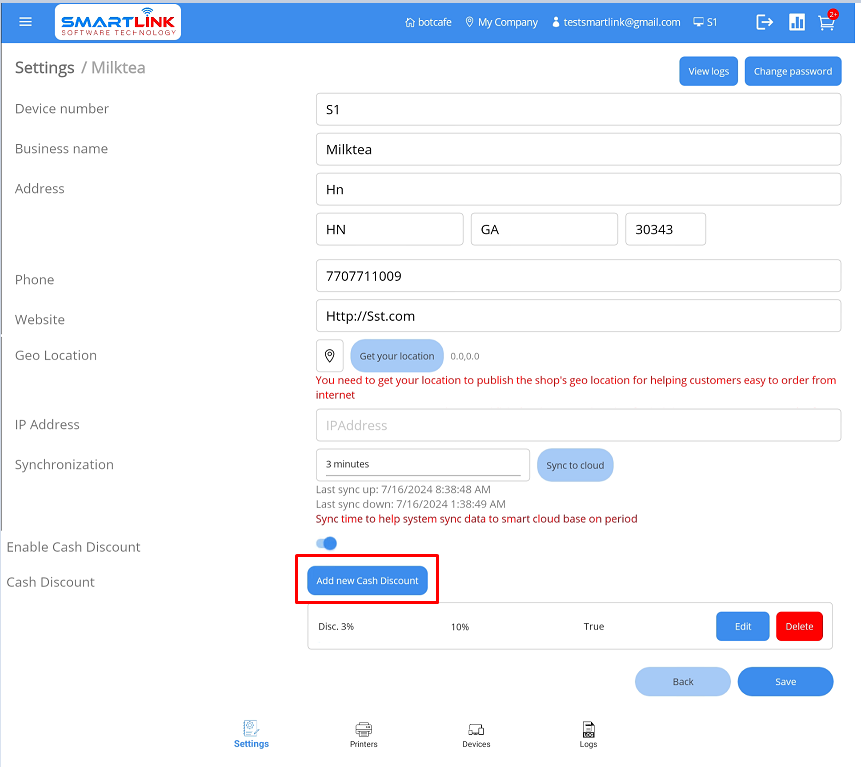
● The system displays a screen to add new cash discount information.
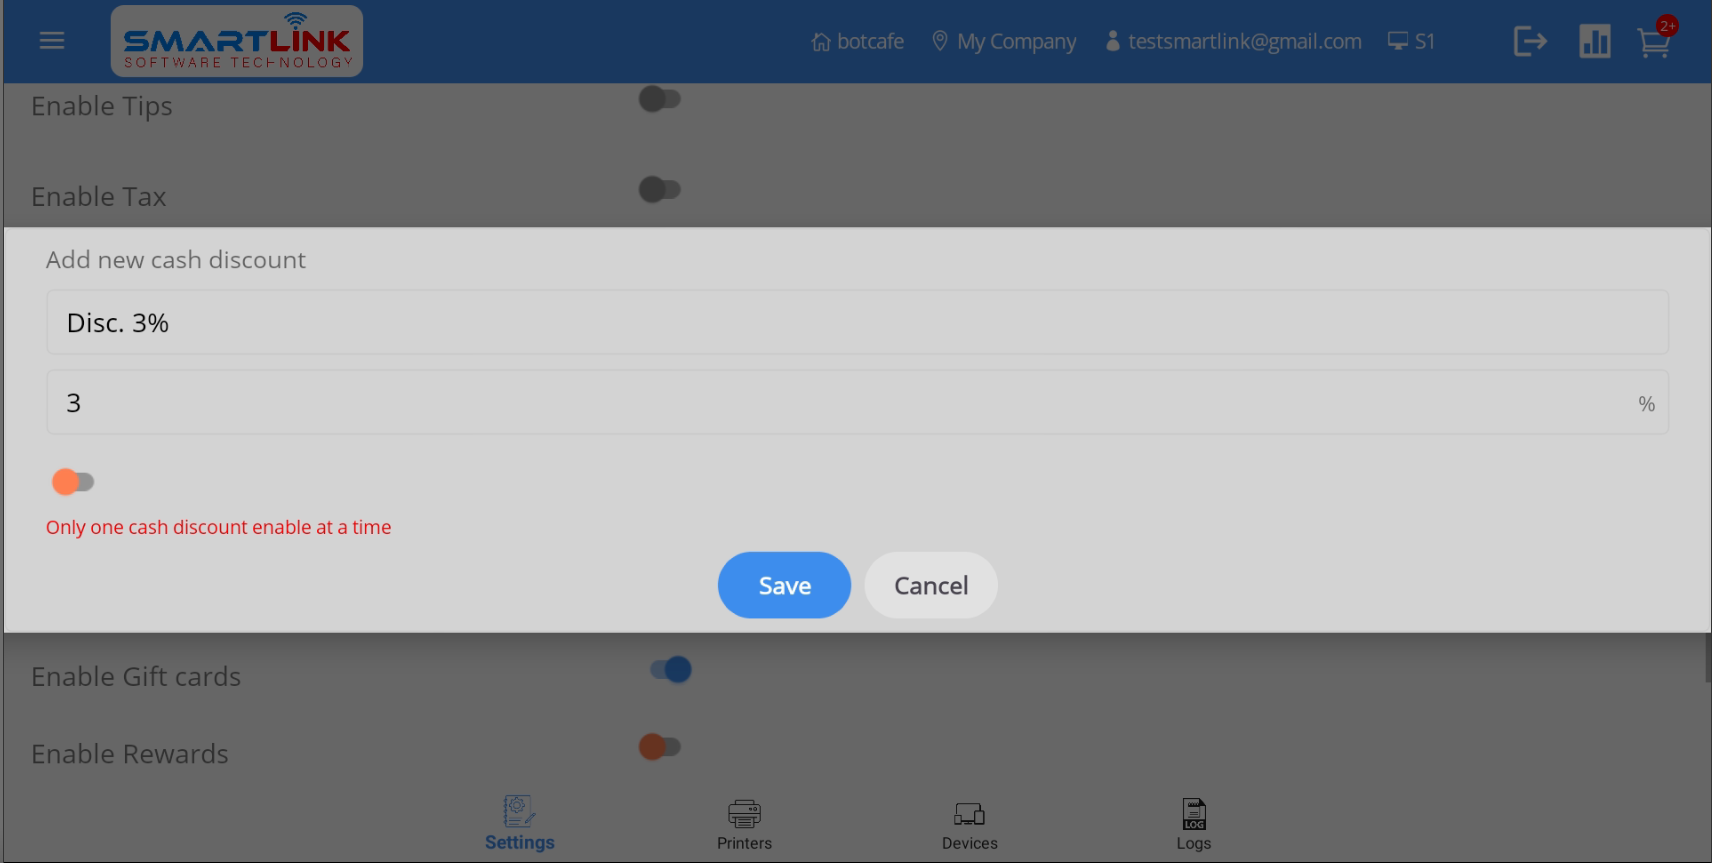
- Step 2: The user enters complete cash discount information into the fields such as Name,
Phone number

- Step 3: Press the Save button to save a new cash discount
information. Press the Back
button if you want to cancel.
- Step 4: Successfully added new cash discount information, the system displays the newly created
cash discount information on the cash discount list.
- Step 5: Press the Save button to save the setup information.
Note:
● Cash discount values cannot overlap.
● Users can only activate 1 Cash discount.
● Cash discounts with Active status will be automatically applied to orders with Cash
as payment method.
9.3.3. Edit cash discount information
To edit cash discount information, follow these steps:
- Step 1: On the Cash discount screen, press the Edit
button.
● The system displays detailed cash discount information.
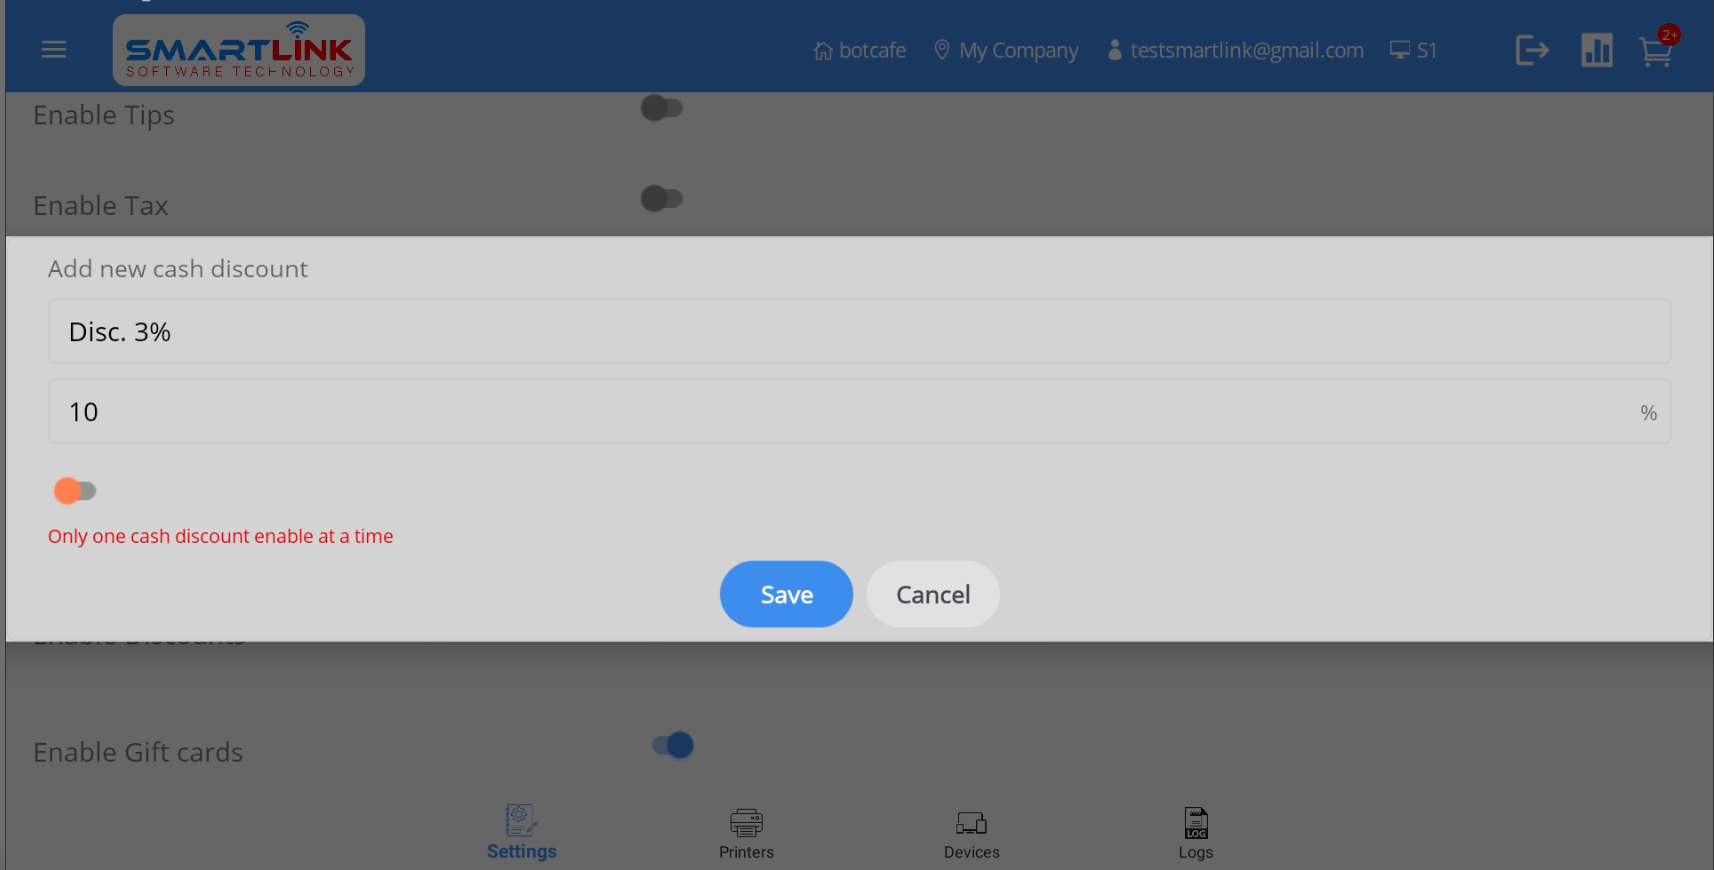
- Step 2: Enter the information to be edited
- Step 3: Press the Save button to save a new cash discount
information. Press the Back
button if you want to cancel.
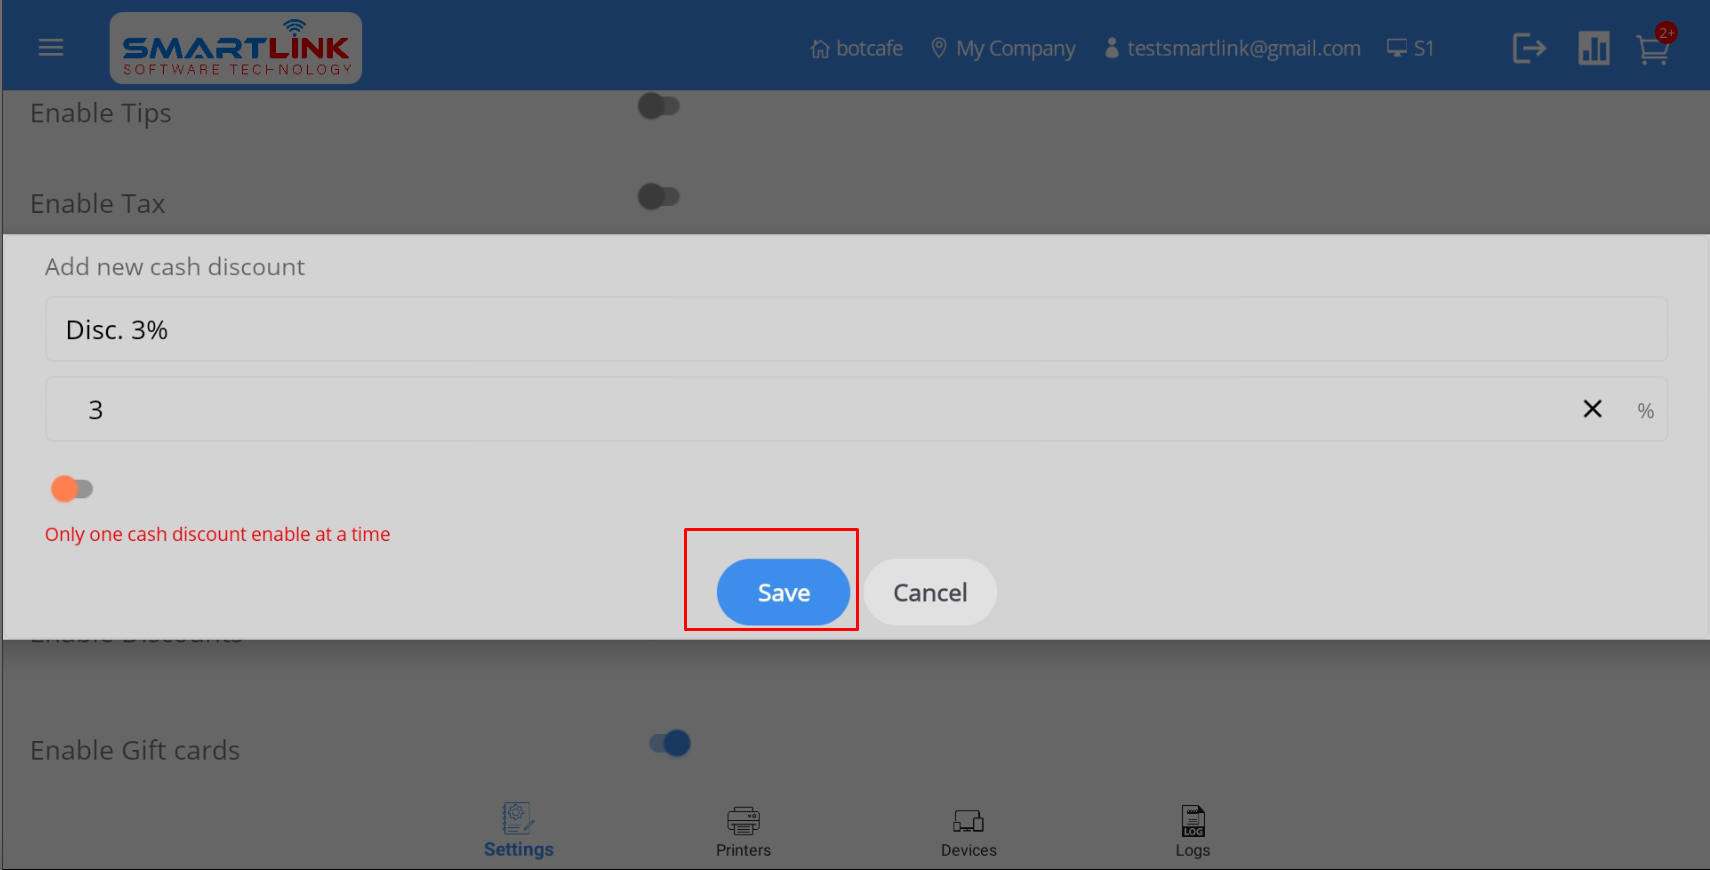
- Step 4: Successfully edited new cash discount information, the system displays the newly edited
cash discount information on the cash discount
list.

- Step 5: Press the Save button to save the setup information.
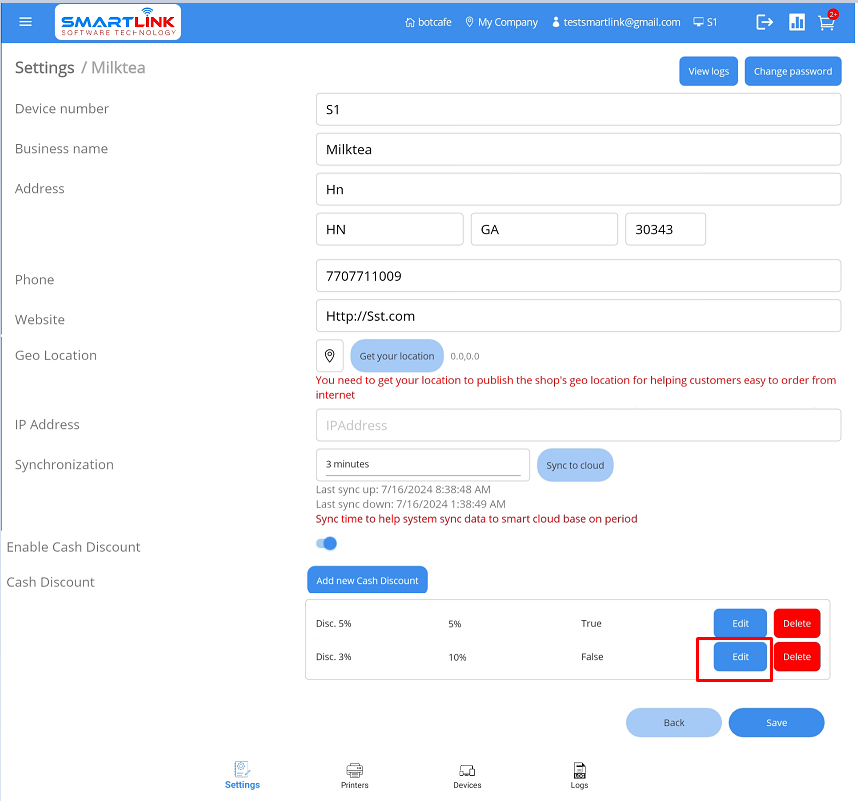
9.3.4. Delete cash discount information
To delete cash discount information, follow these steps:
- Step 1: On the Cash discount screen, press the Delete
button.
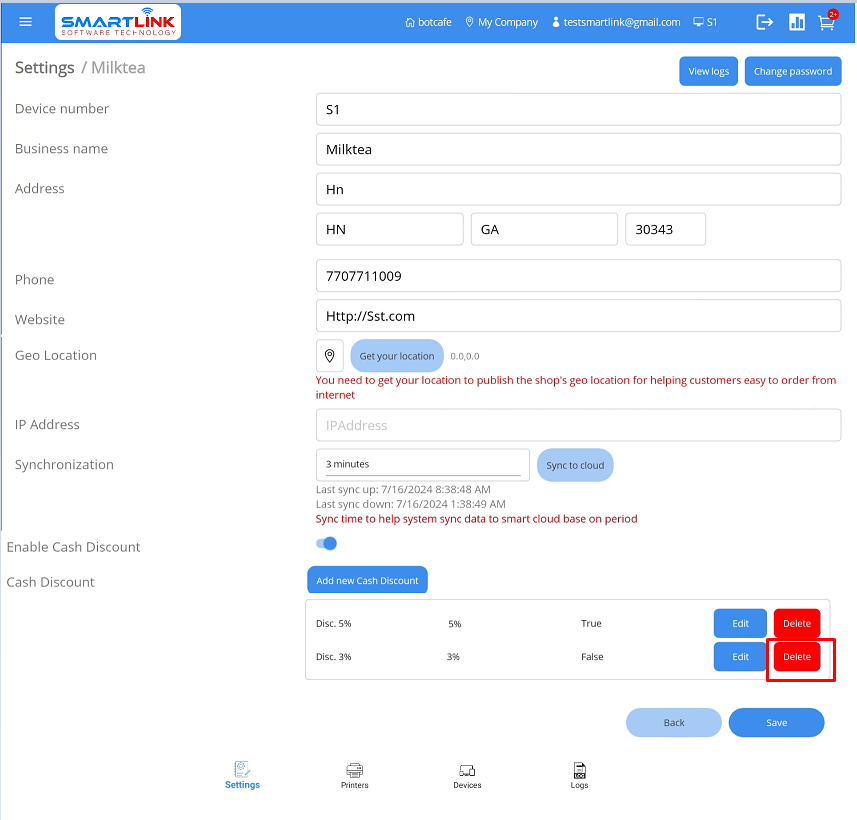
● The system displays a confirmation screen to delete cash discount information.
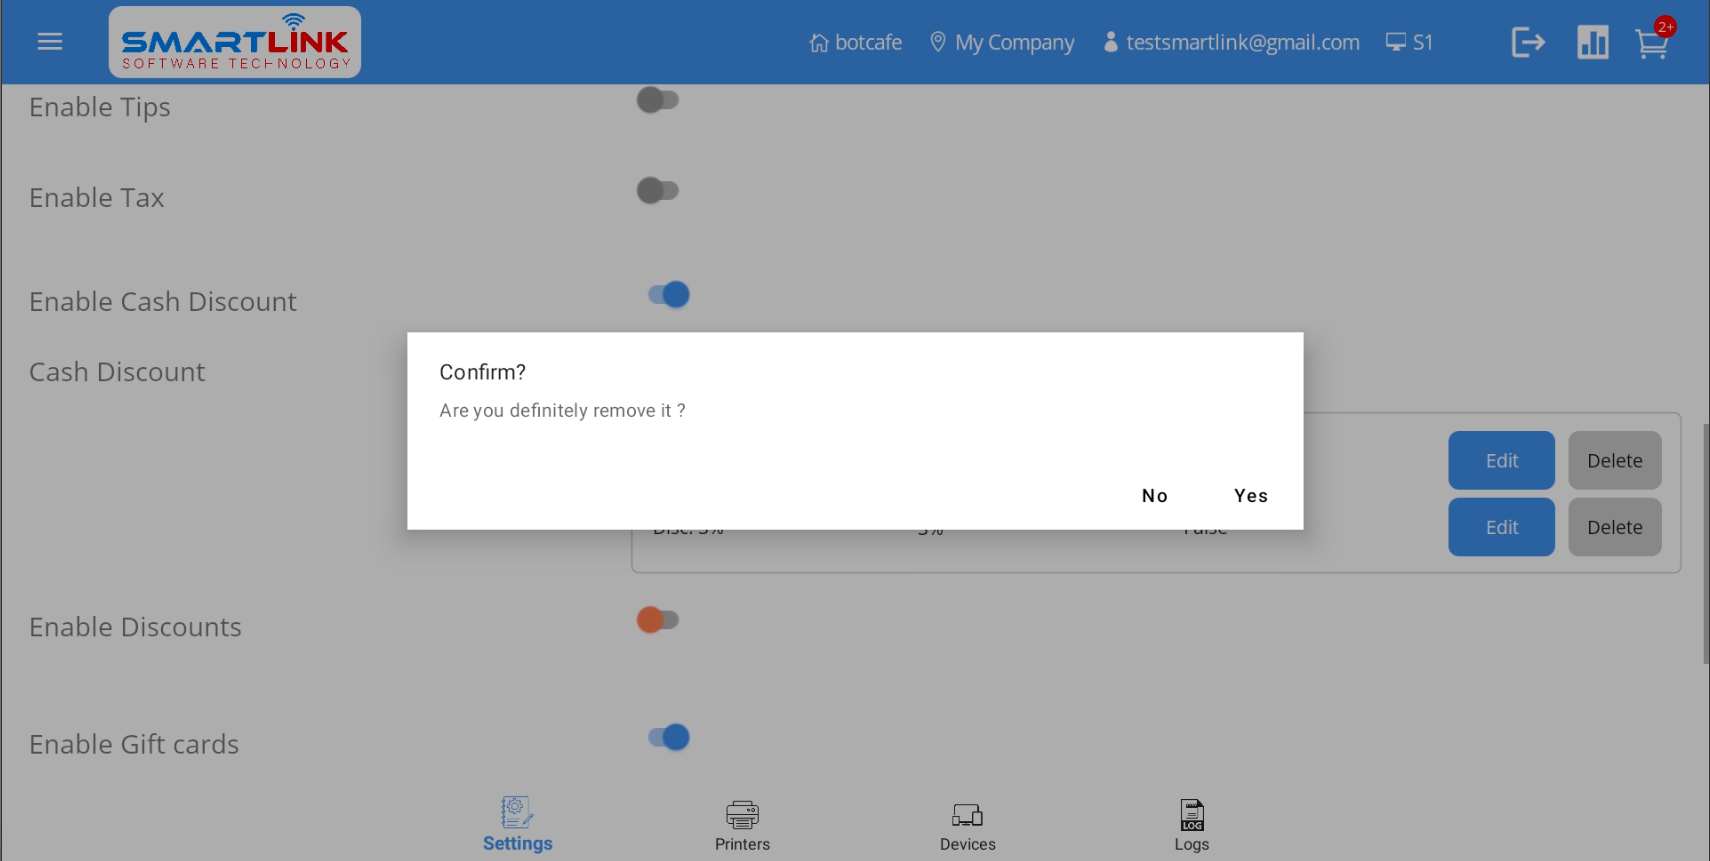
- Step 2: Press the Yes button to delete cash discount information.
Press the No
button to cancel.
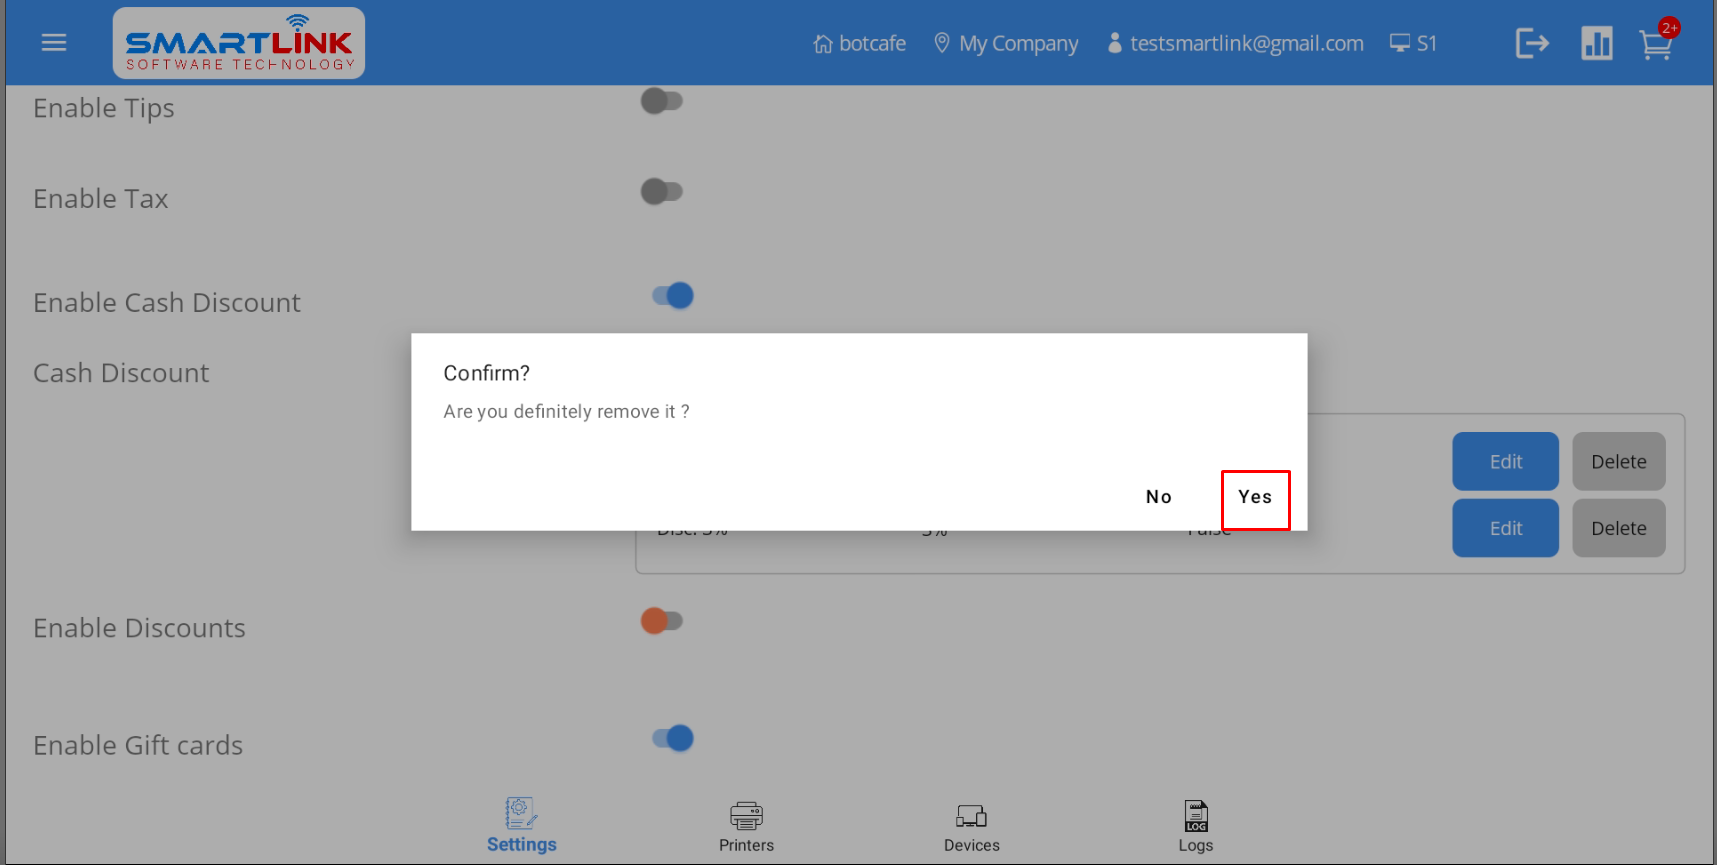
- Step 3: After successfully deleting new cash discount information, the system returns to the cash discount
screen without the deleted cash discount information.
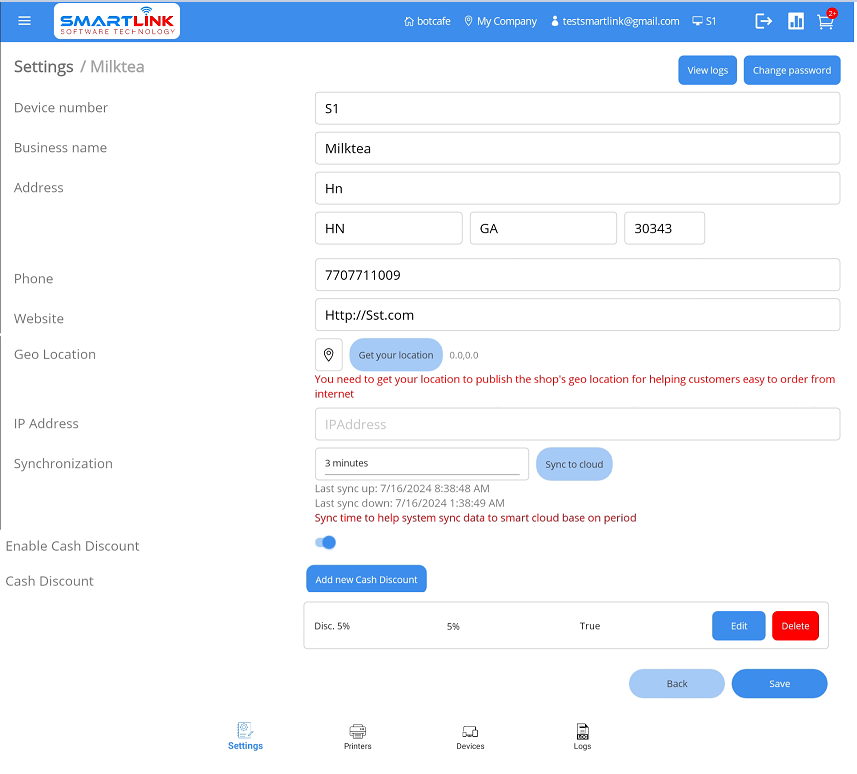
- Step 4: Press the Save button to save the setup information.
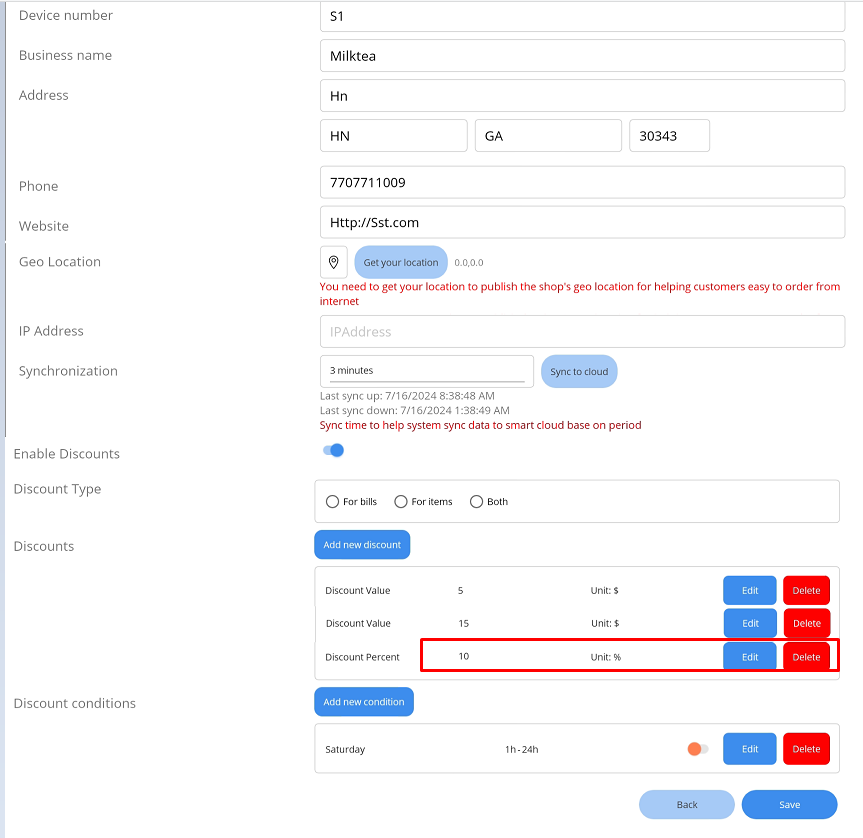
9.4. Discount
9.4.1. Enable discount
To enable discount, follow these steps:
- Step 1: On the Settings screen, press the Enable
button in Enable discount field.
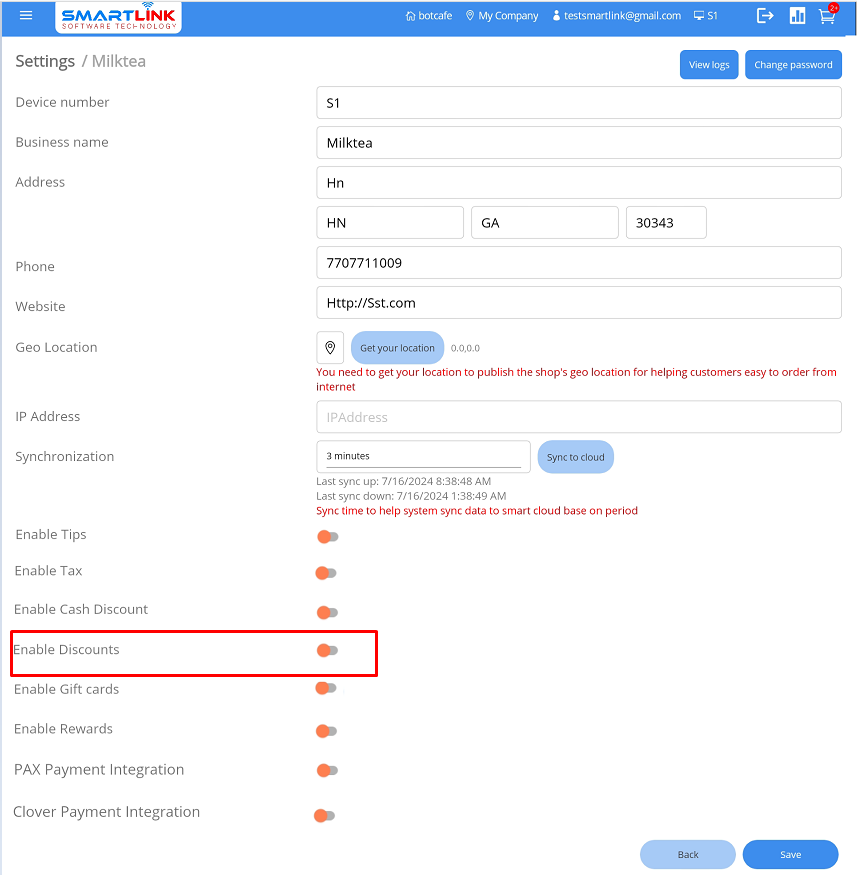
● The system displays some cash discount values.
- Step 2: Press the Save button.
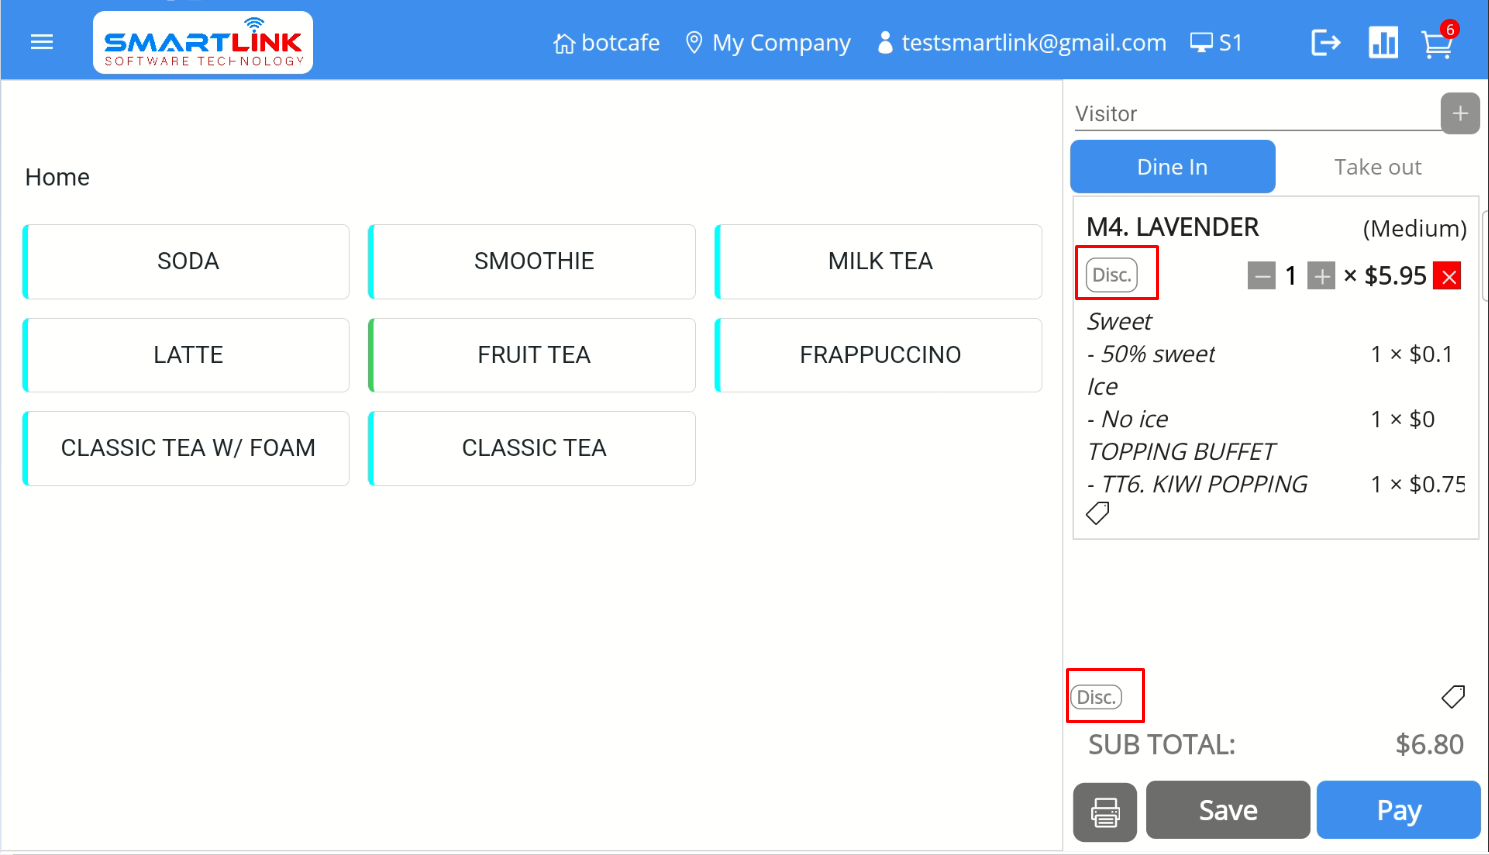
- Step 3: Discount will be displayed and applied according to the type of discount the user chooses.
● The user press the Disc. button for the whole order, discount will be applied to the
entire order.

● The user press the Disc. button for items, discount will be applied to each item
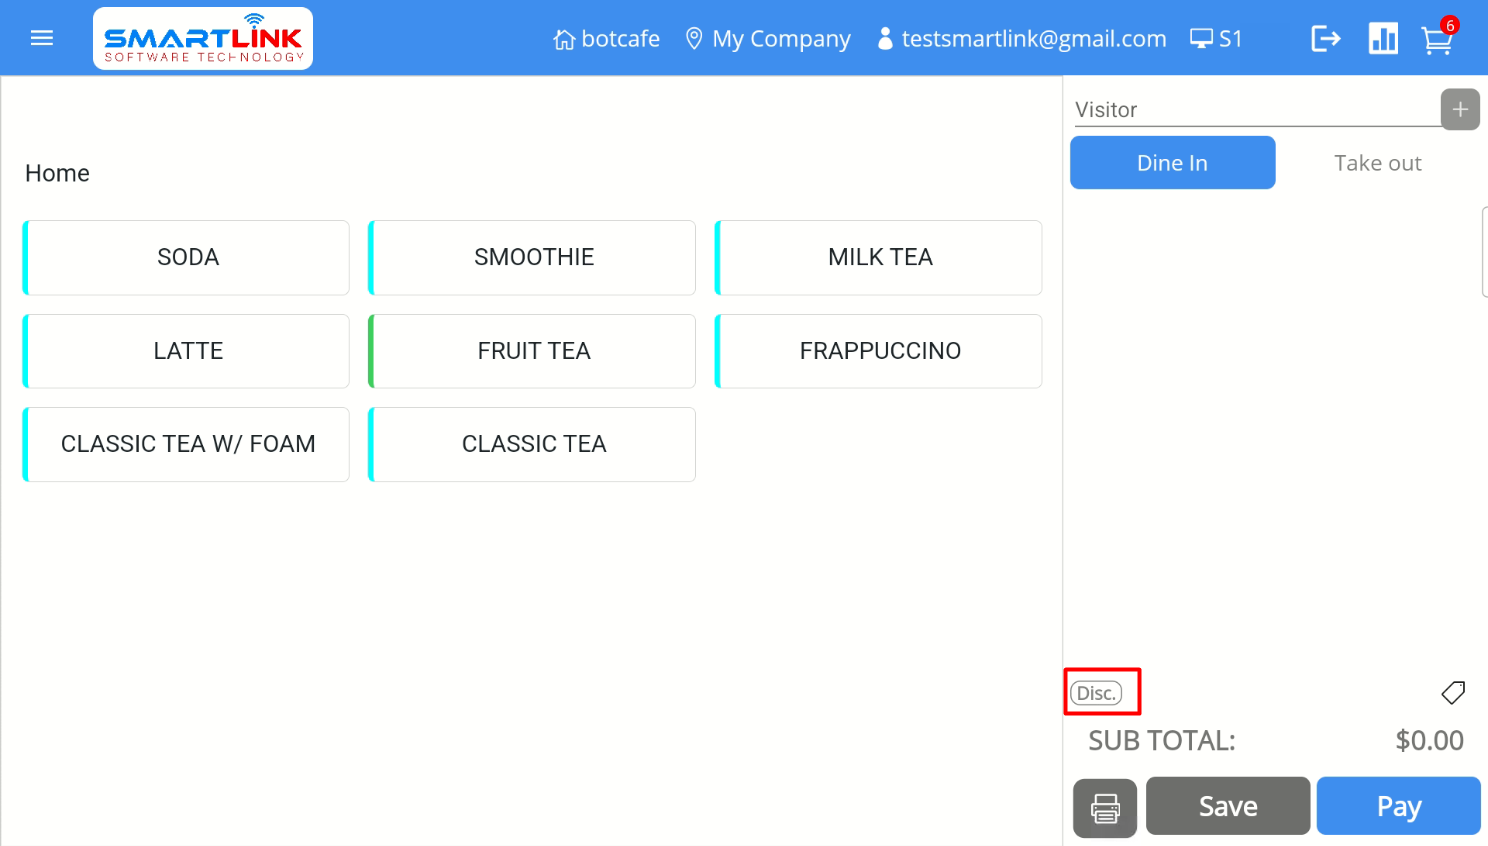
● The user press both buttons, discount will be applied to each item and the whole retire order.
Note:
● Discount will be applied according to the settings in settings.
● Users who force step must press Save to save the setup information.
● When applying a discount, the user is only allowed to choose one of the preset values.
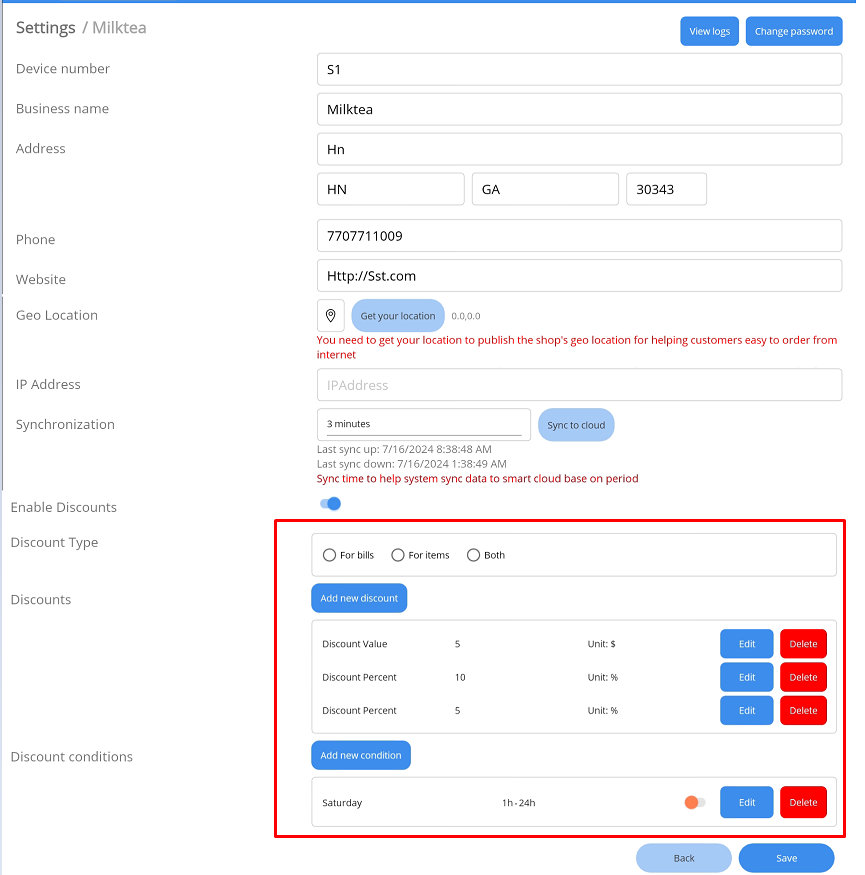
9.4.2. Discount type
- Step 1: After enabling Discount, press the Discount type
button.
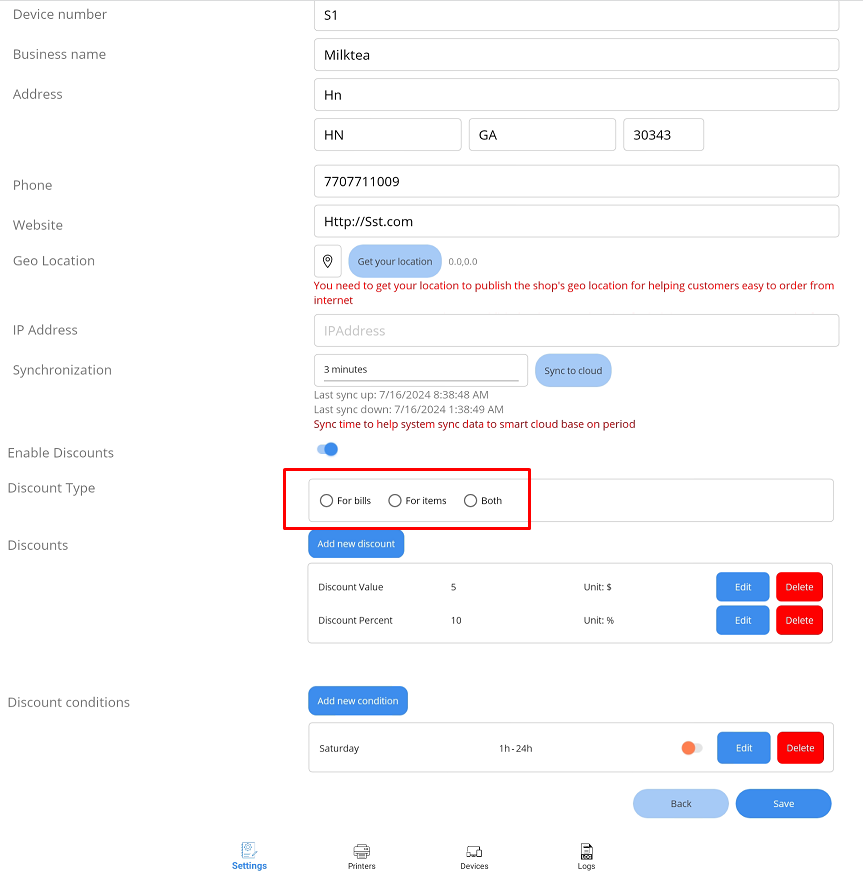
● Users choose 1 in 3 types of discounts to be applied. Then press
Save
9.4.3 Discount
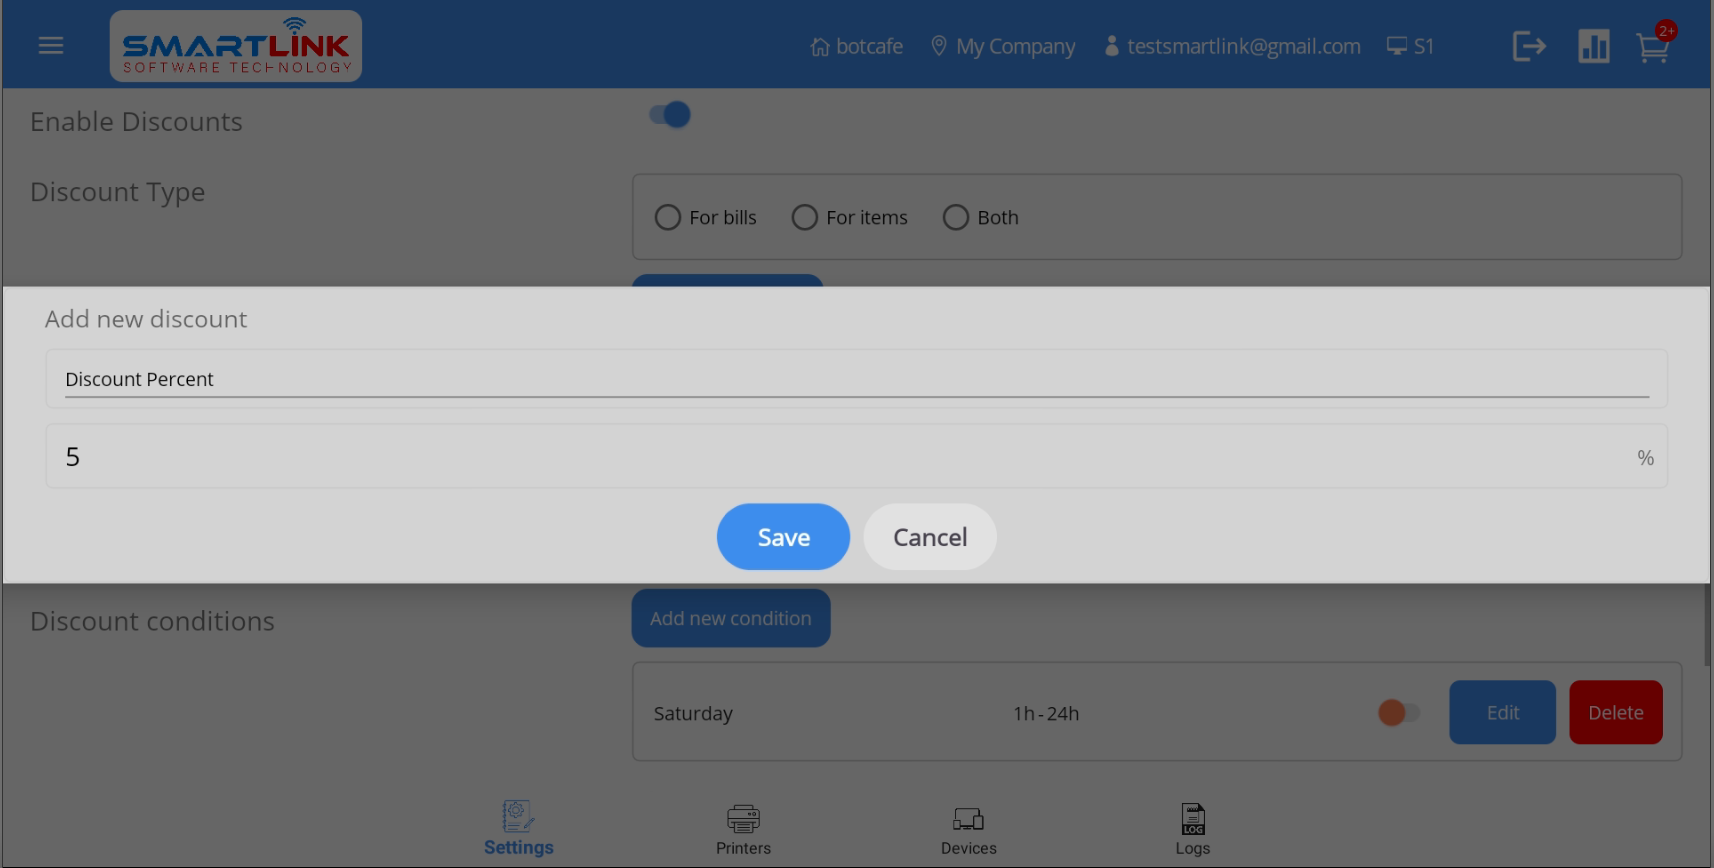
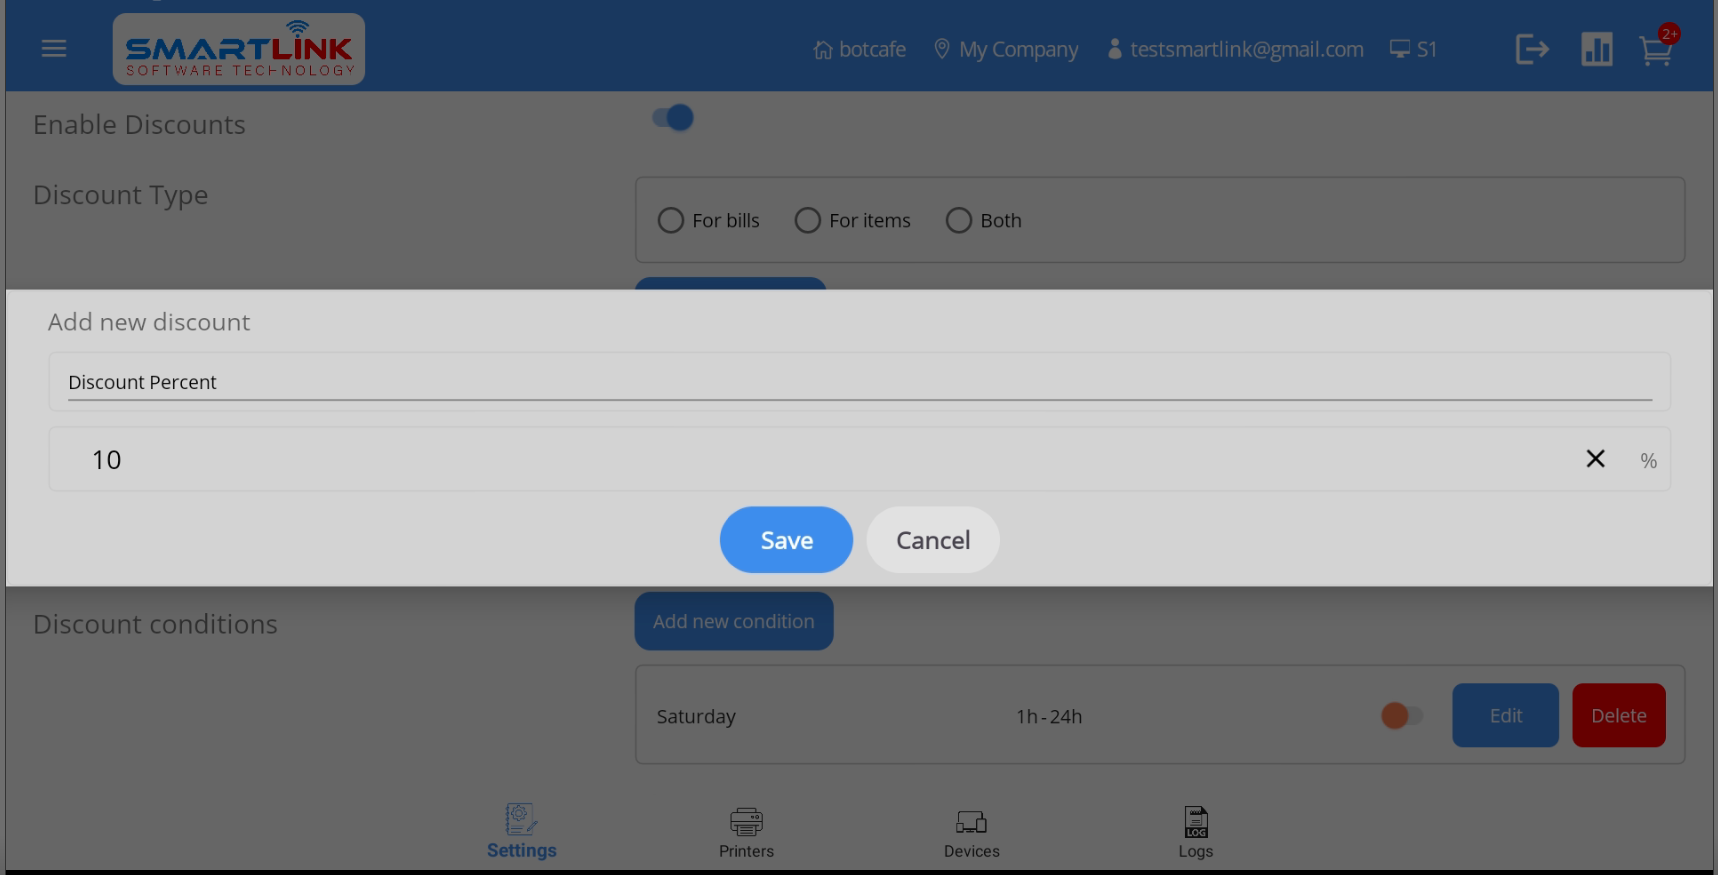
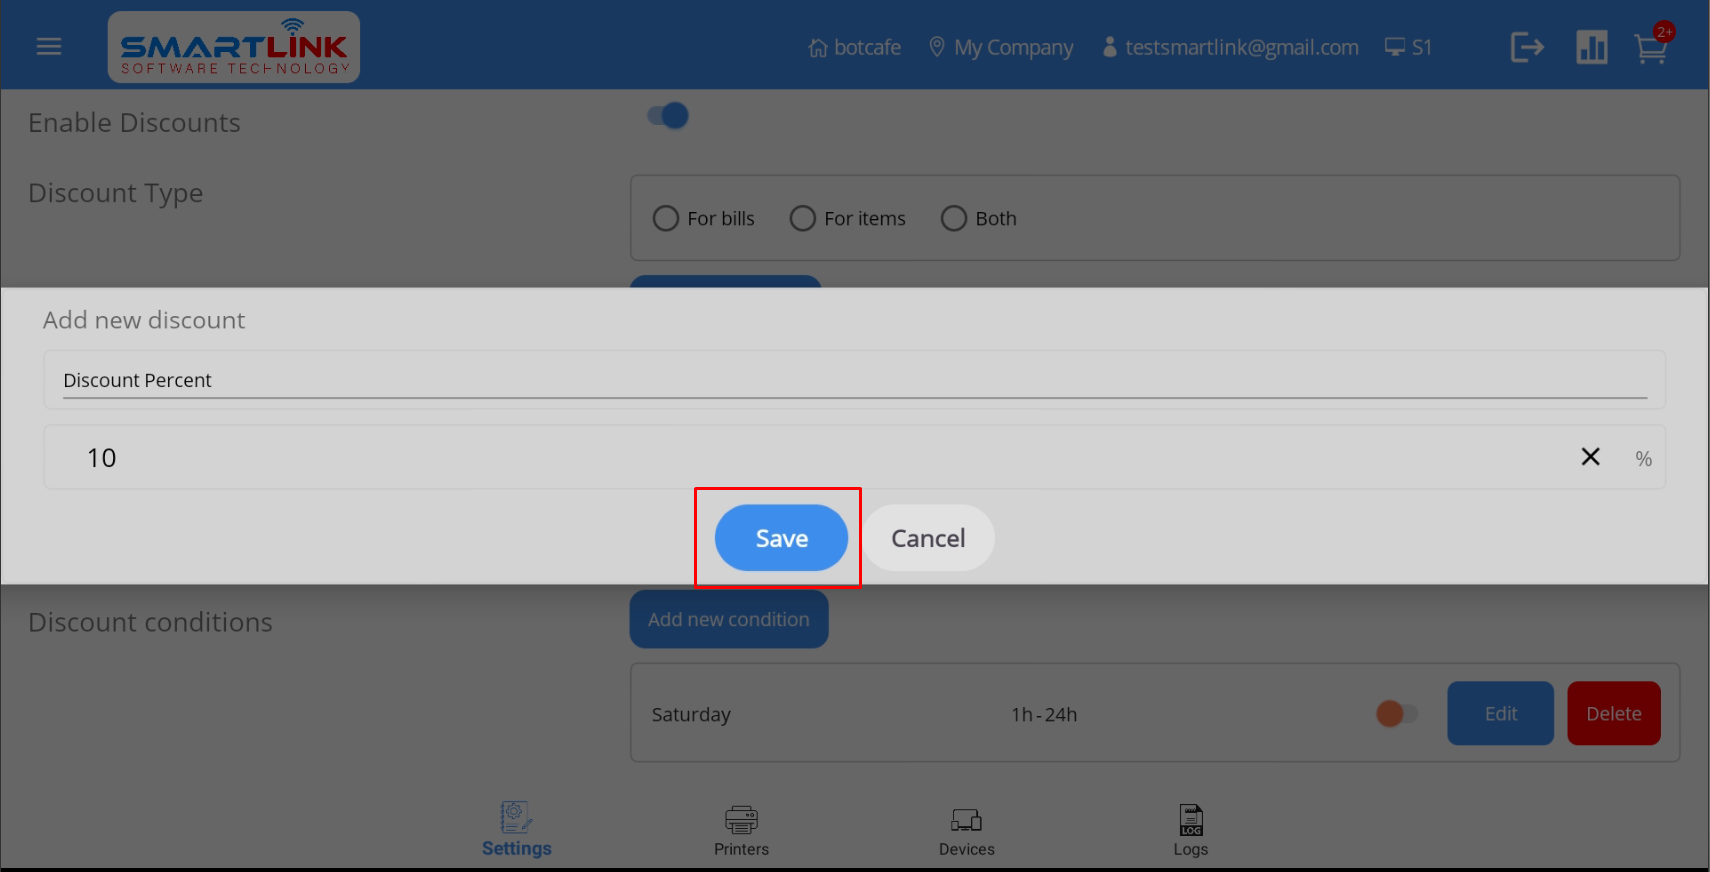
9.4.3.1 Add a new discount
To add a new discount information, follow these steps:
- Step 1: After enabling Discount, press Add new
Discount.
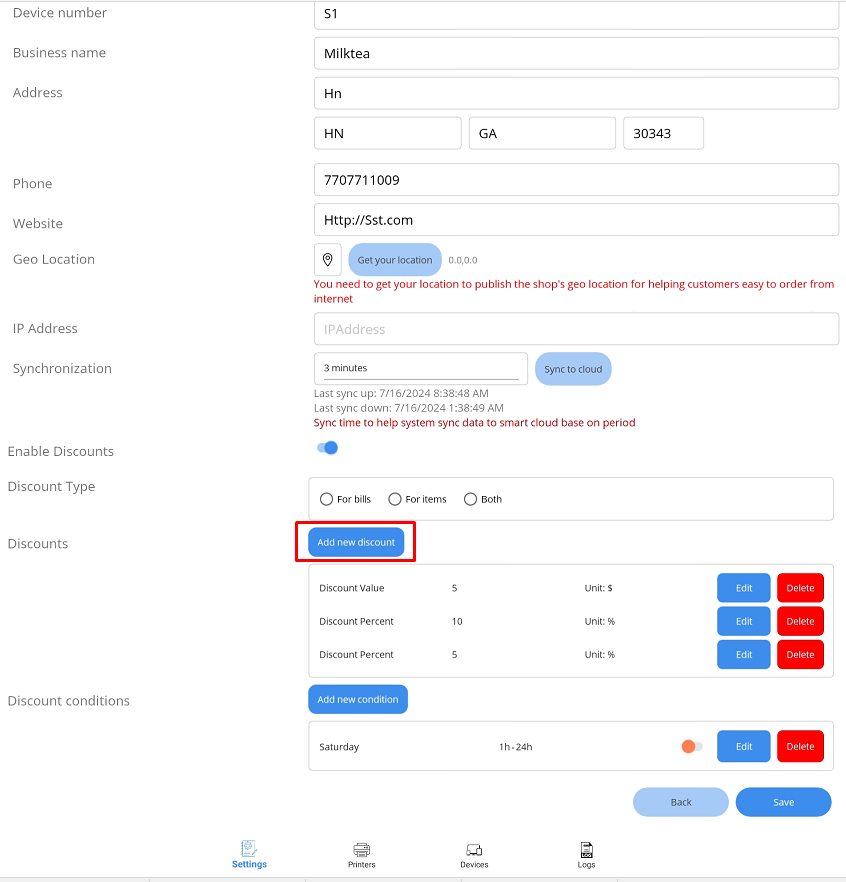
● The system displays this screen.
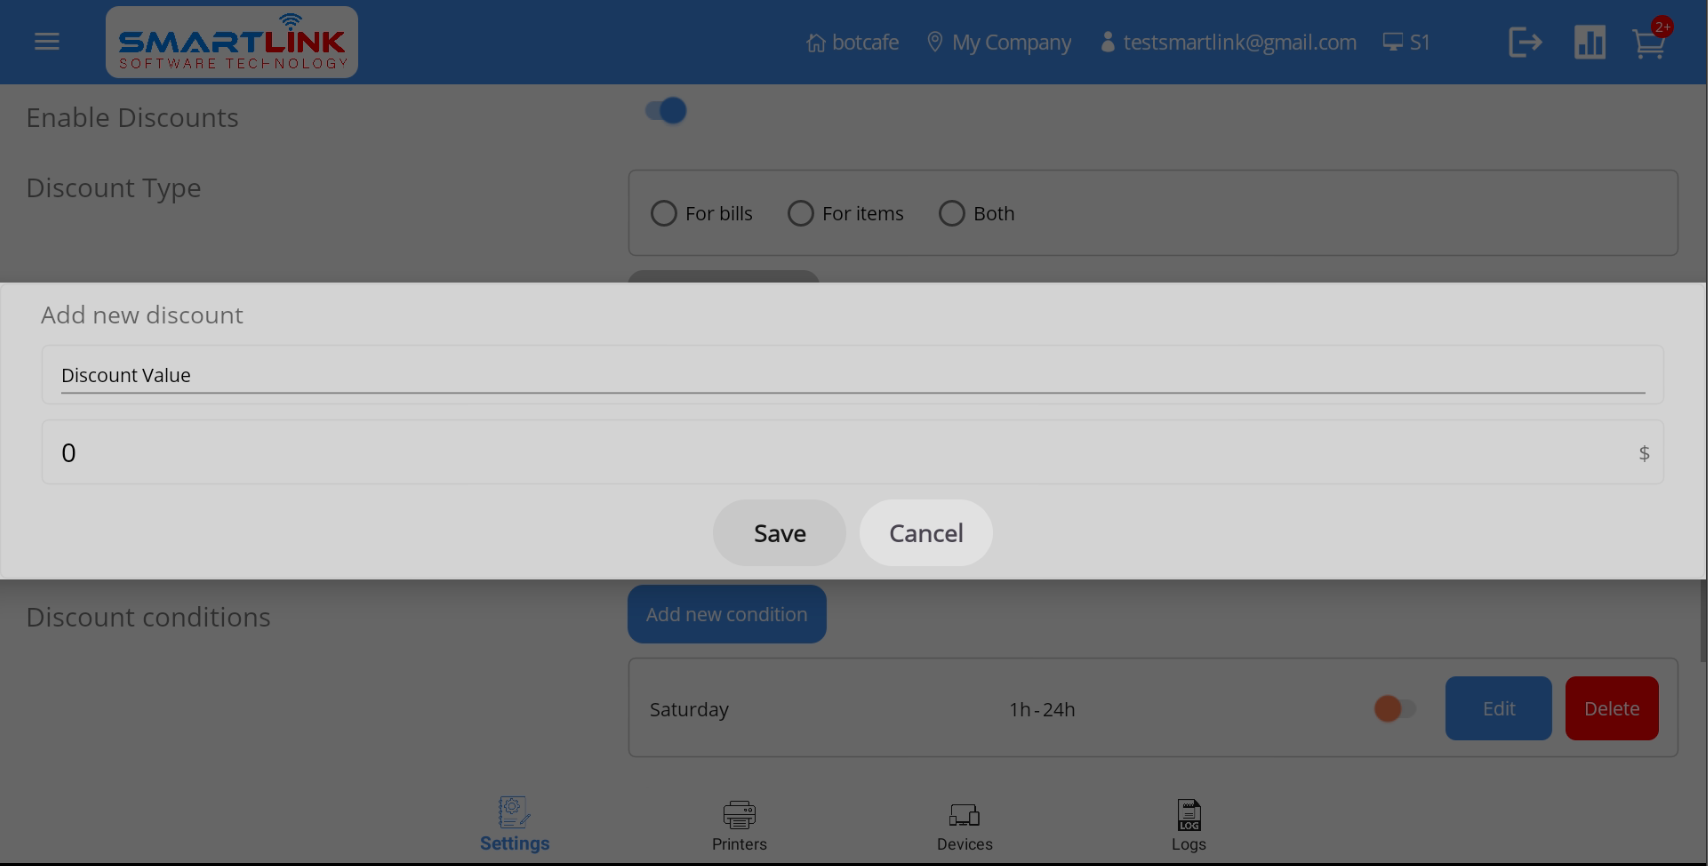
- Step 2: Enter the information to be edited
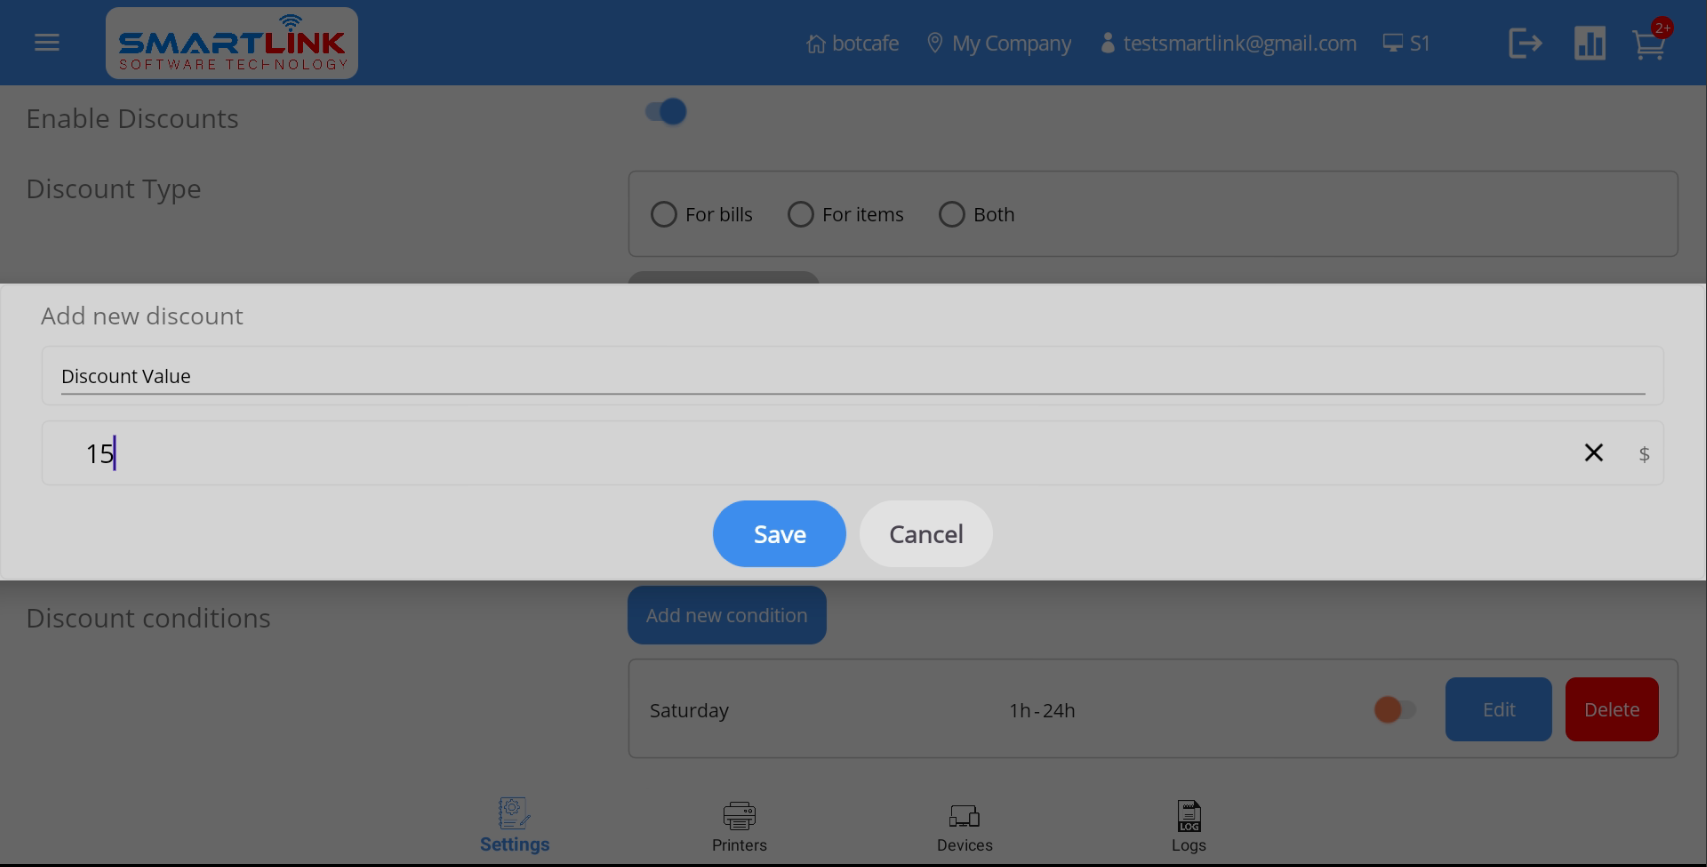
- Step 3: Press the Save button to save a new cash discount
information. Press the Cancel
button to cancel.
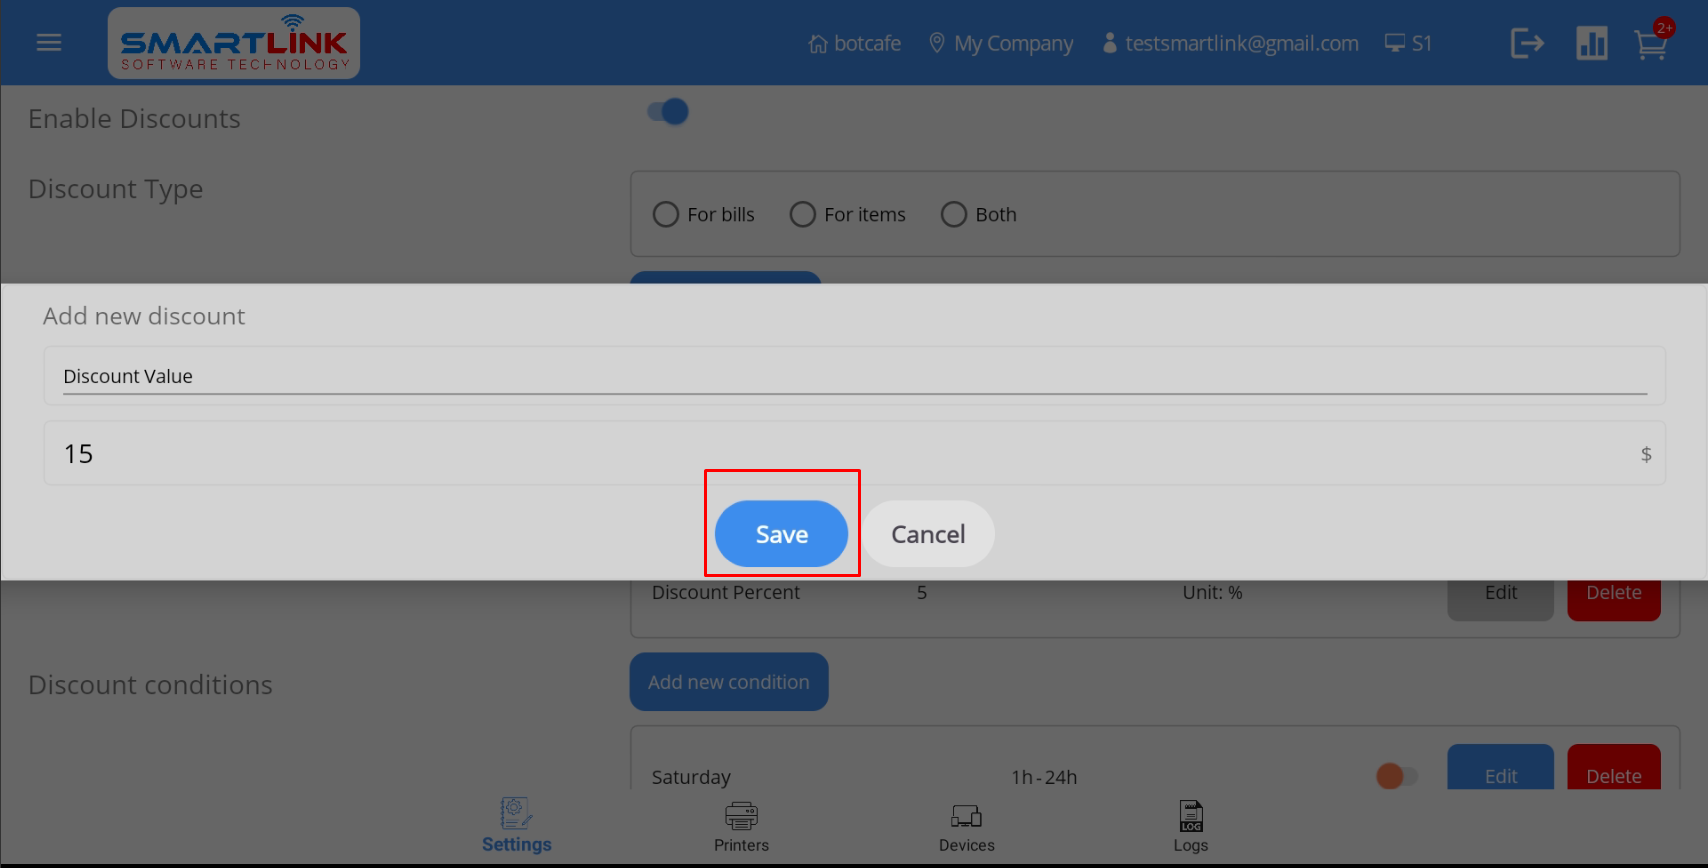
- Step 4: Successfully edited new discount information, the system displays the newly edited
discount information on the discount
list.
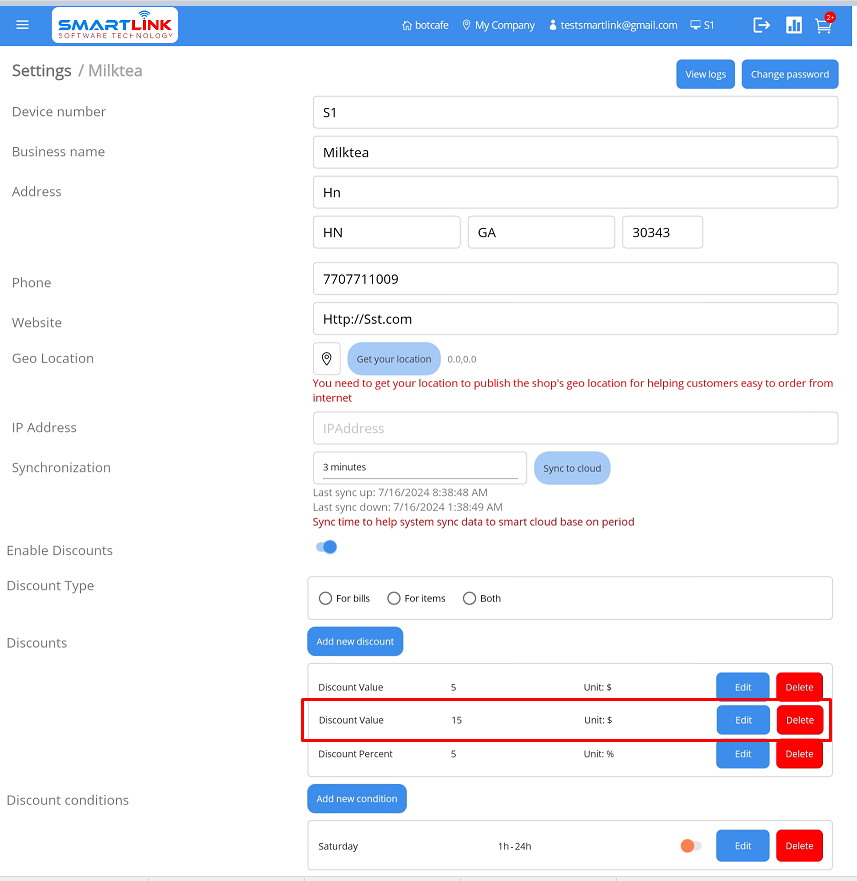
- Step 5: Press the Save button to save the setup information.
Note:
● Discount values cannot overlap.
9.4.3.2 Edit discount information
To edit discount information, follow these steps:
- Step 1: On the Discount screen, press the Edit
button.
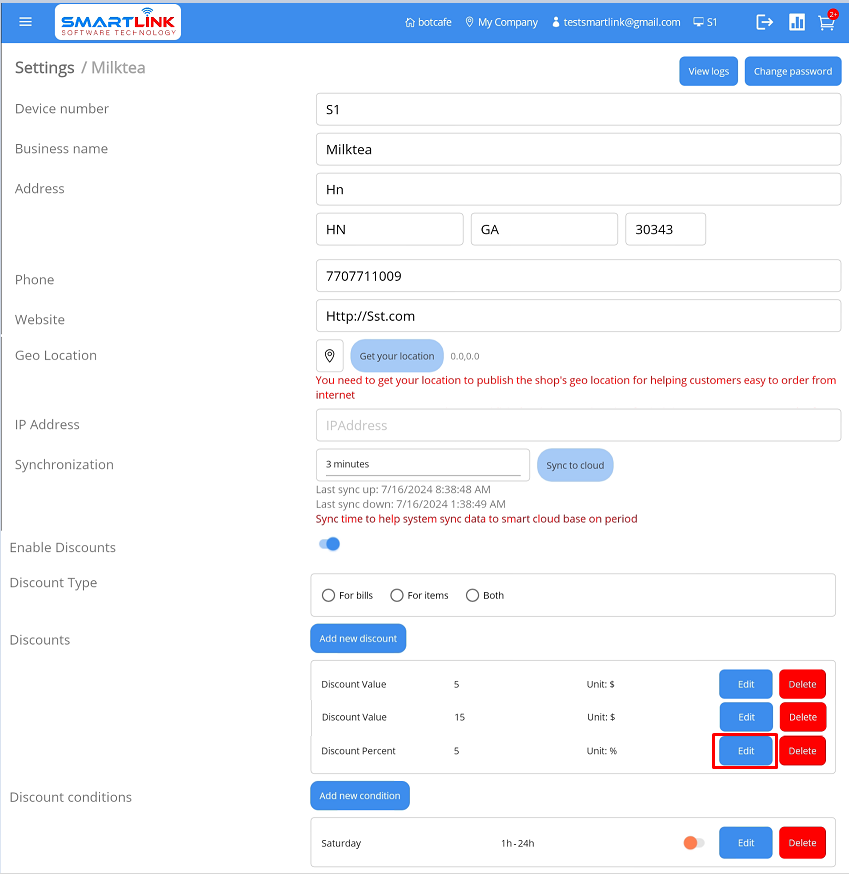
● The system displays detailed discount information.
- Step 2: Enter the information to be edited
- Step 3: Press the Save button to save a new cash discount
information. Press the Back
button if you want to cancel.
- Step 4: Successfully edited new discount information, the system displays the newly edited
discount information on the discount list.
- Step 5: Press the Save button to save the setup information.
9.4.3.3. Delete discount information
To delete discount information, follow these steps:
- Step 1: On the Discount screen, press the Delete
button.
● The system displays a confirmation screen to delete discount information.
- Step 2: Press the Yes button to delete discount information.
Press the No
button to cancel.

- Step 3: After successfully deleting new discount information, the system returns to the discount
screen without the deleted discount information.
- Step 4: Press the Save button to save the setup information.
9.4.4 Discount condition
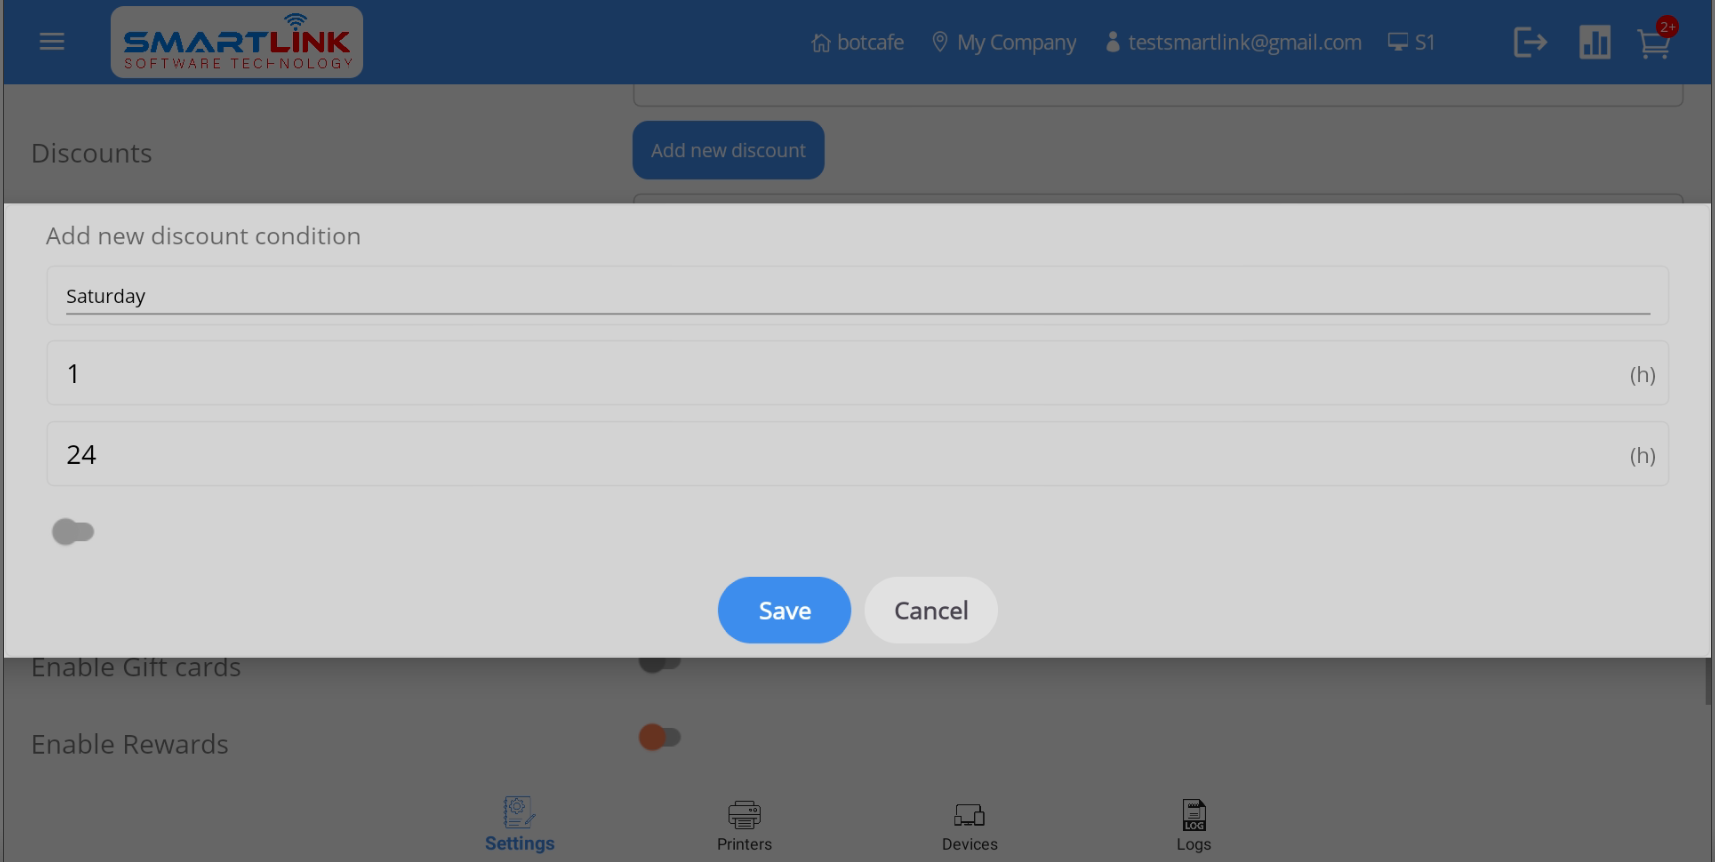
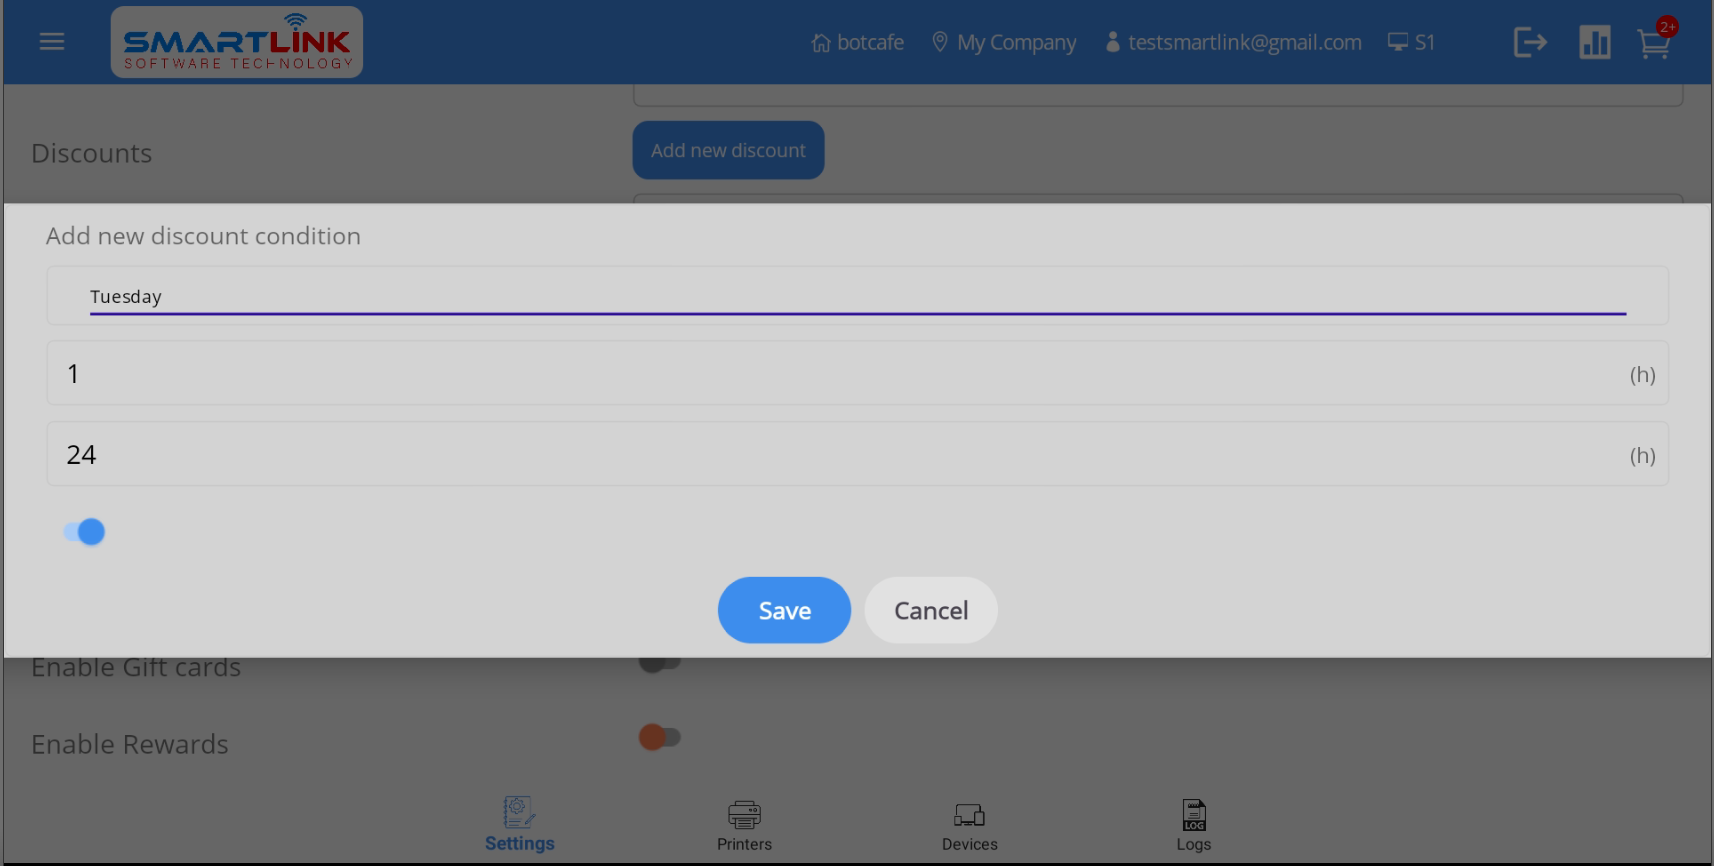
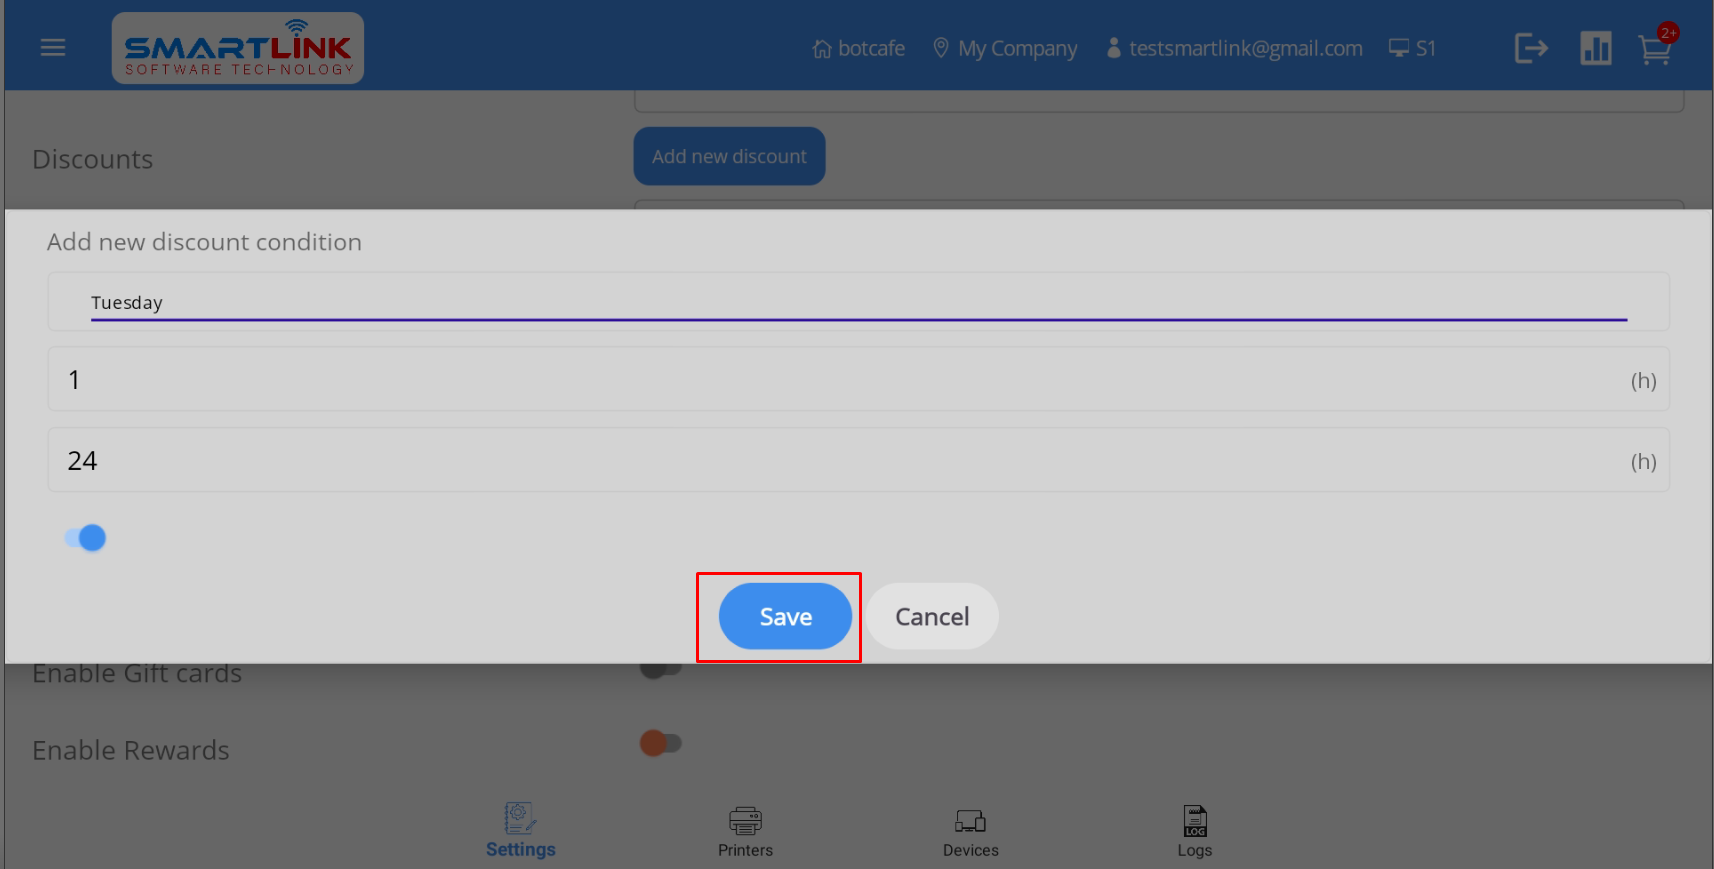
9.4.4.1 Add a new discount condition
To add a new discount condition, follow these steps:
- Step 1: Press Add new
Discount condition.
● The system displays this screen.
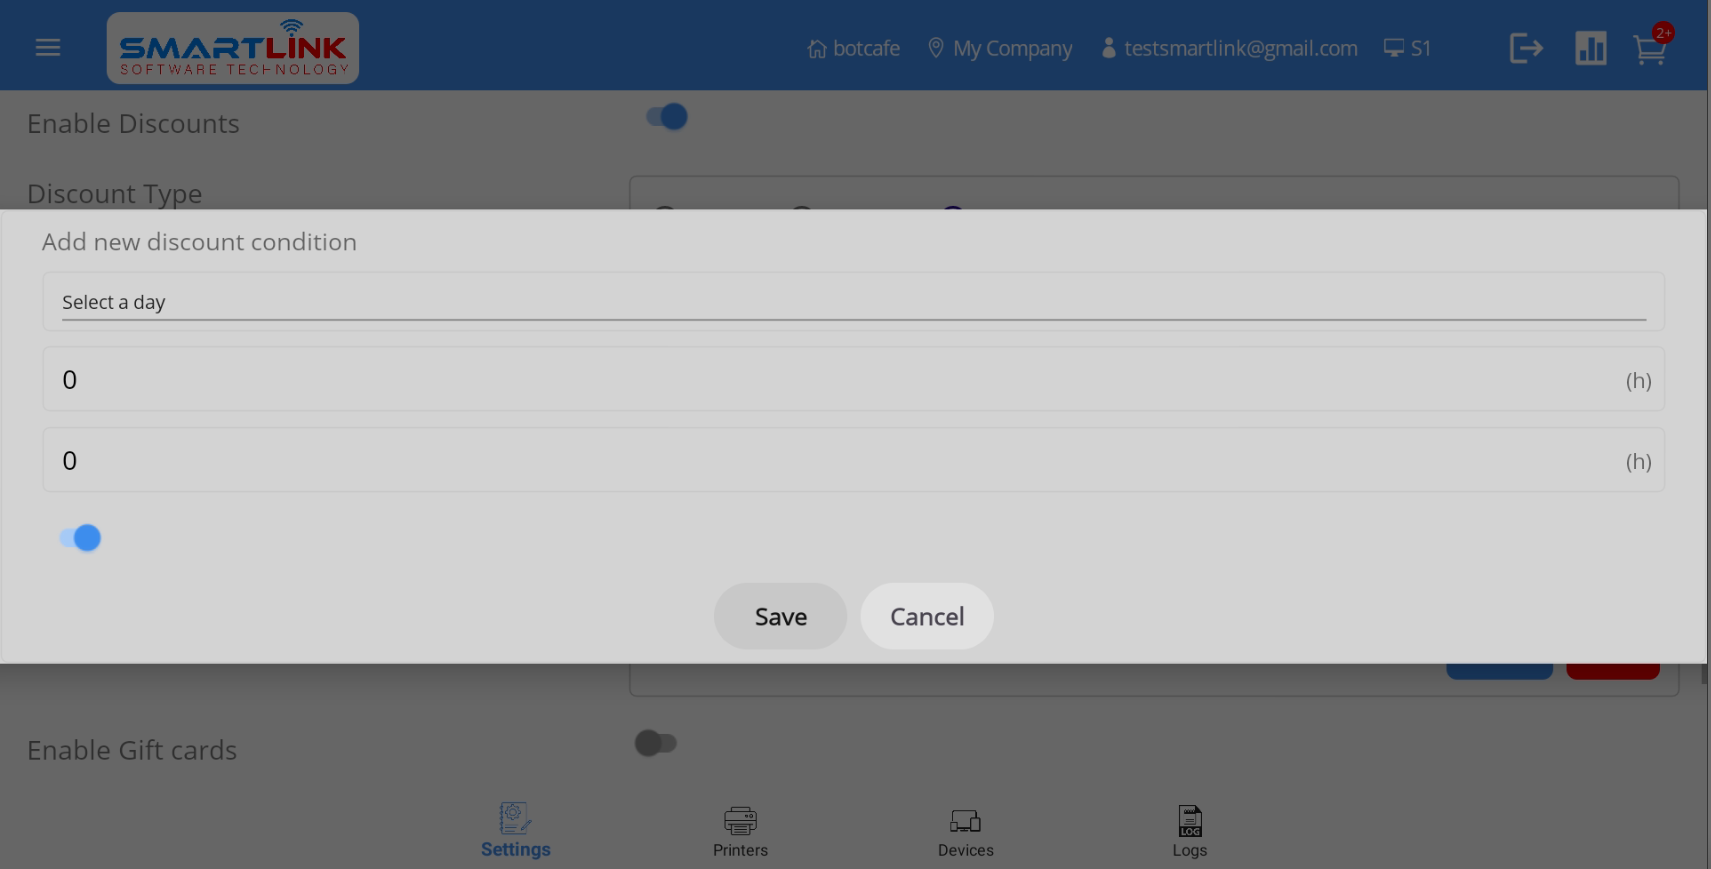
- Step 2: Enter the information to be edited
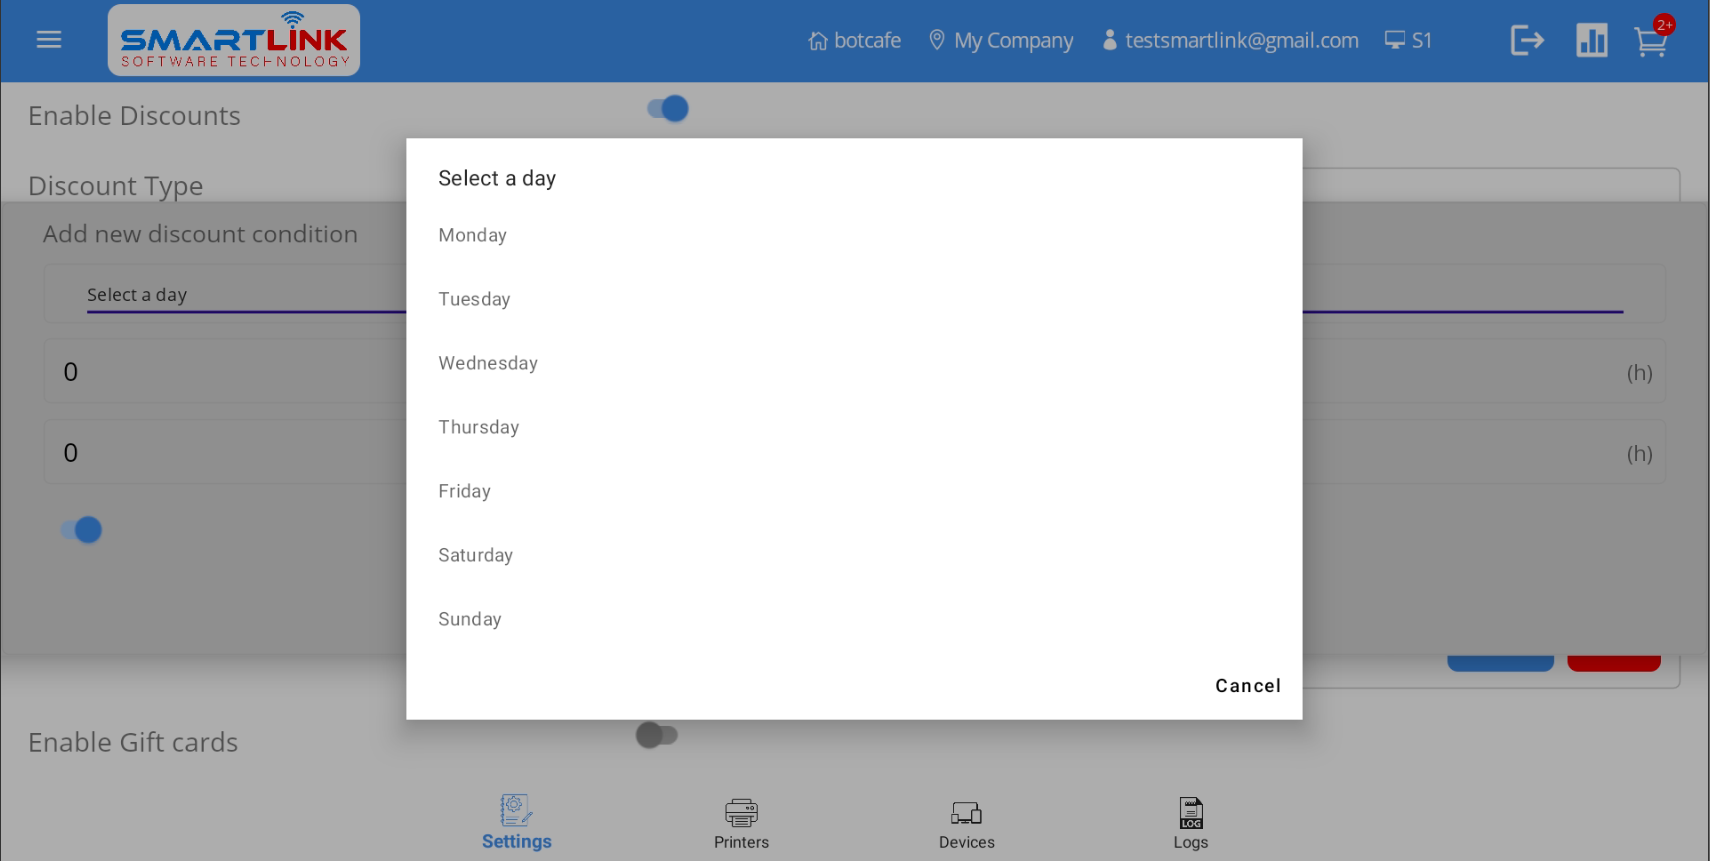
● Click Select a day to select the day to apply the discount.
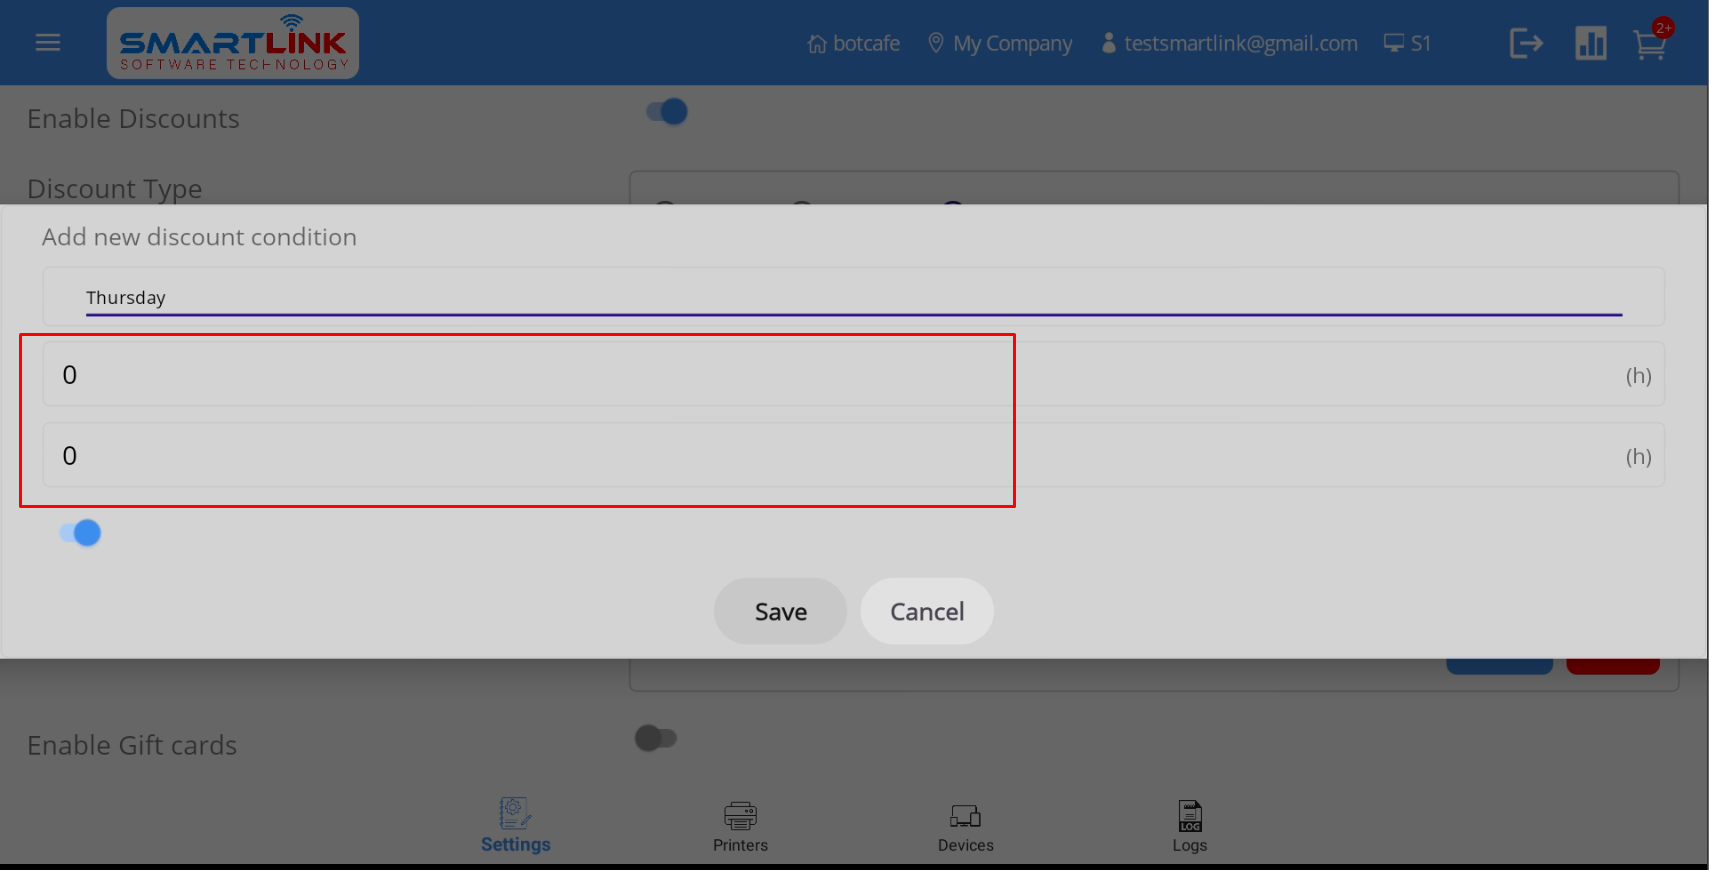
● Enter the start time and end time to apply the discount.
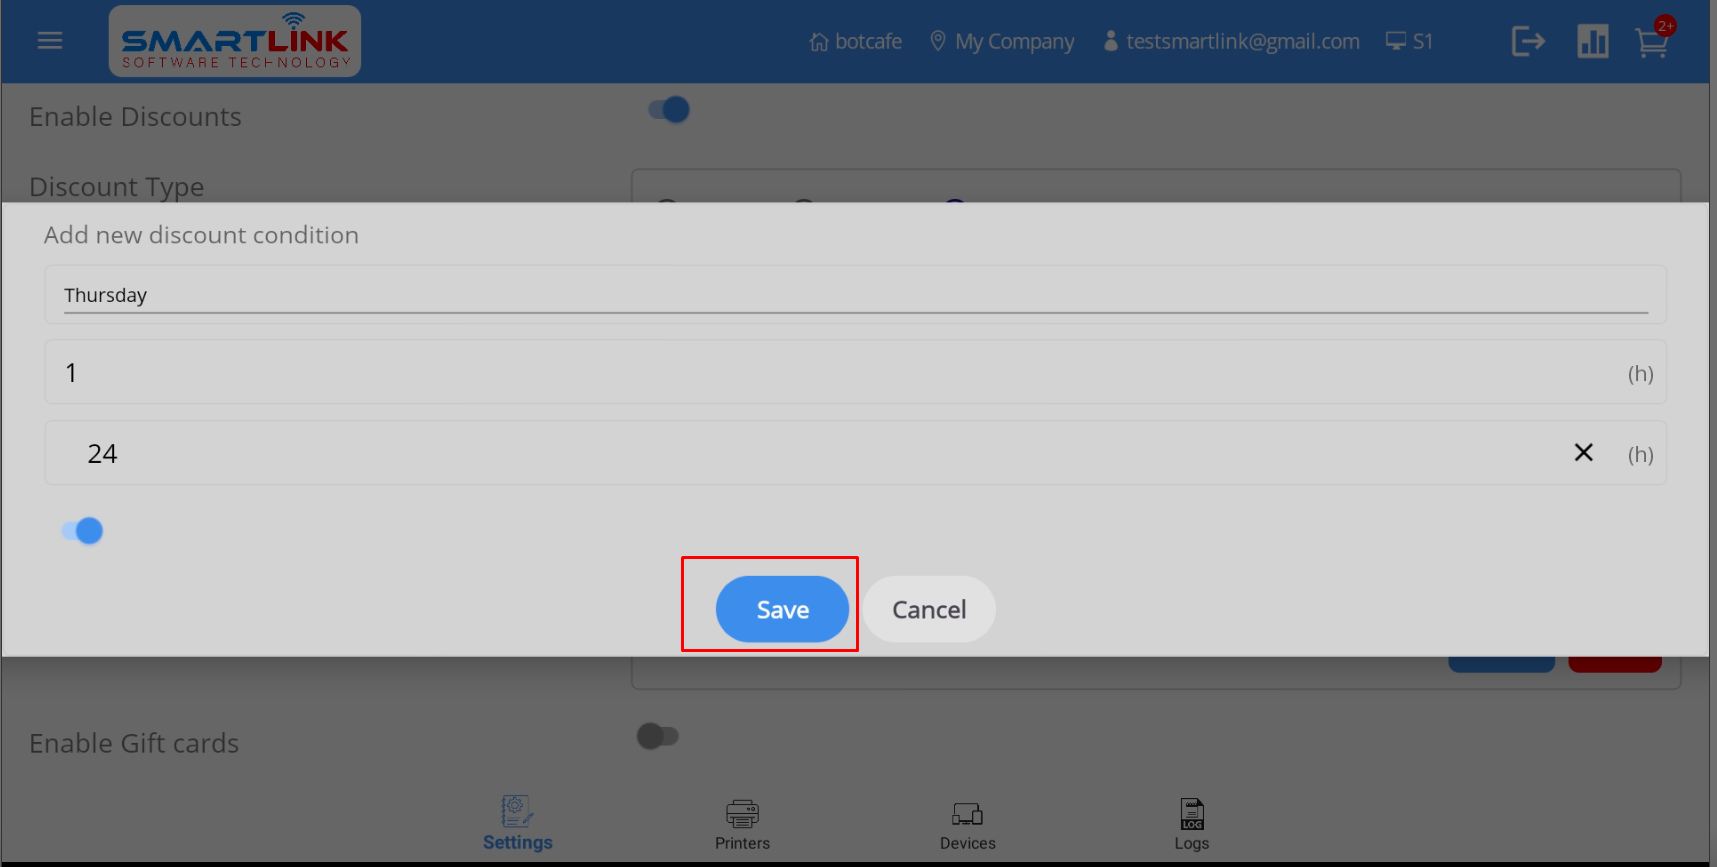
- Step 3: Press the Save button to save a new cash discount condition
information. Press the Cancel
button to cancel.
- Step 4: Successfully edited new discount condition, the system displays the newly edited
discount condition information on the discount condition
list.

- Step 5: Press the Save button to save the setup information.
Note:
● Discount will only be applied when the discount condition is met.
● When the user does not set up the discount condition, the default system is always applied.
9.4.4.2 Edit discount condition information
To edit discount condition, follow these steps:
- Step 1: On the Discount screen, press the Edit
button.
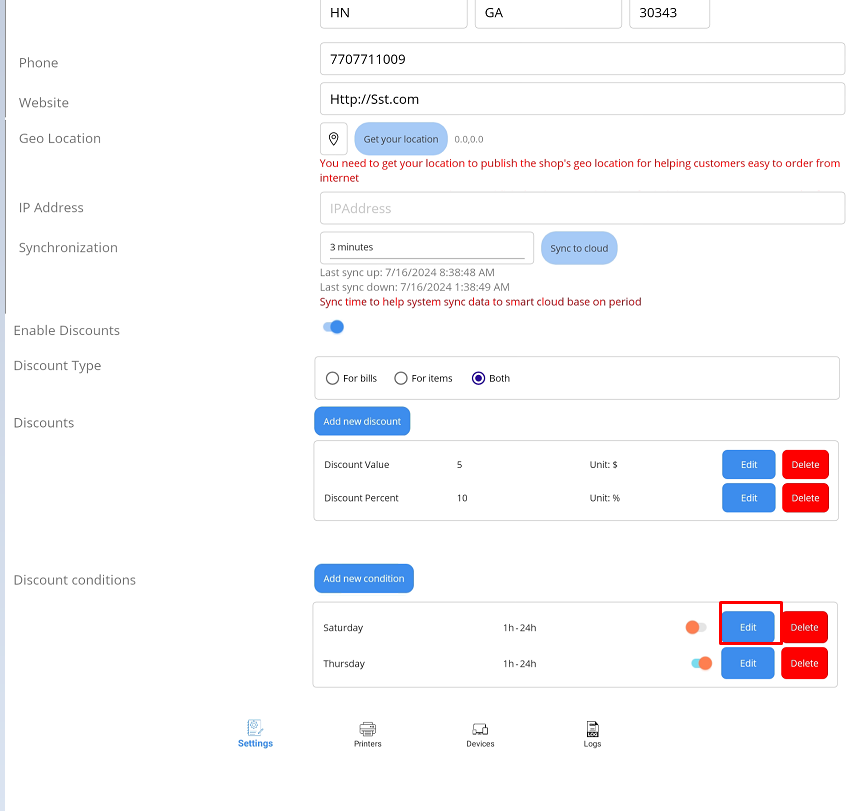
● The system displays detailed discount condition information.
- Step 2: Enter the information to be edited
- Step 3: Press the Save button to save a new cash discount condition. Press the Back
button if you want to cancel.
- Step 4: Successfully edited new discount condition, the system displays the newly edited
discount condition information on the discount condition list.
- Step 5: Press the Save button to save the setup information.
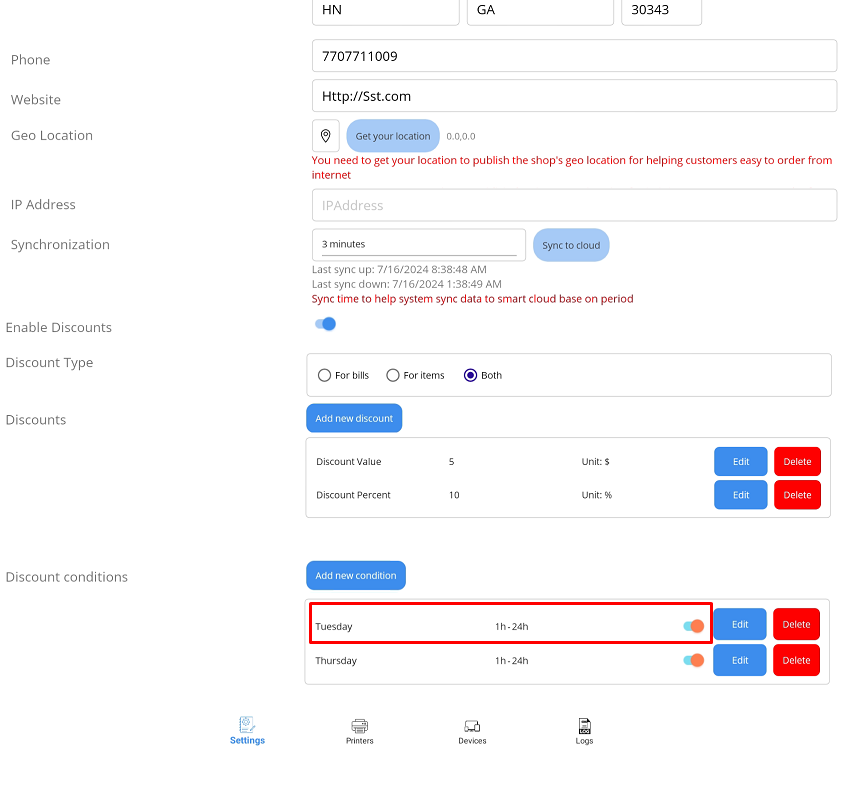
9.4.4.3. Delete discount condition
To delete discount condition, follow these steps:
- Step 1: On the Discount screen, press the Delete
button.
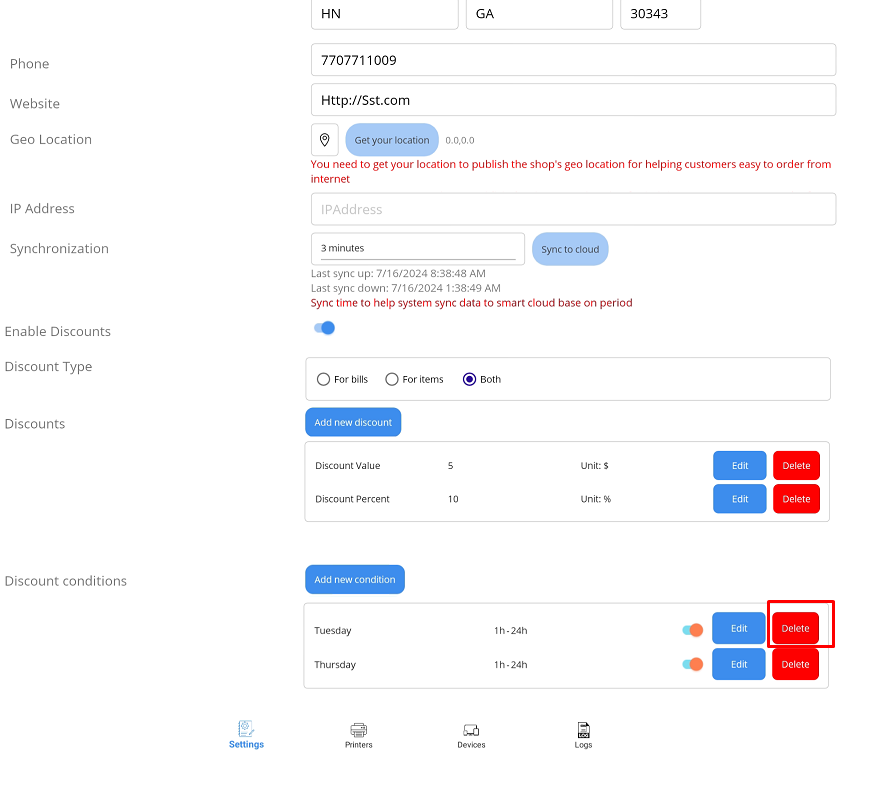
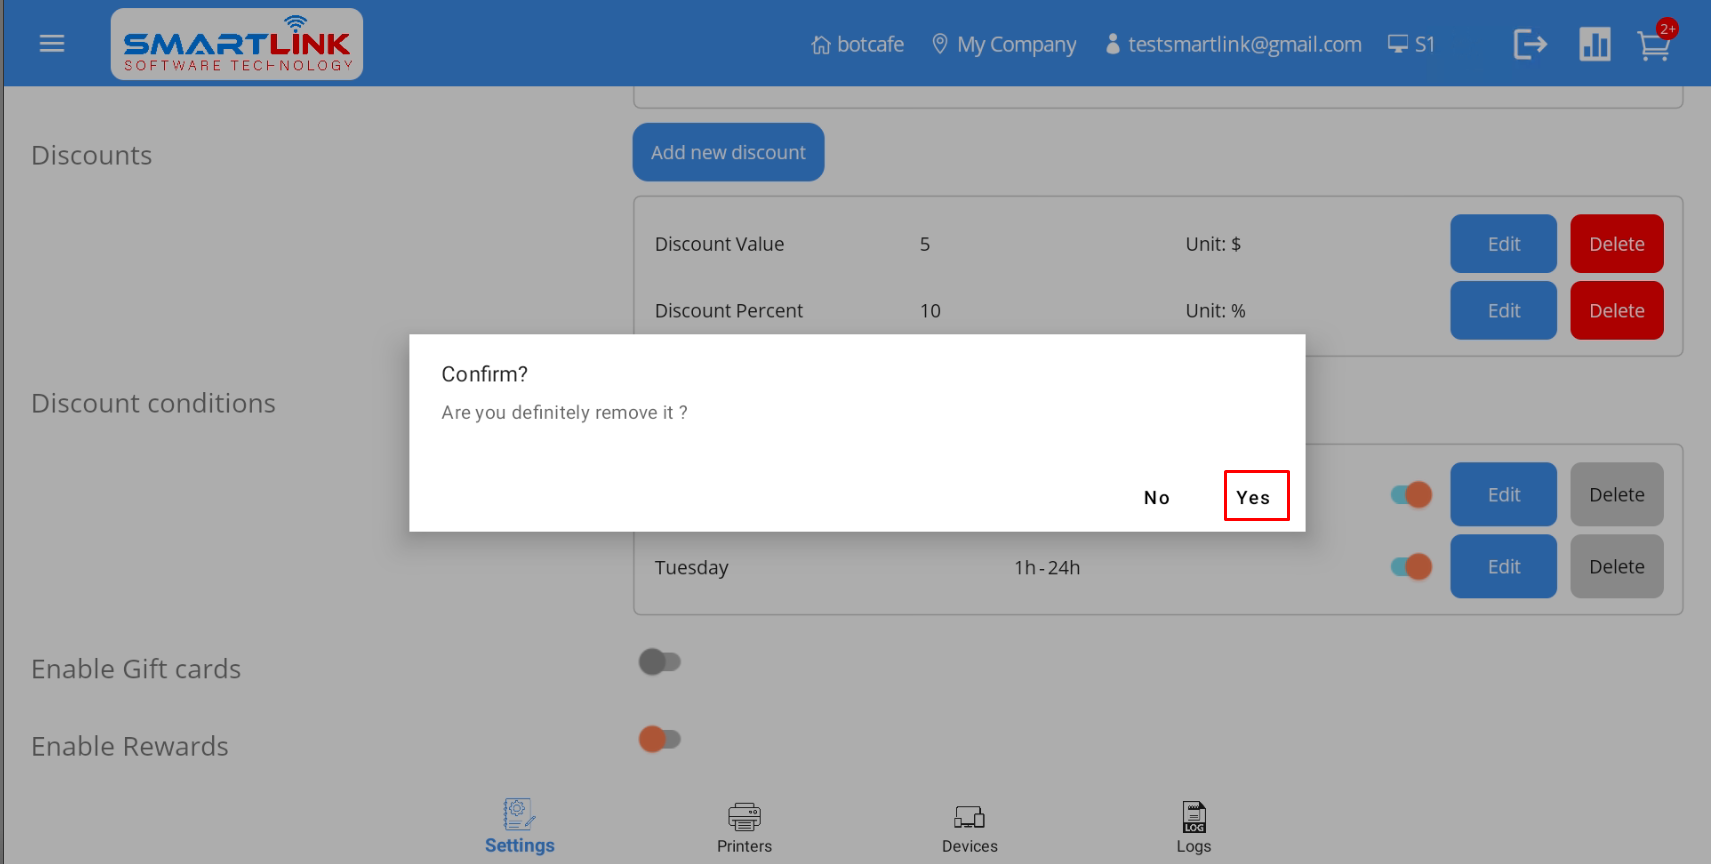
● The system displays a confirmation screen to delete discount condition.

- Step 2: Press the Yes button to delete discount condition information.
Press the No
button to cancel.
- Step 3: After successfully deleting new discount condition , the system returns to the discount condition
screen without the deleted discount condition.
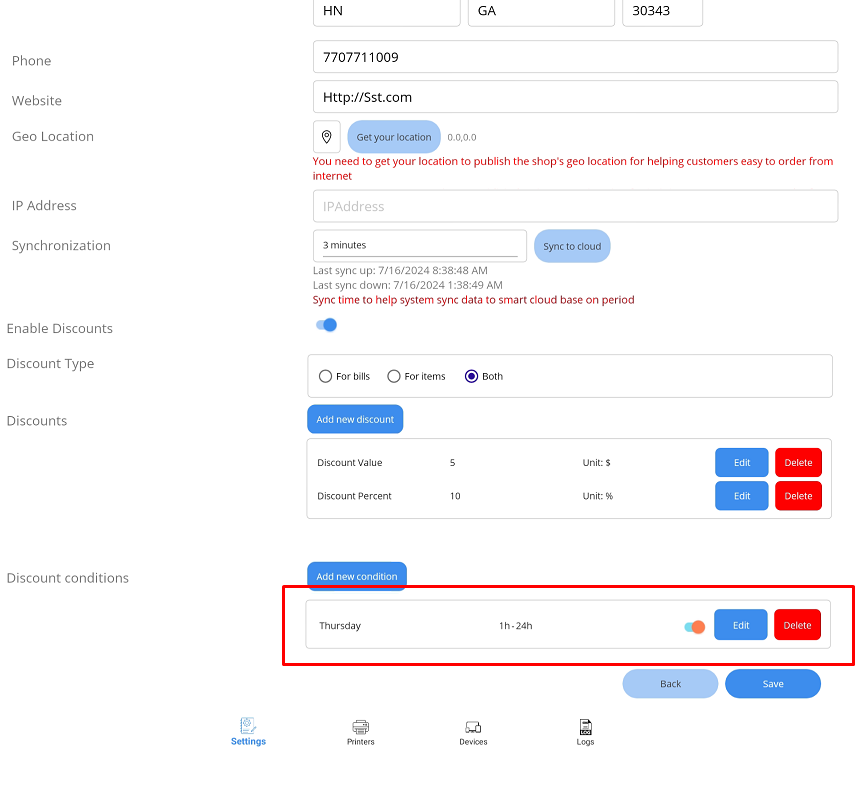
- Step 4: Press the Save button to save the setup.
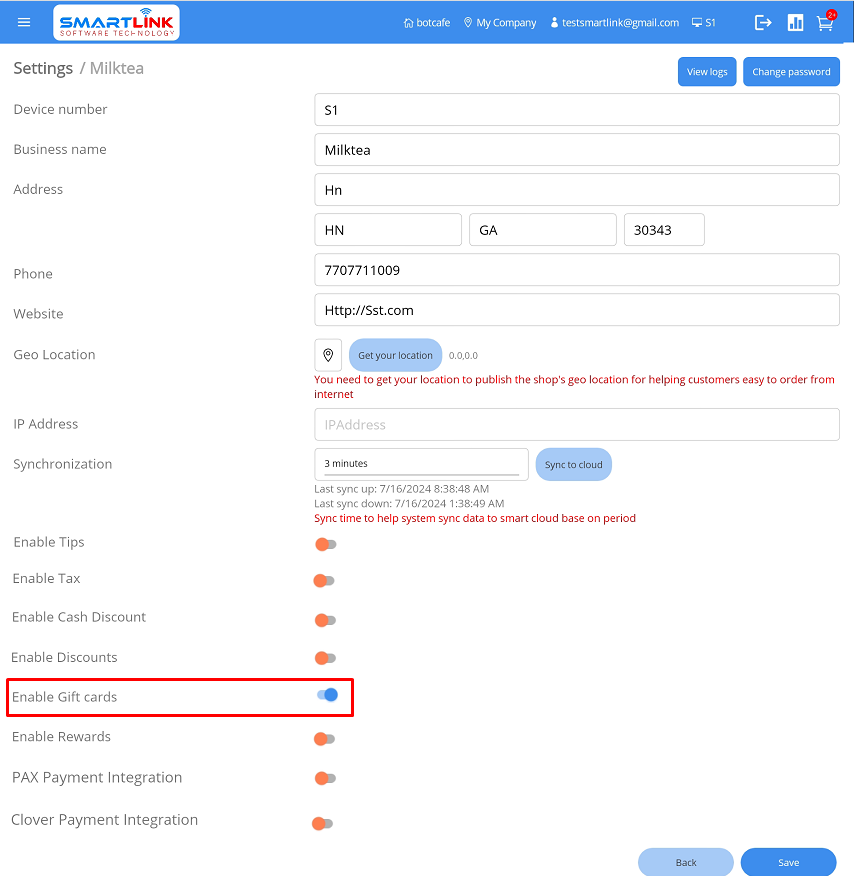
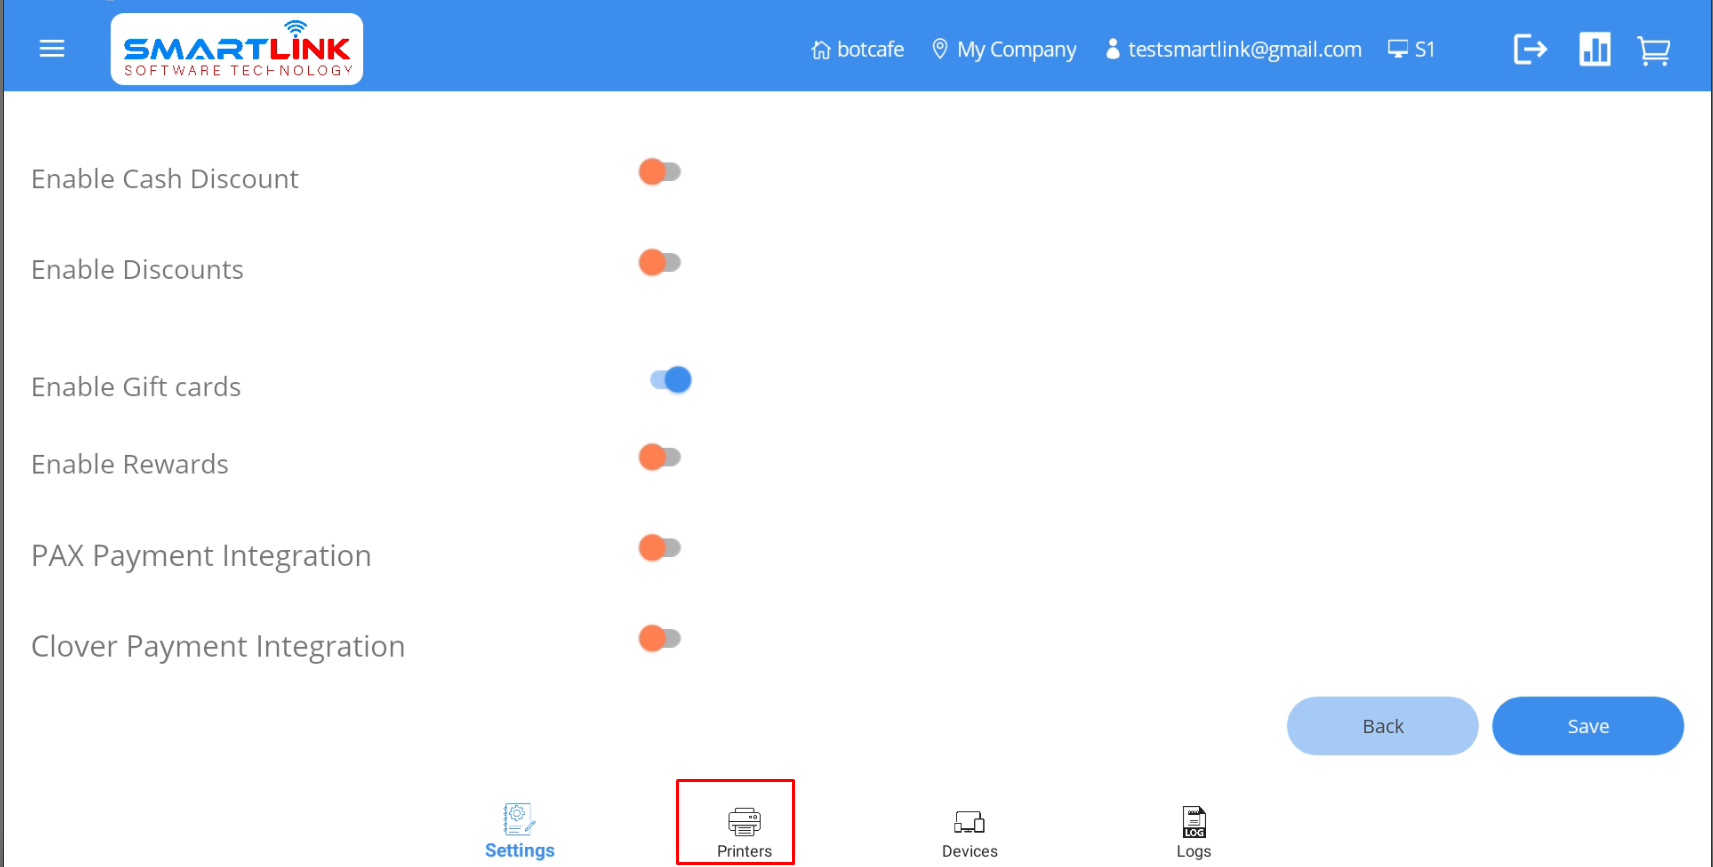
9.5. Gift cards
● After being enabled, the gift card will be displayed on the main screen.
- Step 1: On the Settings screen, press the Enable gift card
button.
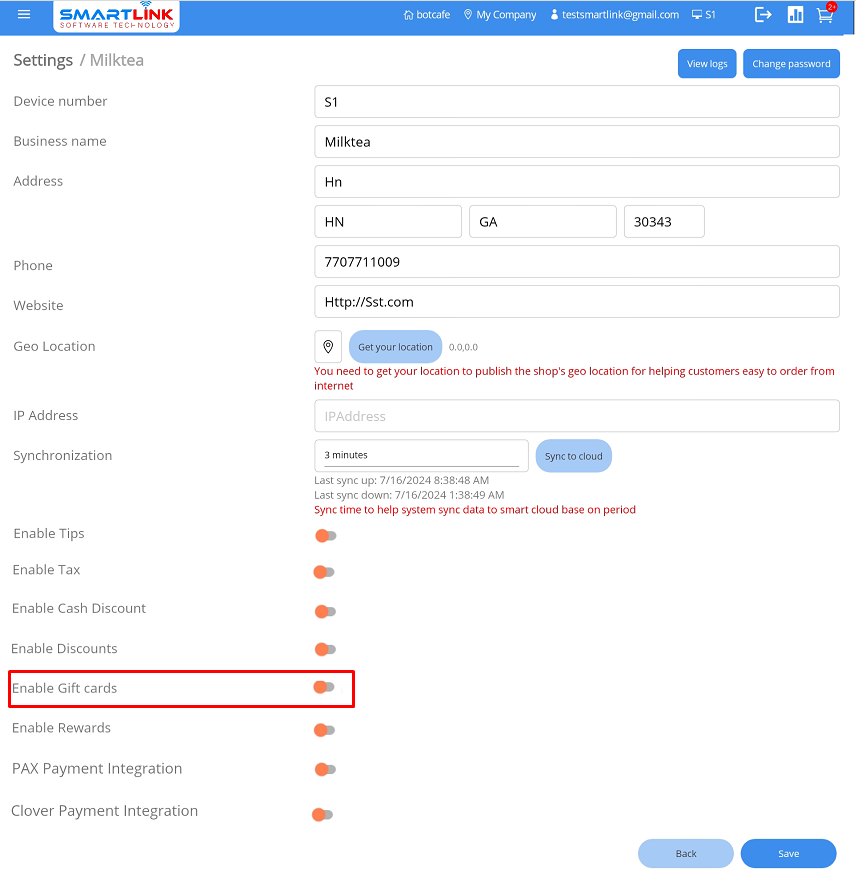
● Enable Gift card successfully.
- Step 2: Press the Save button to save the setup.
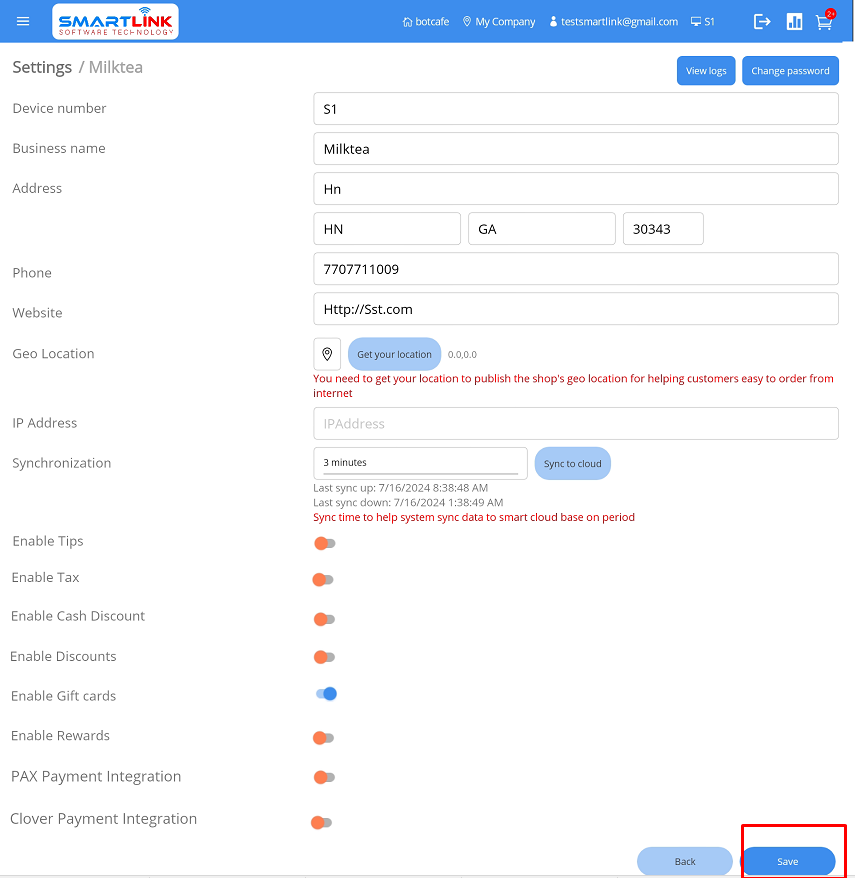
- Step 3: After being enabled, the gift card will be displayed on the main screen.
Note:
● Users must press the Save button to save the setup information.
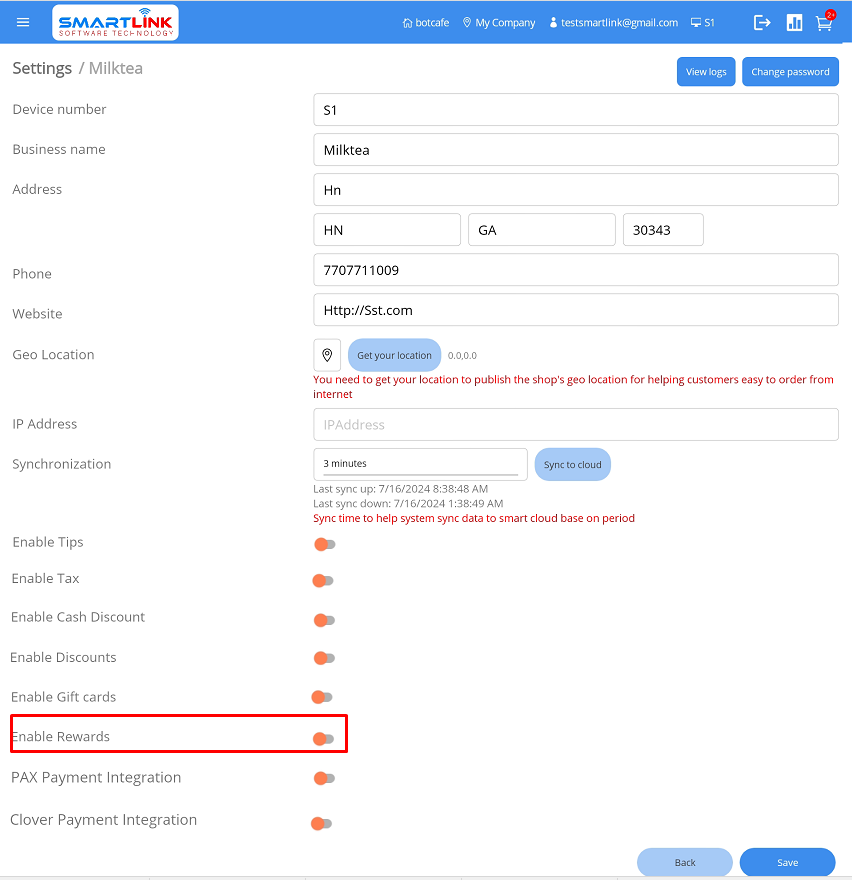
9.6. Rewards
● Users can set up the customer's accumulated points after each order.
● These accumulated points can be used to pay for future orders.
- Step 1: On the Settings screen, press the Enable rewards
button.
● Enable rewards successfully.
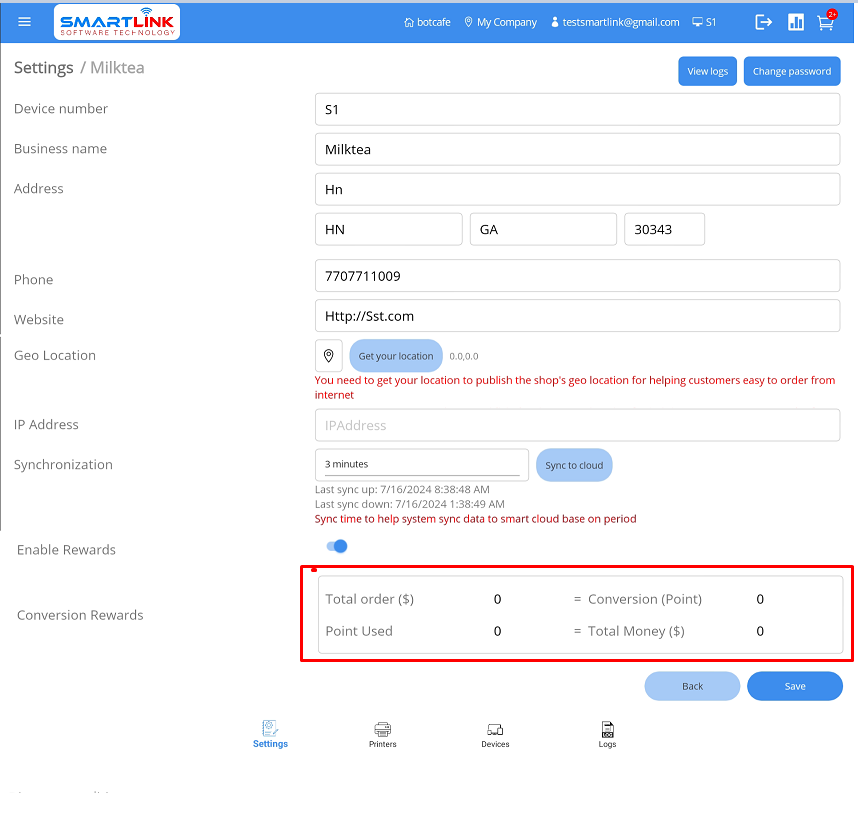
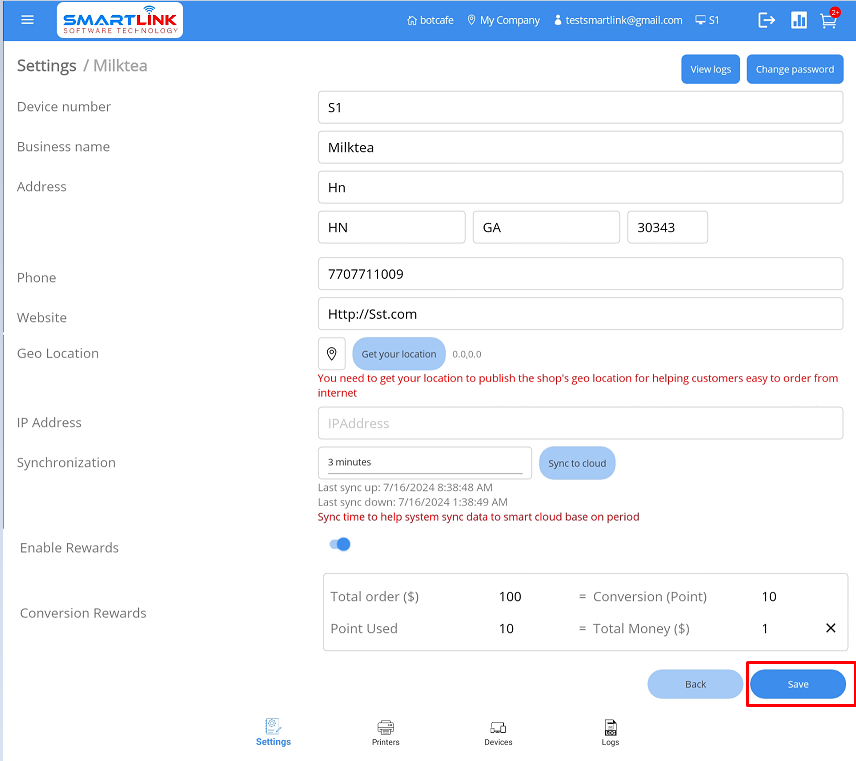
- Step 2: Fill in all fields' information
● Total order: Total value of the order.
● Conversion: The number of points that the customer will convert from the order.
● Point Used: Number of points used by the customer.
● Total money: The amount of money the customer converts from points.
For example:
If the total order value is $100, the customer will accumulate 10 points and these 10 points when used can be exchanged
for $1.
- Step 3: Press the Save button to save the setup.
Note:
● Users must press the Save button to save the setup information.
9.7. PAX payment integration
User uses PAX device for Credit card payment method.
- Step 1: On the Settings screen, press the PAX payment integration
button.
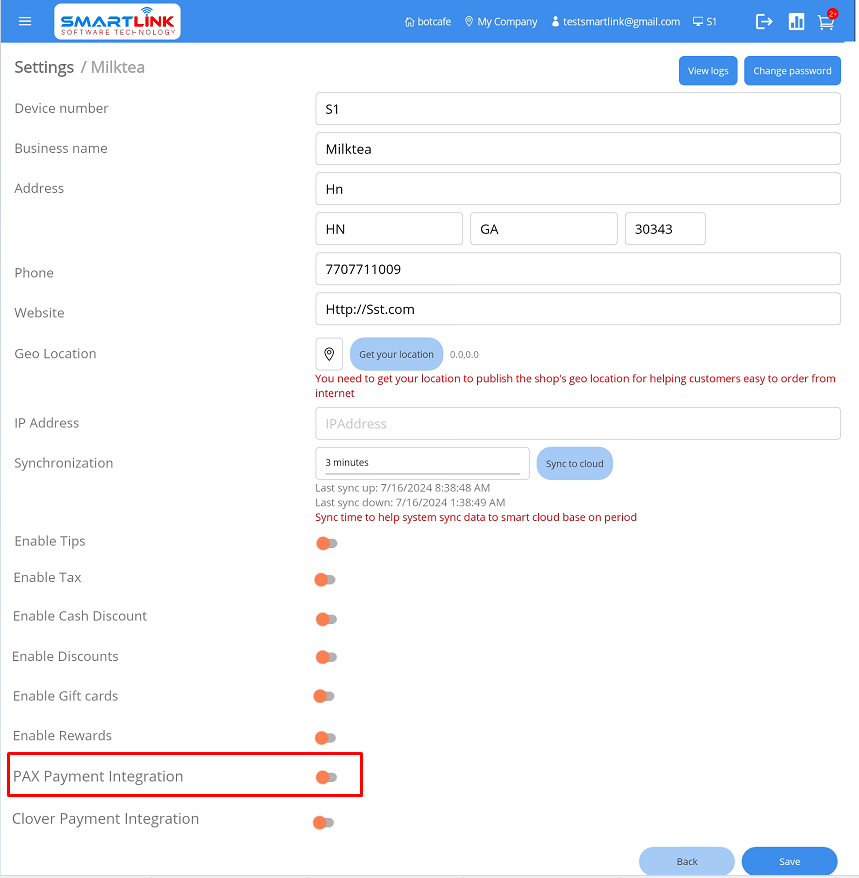
● The system displays the setup form.

- Step 2: Fill in all fields' information
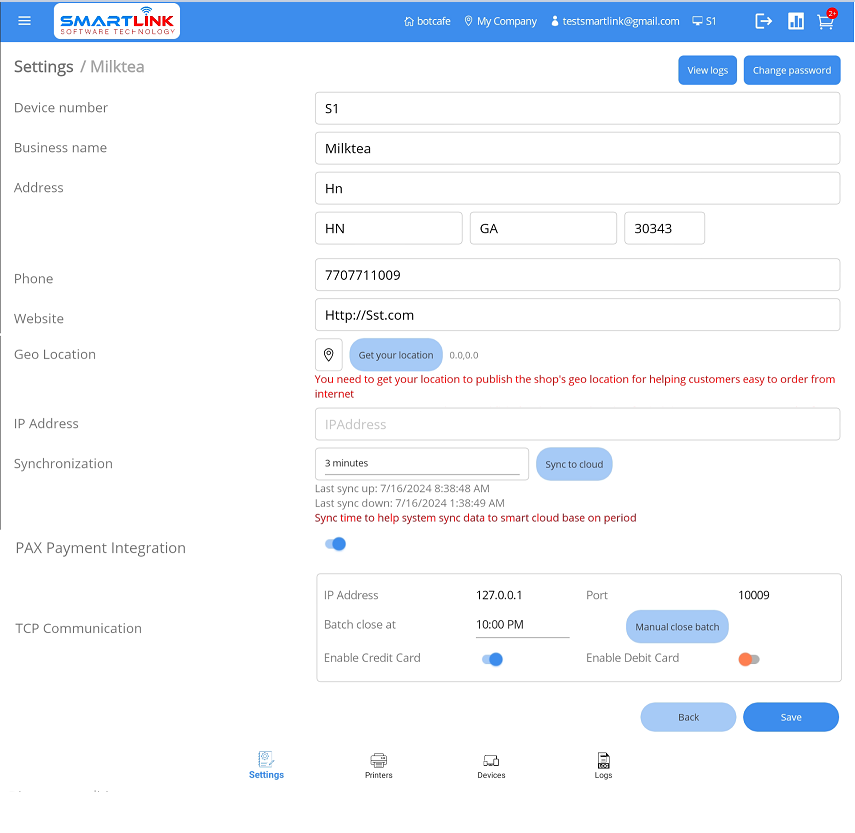
- Step 3: Press the Save button to save the setup.
Note:
● Users require step to enable PAX payment integration to be able to use credit cards to pay for orders.
● Users force step to choose at least 1 card type to apply for payment.
● The system will automatically close the batch according to the user setup time.
● Users need to enter the correct IP address and port information of the PAX machine.
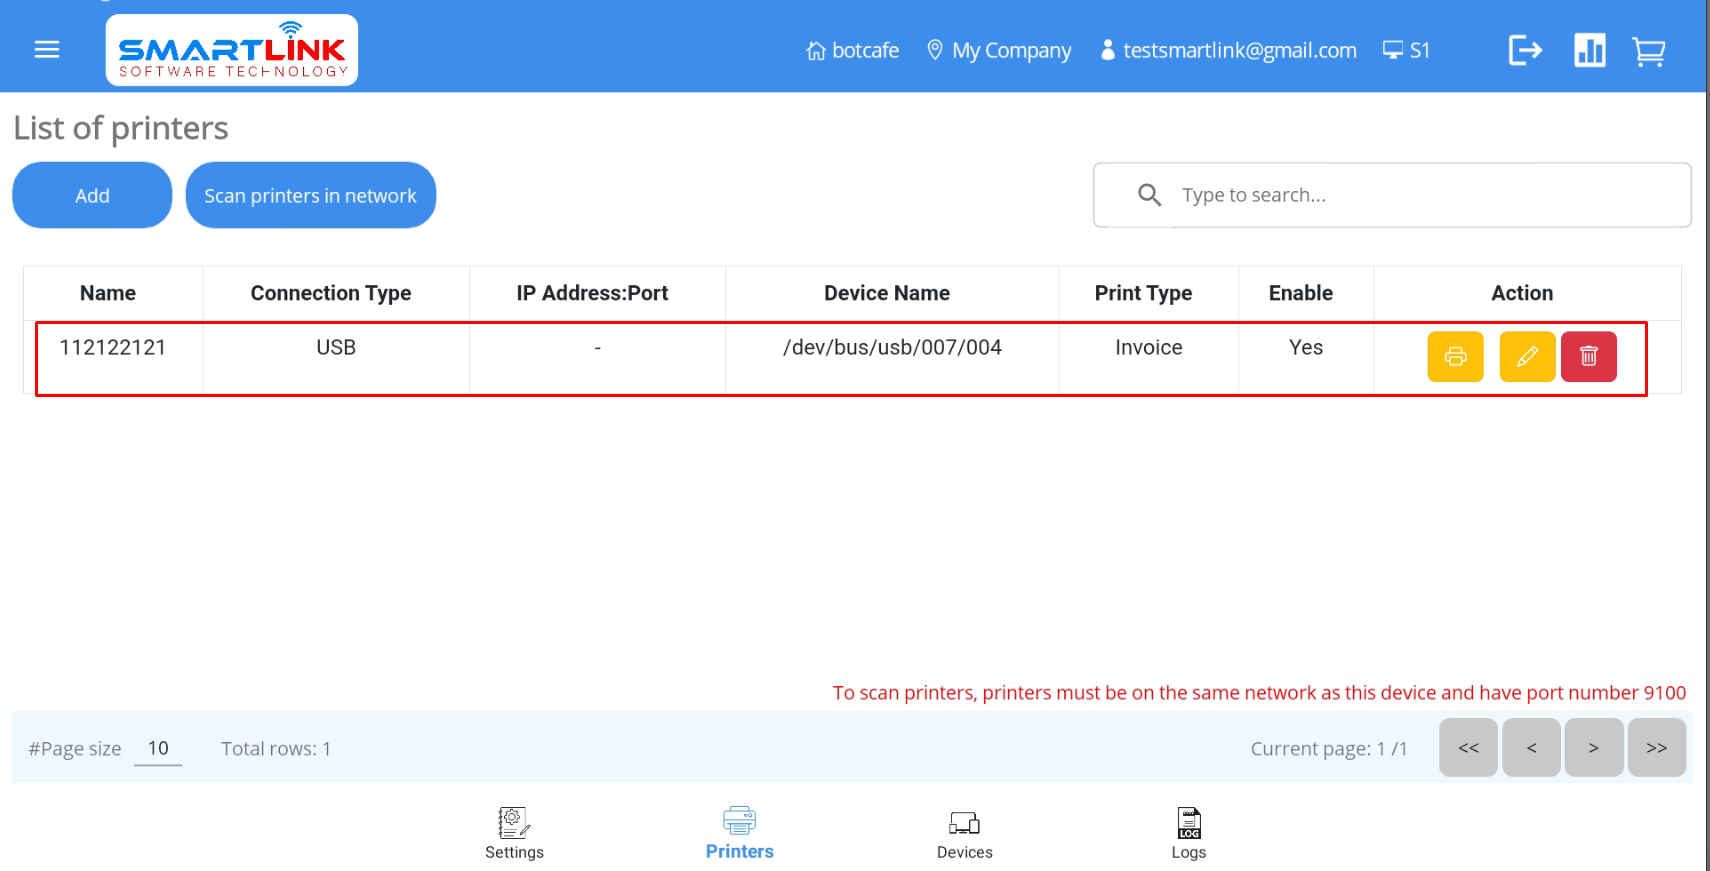
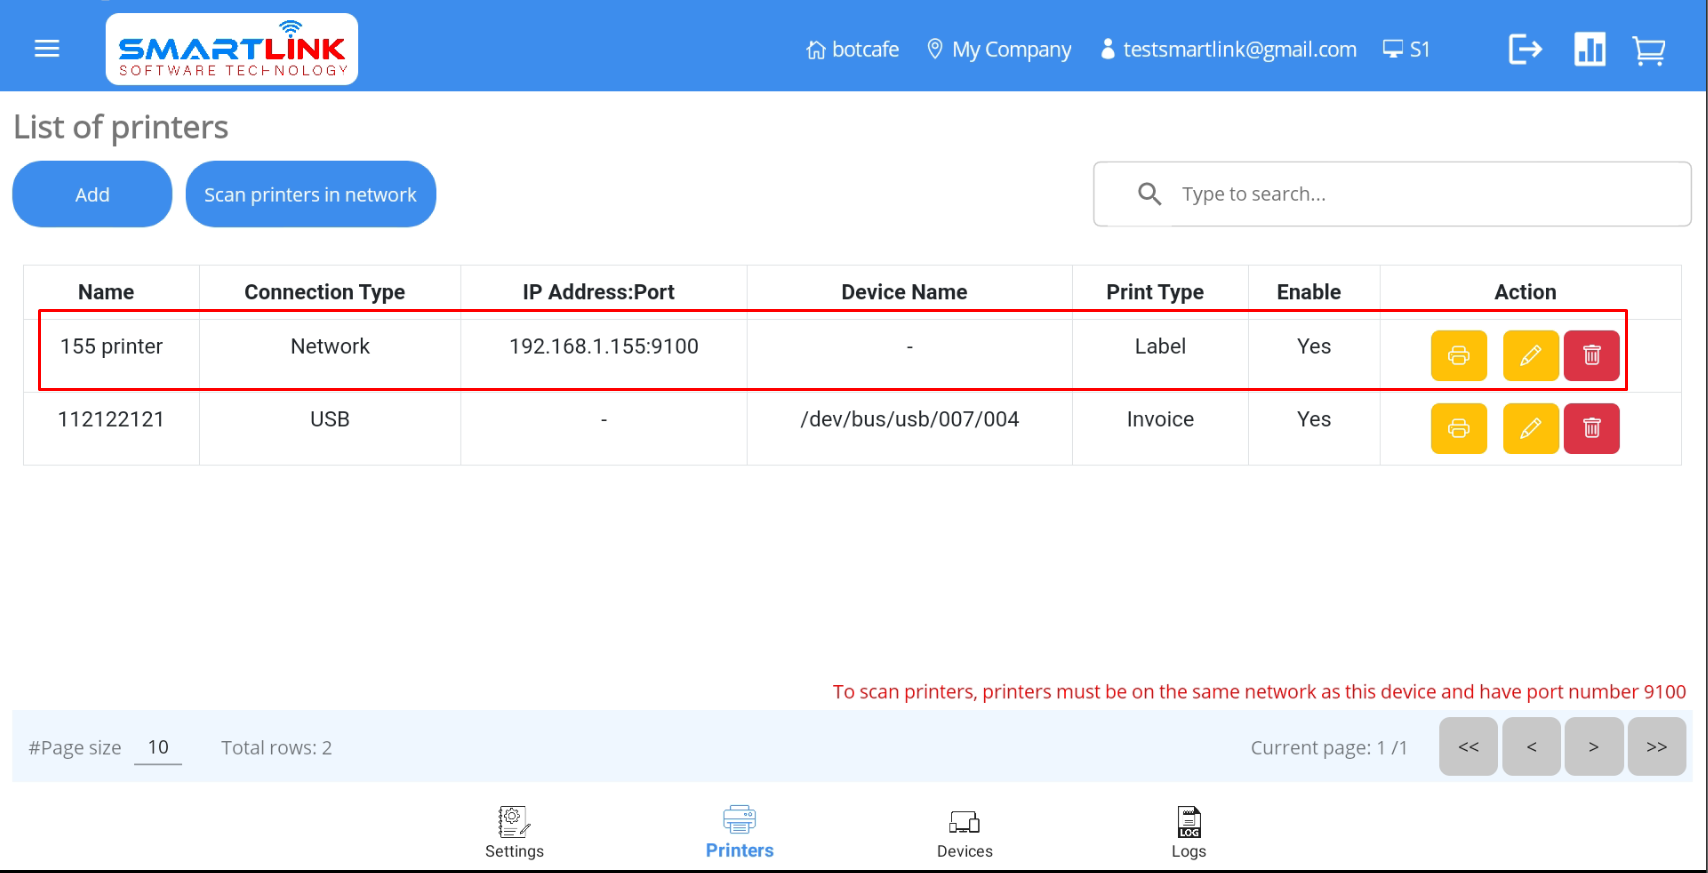
9.8. Printer
To connect the printer to the POS machine, follow these steps:
- Step 1: On the Settings screen, select the Printer
tab.
● The system displays the printer screen.
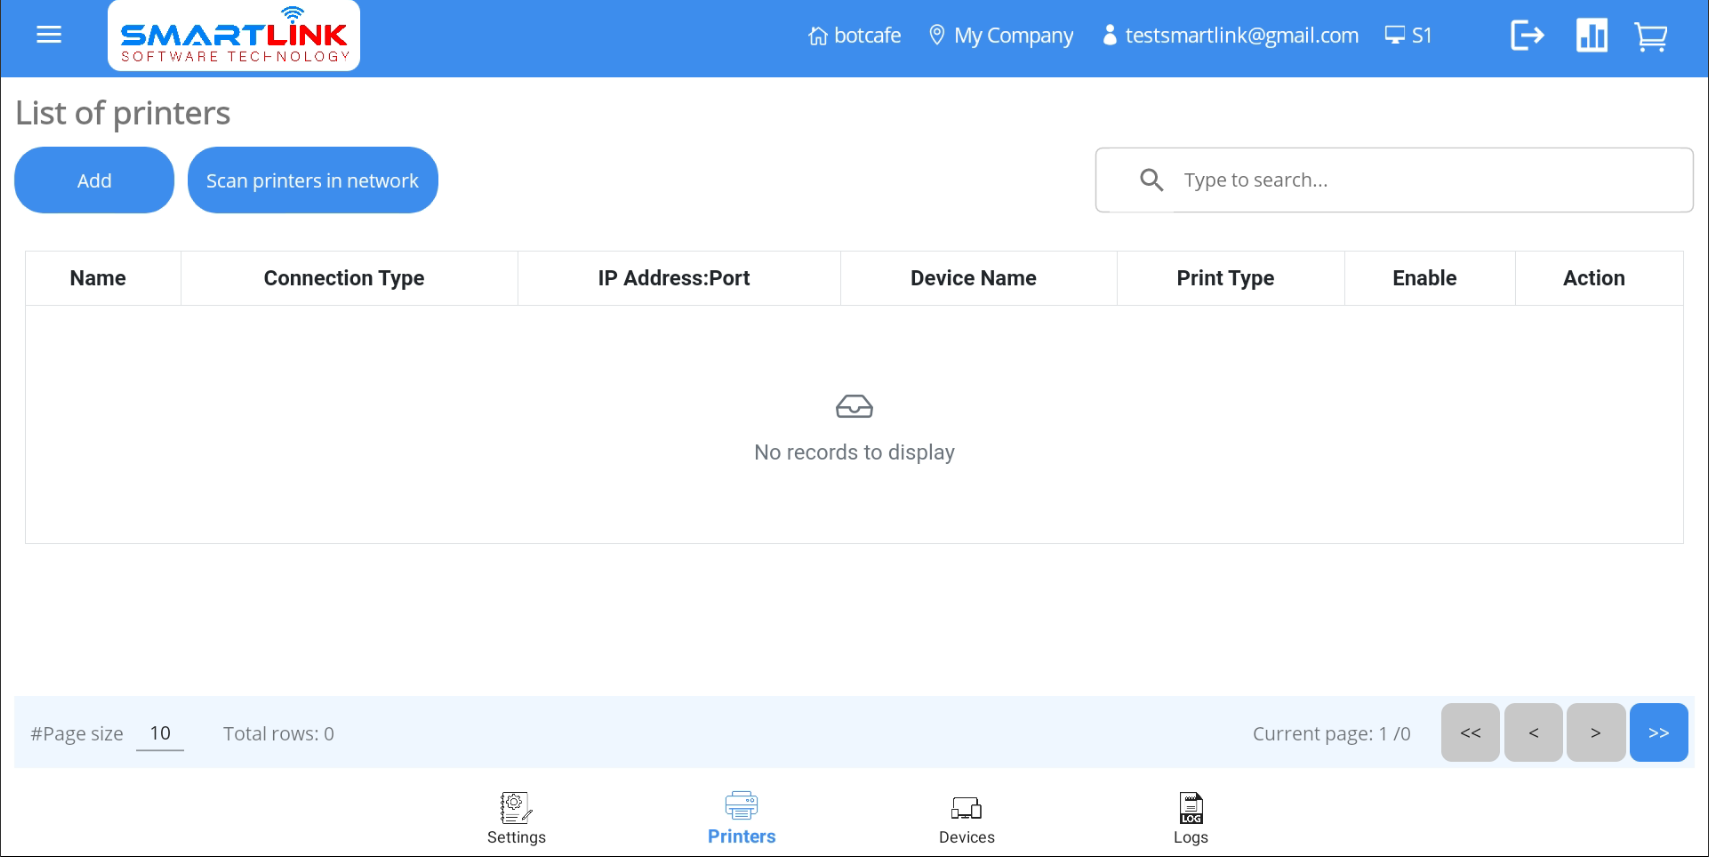
9.8.1. USB Printer
- Step 1: Press the Add
button to add new printer.
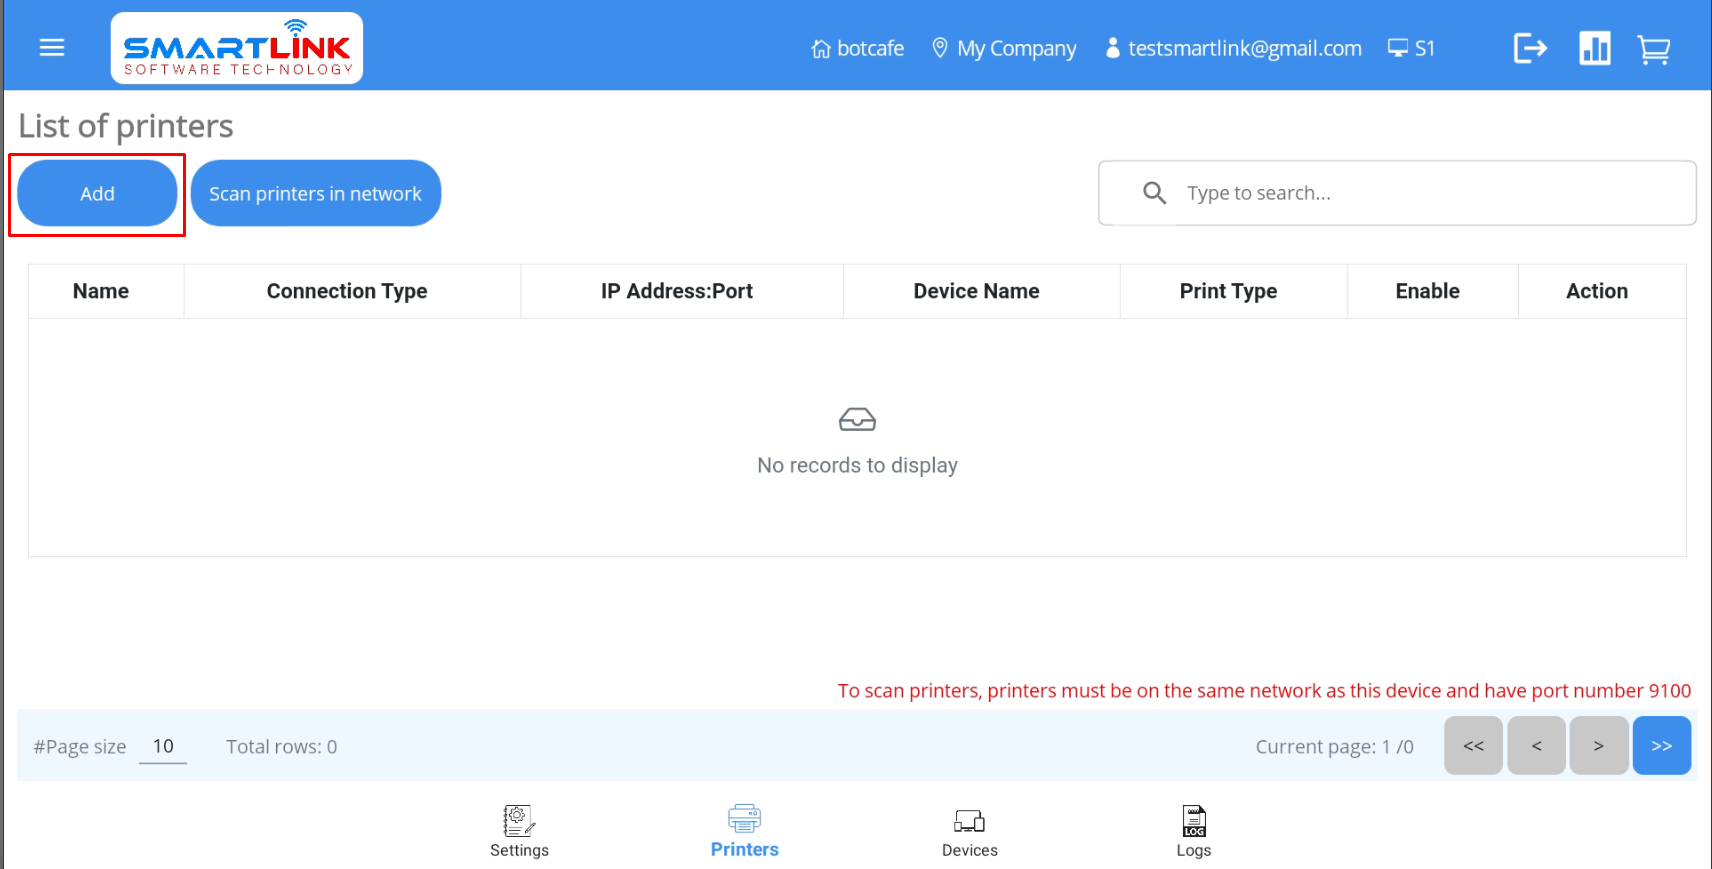
● The system displays the form to add a new printer.

- Step 2: Users perform operations
● Enter the printer name
● User print form: Disable wifi/network and select USB
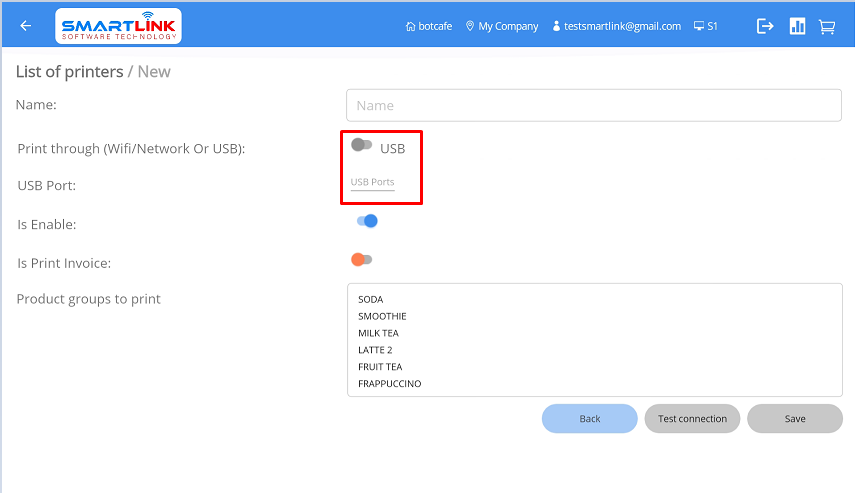
● Users connect the printer device to the POS machine via USB
● The user clicks on the USB port field. The system automatically detects the USB port connected to the POS machine
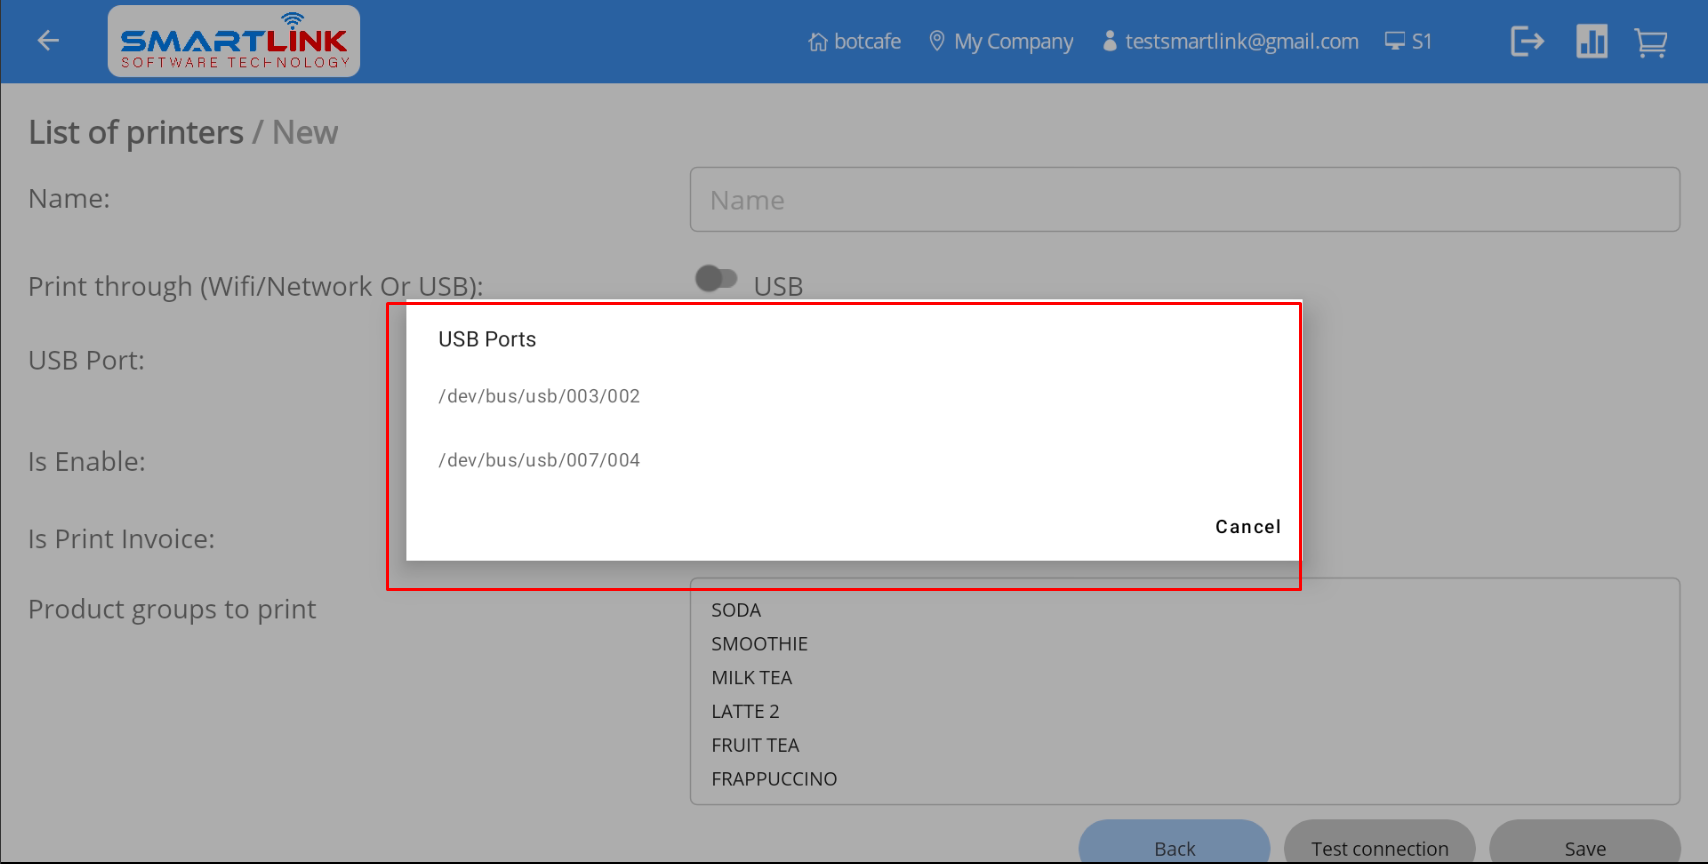
Note:
● Users need to choose the correct USB port to be able to connect to the printer.
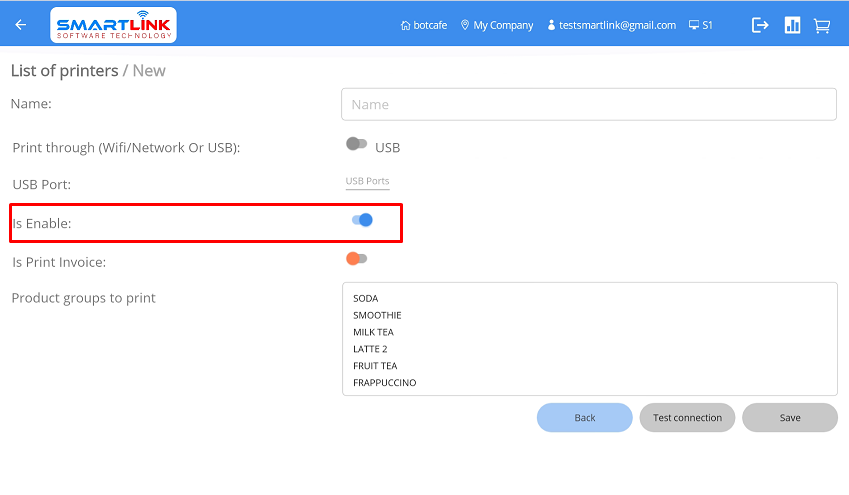
● The user clicks enable printer, the printer needs to be enabled to be able to print.
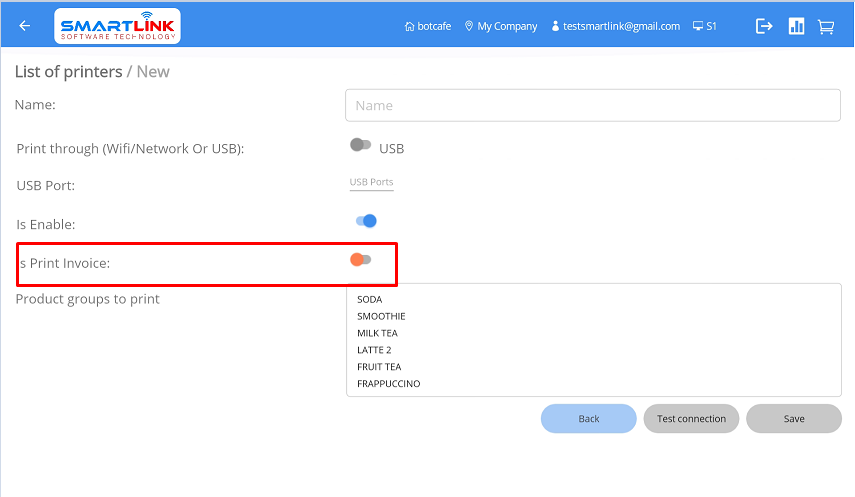
● When the user enables print invoice, the printer will print the invoice; otherwise, if the user does not enable the
printer,
the
printer will print the label.
● When the user selects product groups that can be printed at this device => The selected groups will be printed at this
device.
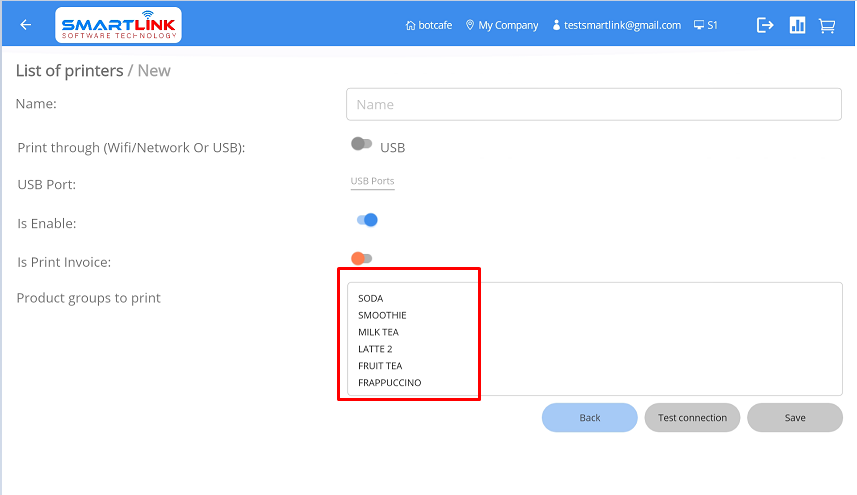
- Step 3: Users press Save to save the printer setup information.
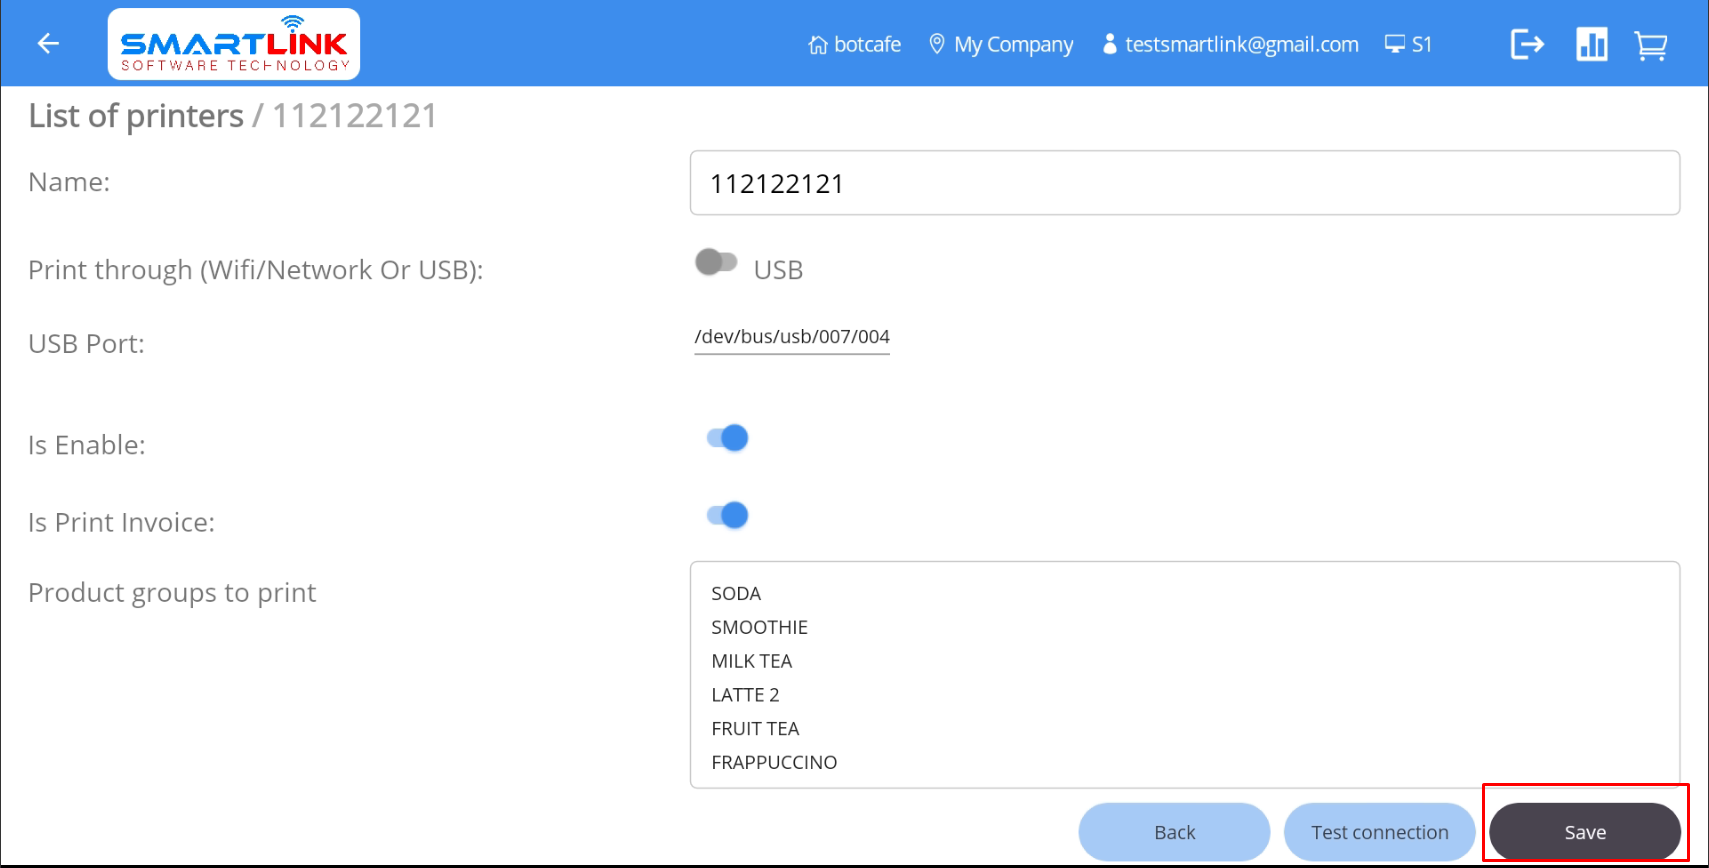
- Step 4: After successfully saving the settings, the printer information will be displayed on the list of printing
devices
screen.
9.8.2. Wifi/Network Printer
- Step 1: Press the Add
button to add new printer.

● The system displays the form to add a new printer.
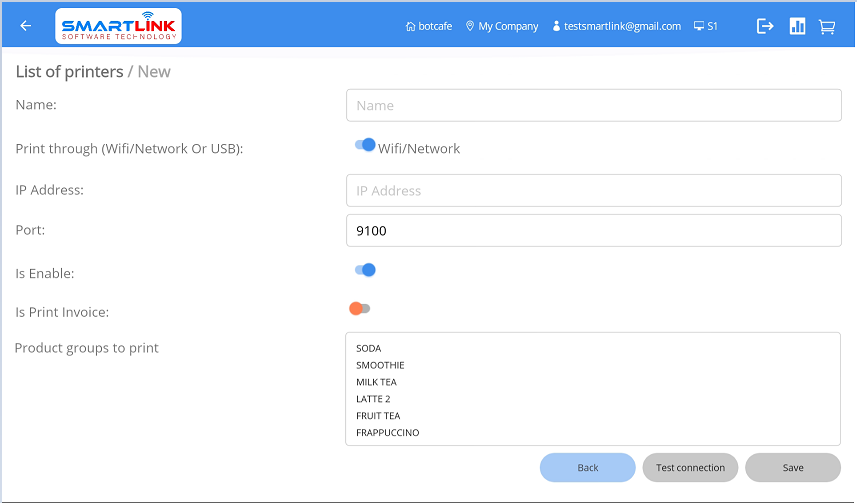
- Step 2: Users perform operations
● Enter the printer name
● User print form: Enable Wifi/network
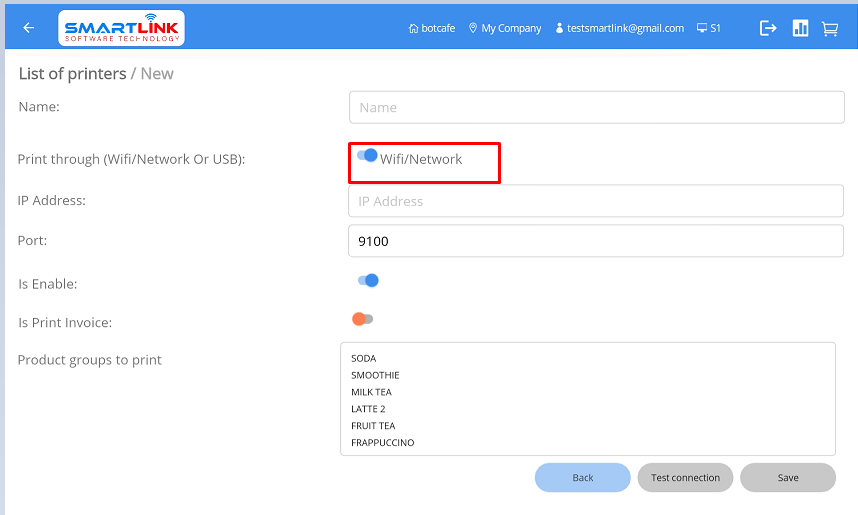
● The user enters the printer's IP address to connect the printer to the POS machine.
● The user presses Enable printer, the printer needs to be enabled to print.

● When the user enables print invoice, the printer will print the invoice; otherwise, if the user does not enable the
printer,
the
printer will print the label.
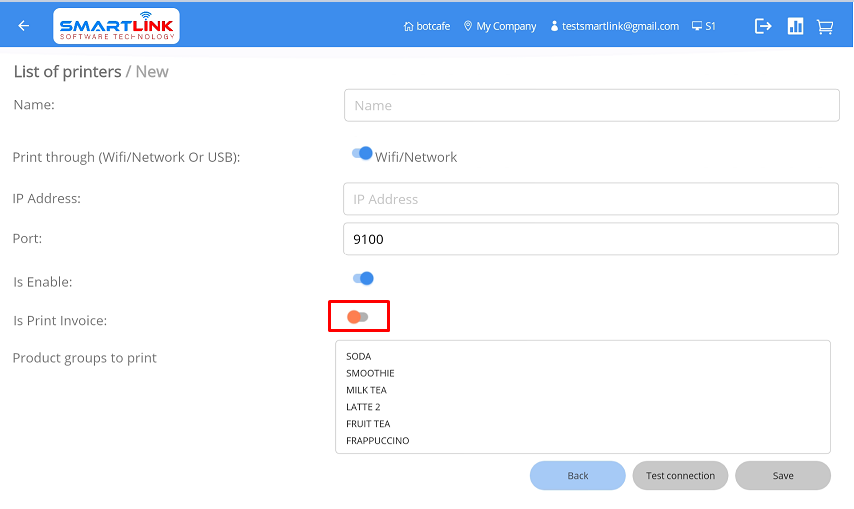
● When the user selects product groups that can be printed at this device => The selected groups will be printed at this
device.
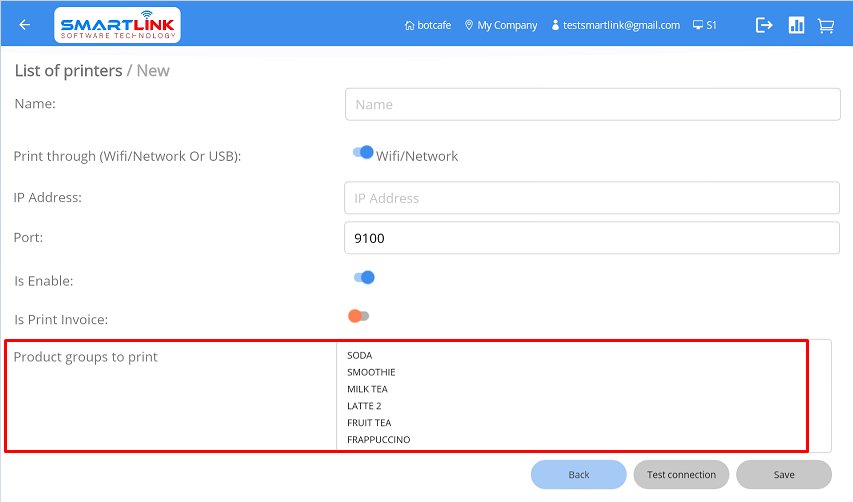
- Step 3: Users click Save to save the printer setup information.
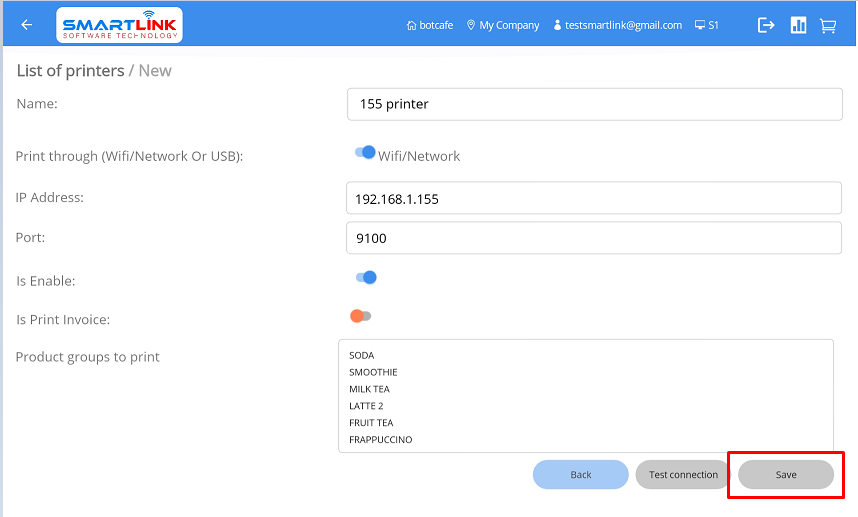
- Step 4: After successfully saving the settings => printer information will be displayed on the list of printing
devices
screen.
9.9. Devices connection
To be able to synchronize orders from the POS machine to the
Kitchen
machine, users need to connect the devices together, follow these steps:
- Step 1: On the Settings screen, Press the Devices
tab.
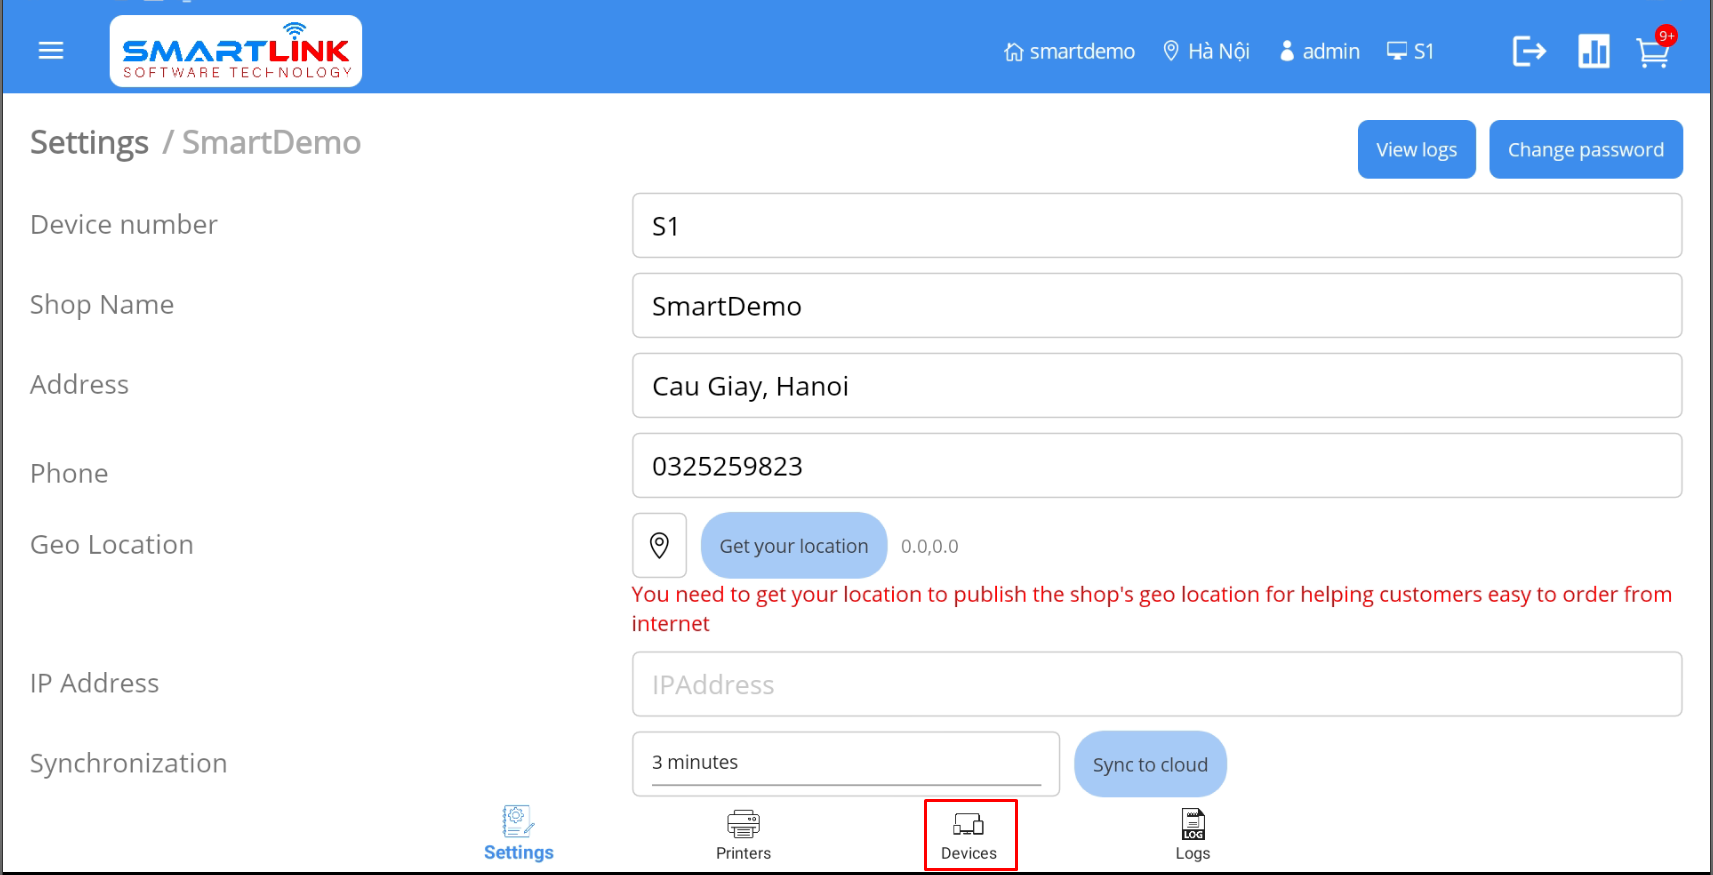
● The system displays Device management screen.
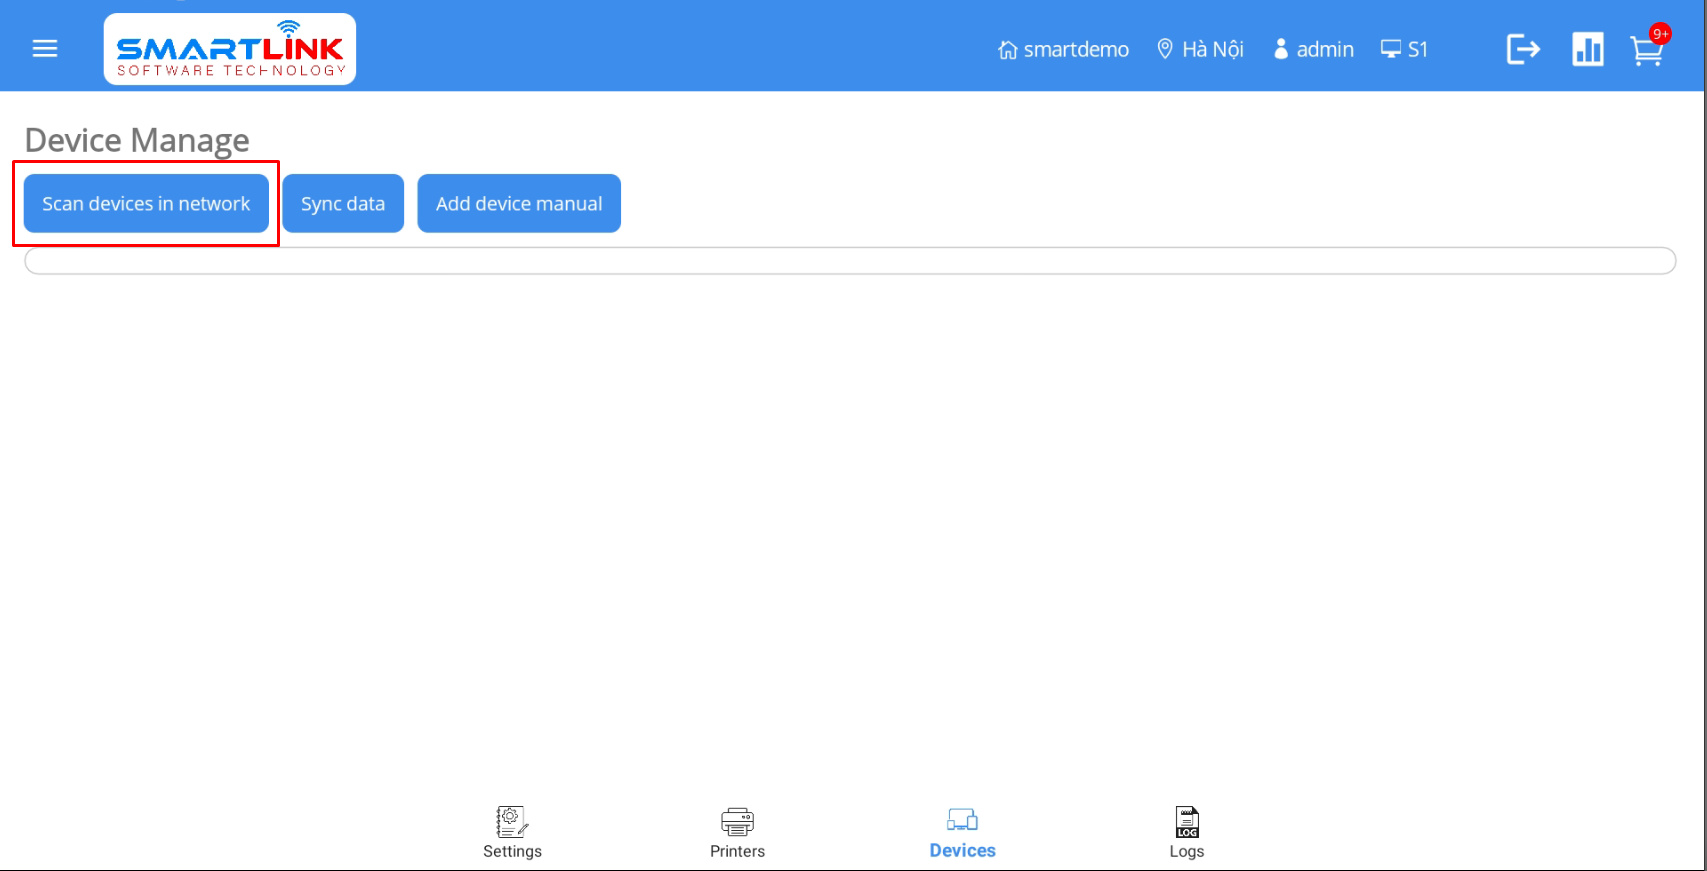
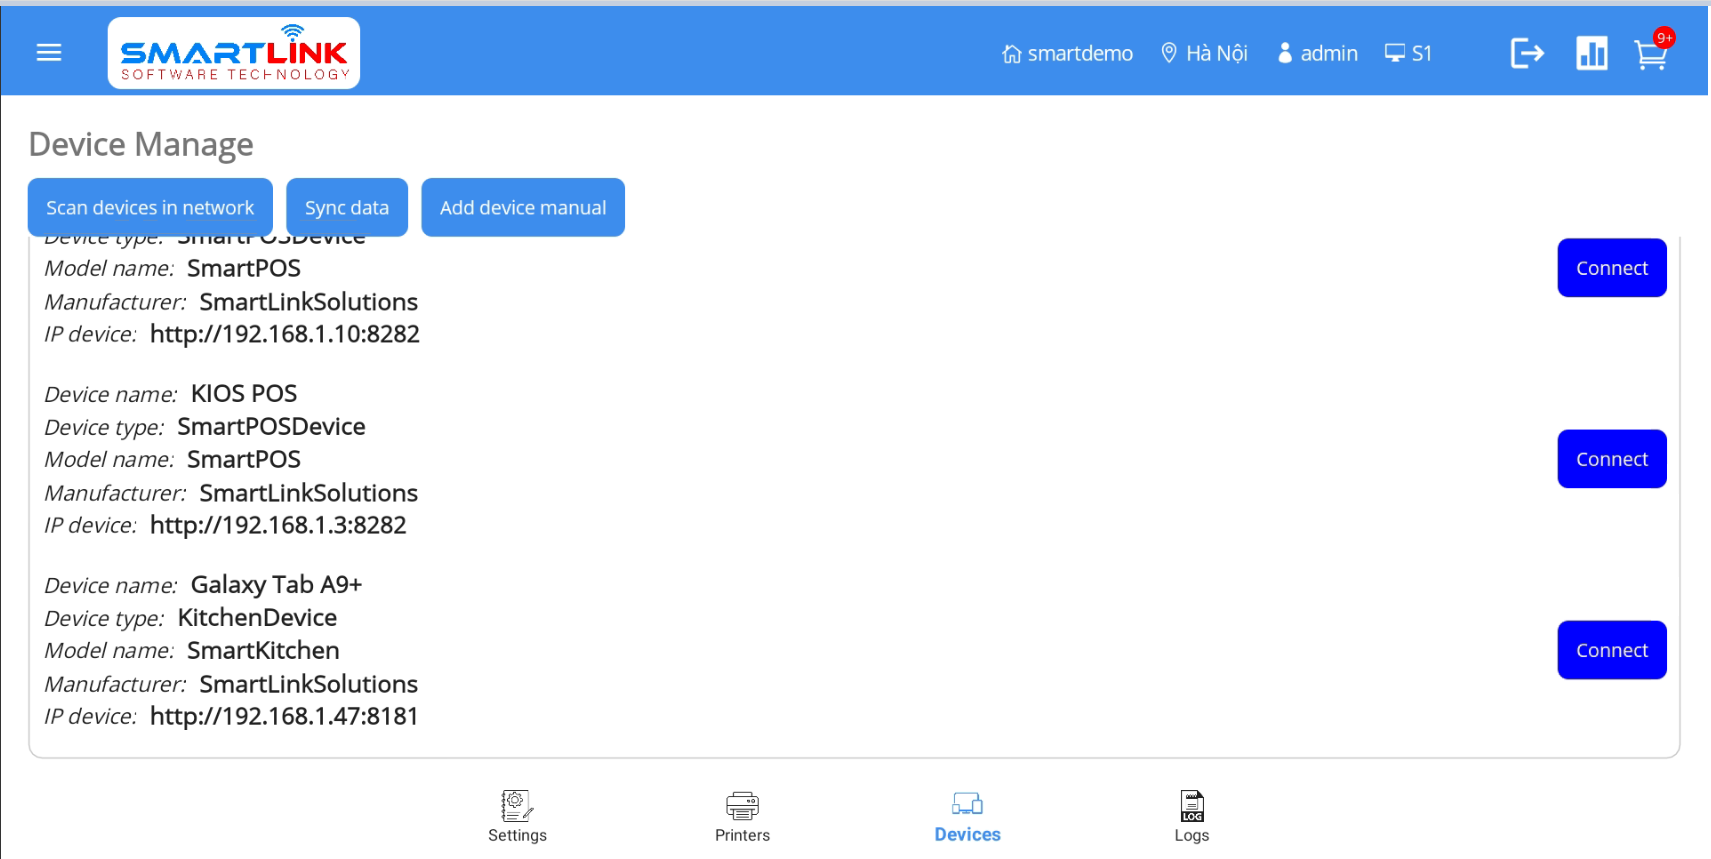
- Step 2: Press the Scan devices on network button
● The system searches for devices with the same network connection
● After successful search, system displays the devices that the system can scan
● In case the user press to scan but the device is not found, the user can add the device manually
Step 1: Click Add device manual.
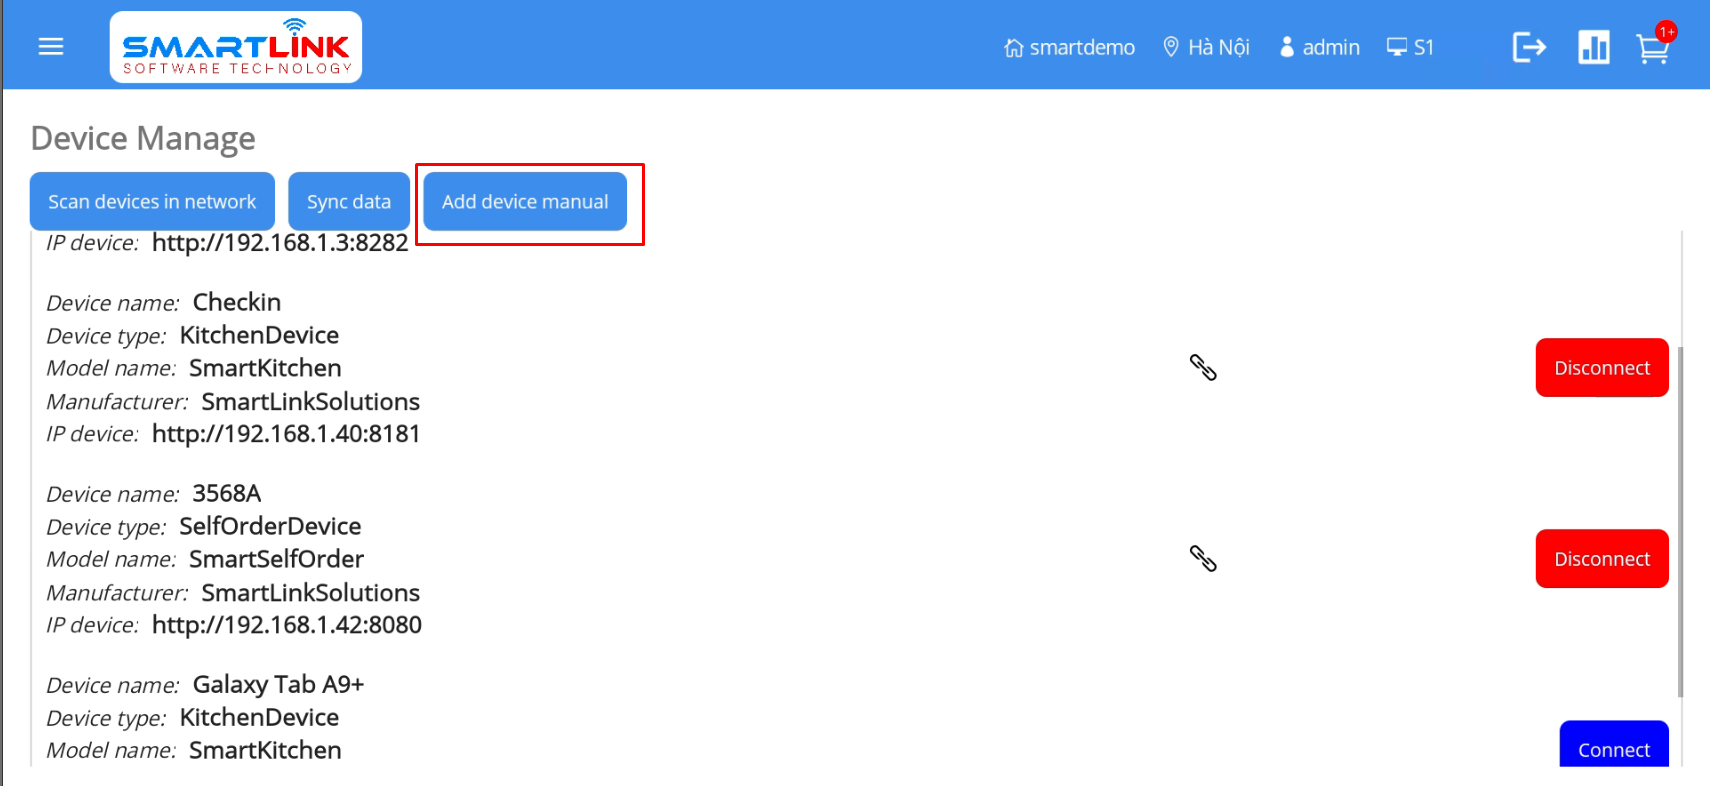
The system displays Add new device screen.
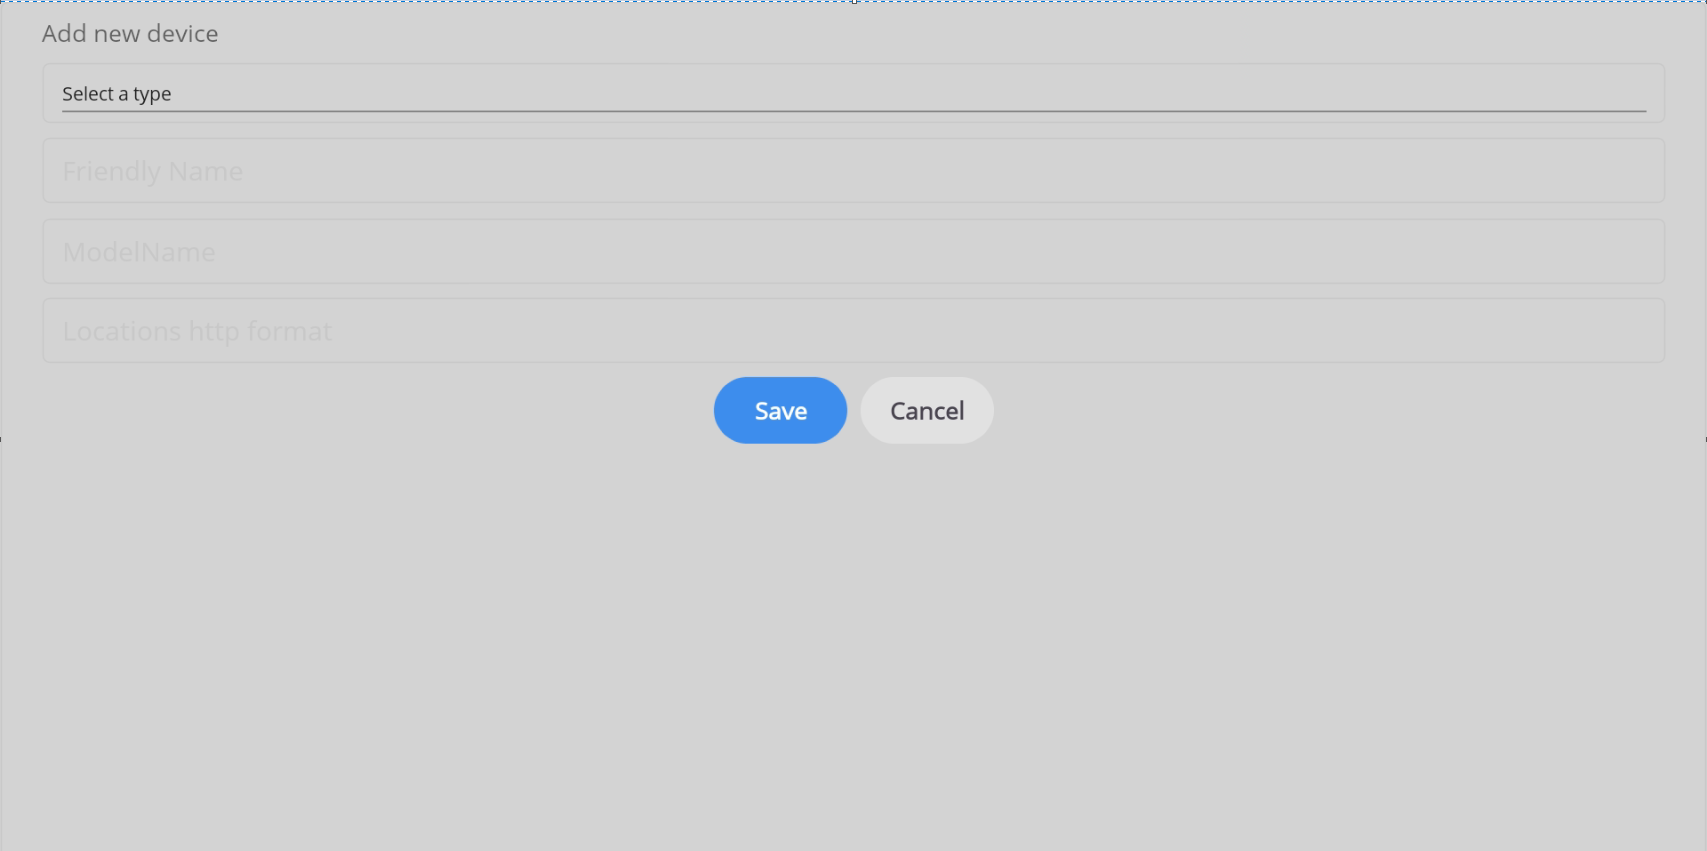
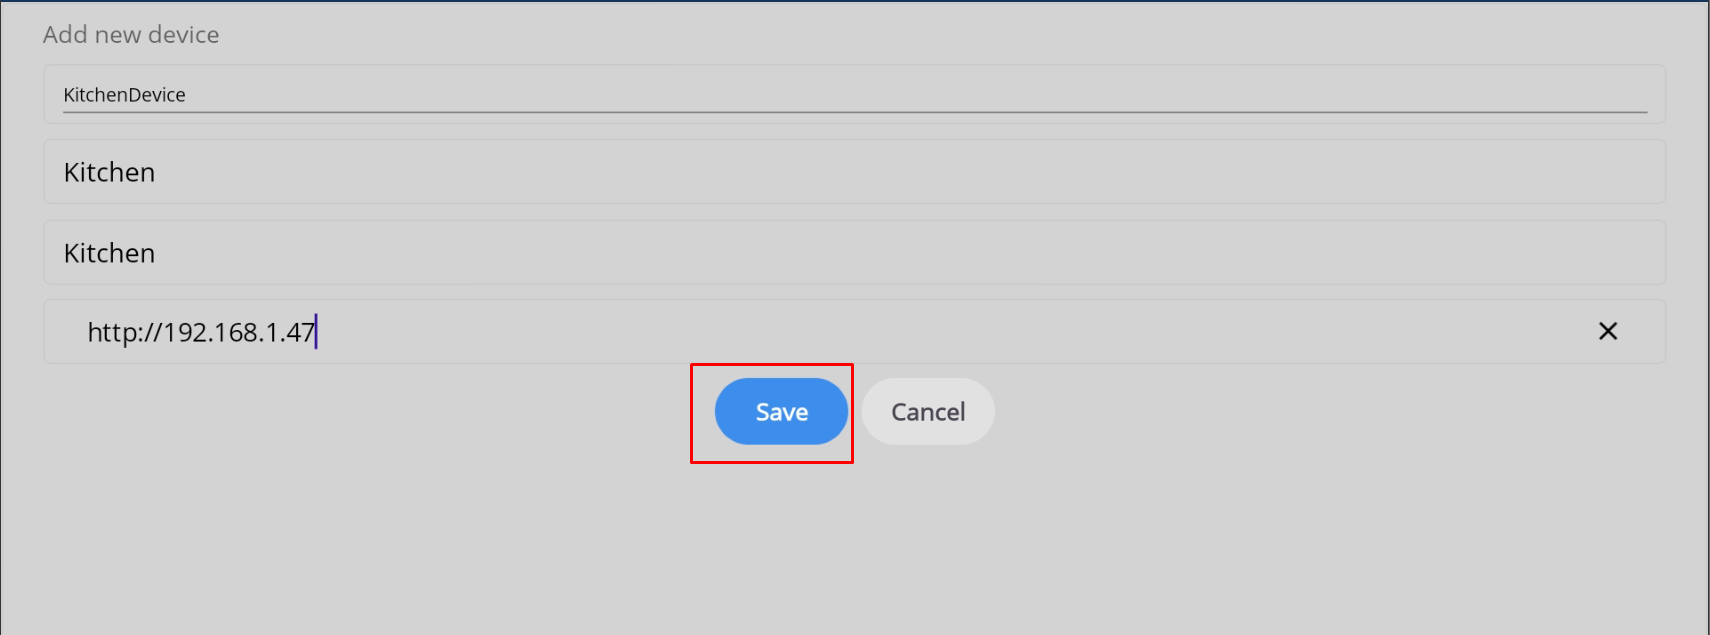
Step 2: Users enter complete information in all fields.

Step 3: Press
Save
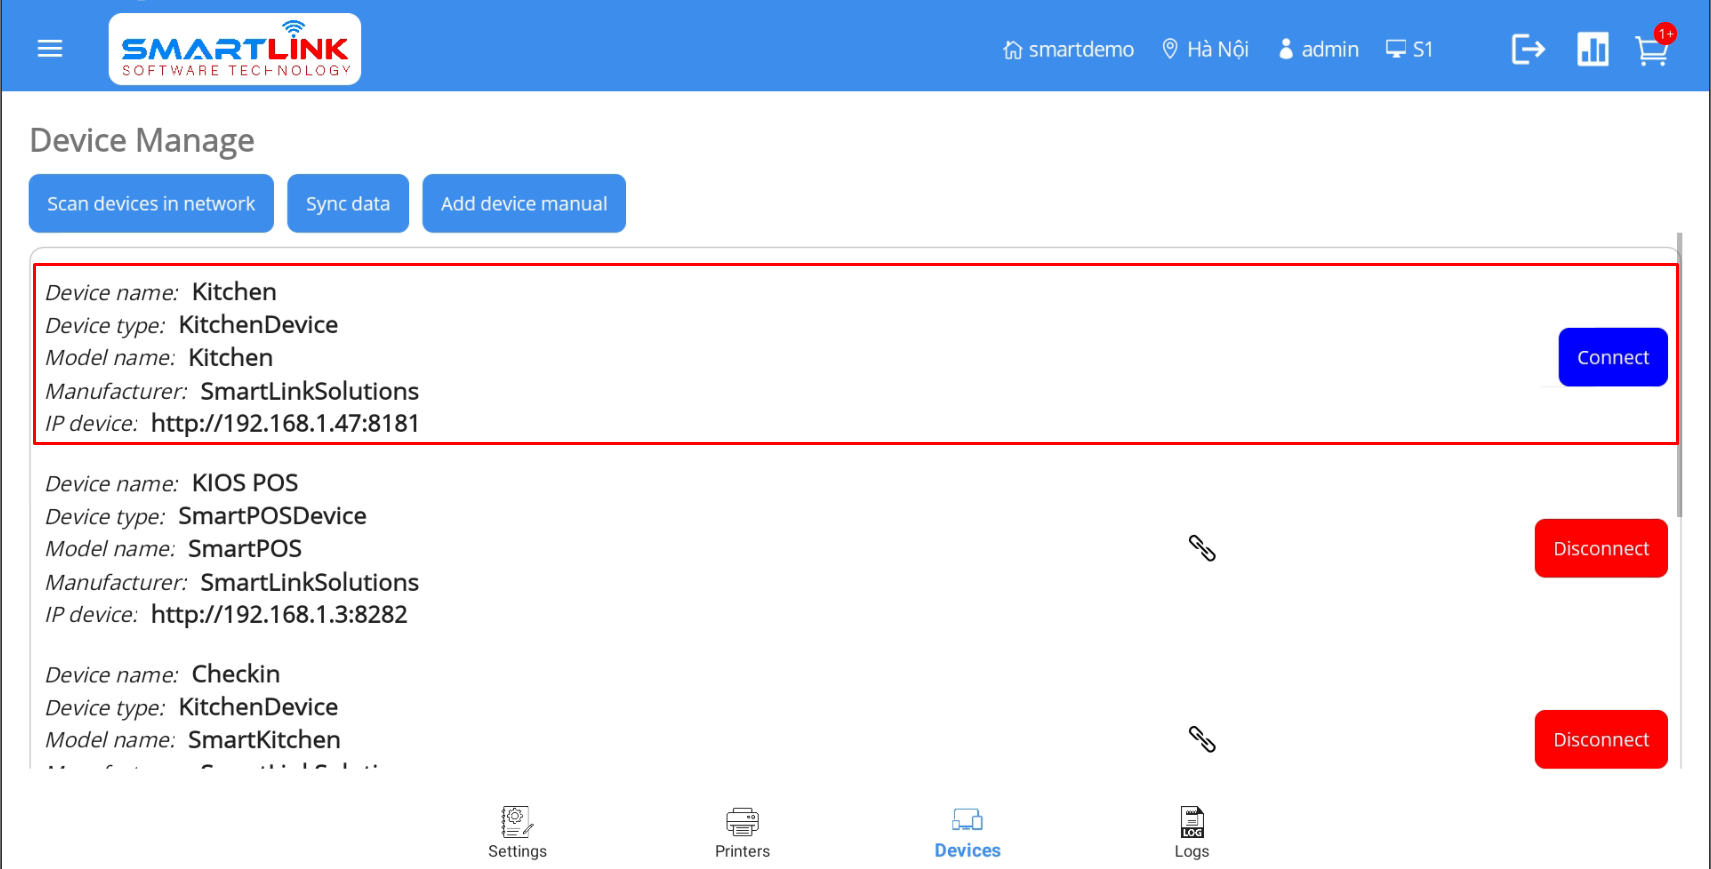
Successfully saved, the system displays newly created device information on the Device Manage screen
- Step 3: Press the Connect button to connect the selected devices together
● Users need to click to connect the POS device[1] and the Kitchen device[2]
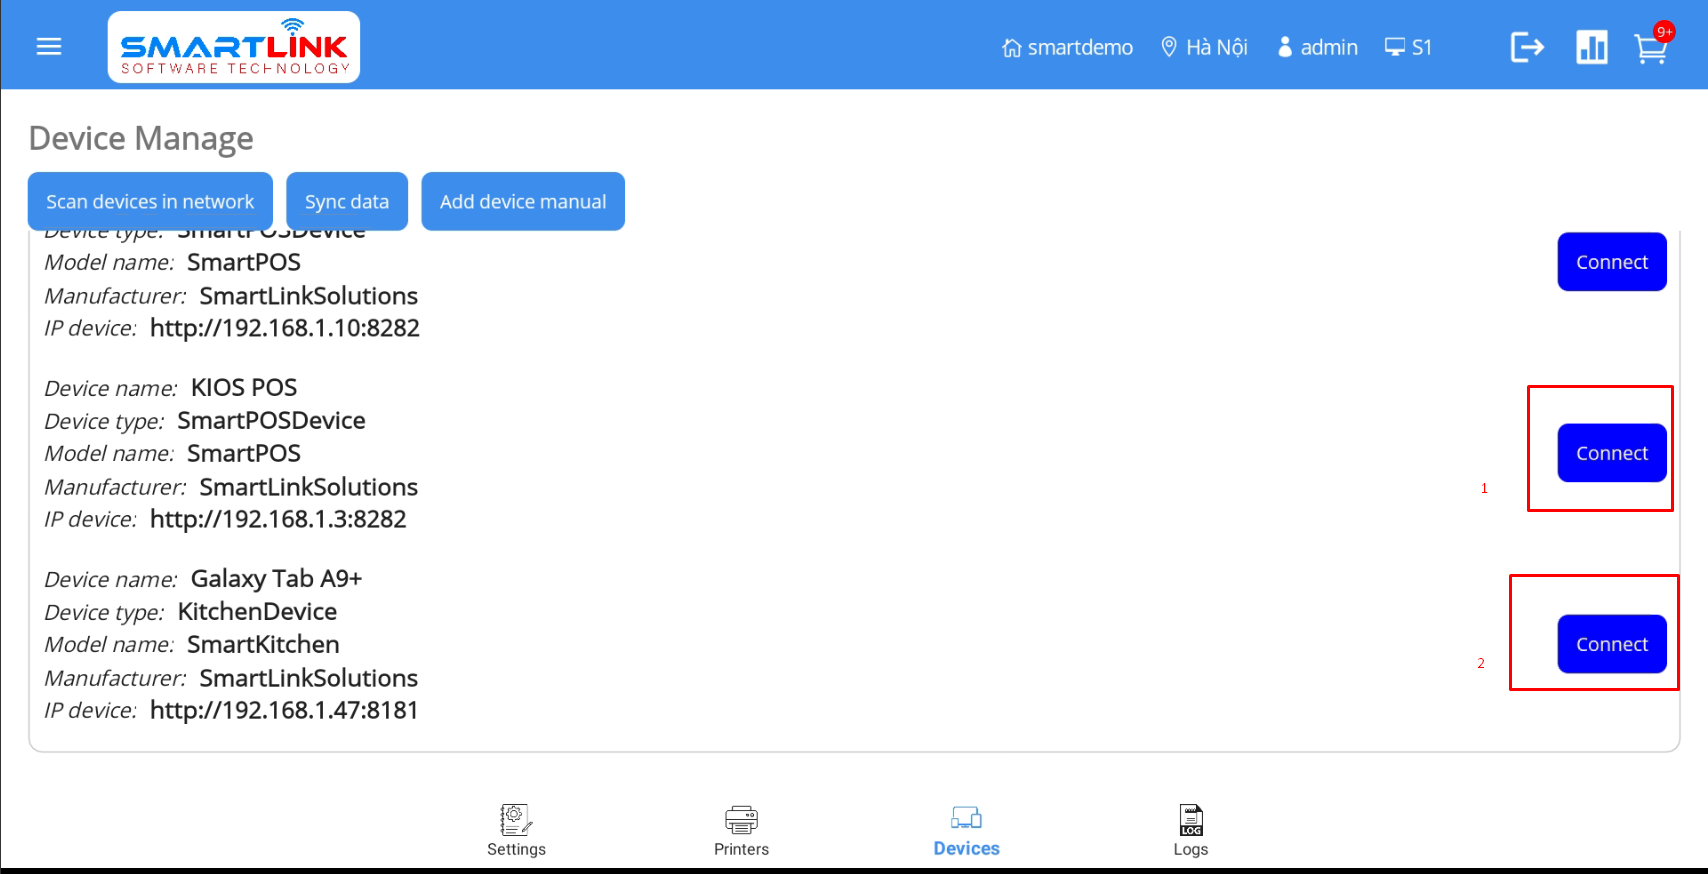
● POS and Kitchen are connected together, the button status will be changed from Connect to Disconnect
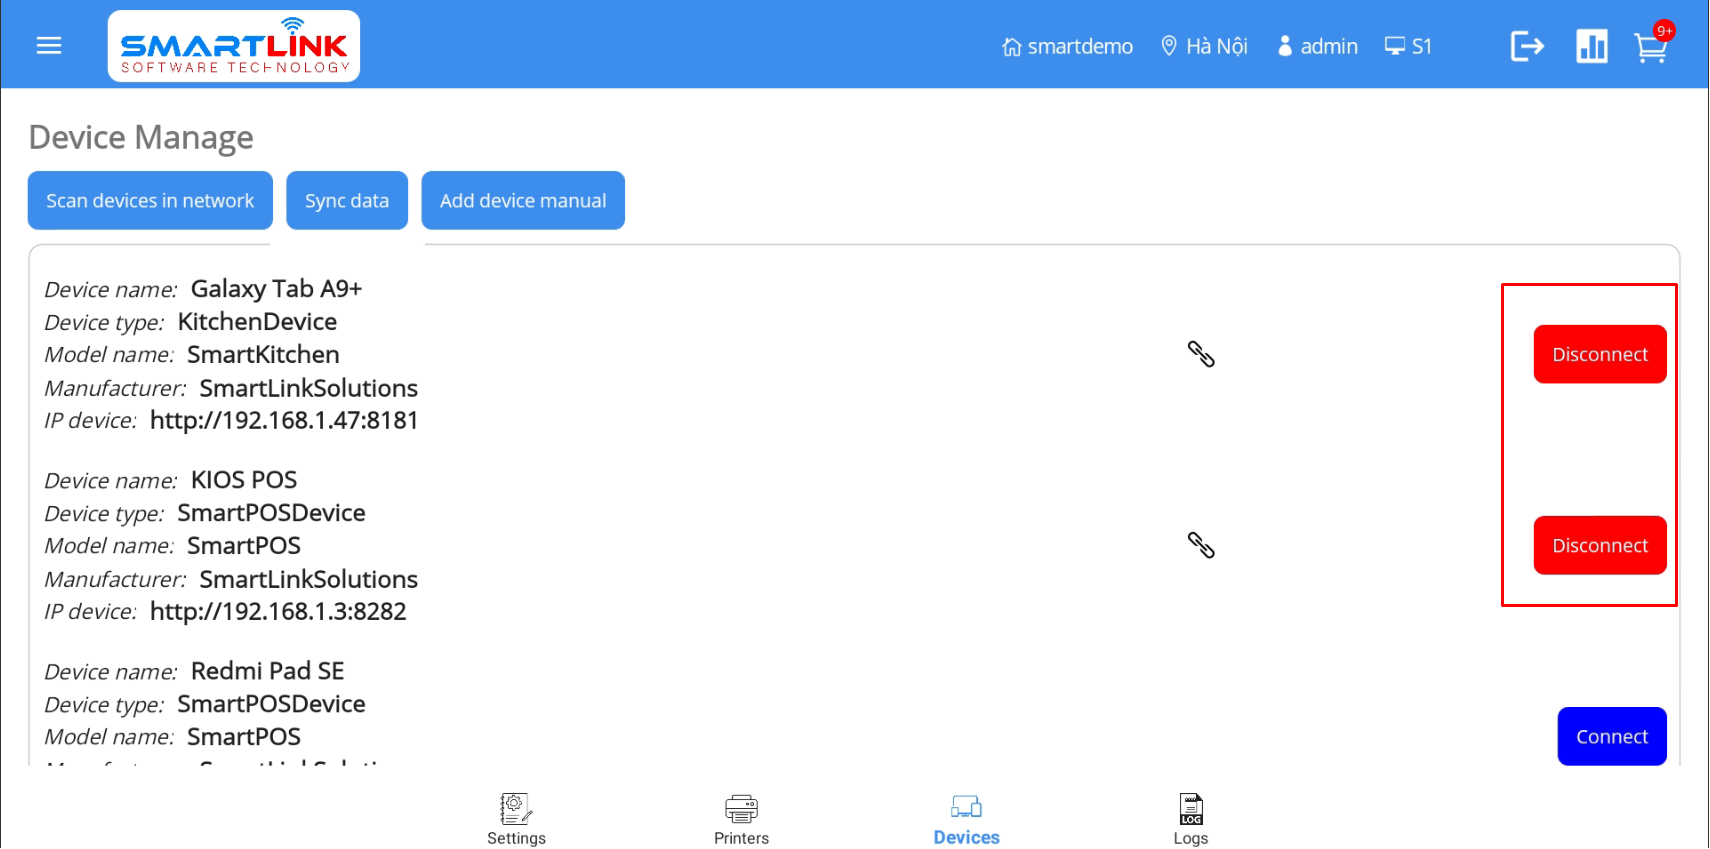
- Step 4: After the devices have connected to each other, click select Sync data
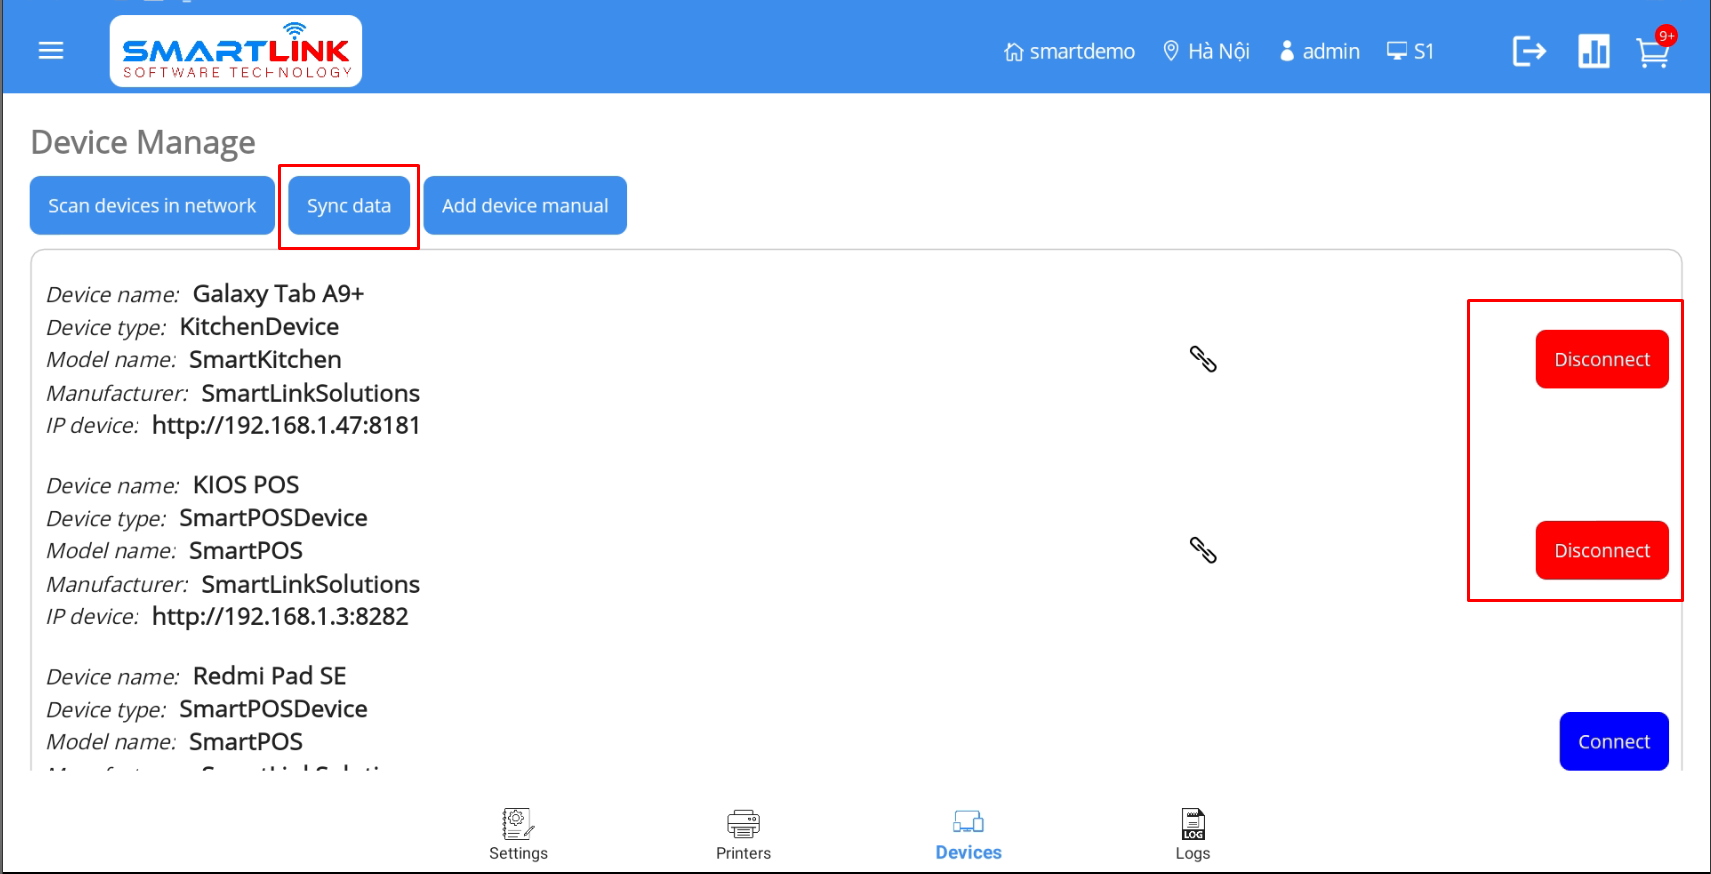
The system synchronizes order data from the POS machine to the Kitchen machine
Note:
● Devices can only connect to each other when they are on the same network.
● Devices other than the system network will not be able to scan and will not be able to connect to each other.
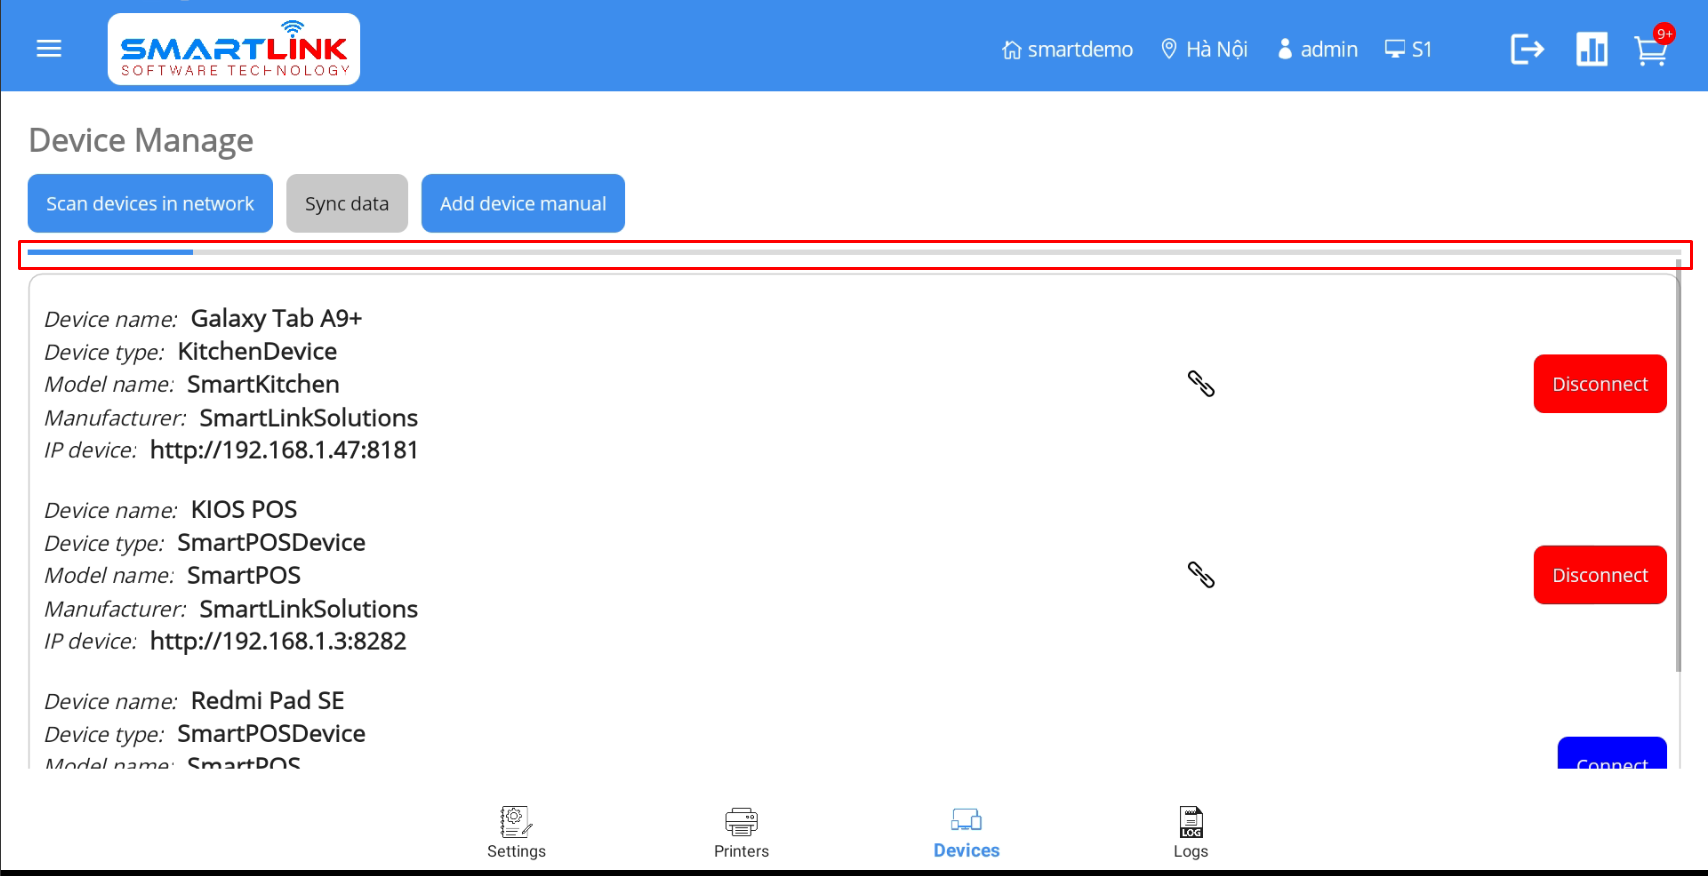
- Step 5: After successfully synchronizing data
● At the kitchen machine, the system displays a notification
Devices synchronized.
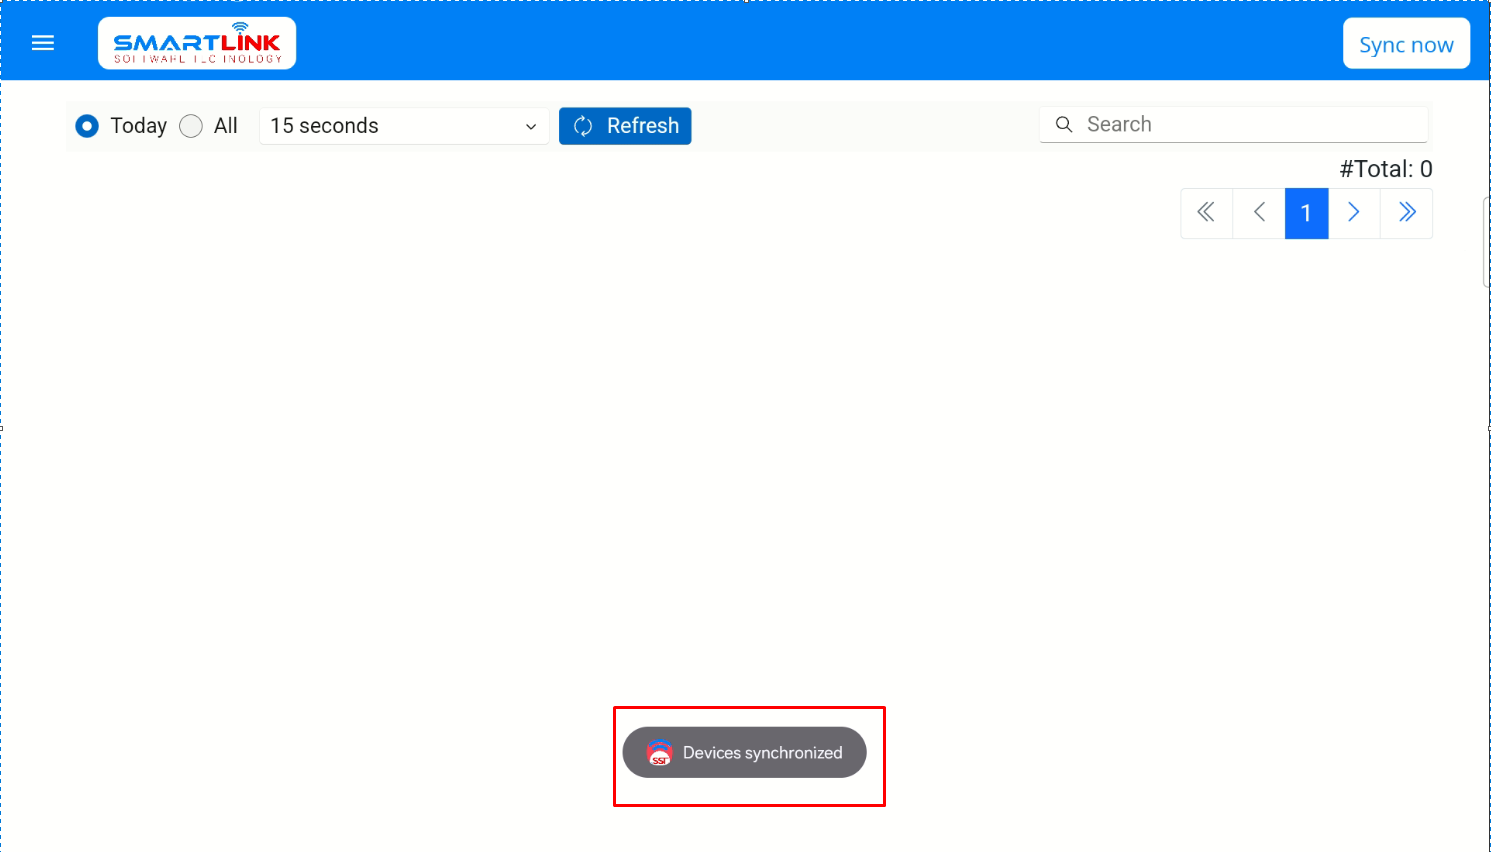
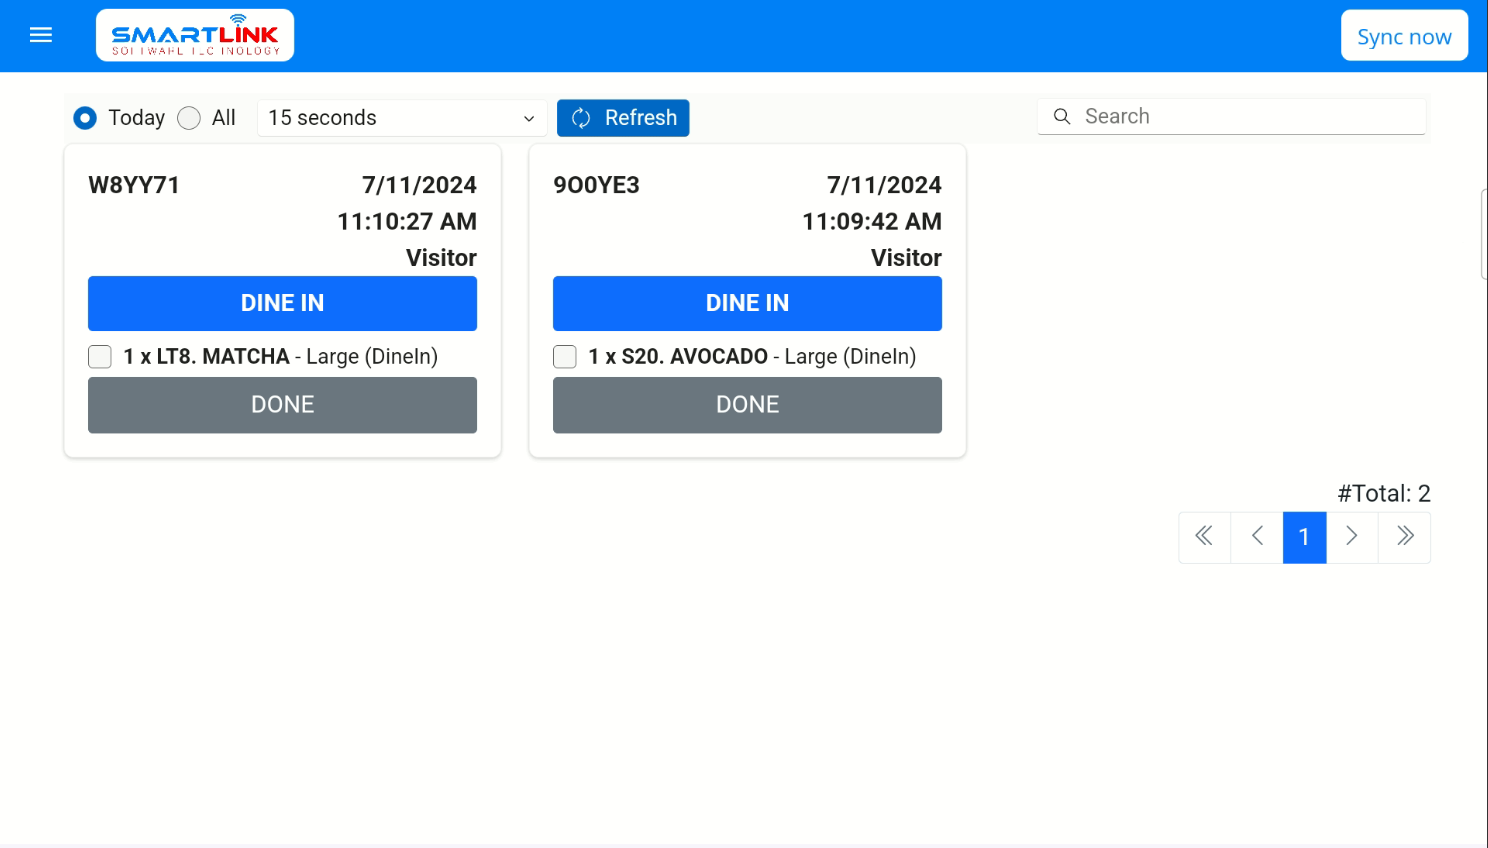
● The system displays all order information of the logged in shop.
Sign out
To connect the printer to the POS machine, follow these steps:
Step 1: Press Sign out button in the bottom of side bar

● The system displays a confirmation message to log out of the application
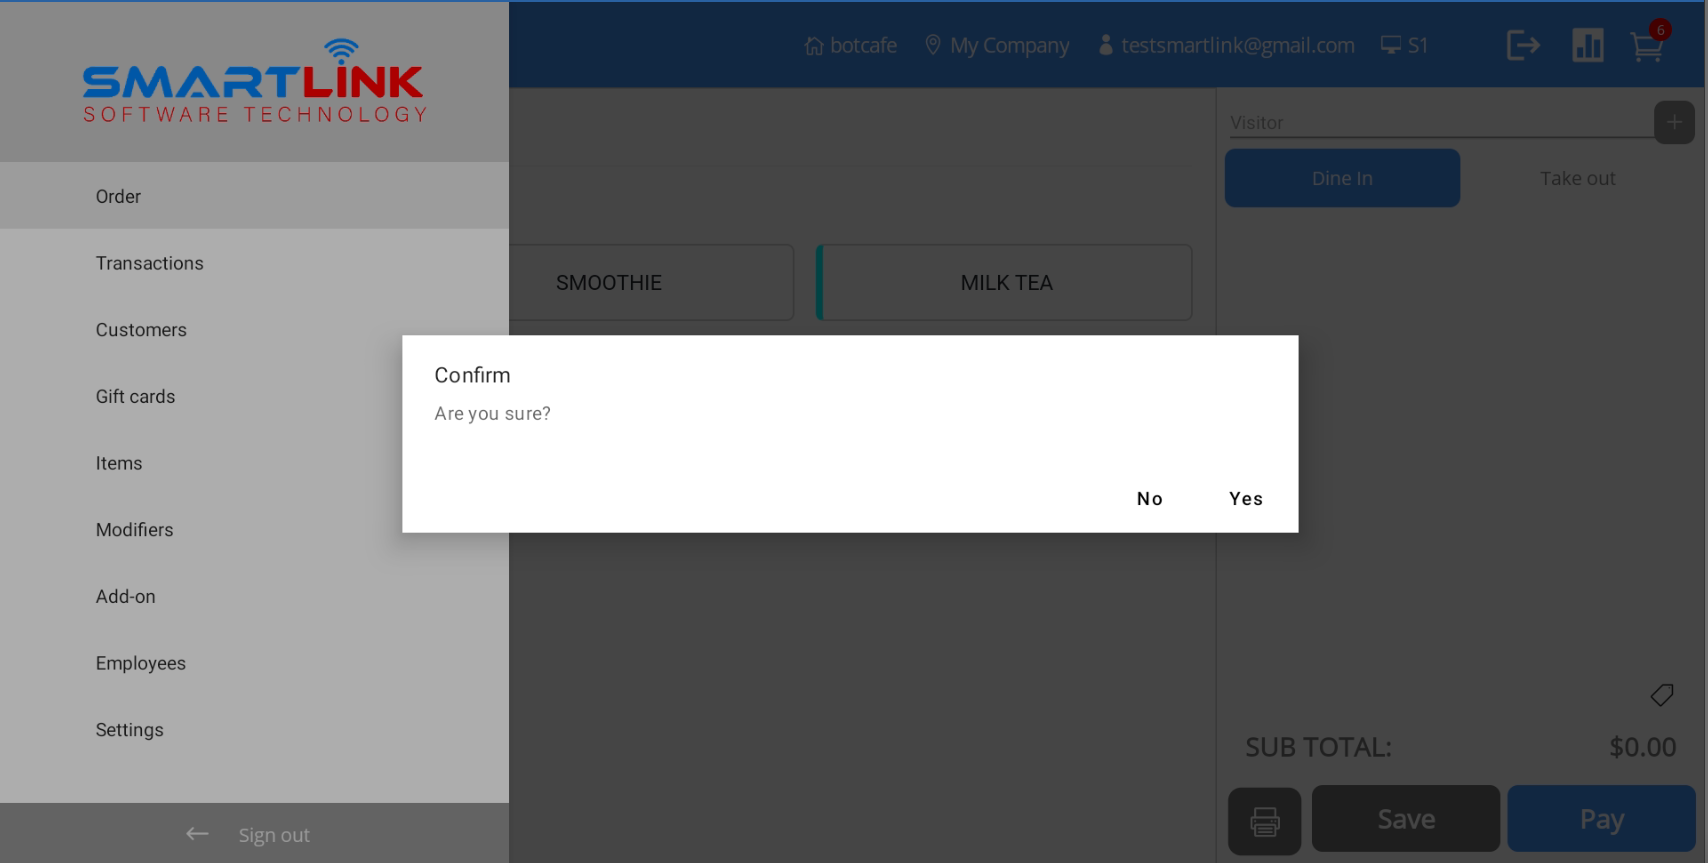
Step 2: Press Yes to sign out. Press No to cancel.